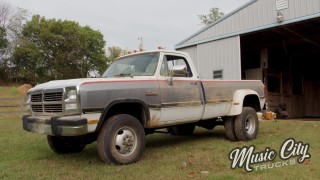
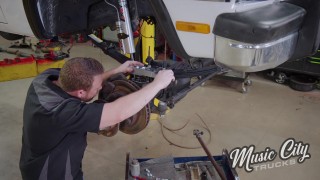
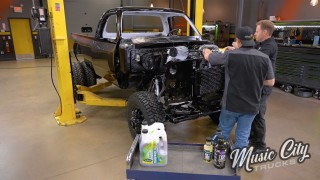
Music City Trucks Featured Projects

Music City Trucks Builds

Parts Used In This Episode

Episode Transcript

(Marc)>> You're watching Powernation!

(Joel)>> Today it's all about paint, power, and P-pumps as we swap out our old VE for something a little more spicy.

(Eric)>> That's right, we're cracking open this Cummins to inject plenty of power into this old 12-valve. So make sure you stick around and check it all out today on Music City Trucks. [ Music ]

(Joel)>> Nothing cooler than an old pickup, am I right? [ Music ]

(Eric)>> Underneath all this dirt there's probably a pretty good truck.

(Joel)>> After some sweat from our brow we've got our five-nine 12-valve Cummins sitting on the engine stand ready to rock 'n roll. We plucked this thing out of our Ram W-350 that we have christened as Project Nightshift. In all honesty the fun's just beginning.

(Eric)>> We've got a long, long list of performance parts we want to bolt onto this thing and a tried and true recipe to make it look awesome. Before we do that we've got to get it sealed up, sprayed down, and ready for paint. [ pressure washer humming ]

(Eric)>> I've seen a lot of rough looking engines come through this shop with a lot less miles on them, but once we pressure wash and scrub down this 6-BT Cummins she'll probably look pretty close to brand new. [ Music ]

(Joel)>> Good news is by the time this bucket's filled it'll be lunch time. I can smell that degreaser from here though. That's the good stuff. Lot better than most 170,000 mile engines I've seen. Any time you're cleaning an engine outside like we are you always want to limit your effect on the environment. So we're actually using a water based engine cleaner. You can also just use some dish soap or whatever is at your disposal. We'll let that degreaser soak in a few minutes and then we'll give her another spray down.

(Eric)>> See if we can get this turbo busted off of here.

(Joel)>> Good luck on that manifold. Looks like some of them bolts are welded on there.

(Eric)>> That's half the fun. [ drill humming ]

(Eric)>> Don't you just love dealing with old exhaust components?

(Joel)>> Can't say that I do.

(Eric)>> If you're having a bad day it gives you something to get angry at.

(Joel)>> Not wrong on that one.

(Eric)>> At least with this one we're replacing everything. [ Music ] [ drill humming ] [ Music ]

(Joel)>> For the most part we are pulling off all of the accessories but we're gonna keep our VE pump and our power steering pump on for now, and there's a reason for it. Both of these are tied into the timing on the engine. So to pull those off we'd have to pull off the timing cover and all that jazz. We're not looking to get into all that quite yet but we will a little bit later on. So for right now we're just gonna mask these off. Then we'll touch up the paint later. A little tight?

(Eric)>> 90 percent of the time it works 60 percent of the time. I said that backwards.

(Joel)>> It's cause you're used to working on a rusty old Ford.

(Eric)>> Beautiful!

(Joel)>> About to get oil all over your engine stand here Eric.

(Eric)>> I call that rust preventative.

(Joel)>> Makes you wonder if I'm ever here right now.

(Eric)>> I don't know if anything's here anymore.

(Joel)>> Fumes from the diesel!

(Eric)>> I think that's just about everything we need off there for right now. Get this thing over to the booth. [ Music ] Make sure all of these fittings are sealed off.

(Joel)>> Anywhere there's a sensor, or access to the combustion chamber, or any of the internals.

(Eric)>> I don't think we want to get any of this paint inside the crankcase.

(Joel)>> I've heard paint adds like 10, 15 horsepower.

(Eric)>> It is a Cummins. It probably wouldn't hurt it any.

(Joel)>> It doesn't matter if you're doing a hood, or a door, or an engine, at the end of the day it all comes down to the prep work.

(Eric)>> You've got to have a good base for anything you're doing.

(Joel)>> Or specifically on an engine, and I've seen this a lot, is gotta have a clean base and a clean surface area because paint does not mix well with any carbon build up, diesel in this case, or oil. All that stuff's just got to be cleaned up.

(Eric)>> Stuff like that just makes the paint jump right off doesn't it?

(Joel)>> Especially with the solvents. Anything with brake clean or anything like that. Your paint and your hardeners are covalently bonded, and when you expose them to those elements and they start fighting each other the whole thing just falls apart.

(Eric)>> I can rattle can with the best of them but I haven't really done a whole lot of proper painting as it were.

(Joel)>> I'm all about crash courses.

(Eric)>> Heavy on the crash.

(Joel)>> You guys may have noticed that we didn't do any prep work on our valve covers. That's because we're gonna be replacing these with some aftermarket ones. So it's okay if we keep them on there for now just so we don't get any overspray on our valvetrain.

(Eric)>> And the same thing goes for our timing cover. That's gonna be getting replaced as well. So we're gonna leave it unmasked. Up next, I boldly go where I've never gone before, the paint booth. This is definitely an upgrade from doing a rattle can refurb.

(Joel)>> I think our epoxy's pretty much flashed off.

(Eric)>> Looks pretty good! Almost don't even need the paint.

(Joel)>> You say that, but I think it's gonna look pretty good with that POR-15 black on it. And because we sprayed that epoxy we've got less of a chance of any of that old rattle can paint lifting on us. Why don't you go suit up and I'll mix you up some paint. As we mentioned before we're gonna be using the black engine enamel that we got from the guys at POR-15. Technically you don't have to reduce this stuff but I prefer to because I feel like it sprays out of the gun a little bit better, and the tech sheet says you're allowed to do that. Now there is a certain way to do it if you want to do a ten percent reduction. Easiest way to do it is with a digital scale. Set your measuring cup down, and then we'll go ahead and zero it there. We'll go ahead and dump in our paint. We're gonna need quite a bit for that big ole Cummins engine. So I'm just gonna dump what's left in the can in here. Looks like we're at about 200 milliliters. So that means we need 20 milliliters of reducer. 20 milliliters is not a whole lot. So just dump it in a little drop at a time. That's about nineteen and a half, call that good! You can kinda see how paint rolls off the paint stick nice and smooth. That's exactly what you're going for. If it's kinda clumpy and falling into the paint cup I'll add just a little bit more reducer. I think I'm gonna call that good.

(Eric)>> Now I know we had to do a lot of prep work so I could use the spray gun on here, but this is definitely an upgrade from doing a rattle can refurb. [ spray gun hissing ] [ Music ]

(Eric)>> It is way easier to control the flow and get an even spread on this POR-15. Adding that reducer seems to have helped too because this is coming out and laying down really smooth. [ Music ]

(Joel)>> Well Eric, I don't know what you were so nervous about cause looks like it turned out pretty good.

(Eric)>> It does look pretty good.

(Joel)>> Looks like she's still a little bit tacky. So I think we'll let her sit overnight, and then start adding some power to this thing.

(Eric)>> Sounds good!

(Joel)>> After a quick trucker bath and few coats of paint we've got our old 12-valve Cummins sitting here styling and profiling and we're ready to bolt on some power. When it comes to that subject matter one of the most common upgrades a lot of you diesel dudes like to do is to swap out your VE pump for a P-7100 injection pump. With a VE pump you have a single plunger trying to supply fuel to all six injectors, but with a P-pump you have six individual plungers to supply fuel to all six injectors. So you have better fuel efficiency, and more importantly more power. We are slapping on a larger turbo on this thing. So we need a more efficient pump to maintain our air to fuel ratio. I wish I could sit here and tell you guys that this is a fairly easy and straightforward process but in all honesty there is a lot to it. Don't worry. We're gonna walk you through each and every step, but before we touch anything we need to make sure that this engine is sitting at top dead center. [ ratchet clicking ]

(Joel)>> Before we get started we're gonna remove our valve cover off our number one cylinder and zip off the timing cover. Some of these timing cover bolts are longer than the others. So make sure you can keep track of which ones go where. [ Music ] There are several different methods to finding top dead center on your old 12-valve. By far one of the easiest is to use your timing pin. Now basically this is just a little button that sits on the back side of your cam gear and your timing case. So as you rotate the engine over apply a little bit of pressure to that pin. Once your cam gear reaches top dead center that pin will slide into a little shoulder on the back side of that cam gear. The next method is to go off of your timing marks. If you take a look at your VE pump gear, your cam gear, and your crankshaft you've got four different markings. Each one of them with their own corresponding color. As you spin the engine over your blue should line up with your blue and your white should line up with your white. Then finally there's the more traditional method of pulling the valve cover off of your number one cylinder and cycling your valve train. Your intake valve should do a complete cycle of going all the way down and all the way up, and then it'll start to compress your exhaust valve. Once it's all the way seat you should be within the ballpark of t-d-c. You'll just need to double check that with one of the other methods. Since our flex plate is off we can use our crankshaft pulley bolts to help spin the engine and line up our marks. I'm taping these bolts up just so I don't accidentally mar up the threads. Got to protect them like a newborn baby. We're gonna spin the engine over now, line up our timing marks, and I'm also paying attention to my valvetrain making sure that it's cycling correctly. These old Cummins have got some serious compression behind them. You may have to get a little stern when trying to crank it over. Got all of our timing marks lined up. Our dowel on our crank shaft is in the 12 o'clock position, and our timing pin is in. So we are sitting at top dead center. Coming up, it's time to put this Cummins front and center.

(Eric)>> Just like that!

(Joel)>> Well we got our engine sitting at top dead center, and the reason why this is so important is because both a VE and P-pump run off the timing of the engine. So if you pull the pump off, spin the engine over, and then reinstall the pump your injectors are gonna fire out of order. But with quadruple confirmation that this thing is sitting at top dead center we're ready to pull that timing gear. Ideally in this situation you would use a gear puller or even a harmonic balancer puller to get this thing out of here, but for some of you guys who may not want to shell out any kind of coin to buy a specialty tool all you really need is a pair of M-8 125 bolts to pop this thing off of here. As I tighten these bolts down they're gonna press up against the back side of the timing case. I'm just gonna turn them one to two times on each side. That way that gear's pulling off nice and evenly. The next thing we're gonna pop off is our fuel supply line. Then we've got three bolts on the timing case and then one more bolt on the power steering bracket. [ Music ] I only added in two threads. I thought it'd be smoother than that. By far one of the biggest hurdles you're gonna run into when you're doing this swap is having to pull your camshaft, but before we get into all that I've got a really cool trick I want to show you guys on how to keep your tappets from falling down into the oil pan. While I'm gathering supplies for that I'm gonna tag Eric in so that he can show you how to organize your top end.

(Eric)>> Now actually removing your valvetrain is not all that hard but keeping it in order is extremely important because as your engine racks up the miles the internal components develop wear patterns where they make contact. So if you plan on reusing what you pull out it's really important to make sure that it all goes back in the same places. Taking it apart is pretty easy like I mentioned before, and keeping it organized can be just as easy. There's a couple of different ways that you can remove everything. You can do one cylinder at a time or you can do them all in stages. I'm gonna start by pulling the covers off. And away we go! I'm trying to leave these push rods in for right now. We'll make this a little easier on ourselves and just crack all these loose at once. That way we can grab an impact, take them all out real quick, and get everything out of the way. Dirty old diesel. [ Music ] With the rocker arm assemblies removed it's time to take the push rods out, and this is where organization becomes really important because push rods are one of the things that actually wear in as your engine runs. To show you just how that happens we're gonna measure them as we take them out. Now when you first install a set of push rods generally they all come in the exact same length, but as they wear in the length is gonna change on each one of them, and it's gonna change a different amount. This is measured in at 275.67 millimeters. We'll measure the second one. It's 275.82 millimeters. That might not sound like that much of a difference but inside of an engine even a thousandth of an inch or a hundredth of a millimeter is gonna make a big difference. With all of our push rods removed we can go ahead and remove the tappet cover off the side of our engine. Loosen these up and get this fuel line out of the way. [ drill humming ] [ Music ]

(Eric)>> It's not really what this scraper is for but it was the closest thing that'll work. Just like that, easy day. Now that we've got that cover off of there and access to what we need it's time for Joel to come in a work his magic. Coming up, we want to up your pump.

(Joel)>> This thing just screams performance. It's basically another inline six engine in itself.

(Joel)>> With our valvetrain out of the way we're one step closer to getting that cam shaft out. Now I mentioned a little bit earlier about a little trick about keeping your tappets in so that they don't fall down to the oil pan. It does require a specialty tool however, and that would be a half inch wooden dowel. You can pick these up at your local home supply store for relatively cheap. For this application I actually had to chop them down into little one inch sections along with drilling a seven-thirty-seconds pilot hole. That way I can fit in these little eyelets. Basically the idea is to take each of these dowels and hammer them down into the tappets. Then we'll run some mechanics wire through the eyelets and tie it up so the tappets won't fall into the crankcase when we pull the camshaft. First step we've got to do is get these hammered in. [ Music ] With our dowels in place we're good to start running some wire. Basically I'll feed it through both eyelets and wrap it around this bolt, and that should hold them up as we pull the camshaft so that everything's good to go and it won't fall down into the oil pan. With our tappets safely in place we're good to pull the cam shaft. All that basically entails is a couple of retainer bolts. [ Music ] Slowly, gently pull this thing out of here. Yahtzee! With our cam shaft out good to pull this timing case, not to mention give this old Cummins a little bit of a face lift. Now of course we can't tear into the timing assembly on an old Cummins without addressing the infamous killer dowel pin. For many of you at home this thing was the bane of your existence. Basically what happens is this little guy over time starts to wiggle out, and sometimes it'll land on the crank gear, or if you get lucky it'll land in the oil pan, but most of the time it causes detrimental damage. So what are the solutions? You could weld it up or you could just pull it out, or you could take a spare piece of metal, build you a little tab that goes over it, and that'll hold it in place. Original owner of this truck already swapped out the stock cam for a 480-lift cam. We've inspected all of our journals as well as all of the cam bearings. We're just gonna put this bad boy right back in there. [ Music ] You want to be sure to take special care when reinstalling your cam shaft so you don't damage your journals or any of the cam bearings. [ Music ] Line up our timing mark. [ Music ] Torque spec on your cam retainer bolts is 18-pound feet. [ Music ] Cool, the cam is in. Well guys the time is upon us. We're finally ready to stab in our P-7100 pump, but before we do I just want to take a step back and show you guys the sheer physical size difference between these two pumps. This thing just screams performance. It's basically another inline six engine in itself. Really you've just got to get it in there far enough to where you can get a nut on it, and then you can use the nuts to seat it the rest of the way. We got our pump completely cinched up. One thing I did run into is each bolt had to be individually tightened in a star pattern just so that it seated evenly on that O-ring seal. Next step is to get our timing gear on. Make sure that when you order this kit that you get a new timing gear because the P-pump and the VE pump use different gears. So make sure you get that swapped out as well. With our new pump gear installed I'm gonna go ahead and redo some of our timing marks. One more thing I want to point out to you guys is that we bought this pump completely refurbished and Stage Two upgraded. So it's already set at 12 degrees. If you're doing this swap at home you can buy the timing tool and it'll cost you about $150 bucks.

(Eric)>> With the timing gear reinstalled and the P-pump conversion pretty much finished up it's time to move on to getting our new injectors installed. And of course, before we can put the new ones in we've got to get these old ones out. Here's hoping that none of them are too stuck. These aren't just any old injectors that we're using to update what was already in there. These are competition injectors with a higher flow rating than the ones that we pulled out. What that's gonna do is allow more fuel in, and as long as we can get more air in there as well it's gonna produce more power. Now we made sure when we got these that we ordered with the same spray pattern as the factory injectors because we didn't change out our pistons. So we don't want to end up causing any issues inside. You also want to make sure you get your detent ball lined up with the slot. That way you can get your injector fully seated. As you're tightening you'll feel that alignment ball on there kinda slip in because it'll start to stiffen up a little bit if it's not perfectly lined up but then it'll twist itself just a little bit and loosen up again. Now with our injectors reinstalled and everything torqued to spec we need to get our feedlines installed from the P-pump. It's fairly straightforward getting these lines put on because they came with the injectors. So they're already pre-formed and pre-bracketed to fit where they're supposed to go. So I went ahead and loosened up the brackets that hold them together. That way we can shift and adjust as necessary. Well that just about does it. Just got to get these brackets tight, and throw a couple more things back on, and this Cummins is done. [ Music ] Now we got a lot done today but obviously we still have a lot left to bolt onto this thing before we drop it back into the engine bay of our '93 W-350.

(Joel)>> So we're gonna take a little break from this right now. We're gonna crawl up underneath the Dodge and see what we can do about lifting its spirits. Until then we'll catch you truckers next time.

(Eric)>> Speaking of spirits, it's five o'clock somewhere.

(Joel)>> I'm afraid of ghosts!
Show Full Transcript