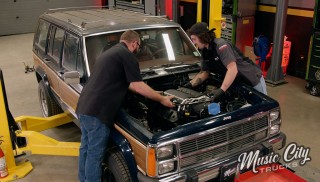
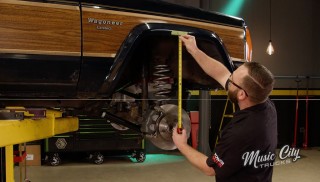
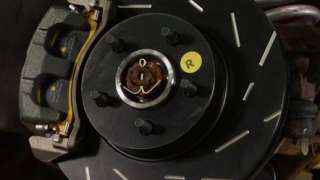
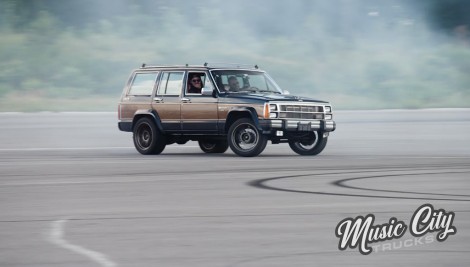
More Jeep TrashHawk Episodes

Music City Trucks Featured Projects

Music City Trucks Builds

Parts Used In This Episode

Summit Racing
Rock Jock Trac Bar
Summit Racing
SeaFoam Deep Creep Penetrating Oil
ARP
ARP Wheel Studs
Matco Tools
MATCO Tools are the Official Tool Supplier to Music City Trucks
The Industrial Depot
Tools, Hardware, Shop Supplies

Episode Transcript

(Marc)>> You're watching Powernation.

(Brandon)>> Today on Music City Trucks we're putting the finishing touches on Trashhawk.

(Marc)>> And then it's off to the races with a payoff you won't believe. ♪ ♪ [ engine revving ] ♪ ♪

(Brandon)>> Welcome to Music City Trucks. I'm Brandon Burke.

(Marc)>> And I'm Marc Crist, and we've got our Jeep project back in here. It's an XJ '86 Jeep Wagoneer that we're calling Trashhawk.

(Brandon)>> It's got an LS supercharged engine, six speed manual transmission, and we swapped in a Ford 8.8 in the rear.

(Marc)>> We lowered it, converted it to two wheel drive, which is kinda not normal, but we also did a d-i-y big brake upgrade. Now it's a big day for us and for this project because we're gonna get all the finishing touches done on it, get it running and driving, and take it out and shred some rubber.

(Brandon)>> Man I was gonna say that. Alright the first thing I'm gonna work on is our fuel system. Now the guys down at Engine Power already installed a FiTech e-f-i system our supercharged LS. So of course I went back to them for our fuel pump. This has two 340 liter per hour fuel pumps in it, it's internally regulated, and it's capable of up to 1,600 horsepower. So this system's perfect for what we've got going on with our 788 horsepower. The kit also comes with all the fittings, stainless lines. All I've got to do is find a spot under the truck and get this thing mounted. Okay with how low this Jeep is and how tightly packaged everything is underneath the truck the safest place for this fuel pump is gonna be on this interior quarter panel. All I've got to do is make a metal bracket to hold it up, run the fuel line straight through the floor into the tank, and the cool part about this I get to keep most of my interior panel. All I've got to do is cut a little hole out. Just got to make the bracket. [ saw buzzing ]

(Brandon)>> The material I'm using is just some polished stainless I found laying around. [ saw buzzing ]

(Brandon)>> Dude that ain't going nowhere! Now all I've got to do is get the panel trimmed, run the fuel lines through the floor. [ saw buzzing ] ♪ ♪

(Brandon)>> Oh yeah!

(Marc)>> We got a new tank from RockAuto dot com but modified the original sending unit with a pair of dash six bulkhead fittings so we could retain our factory fuel gauge. [ saw buzzing ]

(Marc)>> With the tank in place we're gonna install this inline electric fuel pump.

(Brandon)>> Alright now that we've got all the components mounted it's time to plumb everything. Now how we get all the fuel out of the tank is by that pump that Marc just installed right about here. That's actually gonna feed this sump. This is your inlet for the sump and this is the return back to the tank for the fuel you don't need, and these are your two high pressure lines that are going to feed the engine. Now both those lines get a check valve, and we're gonna go ahead and run it through a "Y" that way we can run one line up to the front. Then that's gonna take a 10 micron filter before it gets to the engine. That way we know the fuel is nice and clean. Now how all that's regulated it by these two boost references right here, and that's gonna run off the vacuum of the engine. Now the nice thing about Fi-Tech is their fuel pump wire and relay are already integrated into the e-f-i. so all you've got to do is plumb and wire everything and you're ready to go. We just went ahead and cut a hole in the floor. Nothing too crazy. We're just using dash six a-n lines for the whole fuel system and we're installing all the fittings hand tight until all the lines are routed. Then we'll go back and tighten everything. ♪ ♪ Installing a-n hose ends onto braided line can be a little tricky at first but practice makes perfect. ♪ ♪ This is the return line to the tank. Looks pretty good. This is our little contraption to get our check valves, our "Y", and our post filter installed so that we only have to run one line up to the front.

(Marc)>> Wow, that looks really nice Brandon!

(Brandon)>> Yeah this setup is pretty sweet.

(Marc)>> So I hate to stop you but we've got some other things that we need to take care of here.

(Brandon)>> Seems like you're putting a lot of pressure on me.

(Marc)>> Brakes, talking about brakes. Up next, we put a charge along with a sweet brake upgrade in Trashawk.

(Marc)>> Well up front here we've gotten a lot accomplished. If you'll remember last time we switched this thing from four wheel drive to two wheel drive, and then we lowered it, and then we also upgraded to the WJ brakes, which added about one inch overall diameter to our rotor, which is a pretty cool brake upgrade for you d-i-y'ers at home but we do have some more upgrades that we want to do to the brakes here which we're gonna do first, but while we're at it we're also gonna finish all the other connections up front. A couple of things we've got missing like we've got to get our sway bar links connected here. we've still got to connect the brake hoses and a couple of other little things. These o-e-m pads and rotors are fine but we've got something better in mind. This axle stub right here, this is important. ♪ ♪

(Brandon)>> Just like the four wheel drive version, the hub bearing assembly is held together by the axle, and since this is a two wheel drive it still needs that support. So this unit gets a stub shaft in place of the axle shaft, and is torque to 175 foot pounds.

(Marc)>> Now that big brake upgrade we showed you last time is just fine with all of those o-e-m components but we're gonna be doing some particularly spirited driving with our Jeep here. So we went to EBC Brakes for this pad and rotor combo. This is EBC's USR rotor. These yellow stuff pads are my go to. These pads are great for the street or track. One last upgrade we want to do here on the front suspension on our Jeep is gonna be this track bar. Now this factory one is just fine if you're gonna be running stock ride height. If you're gonna lift or lower, in our case, you want to have an adjustable track bar. Now this one we got from Summit Racing it is made for lifted Jeeps but since it's adjustable this will work fine for us, and plus it's extra beefy. [ drill humming ]

(Marc)>> With that track bar in place we can get the sway bar links installed followed by the tie rods and this front end is done! Well that does it here for the front end of our Jeep. We do need to bleed the brakes, and as you can imagine our alignment's all out of whack now. So we do need to get that taken care of but we'll do all of that right before we take it out for its maiden voyage.

(Brandon)>> Alright so the last time we worked on this rear end we got it all welded up. The pinion angle's correct. Went through and put new bearings and seals in it. Even did a True Track and this nice fancy diff cover. Even got the shocks and sway bars in it but the one thing we didn't do are these wheel studs. Now since we're running almost 800 horsepower to this rear end we want to put stronger studs I it and longer studs. That way we can run different tires. Say we're at the track or the drag strip. So the first thing we need to do is get these axle shafts out. ♪ ♪ [ drill humming ]

(Brandon)>> Now I went ahead and took the gas tank and fuel lines out to make it a little easier for you guys to see these. These differentials are so easy to take apart. Most of it falls out. ♪ ♪ There we go! ♪ ♪ Once you get that C-clip out axle shaft just comes right out. ♪ ♪ So here's a little comparison between the wheel studs we're gonna be using. You can see this is a factory one and this is an ARP one. They're a lot longer and stronger, and a lot of racing sanctions actually require you to have a longer wheel stud. So this is a little safety precaution for us on Trashawk. It takes a little extra effort to install these ARP studs because the neurals are so strong, which is exactly what we want. ♪ ♪

(Marc)>> Well we're getting pretty close to the finish line here on our Jeep but there's a few things we still need to button up before we can get this thing on the ground and running and driving. One of those is the electrical system, specifically the starting system. So we went to our local AutoZone for all of this stuff by Duralast. This battery is actually the size that's for our Jeep but it's got enough cranking amps to turn over that supercharged LS that we've got underneath the hood. The other battery cables we needed we just ordered custom length, but the center piece when it comes to the starting system is of course the starter itself. So we went with this Duralast remanufactured starter. Now remanufactured doesn't necessarily mean less quality. These Duralast starters are engineered for o-e or better performance and torque output. They're remanufactured by tier one or o-e manufacturers with 100 percent new wear components and high quality materials. All the brushes are completely new and these things are built to take the heat. ♪ ♪ With some new bolts and those fresh cables this Jeep's almost ready to get cranking. ♪ ♪ That pretty much buttons up the underhood here for our Trashawk. As you can see we had to cut a hole in the hood here for the air cleaner. That's fine, we knew we were gonna have to do something with that anyway and then we added some hood pins. I'm okay with hood pins as long as they're functional, and since we had to eliminate our hood latch a while back when we install that radiator they were kinda necessary, but they do kinda look cool. So it won't be long now until this thing's gonna be hitting up the the track.

(Brandon)>> Next Trashawk shows it's dynomite!

(Marc)>> Well we are getting dangerously close to getting Trashawk out for its maiden voyage and to do things that Jeep Wagoneers shouldn't do, and the last piece of the puzzle is gonna be wheels and tires.

(Brandon)>> Now we went with an off the shelf 18 inch Konig. This is a flow formed wheel. So it's not gonna break the bank. We went with bronze to match that wood grain. Now these are Continental Extreme Contact Sports 285/40 in the rear, 265/40 in the front. The is a ultra high performance street tire for your daily or track vehicle. This has a 340 tread wear. So it's not a full race tire but it's not gonna wear out as soon as you hit that asphalt. Now this thing is awesome in the dry but extremely good in the wet, and that's because of the tread design and all this siping. So if you've got a street truck, or a full on race car, or just a track/daily this is the perfect tire. Now we chose this for Trashawk because it's light, has a ton of horsepower, and we need all the traction we can get to get to that asphalt on the street and the track. So just got to put this one on.

(Marc)>> It may or may not be your cup of sweet tea but this is Trashawk and we absolutely love it.

(Brandon)>> Alright we got Trashawk all buttoned up and we're down here at Engine Power on the dyno to see how much power it makes because this is a trashy version of a TrackHawk. So one of our requirements was 707 at least horsepower.

(Pat)>> Well we did that on the dyno, made 787. So we beat it by 80 but these things will have about a 15 percent driveline loss with a manual transmission. So it'll be interesting to see what it does, but this thing is spectacular. It's one of my favorite builds you guys have done.

(Brandon)>> Well I appreciate you guys saying that cause you guys are about the first people to see this.

(Frankie)>> If y'all are done yacking let's see what it'll do. I'm excited, I want to see.

(Pat)>> I'm gonna turn on a loud fan here. [ engine starting ]

(Brandon)>> Hey dad, when we get to the store can I get a toy?

(Marc)>> When have toys at home son. You keep it up I'm gonna turn this thing around and take us back home. [ engine revving ] ♪ ♪

(Marc)>> I forgot to push the red button!

(Pat)>> 652!

(Marc)>> 652?

(Frankie)>> 652 and 601 pound feet.

(Pat)>> 601.97 pound feet. That's meaner than I though it was gonna be. I expect it to be a little less I'm gonna be honest with you. I am almost speechless on this one because it's so cool. I want to see it run, and now you're gonna go run it.

(Marc)>> Oh yeah! As much as I'd love to sit here and just make pulls all day we've got to go drive this thing.

(Frankie)>> This thing's gonna be wild!

(Marc)>> It was wild on here. ♪ ♪

(Brandon)>> If you're looking to upgrade the exhaust system on your Jeep look no further than JBA Performance Exhaust from Pertronix. Now they sell a wide variety of bolt in stainless kits. This particular one is an axle back for an '07 to '18 JK. it comes with all your clamps, really nice ones, mandrel bent tubes. Even mounts in the factory hangers so you don't have to fabricate anything yourself. So if you're looking for better performance and a better sound out of your Jeep this is it, and to top it off it even comes with these polished stainless tips.

(Marc)>> Up next, it's hot laps!

(Brandon)>> And hotter burnouts!

(Marc)>> Well we are here at NCM Motorsports Park in Bowling Green, Kentucky, and what better place to take Trashawk out and see what it can do.

(Brandon)>> Than the track?

(Marc)>> Yeah and then out here in the lot because...

(Brandon)>> Well there's a lot of rubber left on these new tires.

(Marc)>> Those tires aren't going to be any good when we're done here I promise you that. So I figured since you haven't been out here on this track and I've got some seat time out here let's just take some leisure laps here so you can get a feel for the track. It's an amazing facility. The surface is great! It's got some elevation changes, all different types of turns. It's a really, really good track. [ engine revving ]

(Marc)>> Lots of power man. Steering is not as positive as I'd want it to be but this thing is straight up animal.

(Brandon)>> This thing feels stabile!

(Marc)>> It is! [ engine revving ]

(Brandon)>> There's death wobble!

(Marc)>> Felt it! It's a little sketchy, I'm not gonna pretend like it's not but feel that lateral grip.

(Brandon)>> The grip with these tires is pretty impressive.

(Marc)>> That was all those brakes had! That was all they had, but you know what? Overall this thing is mind bogglingly fast. We're gonna do some pull down cause that was a little harsh.

(Brandon)>> Our suspension setup as far as, cause we've got the lifted coils that have a higher spring rate that we cut, shorter. We have add a leaf in the rear. The axle on top of the leaves.

(Marc)>> So there's less axle wrap.

(Brandon)>> We've got 285's. What is it 285/40 18's? I mean we've got bigger sway bars. Everything on this truck, even the lowered straight axle. I never thought it was gonna handle like this.

(Marc)>> Well we made a few laps, Brandon's got familiarized with the track a little bit. Now that I've gotten the car shaken down quite a bit I feel comfortable going out and making some hot laps. So I'm gonna get in my brain bucket here.

(Brandon)>> So I'm just gonna go up in the crow's nest and watch.

(Marc)>> Let's see what she'll do. [ engine revving ]

(Brandon)>> What a ripper!

(Marc)>> When I dreamed up this concept of using an XJ to build a TrackHawk knock off I never dreamed it would turn out to be such a cool and impressive truck. It's a counterfeit and a poor one at that. It's powered by an LS, not a Hemi. It's a manual instead of a zippy modern auto, and it's rear wheel drive. A huge difference from the all wheel drive TrackHawk, but it just works. It handles like a sports car, it's got a ton of grip, plenty of braking, and accelerates coming out of the turns like a banshee. It's a little sketchy but in a way that makes it more fun to drive. Is it a TrackHawk, no, but it's better in so many ways. Plus it just looks cool. NCM's Corvette experience gives you a combination of classroom instruction and hands on practice on the track in a lead/follow format. You can get behind the wheel of a C-8 Corvette Stingray Z-51 for laps around their 3.2 miles, 23 turns road course built for speed.

(Brandon)>> And when you become a member of the driving club at NCM Motorsports Park you become part of a special community of like minded motorsports enthusiasts.

(Marc)>> Okay, so now it's your turn.

(Brandon)>> This truck's awesome!

(Marc)>> Yes it is!

(Brandon)>> This is the first time driving this thing.

(Marc)>> Be safe out there! When he comes back he is going to have a permanent smile on his face. You're not gonna be able to wipe it off for weeks you watch!

(Brandon)>> Finally it's my turn to take the wheel of Trashawk and see what she can do. Oh my go this thing's a handful. This thing is awesome! Holy cow! Wow this is like nothing I've ever driven. The way this handles, it shouldn't do this. Much more to life than a 700 horsepower Cherokee. That's every bit of 125! ♪ ♪ Well I used every last bit of fuel of this thing! There's no explaining this! You have to drive this. The pedal!

(Marc)>> So the one comment I had when I was driving it was if you blindfolded me and you put me in here and then you cut a hole in the windshield and all I could see was what was in front of me I would have never in a million years guess that I was driving a Jeep. Any Jeep, doesn't even matter. It's a Jeep!

(Brandon)>> I would be able to tell it's probably a little bit heavier or different shape than a car. This has probably been the best day at work ever.

(Marc)>> Mission accomplished. On to the next one. Let's get this thing out of here, get it back to the shop, put a for sale sign on it, start building something else cool, but before we go? [ engine revving ]

(Marc)>> Oh it'll do a burnout! [ engine revving ]

(Marc)>> You're turn!

(Brandon)>> You see what I'm saying! [ engine revving ]
Show Full Transcript