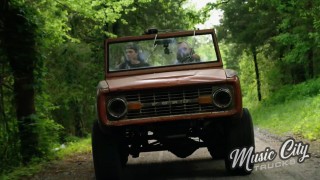
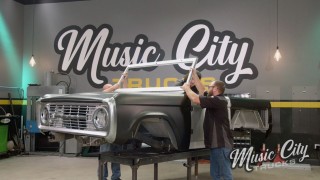
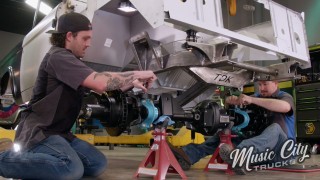
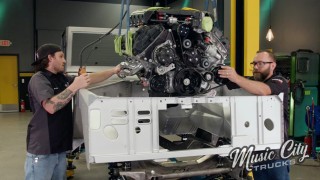
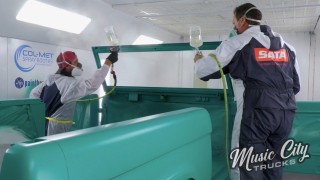
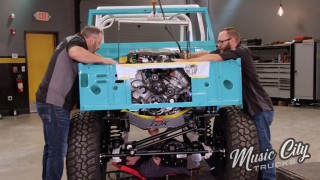
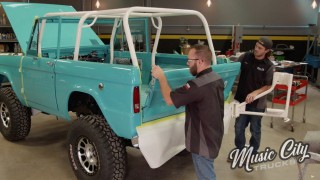
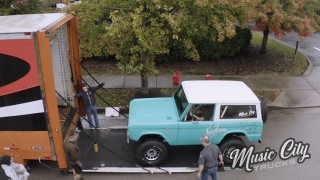
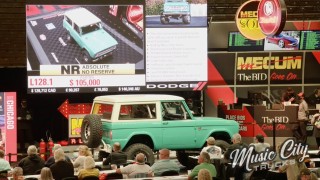
More Beach Cruiser Bronco Episodes

Music City Trucks Featured Projects

Music City Trucks Builds

Parts Used In This Episode

Matco Tools
MATCO Tools are the Official Tool Supplier to Music City Trucks
The Industrial Depot
Tools, Hardware, Shop Supplies

Episode Transcript

(Marc)>> You're watching Powernation.

(Marc)>> Today on Music City Trucks.

(Brandon)>> We've got Chris Ryan and team from Ryan's Rod & Kustom to help get our bronco body all the way from epoxy to paint. (Team Member)>> And in the booths we go. ♪

(Marc)>> And let me tell you that Caribbean Turquoise looks sick! [ hissing ]

(Brandon)>> I love that color. ♪ [ engine revving ] ♪

(Brandon)>> Welcome to Music City Trucks, I'm Brandon Burke...

(Marc)>> And I'm Marc Christ.

(Brandon)>> Now last time you guys saw the bronco, we put it on the frame, got all the panels hung. Now it's time to get it from epoxy into body work and prime and at the end of the week paint and clear, so to help us do that we brought Chris Ryan and his crew. You guys know them. They do excellent work. Thanks for coming out.

(Chris)>> Man any time. We appreciate you having us here. So I brought two of my best guys here, Danny & Dolph and with the help of Marc who's a body and paint expert, we'll have this thing shining by the end of the week.

(Brandon)>> It's going to be a long week. Let's get to it. ♪

(Brandon)>> First thing we need to do is get the roll cage out and that mean cutting the tack welds on the base plates. ♪

(Chris)>> Gaps! Making sure we've got our gaps even. We just cleaned out the holes on that side of the hood. Hopefully we brought that side of the hood down some Dolph.

(Dolph)>> We brought it down pretty good little bit. I think we'll be alright with that.

(Chris)>> Well in the perfect world it'd be three sixteenths and even.

(Brandon)>> We'll give it a first prime by this evening.

(Chris)>> I hope so. The guys doing the sanding do all the work but the guy pulling the trigger's the hero. Nobody asks who sanded for four days. They say who painted that?

(Brandon)>> First we're going over the epoxy with one hundred and eighty grit.

(Chris)>> With the epoxy, we're in the window now and we don't have to sand it before we apply our filler on top of it. We did not personally assemble this vehicle so I want to make sure how straight it is. So it's kind of given us an idea how straight it is, so when we go over a pattern you kind of see some of the shiny sticking through, that means we're low right here. Already. So we know we're going to need some filler in this area right here. It will promote adhesion although we don't have to do this, since we have an epoxy on it right now. [ sanding ] We've been building hot rods and custom cars and broncos for twenty one years now. So full time. We done our first coyote bronco about seven years ago and we did for a somewhat local guy for us. It was an experience trying to drop a coyote in a bronco for the first time. As you know, things don't quite fit like they should.

(Marc)>> What do you think about our bronco?

(Chris)>> I was pleasantly surprised when I walked in this morning. I know how difficult these are. I know aligning that sheet metal without a roof is very difficult. So when I walked in this morning, I was a little... you know actually I was pleasantly surprised put it that way. You all did a jam up job assembling it put it together especially panel by panel. I think you've got a good base here for us to work from and it's not going to be too difficult to get this thing in paint by the end of the week. ♪

(Chris)>> Well we certainly appreciate what Chris said about the body being straight. When you start off with good panels and gaps, you end up with a base that doesn't need a whole lot of attention. ♪

(Brandon)>> So we're addressing the areas that actually need it and then moving onto super build. ♪

(Chris)>> While I'm mixing the primer, the guys are spreading the last bit of needed filler using a lightweight glazing putty. ♪ Now that we've got all the larger areas done, we've got to hit all the cracks and crevices. ♪ [ sanding ] ♪ Now that all that's done, it's time to mask up for the first round of polyester primer. ♪ Well the next round of primer is going to be this high build, this is a four to one polyester primer. It's basically a sprayable body filler. What's great about this is it's going to give a really good level surface to work with and we can block that down and move onto the next step. ♪ Here you go bud.

(Chris)>> Alright, we're going to mix this super build up. Four parts primer to one part catalyst. ♪

(Brandon)>> Reason why we use poly on a high end build like this is because this primer doesn't shrink like a two-k urethane high build would. Giving us the ability to build up the surface enough to block everything flat. Hopefully in one go around. ♪

(Brandon)>> Now this super build is very forgiving. You could lay it down heavy and usually in three coats. ♪

(Marc)>> Man that looks good! I'm sure glad I didn't have to do that. (Brandon).>> Up next! Dolph puts on the finish sand and we get closer to spraying some color.

(Chris)>> We're anxious to see the color done.

(Brandon)>> Alright day two. Yesterday was a big day. We got the bronco in poly. Now we've got to guide coat it, block it down and make this thing straight, so let's not waste any time and get this thing going. ♪ The reason for guide coat is it gives you gauge while sanding to find all your high and low spots. When you remove all the orange peel, which is the texture left behind from the application of primer, the surface is level. [ sanding ] Alright! Well we're pretty much with eighty, I just got this corner left because I've been taking my time, making sure it's perfect. They kind of went around the truck pretty fast, but you know.

(Dolph)>> That's a solid c minus, but you know, keep up the good work.

(Brandon)>> Well we got the rest of the truck re-guide coated and they're going to go around with one eighty to get all these eighty grit scratches out. [ air hissing ]

(Chris)>> A really love the taste of super build in the morning. Really gets me going. ♪

(Brandon)>> Alright! So we're done with the one eighty sandpaper now we're masking the truck back up so we can go ahead and put that finish sand on there. That's going to be our last round of primer before we three twenty and four hundred and then we're ready for paint. ♪

(Chris)>> I think we've got it straight enough right now that we can probably throw on two or three coats of finish sand and get three twenty and four hundred and be ready to rock n roll with some paint then. Dan you stole my tape. ♪

(Brandon)>> Finish sand is still a polyester primer but it's a lot thinner that super build. ♪ What Dolph is spraying right now is finish sand. It's a hybrid polyester primer. It's less heavy that the super build but still a polyester, so it's still going give us that nice finish, not as much orange peel to sand off like the high build. [ hissing ]

(Brandon)>> You can tell this finish sand isn't as a high build as a super build because of how it's laying down.

(Chris)>> Yeah it came out slick man. We got down to one eighty now and this final finish ought to fill in any other minor little imperfections.

(Brandon)>> Yeah and that finish sand's still a polyester right?

(Chris)>> It is. It's just not as high a build as super build so you know... We don't need the filler we required previously. We should be able to take this to four hundred and even if we were doing a metallic or pearl we could run it to six hundred, easily with finish sand.

(Brandon)>> Yeah you can tell it doesn't have as much orange peel as that super build.

(Chris)>> No! It's laying down much slicker. We're anxious to see it colored and done you know.

(Brandon)>> Well you guys are... a great team. You guys work good together. Glad you guys came out. Trucks looking great.

(Chris)>> Cool! I'm glad we could help. You know it was a great experience for these guys you know the first time here. And I know they were stoked just even to be here and do this. But they've busted their butt all week so far you know. It's going to be a lot of hard work but in the end when you see on tv and you see it at SEMA. Dolph will be like "Yeah I painted that. I was into that."

(Brandon)>> It's all worth it at the end.

(Chris)>> Right on! ♪ [ paint hissing ] ♪

(Marc)>> Up next!

(Chris)>> Perfect technique! Don't' spill any.

(Dolph)>> I really like it. I think it's going to look good on the bronco.

(Marc)>> Showtime!

♪ ♪

(Brandon)>> Alright! Day three. We're done with three twenty. We're moving on to four hundred grit. And we're going to be doing that as our final sand and one the reasons we can get away with four hundred grit is because we're using a solid color not a metallic or pearl.

(Chris)>> Right! If we were shooting a metallic or a pearl, we'd carry the whole way to a six hundred to ensure that those flakes or those pearls lay down evenly. So we're gonna knock this out with four hundred and blow it apart and get it cleaned up, slam it in the booth and make it shiny.

(Brandon)>> Sweet! Let's do it. ♪ During final sanding you really want to focus on not flattening any of your radiuses or edges and keeping those body lines crisp. ♪

(Marc)>> Before the body is fully prepped for paint, we want to double check fitment on the top so we don't run into problems down the road. ♪

(Dan)>> Alright, I'm coming down.

(Marc)>> Alright! Day four, we're pretty much done sanding on our beach cruiser bronco. We're going to be taking the front clip off and I'm not going to lie, we're going to throwing paint on this thing today.

(Chris)>> Don't worry Brandon. We got this. Go get yourself a coffee.

(Brandon)>> Alright! Well, I need energy.

(Chris)>> Let's go. Out front. Flop out this side. Well we destroyed that quick didn't we?

(Dolph)>> We're putting some seam sealer in all these gaps and cracks here to prevent water from getting inside the truck. And prevent rust.

(Chris)>> Well anybody can paint. If you have great bodywork and the gun is set up perfectly and the body work's great and the temperature's great and the barometric temperature is great. What I'm going to go over right now is proper spray pattern. And what the adjustments are on the gun. Every gun is pretty much the same. This is kind of my weapon of choice right here. On the gun, we have a fan pattern, a fluid adjustment and an air adjustment. I say most are the same. And all of them depend on each other. So, we're going to go over a couple of pattern differences right here. See that's a nice big, even fan. In fact, I can narrow it down a little bit to make it a little tighter. Just to show you how the pattern affects it. We can also, if we go with more air or less air, you'll see it just spit out. And going to extremes here. We crank up the air. You see it's heavier on the top and bottom. What's happening is we're blowing it past the air horns, right now. It's creating a heavy pattern on top and the bottom. So, we'll cut the air back a little bit. Too much! [ hissing ] To get a proper guard shaped pattern. Now I'm a fast painter, so I want my fluid wide open and I want to control my speed for my pattern. So, if you're a slow mover, you might want to cut back on your volume a little bit so you're not dumping as much product on the panel.

(Dolph)>> And in the booth we go. ♪

(Chris)>> It just gives us a nice uniform base for coverage. This is our activator. Looks like it's a four to one product. ♪ Once Dolph puts a cap on it, we're gonna load it in a gun and rock n roll. Right now we're just doing a final tack and inspection, look for any little imperfections that we might've missed. Picking up any dust and contaminants. Just our last inspection before we seal it and get ready to put some base on. I guess they did a pretty job cleaning it up. My rag's still fairly clean.

(Marc)>> The first step... sealer. [ hissing ]

(Dolph)>> Alright! Now that the sealer is dry, we're going to mix up some of this Caribbean Turquoise chrome base and get Chris back in the booth spraying. Turn this thing green. ♪ Perfect pour. Yeah that's really going to look good on that bronco.

(Chris)>> Looks vintage.

(Dolph)>> This is a slow base maker for the base coat. Just basically to reduce it. It mixes one to one.

(Chris)>> Look at that perfect technique. Don't spill any.

(Dolph)>> I really like it. I think it's going to look good on the bronco and kind of lend itself to the era it came from. It's going to look really good. [ hissing ]

(Brandon)>> And finally... this is the moment when a concept of the build becomes a reality. Seeing this color, on this bronco is a reminder of where we're headed with this build. And also the heritage of the bronco. So yeah! This is pretty exciting. [ hissing] ♪ [ hissing]

(Brandon)>> Alright! Our base is on, that's going to be the color and it looks amazing. Now we gotta get that clear on to make it shine. You guys are going to tag team it right?

(Chris)>> Right on Man! Dolph and I are gonna get in there and tag team that seventy two five hundred clear and make quick work of it. [ hissing ]

(Brandon)>> The clear coat that we're using is as good as it gets. It's a high solid clear which us more uv protection and a deeper appearance than other clears. [ hissing ]

(Marc)>> Up next. Brandon takes the reigns on the clear coat and does a spectacular job.

(Brandon)>> Why thank you Marc.

(Marc)>> Sure thing buddy.

(Marc)>> Today's tip is all about fuel filtration. Now when it comes to fuel filters, you've got a lot of different options. From inline to cannister style, to filter regulator combinations. But let's talk about custom applications. Let's just say you're taking a carbureted vehicle and switching over to e-f-i. You might want to use something like this Summit Racing filter regulator combo. What's nice about this, is that it's got the inlet and outlet both quick connects, but then it's a return back to the tank here and of course the filter built in. It even comes with a clamp. And it looks like an o-e-m style filter, which is really nice if you're trying to do a clean install. But there's a lot of different other types of filters as well. Now if you're going to use an external pump, you need a pre-filter. Usually around one hundred micron. Which is what this one is here. What's great about these is, these are serviceable. And like this one is pretty small and easy to find places to mount. You can take it apart and replace this element here. What that does is that protects your fuel pump from getting any sediment in it that might have been settling in the tank. Here's another option. This one is actually got a little bit of a bigger filter. And this one can mount onto your frame rail. It's a little bigger, but it also a hundred microns. It's got a nice stainless filter. This one's made by Areomotive. It's even got the fittings built in here. You can put whichever type of fitting you want. If you want to do a nipple or you want to do a-n fittings. If you're building a racecar or something like that. This ideal for that. But then after your pump, you need a post filter. Usually somewhere between five and ten microns. You probably recognize this paper filter here. It's very dirty. This actually came off of our F350 flatbed. This is intended to catch all of the stuff before it gets to the engine. So you have to have a post filter and that's what actually protects your engine from all the really really fine elements that can get past your pump. Keep those from getting into your engine. Another different type of post filter would be like this one here. Again, like the others, this one is serviceable. So it's got a little, serviceable cannister, element in here. This is actually a six micron filter. This one's nice and small too so it's easy to mount. Has the a-n fittings built right in there. So not all fuel filters are made the same. So, it really depends on your application and what works best for you. ♪

(Brandon)>> Alright! Day five, the tub and doors are done. The bottom side of the hood's been painted. Looks good!

(Marc)>> I'm blown away by how nice this thing turned out. This is better than we ever imagined so thank you guys from coming but, we're not done yet.

(Brandon)>> No we still have the fenders, the tailgate and the grill. So, let's get this thing wrapped up and all the paint work done. Hey! No! Come back! [ hissing ] Now this is where the styling cues of the early bronco start to pop. [ hissing ] The reason we picked this color, Caribbean Turquoise, is not only does it look cool, it was a factory option in 1966. The first year of the bronco. Now that's cool. [ hissing ] I love that color. [ hissing ]

(Dolph)>> That side of fifty five hundred x is really throwing a big fan and laying that color down nice. It's gonna look good. [ hissing ]

(Brandon)>> Well I was able to persuade Chris to let me take the reigns for the final coats of clear. See if I could match his ability behind the gun. [ hissing ]

(Marc)>> Oh yeah! That looks awesome. You guys done?

(Chris)>> About time you got here.

(Marc)>> Well I know I joke about not doing any paint and body work but I did chip in, I did some taping. And I did some sweeping. And that's about it, so that means the four of you guys did the rest and it looks absolutely amazing, Chris, you and your crew knocked it out of the park. I can't believe it looks this good.

(Chris)>> Well I appreciate Marc. It's always a joy to be here at Powernation. I'm fortunate to have the talented crew behind me to help knock out this bad bronco in one week.

(Brandon)>> Yeah I don't think the one and a half people we got would've been able to knock this out in five days.

(Chris)>> Five years maybe?

(Brandon)>> Time is relative.

(Marc)>> Yeah but that corner up there looks really good.

(Brandon)>> Super straight. Top of the fender as well.

(Dolph)>> Well, I guess it's time for us to get out of here and get back to the big town on ninety six, grab a couple cold ones.

(Brandon)>> Alright, I need a vacation.

(Marc)>> Alright, I might as well go too but, I'll probably end up cleaning up first.
Show Full Transcript