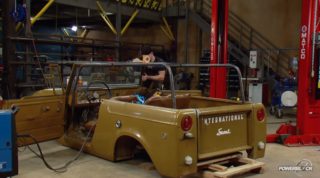
More '69 International Scout 4x4 Episodes

Xtreme 4x4 Builds

Parts Used In This Episode

Auto Meter
Street Rod Old Tyme Black Electric Speedometer & Electric Oil Pressure, Water Temperature, Voltmeter, and Fuel Level Guages., 7000RPM Tachometer.
D and C Extreme
Aluminium Dash Panel Conversion.
Painless Performance
Extreme Off-Road Harness.
Painless Performance
Remote Battery Wiring Kit, Headlight Switch, Windshield Washer Switch, Ignition Switch, Master Disconnect Switch, LED Flasher.

Video Transcript

We never thought the little scout would become our most talked about project yet. Today on Xtreme 4x4, the corn binder returns to get energized. And along the way, we'll offer up tips and tricks on how to best wire your off Roader. Plus troubleshooting. When the lights go out, don't short circuit sit down for extreme.

There's one job out there that a lot of guys get a little bit nervous when it comes to doing. I mean, they'll tackle almost any project on a rig. They'll rebuild axles, they'll rebuild transfer cases and engines, they'll even build complete roll cages. So when they roll the truck, it saves their life. But when it comes to wiring up their project, sometimes they get a little bit skittish and it's rightfully. So, I mean, if you mess up the wiring on your truck, you can be out there riding through the woods, having a great day

and your rig could burn to the ground.

Now, today is the day that we plan to completely rewire our Scout 800 A. It's pretty much the last big job we need to tackle before we can button up some loose ends and take that truck out on the trail. So we thought, why not take advantage of this situation? We'll take you guys through the step by step procedure of rewiring a classic truck like our scout or just an everyday trail truck to take it out, wheeling, we'll dispel some myths. We'll go ahead and answer a bunch of questions and show you the right way to do it. So when you're out wheeling, you know, your truck is safe

and it'll all start by ditching all the stock wire

on a classic truck like our scout. This is obviously the best decision. These wires are over 40 years old and the heat from regular use can cause the insulation to get brittle and crack. Now, these cracks can cause a dead short and possibly a fire.

Now, the first system you're going to want to install in your truck is going to be the main starting and charging system because it's a little bit difficult to see in the truck. We laid it all out here on the bench to talk you through it. Now, it obviously starts with a good 12 volt battery. In our case, we're installing it in the back of the truck. There will be a large battery cable attached to the positive terminal that travels down to large nut on the back of the starter solenoid. Now there'll be two wires coming off that stutter solenoid as well. One is your main power feed for the truck first goes through a main fuse. In this case, a 50 amp fuse and then down to the ignition switch to hook up to the battery terminal. Now there's two other terminals on the ignition switch that will feed out to the harness and the accessories. But we'll talk about those later.

The wire that comes off the switch is the start wire. It's energized with power. When you turn the key to start, comes down here to the solenoid and actually energizes the solenoid and allows the starter motor to turn to roll over your engine. Now, the other wire attached to the starter solenoid is actually coming from the alternator as the engine turns, 12 volts is developed by the alternator to charge your battery. The power is actually traveling down this wire and then meets up with the main battery cable, travels back down the battery cable and then charges your battery. So it's

always being replaced with electricity as you drive the truck. Now, one item you'll definitely want to install, especially in a trail truck is a remote battery disconnect switch. You can install this in line in either the positive or the negative cable. And then when you want to kill all the power of the vehicle, all you have to do is turn it off. This is great when you're storing the truck, you don't have to worry about your battery slowly going dead. But more importantly, if you roll the truck over and the engine doesn't shut off. Someone just has to reach in and hit this switch and it'll kill the whole truck making the truck a lot safer when you're out on the trail

to make the installation of our rear battery easier. We're going to be using a painless wiring promote battery kit.

It comes with enough to gauge cable to get power from the back of your truck to the front and the ends are pre fitted with clamps for your top post battery.

So with the battery cable hooked up to our starter, we have a 12 volt junction block underneath the hood. So we're gonna start to lay out some of the items for our harness that will need power when we put it all together. Now, some items obviously have a fixed location like the alternator or the ignition switch or the gauges, but other things you can install pretty much anywhere. We're going to take advantage of this flat plate right here and put all of our fuel injection modules underneath the hood. Now, we can do that because they are equipped with a weather pack connector, the

weather pack connector, it's virtually waterproof, so it's safe to install out here in the elements. Now, the computer, it's not like that, you're gonna want to install this computer inside the passenger compartment, preferably on the firewall and you'll also want to make sure that you install it with the connectors facing down if you install the computer on its side or with the connectors facing up any water that splashes into the truck. When you're out, wheeling can actually puddle up in this little trough, short out your computer. Burn it up.

Stay tuned. Ian makes sense of circuits, relays and schematics. That's next

today at Xtreme four by four. We're taking you guys step by step through the process of wiring up a trail truck project like our scout 800 A. Now, so far we've installed the starting and charging system. So we've got good power feeds. We've also hooked up all the electronics needed to run our 345 with its fuel injection and now it's time to install just a straight up harness to take care of all the regular circuits on the truck. Now, painless performance products has just come out with a brand new harness, which is ideal for this situation. It is a waterproof fuse block and a 10 circuit harness. But the nice thing about it is they've built in four relays into the fuse block itself, 240 amps and 220 amps. Now, what this means is you can run everything in the truck off these 10 fuses, all your regular stuff like your fuel injection computer, maybe your,

your lights. But when it comes to your heavy duty fans for your cooling or your off road lights, you don't need to add relays to the system. They're built right into the fuse block. So it's ready to go right out of the box. Now, it is a universal kit. So it is a little bit more difficult to hook up. But if you spend any time wiring a truck, you'll find it very easy. Now, at the same time, we're going to install all new switches because if you remember, ours are over 40 years old,

a new windshield washer switch, a new headlight switch as well as a brand new ignition switch. And once we have the fuse block mounted, we can start hooking up some wires

on a custom car. It's all about hiding the wires. But on a trail truck, you want the fuse block in an area that you can get to easily in our case under the hood will work perfectly

and we can split up the harness, move some of the wires into the passenger compartment and leave the rest under the hood.

Now, with everything mounted to the firewall, we can talk you guys through the layout of our particular harness. I wanna show you some tips and tricks when you're wiring up your project at home. Now, our fuse block gives us a couple of options. We have 10 circuits and we can either have them hot all the time or hot when the key is turned on and we decided to split them up. We have 210 gauge wires that run across the firewall down to the large connection on the starter, solid oil that'll give us battery positive power to these bottom seven fuses in the block. Now, that'll be constant 12 volt power. At the same time, we have another 10 gauge wire that we've peeled off the harness and we've fed inside the truck that will hook up to the ignition switch. So when you turn it on, it will become energized with battery power that will only energize these top three fuses that is keyed or switched power, things that you only want on when the key is on, things like your ignition box or your fuel pump. Now, we also have our relays and they're a little bit more complicated. They need both constant power and switch power. So we have them fed from the battery terminal as well. But we go through these circuit breakers that we've mounted up

the firewall. And the reason we have the circuit breaker is because the relay handles a higher load. These are 40 amp breakers and the relay is always used in those large load circuits to handle that kind of power. Now, it can get a little confusing when you're wiring up a complete truck like we are here. But the best way to do it is just break it down into single circuits and think of them as one little part at a time. Now, we've got two circuits here to show you. And the first is a simple circuit and this would be things like maybe your light or your ignition box, you have power coming from the battery and it goes through a fuse. In our case, it's a, the fuse block, it'll travel from another wire out of the fuse block to a switch. Now, this can be the ignition switch like we showed you or just a toggle switch or a headlight switch on the dash. When you turn that switch on, you close the contacts and the power continues down to power the device and then travels on to ground. And that's a very simple circuit. Now, a relay that's a little bit more complicated of a circuit. But it's easy. If you think of it as two simple circuits paired together, you have power coming from the battery going through a fuse in the fuse block and then it will go to a switch just like a simple circuit.

The power comes out of that switch and goes into one port on the relay. And inside that relay is a small electromagnet and then it goes out to ground. Now, there's another circuit as part of the relay that comes out of the battery and comes through the circuit breaker. Now, that's what we showed you on the firewall, it travels out and goes to another terminal on the relay and inside the relay is a small switch. When you throw the first switch in the vehicle, you end up energizing the small electromagnet that closes the switch in the relay. Now that is going to let the

power travel out of the relay on to turn on something like a cooling fan or a fuel pump. Now, items like cooling fans, fuel pumps or even off road lights, they draw more amperage or more power, more amperage and power than a standard fuse can handle. That's why you use a relay usually above 20 amps. If you don't use a relay, you run the risk of either burning out the switch itself, blowing the fuse or actually burning the wire and causing a fire. That's why whenever you're dealing with a large draw device like a fan or a light,

you're gonna use a relay.

Now,

you're watching Xtreme 4x4 for a DVD copy of this episode, just go to Power Block, tv.com and order your copy for just 595 plus shipping and handling. Start your own Xtreme 4x4 collection delivered right to your door from the power block.

Now, today we've been taking you guys step by step through the process of wiring up our scout. Now, right now, we're gonna show you a couple extra tips and tricks. The first one is how to work in a zone in a part that you may need to remove at a later date and you wanna make it plug and unplug with ease. Now, obviously, since we put all new switches in our dash, there's no way we're gonna run with 40 year old gauges in this truck.

Now, we'll replace the entire dash piece with a pre cut aluminum panel that we got from DNC Extreme. We went ahead and filled it with auto meter, classic hot rod series gauges. Now, we chose these gauges because they have kind of an old school look that'll really tie in well with our scout. But the real story here is the backside of the panel. Now, when you're wiring up an instrument cluster like this, it can seem a little bit daunting because you have a whole bunch of grounds and a whole bunch of power feeds. Now, the best thing to do is to group all those together. So we're gonna be using weather pack connectors for that. We'll have one male, four pin and one female four pin on the back of the panel and then the same coming out of the dash pan on the truck. That way we can just plug it in and unplug it if we ever have to remove it. Now, the nice thing about the weather pack connectors is they're one way only connections they click. So you know, they're put together and all you need to put them together

is a weather pack crypt tool

by hooking all the light feeds as well as the power feeds and the grounds together. We'll only need one plug to feed our gauges.

Since we're showing you guys a bunch of tips and tricks that relate to wiring an entire vehicle. I have some parts here that you'll definitely not wanna forget, I'll make the job a lot easier and make it work a lot better if you noticed we installed led tail lights in the back of our scalp. Now, if you do that, you cannot use a standard Flasher relay for your turn signals and your hazards, the led lights do not draw enough amperage to make the Flasher work. You need what's called a no load or led Flasher.

Now, this is a small circuit board in it. So it needs no load from the light to cause the lights to turn on and off. And this will actually keep your turn signals and hazards working. You want to pick up a bunch of these flat ground straps. Now you can get these at any part store. But what they will do is go between the engine and the frame and the body and the frame and even your cage and your body and they'll grab a good ground circuit for the entire vehicle. So all your accessories, when you add, you can just ground it in the body and you know, the electrons will get back to the back.

Now, you'll notice when we did our whole kit here, we went ahead and used all these terminals that have integrated heat shrink tubing on them. Now, that just makes it better because water can't get into the terminal. And more importantly, when you try to pull the wire out the heat shrink actually holds it into the connector. Now, if you don't have those terminals and you just have the standard set, you can easily replace that whole setup with a terminal and a piece of heat shrink tubing, you just have to install them separately. And also remember when you're crimping

these terminals, you wanna make sure that the nose of your crimping tool is on the opposite side of the little cut that makes up the terminal. If you crimp on the seam, it actually opens up the terminal and can cause a loose connection.

Now, if you are using weather pack connectors like we have here, you have to get a set of weather pack connector, pliers. You cannot properly crimp the whole weather pack fitting in one shop using needle nose pliers or a standard crimper. You need the weather pack tool to have a good connection.

Build on a budget Xtreme 4x4 projects that save you time and money.

Now, there's no question that a single wire alternator is not only easier to install the finished installation looks a lot cleaner, but you can turn almost any alternator into a single wire system. If you just know how take this old school GM external fan model, all you need to do is start your truck and let it idle, take a volt meter and check the voltage at the large post at the back of the alternator with the alternator not turned on. You'll see somewhere between 11 and 12 volts, just take the wires from a pigtail connector and touch them onto that terminal. As the truck is what

you'll actually hear the alternator turn on. And more importantly, you'll see that voltage jump up to between 13 to 14 volts to signify that the alternator is now charging the battery. Now, the more modern alternators with the internal fan and the complicated circuitry inside, they need a load in that pigtail circuit or you actually burn out the bridge inside the alternator. So all you do is instead of using a straight up wire, use one of these small little bulb pigtails that'll give you resistance in the circuit

and it'll also turn off when you've energized the correct terminal,

an area that's somewhat difficult to deal with when installing a complete vehicle harness is diagnosing problems. Now, simple circuits are actually pretty easy to figure out with the test light. You can check the fuse as well as the back of the switch to see if you have power going to the right place. And we'll show you how to do that over on the bench. An area that's more difficult are the relays. Now, the downfall is is relays usually control items that we definitely need when we're out on the trail, like the fuel pump or the cooling fan. So what I'm gonna show you right now is how to diagnose a relay problem in the shop and how to bypass it. If you're out on the trail,

every relay has a diagram on the side of it to tell you which terminal will have power in our case 30

which terminal have switched power. In this case. 86.

If you have power at both those terminals in your fuse block, you know that the circuit is ok. And the relay is probably burned out. A simple trail fix is to take a Cotter pin and jump across the internal switch of the relay. You can leave that in your fan will run, get you off the trail.

Simple circuits are easy to diagnose with just a test light. Starting at the battery. You just chase the power through the fuse and through the switch on both sides, the item still won't turn on. Break out the old meter and check for continuity in the circuit. If it registers as open, there's a problem in this section either in the wiring or in this case, it's probably just a bad or maybe even a loose bulb. And that's all it takes to wire a truck. Guys, you gotta break it down into a single circuit at a time. Don't worry, everything's got a fuse. If something goes wrong, the fuse will blow. It's got to chase down your problem.

Yes.
Show Full Transcript