More Team Built TJ Episodes

Xtreme 4x4 Builds

Parts Used In This Episode

Airtex
Fuel Pump
Clayton Offroad
Link Suspension
Duralast
Ball Joints
Essentially Off-Road
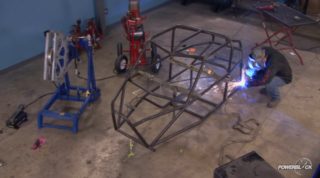
TJ Rollcage Kit
Falken Tires
Tires
K&N
Cold Air Kit
MasterCraft Safety
Suspension Seats
MetalCloak
Bumpers and Armor
Pat and Ray Auto Repair (Depew, NY)
Pat and Ray Auto Repair Mechanics: Ray Castanik & Pat Carroll
Precision Auto Masters (San Antonio, TX)
Precision Auto Masters Mechanics: Andrew Gomez & Danny Ambrose
Raceline Wheels
Beadlock Wheels
Reid Racing
Outer Knuckle Kit
Rusty's Off Road
Header
Savvy Offroad
Frame Cross Member
Savvy Offroad
Gas Tank Skid Plate
Spidertrax
Bearing Cup
The Industrial Depot
Industrial Depot - Fasteners, Hardware, and Shop Supplies

Video Transcript

When Jeremy Wimple showed up at our shop with a badly lifted TJ, we said we'd take a look at it.

What he doesn't know is we're rebuilding his Jeep from the ground up

today on Xtreme 4x4,

Ian and his all star crew of auto

techs drop in a custom roll cage, stainless exhaust. And more

week two brings a big group into the extreme shop. Danny and Andrew from Precision Auto Master,

an auto zone commercial customer out of San Antonio, Texas,

a group of extreme veterans, Jimmy and his crew from essentially off road.

And lastly all the way from Buffalo, the guys from Pat and Ray's Automotive.

How you doing guys?

Nice to meet you, Pat

and

Precision. Andrew. Nice to meet you, man. We'll just pretend that we shook hands. We'll do like a high five from across the shop there. It's all good. Our goal this week is to basically just keep rolling. We wanna get axles underneath this tires and wheels. Uh Jimmy and the crew from essentially, they'll knock out all the cage, all the armor and stuff gonna have you work on this frame, you know, get the axles underneath it tires. Wheels, basically rolling chassis

and then hopefully the body, you know, then we, for paint.

First thing I'm gonna have you guys do is we got a full stainless exhaust system that's gotta go on here. It's a rusty off road header and a full magna flow kit that's gonna kick all the way around to the back

once it's in, then we can worry about

securing this front skid plate because we gotta have clearance for that

and then we'll get an axle underneath it.

Y'all good with that. Sounds

good.

All right. Well, we got some tools over there. I'll go get the kit and we'll get it all laid out. Let's do it

not wasting any time. The first step the guys took on was to remove both intake and exhaust manifold.

Then prep the block for the new header.

The magna flow header back kit is a cut to fit system designed to fit around custom four length suspension

from trimming on the pipe

and on the savvy off road cross member

would help it slide into place.

Meanwhile, on our Jeep tub,

the crew from essentially off road, pulled out the factory cage and removed all the stock seats to make room for our new master crash safety reclining bucket suspension seats.

The new cage kit is pre

bent and notched for easy installation.

A few knocks with a two by four and a hammer help line up our new floor plates

unique piece of this kit is, it goes through the dash. It comes with this template to show you where to drill through.

Just line it up here with the seam

little tape to hold it in place.

You can center punch this or we're just using a real small drill bit going right through the template.

Just plastics are real easy.

Come back in with a two inch HOA

this allows clearance around the tube which is inch and three quarter inch,

pop it right through clean the edges up with a little scotch

bright

and you're done.

The kid also includes an alignment jig

that mounts to the body tub and indexes off one of the hard top mounting holes.

What this does is this supports the upright bar, make sure everything's in line which is critical for soft top alignment.

Uh These two holes mimic the factory holes on the roll cage for bolt in the soft top on. So it functions correctly.

These two holes, although optional will allow you to mount the factory seat belts back in. So you can be dot compliant.

I

know

and 42.5 at the bottom of the two

I my

it almost looks like this side could go out just a little bit more.

It's got a custom look to it

but it still fits the factory soft top, still fits the factory hard top fit most aftermarket tops. But when the tops off and the windows down,

you got that custom look that no other cage offers

with the magna flow exhaust system. Cut to the correct length.

Andrew welds it up.

It's ground smooth

and installed back into the chest.

I got

it

in order to finish. Well, the custom roll cage, it needs to be pulled out of the Jeep tub and set on the floor

coming up while the rest of the gang sweats over the axles and hammers out the body work. Ian takes a power nap.

The parts keep rolling into the extreme shop for Jeremy's TJ.

And the new cold air kit from K and N is unboxed and bolted on to the throttle body

with the fuel tank secured inside our savvy off road aluminum skid plate.

It's jacked up into place and bolted into the frame.

The number one problem we have these Jeeps when we're off road is heat

because you're going slow. You got four low engines revving up, gets a lot of heat build up underneath the hood and there's no fresh air coming in.

So a way to solve that is we're actually gonna cut this hood open,

but we're gonna put in place

this louvered panel

and what this panel will do

is we're gonna be cutting underneath all these Louvers and then screwing this panel down

and then that'll let any heat underneath the hood out.

It keeps the vehicle from overheating. It doesn't sound like a big deal, but it makes a huge difference these things when they're on the trail.

Now, we wanna go ahead and cut it all and drill all the mounting holes

before we do any of the body work. So we don't end up with like just raw steel and the fresh body work.

So you have a template right here to mark it out. All the instructions are on there. Just go ahead, mark it out.

Just don't tighten down any of the bolts, just drop them through all the holes and then we'll just set this aside and we'll get the guy to come in, do all the body work and get ready to paint.

Have fun.

These guys spend the majority of their days servicing daily driver cars. But after winning a contest to come to the power block and show off their skills. Well, they're learning that cutting and grinding. It's a whole lot of fun. Oh, I'm, I learned quite a bit. I wish I'd have done this earlier

a lot earlier.

There you go, baby.

Ready to go.

Poison Spider Customs offers these louvered hood panel for all makes and models of Jeep wrangling.

And they come in either black powder coat like ours or polished aluminum

with the cage pulled out of the Jeep Tub, Morgan T

welds the entire assembly for strength.

Our body man, Eric Stanley is better known as Chewy

and he's no stranger to the power block tech center.

He's helped out on a few builds before

And when he heard we had a Jeep in the shop, his love of off road rigs had him kick in the door and start sanding,

gonna try to repair some of the dents on this door.

Basically, if you use the paint that's already on it to find all the dents before you start sanding on, it makes it easier.

So I'll just use tape to locate

wherever I see a dent using the light pull this dent and I'm hoping this gets pulled

will help pull this low here. So I won't need as much filler in order to get the panel as straight as possible.

All right, I'm gonna grab an angle grinder,

remove the paint so I can use the stud gun

and now using the stud gun

with like a

few seconds of the trigger,

find, find the lowest point and hit it for about half a second, attach the T handle and

while applying pressure

by working to the dent, it's kind of pulling the metal. So it doesn't 10 cans

come back with a grinder, flush it out

and I basically just hit it with the D A feather it out and wiping some filler on it.

The key to keeping Chewy's body work looking good is a quality armor package.

This Jeep is getting wrapped in medical gear all the way around

a

frame built front bumper with integrated grill hoop and stinger

and the rear bumper is equipped with a full size spare tire carrier

that.

Mhm.

This all bacteria

with all of the mechanical work done.

It's time for these guys to show off their newly developed fab skills.

Mainly we just fix the cars, get them out as soon as possible. And, uh, this week it was like a lot of modification and, and it was a challenge, you know, but

no big deal

starting by French

in the rear shock mounts

and finishing up the Clayton Long Arm suspension system,

then they'll prep our junkyard axles to begin building one beefy front end unit.

Let's say it all just in case.

All right guys, now that everything's in place, we can finish out both axle housings front and rear.

Now in the front, we're ditching the factory unit bearing like the jeep came from the factory with and we're converting it

using this reed racing outer knuckle kit. It's 100% new all Cro Molly knuckle

and it changes it through the unit bearing. And now we use the older spindle type. So it's a tapered roller bearing. That means he's gonna be able to easy for service. You can just

repack the bearings, clean them up, won't have to worry about a unit bearing failing. And more importantly, because now it'll have freewheeling hubs, you can unlock the axle and get better fuel mileage when he's driving on the road,

the back is completely different. It's 100% custom and all new. We're gonna be welding this, it's called a bearing cup that's from Spider tracks off road. This bearing cup accepts this heavy duty unit bearing

and the unit bearing is basically all in one. It's just like what we took off the front.

The reason it's better is it's just bigger. It's actually similar in size to one. You'd find like a big one ton truck.

It's 100% non serviceable. It's good to go. We don't have to worry about taking care of it. Once it's in,

we'll measure for shafts bolted in and we'll never have to work on that again.

All right. And all the, the first step in doing all of this is we'll basically assemble this entire package on the front to measure how wide it's gonna make the axle and then we can cut our housing

with new

dias

ball joints pressed into our freshly machined inner seat.

The knuckle is assembled on the bench.

After measuring the length for the front and rear unit bearing axle assembly,

both housings are cut to length.

The bearings are aligned using an axle jig bar.

There we go

and weld it into place

up front. The inner seas and knuckles are installed

a

line

and the caster is set

with all the body work done on the Jeep

Jason stopped by from Anderson classics and customs

to spray on some spot primer anywhere filler was applied

and this Jeep is finally ready for paint

coming up. Jeremy stops by to see what's left of his DJ.

The heart a little bit just to see a big pile of junk that used to be in my Jeep. A little scary

to make our frame a true rolling chassis.

The tires and wheels are bolted up to the new axle and the whole assembly is rolled off of the list.

All right, guys, another good week. You know, the last group came in here and they knocked her to the park. We did the drive train swap and everything. But you guys really finished out. This frame did a great job putting together a rolling chassis.

I hope you guys had fun to Jeff fun this week. I had a great time.

All right. Well,

you know, good having you here and I'm sure this is not what you normally do, but you certainly showed your skills when it came to putting together a hardcore forward drive for this guy. So, hey, thanks for coming out to be

here. All right, man. Thank you. All right,

love it.

All right, thanks guys. Well, I said this is the last group, so I'm gonna say it to you.

You don't have to go home but you can't stay here.

See you later. All right, guys.

I'm keeping the stool though.

It's hard to believe that only two weeks ago this Jeep TJ was a worn out rig that needed a pile of work.

And since we're about halfway finished with this project. We thought we'd bring Jeremy over and let him have a look at what we've done to his Jeeps.

That's the body for your truck. Ok.

Pull it off. All the body works done. Get

dance a couple dents here and there. This is the pile of stuff we're not using anymore.

All of that is garbage. You can have that. Ok? We'll take care of that for you.

Now, this is what we've basically been working on. You got heavy duty metal cloak bumpers, receiver hitch in it.

True. Swing out tire carrier.

All right,

carry a full size spare on the back now.

All right. Went through the tank, cleaned it up, brand new air tex fuel pump, skid plate underneath it

when you're off road

Ford, nine inch full fabricated custom axle,

37 inch tall falcon tires

on a race line, bead locks, super good tire package, right?

Stock suspensions all gone through it all out

custom long arm Clayton off road kit, front and rear

2000 TJ drive trains. So brand new transmission.

Now you've got the straight six, the ultimate Jeep engine. It's what everybody wants up front. Another custom axle data, 44 out of a Chevy half ton truck.

And then we did a conversion spindle up front. So now you'll have a free wheel and hub on the front so you can unlock the hub. You get better gas mileage when you're driving down the road. Ok.

So what do you think so far?

I get this back. Right.

I'm gonna, you're gonna give it back.

That's, um,

that's ridiculous.

That's amazing.

It hasn't sunk in yet. It doesn't,

it's ridiculous. It doesn't make sense. It's a whole new vehicle.
Show Full Transcript