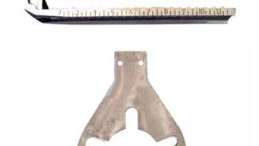
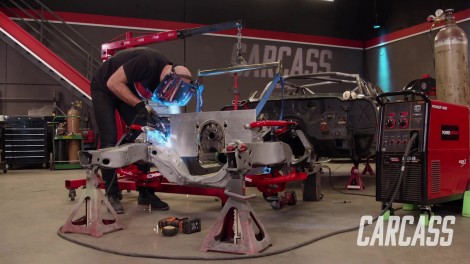
Carcass Featured Projects

Carcass Builds

Parts Used In This Episode

Summit Racing
RideTech Subframe Bushing Kit
GUNIWHEEL
Guniwheel Wheels

Episode Transcript

(Jimmy)>> You're watching Powernation!

(Jeremy)>> Today on Carcass we have to make room for our drivetrain. We have a few modifications to help make our engine and transmission bolt into the subframe.

(Jimmy)>> Then it's time to cut out the firewall and trans tunnel to make room for all that power. Plus, we'll show you how to measure for a set of custom wheels. [ Music ] [ engine revving ] [ Music ]

(Jeremy)>> Hey everybody, welcome to Carcass. We have a big day planned in the shop today. We want to make our road course Camaro a roller, and that entails us putting the subframe underneath the car but not before we set the engine and transmission in between the frame rails. But this isn't just a simple bolt-in deal.

(Jimmy)>> And that's because we're gonna set the engine and transmission back to help improve weight distribution of our car, and we're gonna set it back somewhere in the ballpark of six to eight inches. We're gonna motor plate it up front to the subframe, and then we'll have to figure out some kind of transmission mount.

(Jeremy)>> That's not all the fabrication we're gonna be doing. By moving the engine and transmission back we're gonna have cut a big hole in the firewall, but really the first step for us to get moving forward here is to get the sling on this thing and set it in between the frame rails. [ Music ] That's probably pretty good. [ Music ]

(Jimmy)>> We've got to go back. Backwards!

(Jeremy)>> Way backwards. [ Music ]

[ drill humming ]

(Jeremy)>> So like Jimmy had said, we are gonna be running a motor plate in the front, and really all this is is a giant piece of aluminum specifically cut to act as a motor mount. In the back we are gonna be using the transmission mount. We just have to figure out where that lands. So for now, we're gonna get this in between the frame rails, and then we have to figure out how we're gonna mount this motor plate to the subframe. Keep going! It's kinda resting there now. [ Music ]

(Jimmy)>> About 10 to the bottom of the block. With that measurement we can start making our cuts to the motor plate. [ mechanical humming ] [ drill humming ]

(Jeremy)>> One reason why Jimmy took that measurement is because we need to pay attention to the bottom face of the engine block where the oil pan meets to the top or the leading edge of the crossmember. Now we're gonna be running a dry sump oiling system, and we know the pan measures about seven inches up here in the front, which is quite a bit different than a standard small block oil pan. So we want to make sure we have the clearance there. It's not too critical for us. We did move the engine back quite a ways. It's not really gonna contact anything but it's just a measurement we wanted to be mindful of.

(Jimmy)>> Something else we have to be mindful of is the bell housing and also the headers, which obviously aren't on it right now. The more that we lower the engine the closer those come to the ground, and we need to make sure we have a few inches between those and the pavement.

(Jeremy)>> One thing that we did notice is the stock crossmember for the transmission should work. All we've done is flipped it 180 degrees and put this mounting tab on the back. We just have to cut this tab off, move it to the front, and that should get us mounted on the transmission side of things. From there we'll get the front and the back mounted.

(Jimmy)>> Yep, I'll start making some brackets for the motor plate. [ torch hissing ]

(Jimmy)>> To keep things simple I'll go ahead and cut out the brackets on the plasma table. These are pretty basic and will have two holes on each side to bolt to the motor plate. [ torch hissing ] [ Music ]

(Jimmy)>> I'm just gonna tack these brackets in for now just in case we have to move things at a later time. [ welder crackling ] [ Music ]

(Jimmy)>> I'll transfer punch the holes so we know where to drill in the motor plate. [ drill humming ] [ Music ] [ drill humming ] [ Music ] [ drill humming ]

(Jeremy)>> Now that we know exactly where the front of the engine mounts we know exactly where the transmission is gonna mount. Turns out that we can still use the factory crossmember. We're just gonna come in here and cut the mounting pad off the back of the tube, and then we're gonna reuse the tube itself for the mounting point. That just entails a couple of quick cuts and a couple of holes drilled. [ saw buzzing ] [ Music ]

(Jeremy)>> With the bracket cut off, I'll drill one hole for our new transmission mount. [ drill humming ] [ Music ]

(Jeremy)>> Alright, let's see how this thing fits. If we like it all we have to do from here is drill another series of holes in the subframe rails and then it'll be mounted. I like that! [ drill humming ] [ Music ] [ drill humming ] [ Music ] [ drill humming ]

(Jeremy)>> Alright, that should work for now. The engine and transmission are in their final resting spot. So from here we're gonna take a couple of measurements because coming up we're gonna cut a giant hole in the firewall. The subframe is mocked up and ready to go, but first we have to make a little space to accommodate our drivetrain.

(Jeremy)>> So now that we have the engine and transmission in the subframe it's time to get this thing fit underneath the car. Now since we've moved it all back about eight inches we know it's not gonna fit in the opening, or the stock opening, here on the firewall and in the trans tunnel area. So it's time to make this big cut. Now we have done a little bit of measuring. We know that we're gonna have to open it up somewhere around 18 to 20 inches. Plus, we're gonna have to take some depth out of it. As everything slides back our heads, our intake, our induction will now all be up underneath this cowl area here. So, we'll start by marking a line. We'll get this cut out. Then we'll transition into the car, and we'll start working on the trans tunnel. [ Music ] [ saw buzzing ]

(Jeremy)>> This is just a basic cut for now. Once we get all the engine parts on the engine we'll make our final cuts. [ saw buzzing ] [ Music ] [ saw buzzing ] [ Music ]

(Jeremy)>> Okay, so we've got the major cut up here on the firewall and this trans hump area. Now we've got to work on cutting out the transmission tunnel itself. We have done some measurements and we know the back of the transmission is actually gonna land way back here in the car. That'll put our shifter in this location somewhere, and that's kinda ideal because our but or our seat is not sitting back here versus where it was sitting up front before. Now one thing to note. This is a subframe car and there is a giant crossmember that runs right here. That's where the subframe actually mounts to. We can tell that because of these little plug welds, or these factory weld spots in here. So once we get into this area and start making our cuts we know we're gonna have to spend a little more time because we're gonna have to cut through that. It's not a big deal right now. We will come back and re-strengthen this back up. One major concern with that is as we bolt the subframe under the car and we set the weight down technically on the subframe it could really push the floor up in the air. So we have to do a bunch of supporting here when it comes to that time. We're gonna end up making our cut quite a bit higher on the transmission tunnel area. We're gonna leave this flange here and it's just gonna help us build our new transmission tunnel off of that. It gives us a nice flat spot to work off of. So we'll go ahead and lay a mark down. We're gonna start cutting. Then we're gonna take this whole thing out as one piece. [ Music ] Somewhere in this area. This kind of all somewhat of a guess, somewhat of a mathematical line, but just a real basic cut. [ saw buzzing ] [ Music ] [ saw buzzing ] [ Music ] [ metal clanging ]

(Jeremy)>> This is exactly what I was talking about. Now that we cut this giant crossmember out of here the floor has become extremely flexible. It's kinda lost all its rigidity. So we will have to come back and rebuild this a little bit later. One other thing to note is now that we have this giant hole in here you can almost tell that the transmission is gonna be a little bit too wide, especially back here in this crossmember area. We may have to do a little more trimming, kinda come up in this area, and maybe even get rid of these flanges. But for now what we're gonna do is get the subframe up underneath the car, try to get it bolted into position, and we'll see what happens from there.

(Jimmy)>> To mount the subframe in our car we went to Summit Racing and picked up a set of these RideTech solid subframe bushings. These are made out of Delrin. So they're a lot stiffer than the stock rubber ones, and they are the stock height. So when you go to put your subframe back in your car all the geometry and everything should remain unchanged. Why these are important for our car specifically is because in a race car you want the suspension to do the work and not have any flex between the subframe and the body. So these are gonna do a great job constraining everything. So if you need to mount a subframe in your Camaro go to Summit Racing and pick up a set of these.

(Jeremy)>> We're installing a set of Guniwheels to help us roll our subframe under the car. These have airless polyurethane rubber tires, can hold up to 3,500 pounds, and have a universal bolt pattern that fits most cars and light s-u-vs. [ Music ] I'll grab the shifter in here. Ooh, tight fit, keep coming though. Wow, that's gonna be close.

(Jimmy)>> Actually we've got to come forward a little bit. So it looks like it'll fit.

(Jeremy)>> That does fit, perfect!

(Jimmy)>> Let's get this guy up to the mount holes. [ Music ]

(Jeremy)>> I got this one started. Get the back ones going too. Michael, you can lower the car down a little bit now.

(Jimmy)>> That does it for the front. We're gonna move on to the back and make this thing a roller. Coming up, we show you what to look for when measuring for a set of custom wheels for your ride.

(Jimmy)>> To make our Camaro a full roller we're gonna go ahead and put these hubs on. Before we get the other set of Guniwheels on we are gonna measure for our actual wheels. So I'm just gonna go ahead and get this on here. Not gonna grease the bearings cause this is just purely mockup. This car will go together and come apart probably three or four more times. So just go ahead and get this thing buttoned up on here. [ Music ] Also, gonna put the drive flange on just so we get the right offset of the wheel, and the brake rotor mounts to the back of the hub. So, we don't have to mount the rotor hat. We're going with a three piece wheel setup on our Camaro and we want to make sure we get the specs right when we order it, and this is especially true if you are going with a more expensive wheel because you want to make sure you get it right on the first shot. So we went to Summit Racing and picked up this Wheelworks wheel offset measuring tool. It's easy setup to your rim diameter and your width, and then you can adjust the center section to different back space settings and put it on your car and test it. So I'm just gonna put this up here and see where we're at. [ Music ] Alright, so I expected this. The tire is hitting the leaf spring, and that's where we're limited for this. So, I'm gonna have to adjust this plate to give us a little bit less back space and push the tire out. So, with this tool there's a couple of bolts here that we just have to loosen up real quick. That way we can move the center plate in, comparatively to everything else. We'll get this up against the drive flange and we'll put some lug nuts on here just to secure it. And this tire now is sticking outside of the quarter panel, and that's okay because we are gonna flare this a little bit just to get everything to fit. So what I'm going for here is getting maybe a half inch off the leaf spring cause this tire here is a 335. The one we will run is a 315. So it'll be a little bit skinnier. So I can just about fit my finger between the leaf spring and the tire, which is pretty good there. So according to our tool we are looking at four inches of back space, but we have to subtract a half inch for that beg mounting plate in the center. So, our overall wheel size would be 18 by 11 wide with three and a half inches of back space. So now if you were doing the front it's a little bit different because you have to run the steering through its full range of motion to check for clearance and you have to have it at ride height, which is why the setup rods are nice because we can keep the suspension compressed. Obviously in the back here we are sitting up on the spring, but we're not too concerned about clearance vertically or in the wheel well. We're just concerned about clearance laterally to the leaf spring and the fender here. Just out of curiosity it's probably sticking out about an inch and a half, and we do have a way to take care of that later on, but for right now I'll just get this off and get our wheels ordered.

(Jeremy)>> Up next, we want a little more protection in case of an emergency. So we'll assemble a stylish rear firewall to give some much needed safety.

(Michael)>> Alright guys, we've got our Camaro sitting on the ground. It's basically sitting on its own weight now. So now we're gonna turn our attention to the inside of the car. We've cut the firewall for the front. Now we're gonna move our way to the back.

(Jeremy)>> And what that entails is actually building a firewall in the rear of the car. What that's gonna do is separate the fuel system back here in the trunk from us up here in the passenger compartment. That way, just in case there's a fire or a problem it gives us a little more time to get safely out of the car. Now we're not gonna be doing it the way Jimmy does it with his cad programs and the c-n-c machine, but we are gonna be using cad. This is a little more old school. It's called cardboard aided design.

(Michael)>> Kinda takes me back to kindergarten.

(Jeremy)>> All three years!

(Michael)>> At least I graduated.

(Jeremy)>> Do a base cut in here somewhere, and then we'll come up here to try to follow the wheel tub. [ Music ] The best part about using cardboard is it's easy to make adjustments with. Plus, if you screw up you can just grab another piece. [ Music ]

[ Music ] That fits pretty good on my side.

(Michael)>> I'm pretty good on mine.

(Jeremy)>> So I think from here we'll build out the framework with some square tubing. Build the framework, build a package tray, and then we'll come back and finish these pieces off in steel.

(Michael)>> Sounds good. [ Music ]

(Jeremy)>> We're gonna use a piece of half inch square stock to build out the framework for our firewall. [ Music ]

(Michael)>> Before Jeremy can put the rod in place I'll go ahead and prep the area for welding. [ grinder buzzing ] [ Music ] [ welder crackling ]

(Jeremy)>> We'll cut a vertical here. Let's go 14.

(Michael)>> Yeah, looks good! [ saw buzzing ] [ welder crackling ]

(Jeremy)>> We'll trace our patterns out on a piece of 16-gauge sheet steel, and then just trim it to fit. [ saw buzzing ] [ Music ] [ saw buzzing ]

(Jeremy)>> We'll do a little test fit here. Then I've got an idea of how to give this thing some style. Yeah, that fits really good. Let's give it some style. You may have seen this on the car before, but to give it some style we're gonna be using dimple dies. [ Music ] We'll start by cutting some holes in the firewall that match the size of our die. [ Music ] Then head over to the press and add the dimple. We got these from Rogue Fab. The same place we got our tube bender. [ mechanic humming ] [ Music ]

(Jeremy)>> I'm gonna use these little covers here. We'll cap this off. That way it can still be a functional firewall. [ Music ] [ welder crackling ] [ Music ]

(Jeremy)>> We'll do one more test fit here and see how this looks. Yeah, that looks really good. Now all we have to do is repeat the process on the other side. [ saw buzzing ]

(Jeremy)>> Not only do the dimple dies look cool, they also add strength to a flat piece of steel. [ mechanical humming ] [ Music ]

(Jeremy)>> Well we have all the pieces made in the back here. We even made this top plate. We're gonna call it our package tray, and that pretty much buttons up this rear firewall.

(Michael)>> What that's gonna do is the event of a fire it's going to allow us more time to exit the race car safely.

(Jimmy)>> Now we can get these panels out, get everything prepped, and then tack it in.
Show Full Transcript