


Carcass Featured Projects


Carcass Builds


Want more content like this?
Join the PowerNation Email NewsletterParts Used In This Episode
Blast From the Past
Sand Blasting & Powder Coating
Quick Performance
Full Floating Axle
Video Transcript
(Jeremy)>> You're watching Powernation!
(Jeremy)>> Today on Carcass it's all about handling. We'll finish cleaning up our subframe and give it some added strength before installing our new race suspension.
(Jimmy)>> Then we bolster up the rear for better traction and to handle more horsepower with new leaf springs and a performance rear axle. [ Music ] [ engine revving ] [ Music ]
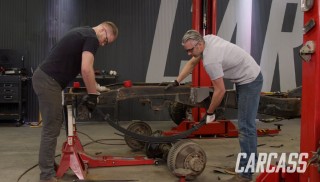
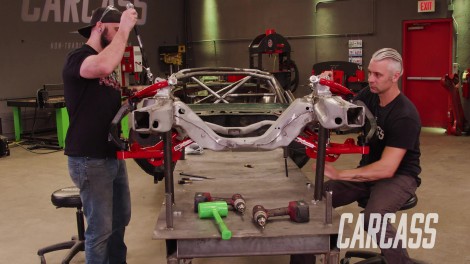
(Jimmy)>> Hey guys, what's up and welcome to Carcass. Now believe it or not the car you see before you is a 1972 Chevrolet Camaro, and I know it doesn't look like much of a car right now but that's just because we're deep into the fabrication process. Now Jimmy has gone ahead and whipped out an amazing roll cage. So, the car should be a lot stiffer plus a lot stronger. Also, we went ahead and cut the wheel tubs out. We added a wider set of wheel tubs, or mini tubs. That way we can run a wider set of tires. Probably the biggest thing you're noticing right now is the fact that the car does not have a roof on it, and we did that for one specific reason. As you come to weld up the roll cage it's really hard to get your tig torch up here on the top, especially when the roof skin is so close. So, the easiest solution to that was to just grab a cutoff wheel and whack the roof off and get it out of the way. Now don't be too worried, we will be putting the roof back on this car. We just have a lot of fabrication to do on the inside. It makes it a whole lot easier when we don't have this roof skin in our way. Now transitioning off the body of the car we are gonna start working on the front of the car or the subframe. Now I already went ahead and stripped out all of the suspension. We've got the steering out of the way and the engine and transmission out of the way. Now this thing had over 50 years of grease and grime on it. So, we loaded it up and headed out to a local sandblasting shop. Now we went to the guys over at Blast from the Past in Lebanon, Tennessee, and they got to work right away. They used a crushed glass or a glass media to clean up our subframe. It's a little more aggressive, but again with all of the grease and grime that was on our subframe it worked very quickly. Now they managed to get into every nook and cranny, and that's what we needed because we're gonna be doing some modifications to this subframe for our suspension. Now the suspension system that we are running is from the guys over at UMI, and they send you this little template or this little cut out because we do have to do some modifications up here to the coil spring pocket to run their coilovers. So, what's simple is just setting this into place. We've got a marker. We'll trace it out, get to cutting, and we'll start welding. This could be a little tricky because it's just paper, but they also say in the instructions to make this more of a rough cut. Then you can always come back and trim it to fit perfectly. [ Music ] The easiest way for us to make this cut is to use our plasma cutter. If you don't have a plasma cutter that's fine. Just grab a tool that will get the job done, like a regular torch or a cut-off wheel. [ torch hissing ] [ Music ] [ grinder buzzing ] [ Music ] [ grinder buzzing ] [ Music ]
[ Music ]
(Jeremy)>> And after a little bit of fine tuning and a test fit we're ready to tack our collar into place. [ Music ] So, the collar's in the subframe now. The last piece that we have to install for this part of the kit is this upper coilover mount. It kinda goes into the original mounts here and bolts in, but you do have to make a small cut on this upper part of the mount. So, we'll mark that out, and then we'll trim this part out to fit, get this all in here, and then we'll weld everything up. [ Music ] This is super quick work and such a small cut. So instead of using a plasma cutter we chose to use a cutoff wheel. [ saw buzzing ] [ Music ]
[ welder crackling ]
(Jeremy)>> That's gonna take care of this side. Everything's just tacked into place for now until we get the full suspension in the car. I've got a couple more tacks to do here just to hold it into place, and then we'll tackle the other side. [ Music ] Coming up, we clean up the old factory welds on our subframe. Then add some modifications to make it stronger for the track.
(Jeremy)>> Moving on with the subframe for the Camaro, per the UMI instructions, says it's a really good idea to come in here and groove out, V-out, or just get rid of the factory welds for this upper control arm mount and then come back and reweld it all back together. We started doing this on the ground and we had a good idea to bring in this table and use it as a chassis table. Now we're doing that for one good reason. As we start driving all the heat into these joints from welding there is a chance that this subframe could twist or turn a little bit. So, we're actually gonna weld the subframe directly to the table to try to stop that from happening.
(Michael)>> And while our subframe is sandblasted there still is some dirt and grime in the edges that we need to clean out just so we can get some better penetration with our welds. That's what we're gonna start on first. [ Music ] [ grinder buzzing ]
(Jeremy)>> Using multiple tools we're gonna clean up the areas that we need to weld to make sure they are as clean as possible. [ grinder buzzing ] [ welder crackling ]
(Jeremy)>> We'll weld on a couple of stands, and then flip the subframe over. Look at all that stuff fall out. [ Music ] Then we'll weld that to the table. [ grinder buzzing ]
(Jeremy)>> We'll do the exact same process on the bottom side of the subframe. We just want to make sure that we get all the grease and grime away from the welding areas so our welds can be as strong as possible. [ grinder buzzing ] [ welder crackling ]
(Jeremy)>> Once we're satisfied we'll fire up the welder and lay down some beads. [ welder crackling ]
(Jeremy)>> We'll skip around the subframe making sure we don't put too much heat into any particular area. [ welder crackling ] [ Music ] [ grinder buzzing ] [ Music ]
(Jeremy)>> Stands back on the bottom, flip it over one more time, and we're good.
(Michael)>> Sounds like a tedious process. [ welder crackling ] [ Music ] [ welder crackling ]
(Jeremy)>> The forces that our subframe will see on our Camaro are gonna be quite a bit stronger than the forces you would see on a normal car on the street. That's why we're taking the extra time to strengthen our subframe with some stronger welds. [ welder crackling ]
(Michael)>> Well we got our subframe all welded up. Jeremy did a really good job on these welds. He did do a little bit of extra up front here to strengthen it for our steering forces that we're gonna see. So, it should be nice and strong.
(Jeremy)>> One thing to note if you guys are doing something like this at home. There are oils that are driven down deep inside of these areas where we ground out to weld. So, you may have to do a hot pass over the top of that to draw those oils out. Then you'll have to re-clean it, and then go ahead and lay your final weld in there. Now we're pretty much buttoned up doing all the modifications on the subframe. So, we're gonna do a little more cleaning on this, get the slag off, and then we'll move on to the suspension. [ grinder buzzing ]
(Jimmy)>> With our subframe ready to handle the forces from the track we can start bolting on our new performance suspension.
(Jeremy)>> Alright guys, we have buttoned up the modifications we're going to be doing to the front subframe on the Camaro, and that's all been in preparation for this. This is the suspension we're gonna be running under our Camaro, and we got this from UMI Performance. Now not only do these guys build everything right at their facility. They also have their own racetrack so they can test and tune and put these things through the ringer. So, we know it's gonna work perfectly underneath our Camaro. The front kit comes with the upper and lower control arms. We have all the hardware to install it, and we opted to go with a bigger splined sway bar in the front just because of the increased loads we're gonna be seeing. Now this is just their front kit. We are gonna be running their rear kit as well, and the only thing you don't see on this table is a set of coilovers, and that's because we do have to take a measurement to get the right length on the coilovers. We'll show you guys how to do that a little bit later. To get this started I've got to grab a couple of these sleeves, and we're gonna press them into these lower control arms. [ Music ] Some of these are easier than the others. This one went right in on its own. [ Music ] Before we install these into the subframe we'll put on the lower coilover brackets supplied in the kit. [ Music ] These might be a little snug just because of the variations in the chassis. So, we'll get it up here and give it a little tap-i-tap into place here.
(Michael)>> Hit it with my purse?
(Jeremy)>> There you go, yep. [ hammer banging ]
(Jeremy)>> Keep going, little bit. A little more than that. Just a little more. One more. Alright, little more and we'll see if it goes in. [ Music ] Come up! [ hammer banging ]
(Jeremy)>> Push in a little. [ Music ] That's close. There we go. Slide that one in here. [ Music ] [ bolt clanging ]
(Jeremy)>> Put this one in too. [ hammer banging ] [ Music ]
(Jeremy)>> Right there actually. Can you get that in there? [ Music ]
(Michael)>> Needs to go up a little bit. [ Music ]
(Jeremy)>> Move that up and down a little bit. There we go! [ Music ] [ bolt clanging ]
(Jeremy)>> Okay, so we have the upper and lower control arms on now, and the next step is to find a spot to put this bump stop that comes in the kit. The guys at UMI in their instructions say to bring up the lower control arm and use this as a template. Figure out where it needs to land, and then we'll come in, mark it, drill the hole. It goes right through the chassis, and then we'll tighten everything down. Somewhere in there. [ Music ] [ drills humming ] [ Music ]
(Jeremy)>> Up next on the install list are the front spindles. Now these are CPP spindles, and we got them from Summit Racing. You guys are gonna notice one very unique thing about this. The fact that they run an outer wheel hub from a C-5, C-6, or C-7 Corvette. They actually run the braking system from that as well. What that does is opens up the door and allows us to run more of a performance braking setup on our Camaro, which we're definitely gonna need. The reason why they do that, or why you use an outer hub like that, is it gets rid of the pin flex inside of a stock spindle. The pin flex, what that can do is that can create knock back. What knock back is, is the fact when you guys go around a corner really hard that pin can actually flex a little bit and it will push the piston the caliper on your brakes. That's gonna give you very inconsistent braking, especially when you're out on a racetrack. These install right into our UMI upper and lower control arms. They actually install in any stock upper and lower control arms. So, we'll go ahead and get these installed here. We're gonna keep moving forward. Normally now we would be installing the coilovers, but we don't have the measurements for those quite yet.
(Michael)>> What we're gonna do for now is install these Allstar Performance setup rods that we got from Summit Racing. What these are gonna do is simulate a coilover when installed. Once we install these we'll set everything to ride height, take our measurements, send them to UMI Performance so they can send us our correct coilover for our Camaro. [ Music ]
(Jeremy)>> Well that takes care of the mockup on the suspension for our subframe. The one thing that we can't do yet is install the big sway bar that runs across here, and that's solely because these big bars are in the way, but we'll take care of that once this thing's on the ground and it becomes a roller.
(Michael)>> For now we're gonna move on to the rear and get that suspension set up.
(Jeremy)>> I'm gonna grab some tools and tighten this down.
(Jimmy)>> Our front suspension is done. Now we can make improvements to the rear, starting with the axle.
(Jimmy)>> Jeremy has a great head start on the front subframe of our Camaro and now it's time to move on to the rear. Just like the front, UMI Performance sent a bunch of great parts for us to run on our car. Up front we have the stock leaf spring from our Camaro, and these two are from UMI. They have a little bit of different arc. So, it'll give us about two to two and a half inches of drop, and they come with Delrin bushings to take the slop out of the system. The other big component to this is the front leaf spring mount. It has the Herb Adams mod built in, which just changes the front mounting location, and the bracket also houses the front end of the traction bar. The other end mounts to the U-bolt plate. What the traction bar does is it reduces wheel hop and it prevents axle wrap so we get more traction to the tires. That's really important for us because we're gonna be sending 700 to 800 horsepower through racing slicks and we need all the grip we can get. UMI's stuff is gonna take care of that just fine. They also sent us their rear sway bar kit, which has three adjustments so we can really dial in the balance of our car. On our Camaro in particular, because it is an early second gen, we would have to drill a couple of holes in the frame rails to install the kit, but otherwise all the late second gens have the holes already in the frame rails so you could just bolt the whole thing right in. That's the great thing about this kit is that if you are running a 10-bolt axle, which came stock in this car, this entire kit just bolts in without an issue. However, we are running a nine inch and we've modified the chassis a little bit. So, we'll have to make a few minor tweaks but nothing major. For right now I'm gonna get these springs in, and then we'll move on to the axle. [ Music ] [ metal clanging ]
(Michael)>> Can you swing that in that way just a little bit? There we go. [ Music ] [ drill humming ] [ Music ] [ drill humming ]
(Jimmy)>> As I mentioned earlier, we're going with the Ford nine-inch axle, and we got ours from Quick Performance in a full floating configuration, which is a huge upgrade over the stock 10-bolt in both strength and safety. In a full floating axle the axle shafts only handle the loads from the drivetrain, and then there's a separate hub and bearings to take the load, which is the weight of the car. In a flange axle it does both. So, in our car we wanted to keep it as safe as possible, and it's geared for almost 170 miles an hour. So, in the event an axle shaft breaks the wheel will stand on the car. Whereas again in a flanged axle application your wheel's coming off, and then Jeremy and I would be in for one heck of a ride. So Quick Performance, they sent us everything we need to get this thing under the car. They sent us the nine-inch center section with 3.25 gears in a 35-spline locker. The axle shafts, which are absolutely massive, the hubs and their respective bearings, drive flanges, and they welded on the spring perches at the stock Camaro width. So, we can just throw this thing under the car without much issue. I did say we had to make a couple of tweaks to get all this to work with UMI's suspension kit. That's because when we mini tubbed the car we cut out the stock shock mount. So, we're gonna have to remake that and remake it on the axle. UMI's U-bolt plate has a specific pattern for the 10-bolt with the shock mount integrated. So, what we did to solve this problem was make a more traditional U-bolt plate, and then we just copied UMI's traction bar geometry. So, all of this stuff from Quick Performance and UMI's suspension kit is gonna work awesome. All I have to do now is just get this axle housing under the car. [ Music ] Alright Michael, let's get this in. [ Music ] [ metal clanging ]
(Jimmy)>> We'll set the axle on top of the springs and secure it with these Detroit Speed U-bolts that we got from Summit Racing. [ Music ] [ jack clanging ]
(Michael)>> Slow down. Should be good here. [ metal clanging ] [ Music ]
(Jimmy)>> All good?
(Michael)>> We're all in.
(Jimmy)>> So that'll do it for the rear end axle housing, getting this thing mocked up. Next time we'll get the front subframe in and make this thing a roller.
Show Full Transcript
(Jeremy)>> Today on Carcass it's all about handling. We'll finish cleaning up our subframe and give it some added strength before installing our new race suspension.
(Jimmy)>> Then we bolster up the rear for better traction and to handle more horsepower with new leaf springs and a performance rear axle. [ Music ] [ engine revving ] [ Music ]
(Jimmy)>> Hey guys, what's up and welcome to Carcass. Now believe it or not the car you see before you is a 1972 Chevrolet Camaro, and I know it doesn't look like much of a car right now but that's just because we're deep into the fabrication process. Now Jimmy has gone ahead and whipped out an amazing roll cage. So, the car should be a lot stiffer plus a lot stronger. Also, we went ahead and cut the wheel tubs out. We added a wider set of wheel tubs, or mini tubs. That way we can run a wider set of tires. Probably the biggest thing you're noticing right now is the fact that the car does not have a roof on it, and we did that for one specific reason. As you come to weld up the roll cage it's really hard to get your tig torch up here on the top, especially when the roof skin is so close. So, the easiest solution to that was to just grab a cutoff wheel and whack the roof off and get it out of the way. Now don't be too worried, we will be putting the roof back on this car. We just have a lot of fabrication to do on the inside. It makes it a whole lot easier when we don't have this roof skin in our way. Now transitioning off the body of the car we are gonna start working on the front of the car or the subframe. Now I already went ahead and stripped out all of the suspension. We've got the steering out of the way and the engine and transmission out of the way. Now this thing had over 50 years of grease and grime on it. So, we loaded it up and headed out to a local sandblasting shop. Now we went to the guys over at Blast from the Past in Lebanon, Tennessee, and they got to work right away. They used a crushed glass or a glass media to clean up our subframe. It's a little more aggressive, but again with all of the grease and grime that was on our subframe it worked very quickly. Now they managed to get into every nook and cranny, and that's what we needed because we're gonna be doing some modifications to this subframe for our suspension. Now the suspension system that we are running is from the guys over at UMI, and they send you this little template or this little cut out because we do have to do some modifications up here to the coil spring pocket to run their coilovers. So, what's simple is just setting this into place. We've got a marker. We'll trace it out, get to cutting, and we'll start welding. This could be a little tricky because it's just paper, but they also say in the instructions to make this more of a rough cut. Then you can always come back and trim it to fit perfectly. [ Music ] The easiest way for us to make this cut is to use our plasma cutter. If you don't have a plasma cutter that's fine. Just grab a tool that will get the job done, like a regular torch or a cut-off wheel. [ torch hissing ] [ Music ] [ grinder buzzing ] [ Music ] [ grinder buzzing ] [ Music ]
[ Music ]
(Jeremy)>> And after a little bit of fine tuning and a test fit we're ready to tack our collar into place. [ Music ] So, the collar's in the subframe now. The last piece that we have to install for this part of the kit is this upper coilover mount. It kinda goes into the original mounts here and bolts in, but you do have to make a small cut on this upper part of the mount. So, we'll mark that out, and then we'll trim this part out to fit, get this all in here, and then we'll weld everything up. [ Music ] This is super quick work and such a small cut. So instead of using a plasma cutter we chose to use a cutoff wheel. [ saw buzzing ] [ Music ]
[ welder crackling ]
(Jeremy)>> That's gonna take care of this side. Everything's just tacked into place for now until we get the full suspension in the car. I've got a couple more tacks to do here just to hold it into place, and then we'll tackle the other side. [ Music ] Coming up, we clean up the old factory welds on our subframe. Then add some modifications to make it stronger for the track.
(Jeremy)>> Moving on with the subframe for the Camaro, per the UMI instructions, says it's a really good idea to come in here and groove out, V-out, or just get rid of the factory welds for this upper control arm mount and then come back and reweld it all back together. We started doing this on the ground and we had a good idea to bring in this table and use it as a chassis table. Now we're doing that for one good reason. As we start driving all the heat into these joints from welding there is a chance that this subframe could twist or turn a little bit. So, we're actually gonna weld the subframe directly to the table to try to stop that from happening.
(Michael)>> And while our subframe is sandblasted there still is some dirt and grime in the edges that we need to clean out just so we can get some better penetration with our welds. That's what we're gonna start on first. [ Music ] [ grinder buzzing ]
(Jeremy)>> Using multiple tools we're gonna clean up the areas that we need to weld to make sure they are as clean as possible. [ grinder buzzing ] [ welder crackling ]
(Jeremy)>> We'll weld on a couple of stands, and then flip the subframe over. Look at all that stuff fall out. [ Music ] Then we'll weld that to the table. [ grinder buzzing ]
(Jeremy)>> We'll do the exact same process on the bottom side of the subframe. We just want to make sure that we get all the grease and grime away from the welding areas so our welds can be as strong as possible. [ grinder buzzing ] [ welder crackling ]
(Jeremy)>> Once we're satisfied we'll fire up the welder and lay down some beads. [ welder crackling ]
(Jeremy)>> We'll skip around the subframe making sure we don't put too much heat into any particular area. [ welder crackling ] [ Music ] [ grinder buzzing ] [ Music ]
(Jeremy)>> Stands back on the bottom, flip it over one more time, and we're good.
(Michael)>> Sounds like a tedious process. [ welder crackling ] [ Music ] [ welder crackling ]
(Jeremy)>> The forces that our subframe will see on our Camaro are gonna be quite a bit stronger than the forces you would see on a normal car on the street. That's why we're taking the extra time to strengthen our subframe with some stronger welds. [ welder crackling ]
(Michael)>> Well we got our subframe all welded up. Jeremy did a really good job on these welds. He did do a little bit of extra up front here to strengthen it for our steering forces that we're gonna see. So, it should be nice and strong.
(Jeremy)>> One thing to note if you guys are doing something like this at home. There are oils that are driven down deep inside of these areas where we ground out to weld. So, you may have to do a hot pass over the top of that to draw those oils out. Then you'll have to re-clean it, and then go ahead and lay your final weld in there. Now we're pretty much buttoned up doing all the modifications on the subframe. So, we're gonna do a little more cleaning on this, get the slag off, and then we'll move on to the suspension. [ grinder buzzing ]
(Jimmy)>> With our subframe ready to handle the forces from the track we can start bolting on our new performance suspension.
(Jeremy)>> Alright guys, we have buttoned up the modifications we're going to be doing to the front subframe on the Camaro, and that's all been in preparation for this. This is the suspension we're gonna be running under our Camaro, and we got this from UMI Performance. Now not only do these guys build everything right at their facility. They also have their own racetrack so they can test and tune and put these things through the ringer. So, we know it's gonna work perfectly underneath our Camaro. The front kit comes with the upper and lower control arms. We have all the hardware to install it, and we opted to go with a bigger splined sway bar in the front just because of the increased loads we're gonna be seeing. Now this is just their front kit. We are gonna be running their rear kit as well, and the only thing you don't see on this table is a set of coilovers, and that's because we do have to take a measurement to get the right length on the coilovers. We'll show you guys how to do that a little bit later. To get this started I've got to grab a couple of these sleeves, and we're gonna press them into these lower control arms. [ Music ] Some of these are easier than the others. This one went right in on its own. [ Music ] Before we install these into the subframe we'll put on the lower coilover brackets supplied in the kit. [ Music ] These might be a little snug just because of the variations in the chassis. So, we'll get it up here and give it a little tap-i-tap into place here.
(Michael)>> Hit it with my purse?
(Jeremy)>> There you go, yep. [ hammer banging ]
(Jeremy)>> Keep going, little bit. A little more than that. Just a little more. One more. Alright, little more and we'll see if it goes in. [ Music ] Come up! [ hammer banging ]
(Jeremy)>> Push in a little. [ Music ] That's close. There we go. Slide that one in here. [ Music ] [ bolt clanging ]
(Jeremy)>> Put this one in too. [ hammer banging ] [ Music ]
(Jeremy)>> Right there actually. Can you get that in there? [ Music ]
(Michael)>> Needs to go up a little bit. [ Music ]
(Jeremy)>> Move that up and down a little bit. There we go! [ Music ] [ bolt clanging ]
(Jeremy)>> Okay, so we have the upper and lower control arms on now, and the next step is to find a spot to put this bump stop that comes in the kit. The guys at UMI in their instructions say to bring up the lower control arm and use this as a template. Figure out where it needs to land, and then we'll come in, mark it, drill the hole. It goes right through the chassis, and then we'll tighten everything down. Somewhere in there. [ Music ] [ drills humming ] [ Music ]
(Jeremy)>> Up next on the install list are the front spindles. Now these are CPP spindles, and we got them from Summit Racing. You guys are gonna notice one very unique thing about this. The fact that they run an outer wheel hub from a C-5, C-6, or C-7 Corvette. They actually run the braking system from that as well. What that does is opens up the door and allows us to run more of a performance braking setup on our Camaro, which we're definitely gonna need. The reason why they do that, or why you use an outer hub like that, is it gets rid of the pin flex inside of a stock spindle. The pin flex, what that can do is that can create knock back. What knock back is, is the fact when you guys go around a corner really hard that pin can actually flex a little bit and it will push the piston the caliper on your brakes. That's gonna give you very inconsistent braking, especially when you're out on a racetrack. These install right into our UMI upper and lower control arms. They actually install in any stock upper and lower control arms. So, we'll go ahead and get these installed here. We're gonna keep moving forward. Normally now we would be installing the coilovers, but we don't have the measurements for those quite yet.
(Michael)>> What we're gonna do for now is install these Allstar Performance setup rods that we got from Summit Racing. What these are gonna do is simulate a coilover when installed. Once we install these we'll set everything to ride height, take our measurements, send them to UMI Performance so they can send us our correct coilover for our Camaro. [ Music ]
(Jeremy)>> Well that takes care of the mockup on the suspension for our subframe. The one thing that we can't do yet is install the big sway bar that runs across here, and that's solely because these big bars are in the way, but we'll take care of that once this thing's on the ground and it becomes a roller.
(Michael)>> For now we're gonna move on to the rear and get that suspension set up.
(Jeremy)>> I'm gonna grab some tools and tighten this down.
(Jimmy)>> Our front suspension is done. Now we can make improvements to the rear, starting with the axle.
(Jimmy)>> Jeremy has a great head start on the front subframe of our Camaro and now it's time to move on to the rear. Just like the front, UMI Performance sent a bunch of great parts for us to run on our car. Up front we have the stock leaf spring from our Camaro, and these two are from UMI. They have a little bit of different arc. So, it'll give us about two to two and a half inches of drop, and they come with Delrin bushings to take the slop out of the system. The other big component to this is the front leaf spring mount. It has the Herb Adams mod built in, which just changes the front mounting location, and the bracket also houses the front end of the traction bar. The other end mounts to the U-bolt plate. What the traction bar does is it reduces wheel hop and it prevents axle wrap so we get more traction to the tires. That's really important for us because we're gonna be sending 700 to 800 horsepower through racing slicks and we need all the grip we can get. UMI's stuff is gonna take care of that just fine. They also sent us their rear sway bar kit, which has three adjustments so we can really dial in the balance of our car. On our Camaro in particular, because it is an early second gen, we would have to drill a couple of holes in the frame rails to install the kit, but otherwise all the late second gens have the holes already in the frame rails so you could just bolt the whole thing right in. That's the great thing about this kit is that if you are running a 10-bolt axle, which came stock in this car, this entire kit just bolts in without an issue. However, we are running a nine inch and we've modified the chassis a little bit. So, we'll have to make a few minor tweaks but nothing major. For right now I'm gonna get these springs in, and then we'll move on to the axle. [ Music ] [ metal clanging ]
(Michael)>> Can you swing that in that way just a little bit? There we go. [ Music ] [ drill humming ] [ Music ] [ drill humming ]
(Jimmy)>> As I mentioned earlier, we're going with the Ford nine-inch axle, and we got ours from Quick Performance in a full floating configuration, which is a huge upgrade over the stock 10-bolt in both strength and safety. In a full floating axle the axle shafts only handle the loads from the drivetrain, and then there's a separate hub and bearings to take the load, which is the weight of the car. In a flange axle it does both. So, in our car we wanted to keep it as safe as possible, and it's geared for almost 170 miles an hour. So, in the event an axle shaft breaks the wheel will stand on the car. Whereas again in a flanged axle application your wheel's coming off, and then Jeremy and I would be in for one heck of a ride. So Quick Performance, they sent us everything we need to get this thing under the car. They sent us the nine-inch center section with 3.25 gears in a 35-spline locker. The axle shafts, which are absolutely massive, the hubs and their respective bearings, drive flanges, and they welded on the spring perches at the stock Camaro width. So, we can just throw this thing under the car without much issue. I did say we had to make a couple of tweaks to get all this to work with UMI's suspension kit. That's because when we mini tubbed the car we cut out the stock shock mount. So, we're gonna have to remake that and remake it on the axle. UMI's U-bolt plate has a specific pattern for the 10-bolt with the shock mount integrated. So, what we did to solve this problem was make a more traditional U-bolt plate, and then we just copied UMI's traction bar geometry. So, all of this stuff from Quick Performance and UMI's suspension kit is gonna work awesome. All I have to do now is just get this axle housing under the car. [ Music ] Alright Michael, let's get this in. [ Music ] [ metal clanging ]
(Jimmy)>> We'll set the axle on top of the springs and secure it with these Detroit Speed U-bolts that we got from Summit Racing. [ Music ] [ jack clanging ]
(Michael)>> Slow down. Should be good here. [ metal clanging ] [ Music ]
(Jimmy)>> All good?
(Michael)>> We're all in.
(Jimmy)>> So that'll do it for the rear end axle housing, getting this thing mocked up. Next time we'll get the front subframe in and make this thing a roller.