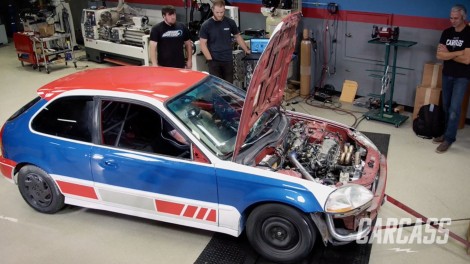
Carcass Featured Projects

Carcass Builds

Parts Used In This Episode

Summit Racing
DEI Titanium Exhuast Wrap
Summit Racing
DEI Titanium Turbo Shield
CX Racing
CX Racing Turbo Kit
Jason Waters Tuning
Jason Waters Tuning
Matco Tools
MATCO Tools are the Official Tool Supplier to Carcass
Summit Racing
Holley Electric Fuel Pump
The Industrial Depot
Tools, Hardware, Shop Supplies

Episode Transcript

(Jeremy)>> You're watching Powernation.

(Jeremy)>> Today on Carcass it's a hunt for horsepower. We head out to a local salvage yard in search of a specific intake that can handle our pursuit of power.

(Jimmy)>> Then we head back to the shop to start assembling our turbo system, strap it to the dyno, and see how much we gain. ♪ ♪ [ tires squealing ] ♪ ♪

(Jeremy)>> Hey guys, welcome to Carcass. Now our little Honda rally car sure is starting to take shape and we've gotten a lot done so far. We've managed to tear out the entire interior, add a custom roll cage with some racing seats. We stripped the entire car down and added a custom paint job, and we also stripped the motor out, added a new clutch, and did some maintenance issues.

(Jimmy)>> And as you can see we're not in the shop today because we're looking for some very specific parts to go along with the turbo kit we're going to install on the Honda. So we're out here at Express Pull 'n Save where Hondas are plentiful and the parts are cheap.

(Jeremy)>> And looks like we're going towards the imports on this one. ♪ ♪ I think the imports are down and around this corner somewhere. ♪ ♪ Now what we're looking for is an intake manifold off of a specific Honda Civic. Now there were a couple different engine options in these cars. Jimmy and I just have to find out which car has one, and I'm going this way.

(Jimmy)>> I'll keep finishing this row. Alright here's one Honda engine and I already know it's not the one we're looking for. It's very similar to the one that we have because the intake manifold right here and also a surefire way to tell is the number stamped on the front of the engine block. This is a D-16-Y-7. The one that we're looking for is a D-16-Y-8. They're both very similar in that they're both single overhead cam but the D-16-Y-8 is a Vtec motor. It has a different intake manifold and makes more horsepower. So I've just got to keep looking. ♪ ♪

(Jeremy)>> Here's a little Honda Civic right here and it seems basically all put together. It actually does have an intake manifold that we could use but this is a D-16-Y-5. It does share the exact same intake manifold as the Y-8 except it has a provision for an e-g-r valve. Now we'd have to block this off and that's just a little extra work. So we might as well just keep searching for that Y-8 manifold. ♪ ♪

(Jimmy)>> Got another one here. Oh somebody took pretty much the whole top end out of it. It is a Y-8 though.

(Jeremy)>> Did you find something?

(Jimmy)>> Yeah this is the motor we're looking for but somebody picked all the parts out of it already.

(Jeremy)>> We should probably look around and see if anything's laying on the ground and look at this right here Jimmy. Somebody pulled the head off of this and it's got the intake on it still. I don't know what they were searching for but left it all here.

(Jimmy)>> It's funny because I can't tell you how many times I've been to a salvage yard and found stuff in the back seat, or in the trunk. Maybe someone was saving it but on the ground is just as good. Oh actually I'll take this dipstick too cause you broke ours.

(Jeremy)>> Well we'll just the intake off of this head cause we only need the intake, and then we'll get out of here and get back to the shop. ♪ ♪ Alright well we only need the intake and the throttle body. So I'm gonna get rid of these injectors and this fuel rail. Then we can get back to the shop. ♪ ♪ Rail off of here. Grab my tools and we're out of here. Ready to go back to the shop?

(Jimmy)>> That's the last piece of our turbo setup I think.

(Jeremy)>> Go back there and set the motor in, and get to work on that turbo. Well we had some pretty good luck at the junkyard finding exactly what we needed, and Jimmy's got that new intake over in the parts washer and he's cleaning it up. So I've got to get this one off of here so we can slap the new one on. [ drill humming ]

(Jeremy)>> We'll spend some time making sure we clean all the old gasket material off before we put the new gasket on.

(Jimmy)>> Alright it's all cleaned up.

(Jeremy)>> Let's get that put on here. We'll get this all buttoned up before we get this motor back in the Honda.

(Jimmy)>> I'll grab the alternator too.

(Jeremy)>> Sounds good! ♪ ♪ After we snug these all up we'll torque them down to 17 foot pounds. ♪ ♪

(Jimmy)>> Before we put the engine back in the car we're gonna replace one of the harder to get to parts near the bottom of the engine. So we got this 100 percent brand new Duralast Gold alternator that we picked up from Autozone. Duralast Gold alternators are engineered to deliver power that meets or exceeds the original equipment on your vehicle. Every unit is 100 percent new and made of proprietary components and processes to ensure maximum life and performance. Every unit is even triple tested to ensure the highest quality and provide the output to power today's vehicles. I'm leaving this a little loose for now so we can put a belt on it later, but otherwise we've just got to through the transmission on this and get it in the car.

(Jeremy)>> Don't go away. We start boosting our little four cylinder looking for some big power.

(Jimmy)>> We've made a lot of progress on our Honda. We got the engine and transmission back in it with the new intake manifold on it and we have the harness all plugged back in. So now is the time we can start adding everything to make more power.

(Jeremy)>> And the way we plan on almost doubling our horsepower in our little Civic is by adding a turbo kit. Now we picked this up from CX Racing and the heart of this whole setup is right here at the turbo. The turbo has a 50 millimeter compressor wheel, a 63 millimeter turbine wheel, and a T-3 flange. We also picked up their fully fabricated exhaust manifold. We have the blow off valve and the waste gate. We also got the intercooler and all of the charge piping, and we opted for their radiator and a cooling fan. Now this kit will make up to 300, 350 horsepower. All we're looking to do is get a little over the 200 mark. So we've got to get this thing installed and that all starts right here with the manifold. ♪ ♪ Jimmy can you hand me the turbo? I think you've got to come in from that side.

(Jimmy)>> Where's that gasket?

(Jeremy)>> I got it. There's actually quite a bit of room in the engine bay it's kinda hard to weasel everything around. If you can hold that right there I'll try to get a bolt started here.

(Jimmy)>> Got one?

(Jeremy)>> Yeah I got one. That should hold it in place for now until we get a little further along. ♪ ♪

(Jimmy)>> So the intercooler's gonna go somewhere between the bumper and the radiator support. So we've got to take the bumper off and that way we can figure out where all the turbo piping goes. ♪ ♪ Okay so basically we just want to mount the intercooler kinda centered between the two sides of the radiator support and it's probably best to mount this first just so we can adapt the tubes to meet these inlet and outlets, and then we'll just make some "L" brackets and actually weld them to this part of the radiator support here. So off to the plasma table. ♪ ♪ The brackets are pretty simple. We'll just cut a slot for a little bit of adjustability, and then add two holes so we can rosette weld them to the radiator support, and then a 90 degree bend to finish it off. ♪ ♪ We'll grind off where we're gonna weld and then tack it in place. [ welder crackling ]

(Jeremy)>> Now that Jimmy has the intercooler mocked up it's time to move on to the charge side of our turbo system. Now we do have one piece of pipe that fits here. That's up here on the intake and lands down here on the inner fender. Now this pipe is perfect because it gets us out of the way of our radiator and it starts heading us in the direction to get to our inner cooler. Now there is some sheet metal in the way. So I've got to drill a hole. [ drill buzzing ]

(Jeremy)>> Start with this pipe first. We'll just snug this up for now. Let's see how this all kinda fits in here maybe. ♪ ♪

(Jimmy)>> So probably just have to shorten this section and then weld this as one piece.

(Jeremy)>> We'll get rid of the coupler. We can just weld it together there. You take care of that.

(Jimmy)>> I got an idea of what to do. [ saw buzzing ] ♪ ♪

(Jimmy)>> Alright let's see. Put this guy on. Twist this around, make sure everything's lined up, and mark it. Once we have it marked we'll head over to the welding table and tig it up. [ welder crackling ]

(Jimmy)>> Let's check this thing for the last time. ♪ ♪ Yeah I'd call that win. Now we've just got to do the other side. ♪ ♪

(Jeremy)>> While Jimmy's working on the other side of the intercooler I'm gonna take care of one more plumbing issue and that's the oil side of the turbo. ♪ ♪ Then we get this down here on the oil pan we already welded in the end fitting when we had the motor out. So all we've got to do is connect this hose, and that's the return side of the turbo. For the pressure side we'll "T" off the pressure port that is shared with the oil pressure sending unit. We'll run it up to the front of the car and hook it up to the turbo. How does that fit?

(Jimmy)>> Really good. Nothing too crazy. A little modification here and there but.

(Jeremy)>> So we've got just the blow off valve to work with and the waste gate but I'm sure they fit just fine. A couple more things to button up but I think next we should probably tackle the fuel system.

(Jimmy)>> Easy enough. ♪ ♪ Coming up, we added boost so now we have to add more fuel.

(Jimmy)>> We've got most of the turbo stuff wrapped up on the front end of the car but a really important piece of this equation is providing the engine with enough fuel at the right pressure. The o-e fuel pump is fine if you're not doing anything too crazy but we're gonna upgrade it. ♪ ♪ Let that drain for second. To upgrade the fuel pump we went to Holley Performance and picked up this 255 liter per hour pump. This thing has the overall same dimensions as our o-e pump. So it's as easy as just taking this one out and putting this one in. ♪ ♪ Since we already replaced the fuel pump once to get our Honda running everything came apart pretty easy. So all I have to do is disconnect a couple of hoses, install the new pump, and plug in the connector. ♪ ♪ Alright that's as easy as that needs to be and that's all we've got to do in the back of the car.

(Jeremy)>> With Jimmy taking care of the fuel system in the back of the car I'm gonna handle it underneath the hood. Now any time you add more air to your engine, like with a turbocharger or a supercharger, you have to have a way to add more fuel to the car. So we're gonna be adding a set of bigger injectors. What we did is got a hold of Jason Waters Tuning, and the guy's practically a guru at tuning Hondas. So we told him what turbo we're running, how much boost we're adding, and what type of horsepower we're look for, and he set us up with a set of 500cc injectors. So what I'm gonna do is switch these out for the ones that are in the car right now and then we're gonna move on to a way to control these things. ♪ ♪ Put the rail back. ♪ ♪ Get in there O-ring. There you go. So now I'll just add these little seals or gaskets down here in the intake and these will help seal the bottom side of the injector, and then we can put the injectors in. ♪ ♪ Alright so with these injectors comes a jumper harness. So we can just plug them in to both sides, injectors and into the Honda side of the connections. Then we'll move on to how we're gonna control these things. Now to help us control our fuel system and the engine Jason Waters also sent us an e-c-u with this little Hondata S-300 module installed. Now that little module right there vastly expands the tunability of our e-c-u, especially now that we're applying boost to the engine. This installs pretty easy. All we've got to do is unplug the old one, use this little jumper harness, and then we'll just plug the new one in. ♪ ♪ This will work right now just sitting on the floor. When we start wrapping up the interior we'll find a permanent spot to mount that but we'll take care of that a little bit later.

(Jimmy)>> Along with our turbo kit we also got this all aluminum radiator and this thing is really nice because the stock fan and shroud bolt up right to it. So we don't have to do anything with wiring up a new fan and the stock overflow tank will fit just fine. ♪ ♪ Then the top hose. ♪ ♪ One last thing we've got to do is install the exhaust that we got with our kit and we went ahead and wrapped this with DEI's titanium exhaust wrap, and while we were at it we picked up a new titanium turbo shield and this is gonna help us control temps under the hood. So once we get this on we can head down to the dyno. ♪ ♪

(Jeremy)>> With our upgrades ready we get a little help tuning our boosted four banger.

(Jeremy)>> Alright guys we're down in Engine Power and we have our little Honda Civic strapped down the dyno, and we have Jason Waters and Chip Meyers in from Jason Waters Tuning. Now if you guys remember they're the ones that sent us the e-c-u and the injectors for our little Honda turbo setup, and they're here today to help us pull some horsepower.

(Jimmy)>> And these guys have already setup the initial timing and put a base tune in it. So guys what is there left to do?

(Jason)>> Everything's setup, dyno's ready to roll, nothing left but just to tune it.

(Jimmy)>> Alright let's hit it. ♪ ♪

(Jason)>> Alright guys, car's warmed up and get ready to do the first pull and see where we're at. [ engine revving ]

(Jeremy)>> That's so awesome! I don't know how to read it but what's it read?

(Jimmy)>> 159 and 158 pound feet.

(Jeremy)>> 159 horse? That's 60 horse?

(Jimmy)>> Just on the first pull.

(Jason)>> A good start for sure.

(Jimmy)>> How much do you think you'll be able to get out of it?

(Jason)>> It's still a little rich. It's on six pounds of boost. Realistically what it made 90 horsepower stock?

(Jeremy)>> 93 was the best one we had.

(Jason)>> It'll make a little more. Then we also have the boost controller. So we can turn it up a little bit more really. Depends on what you what you want to see out of it.

(Jeremy)>> What's a comfortable horsepower number for the stock motor? We didn't do anything to the motor.

(Jason)>> Ideally I like most of these in and around 200 horsepower or less. Some of the motors as long as the customer doesn't care about the possibility of something happening to it we'll go to 220, 230. 200 horsepower is kind of a good point for a stock single cam.

(Jeremy)>> That'd be huge.

(Jimmy)>> Well to double it in such a light car.

(Jason)>> Go from 85 to 200 horsepower is a huge jump for something like this.

(Jeremy)>> It doesn't weigh nothing, and you do that all with tuning right, or the waste gate?

(Jason)>> The waste gate's what's gonna regulate the boost but we have a three port solenoid plumbed in and wired to the e-c-u, and the e-c-u has the p-w-m components to control that. So basically we're gonna pulse our boost controller to add more boost on top of the waste gate spring.

(Jeremy)>> That sounds amazing too! It's a little smelly but it sounds amazing. Are you changing stuff?

(Jason)>> I'm taking a little fuel out of it up top. It's still a bit rich. Like 5,500, 6,000 and up just kind building the fuel around what the car wants. Base pull 159 horsepower. Got some adjustments in, and upload these changes, and then go ahead and do another pull and see where we're at. [ engine revving ]

(Jeremy)>> Every time that gets me.

(Jimmy)>> 173, 159.

(Jason)>> Pretty much about tapped out I'm feeling timing wise. So really turn the boost controller on. Turn the boost up a little bit and we should be good.

(Jimmy)>> How many pounds of boost are you reading?

(Jason)>> Between 5.5 and 6 pounds of boost. Right up top it's 5.7, 5.8. Making solid power for the boost level.

(Jeremy)>> That's pretty mild you know? More boost time!

(Jason)>> We're gonna go do another pull. So let's see where we're at.

(Jimmy)>> Alright let's do it! [ engine revving ]

(Jeremy)>> Come on 200 horse!

(Jimmy)>> 203, 180.

(Jeremy)>> 203 horsepower, dude we broke the 200 horse mark. Is there anything else, you think we're good?

(Jason)>> I think it's good. Like I said you don't want to get too crazy with these stock motors. 200 horsepower was the goal and you hit it. Let's leave it there.

(Jeremy)>> Thank you guys so much for coming in. This is exactly what we were looking for was about 200 horse. So we really, really appreciate it.

(Jimmy)>> And if you guys like anything you've seen on today's show go to Powernation TV dot com and be sure to check out our project pages where you can see more of this car, Project Junk Mail, and our square body tow truck, but let's get this thing off the dyno.

(Jeremy)>> We're done. Let's unstrap it and go have some fun. That's pretty amazing to pull 200 horse out of this.
Show Full Transcript