More Project HRT Episodes

Trucks! Builds

Parts Used In This Episode

Advanced Plating
Plating of non-metal materials.
Bay One Customs
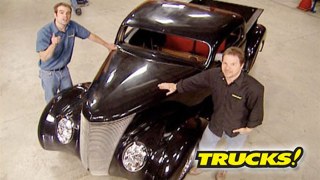
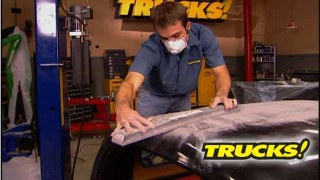
Frame sanding, prepping and painting.
Flaming River
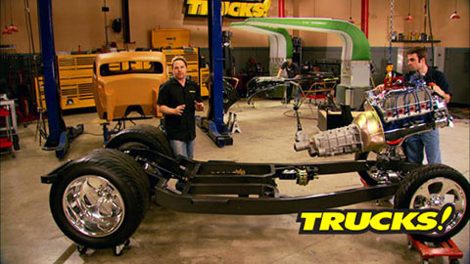
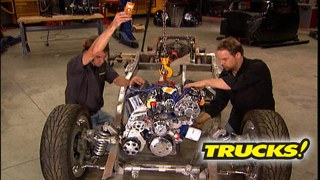
16" micro-column, column drop 4.5 inches, column drop 6.5 inches, stainless u-joints, polished steering shafts, 13.5 inch d-shaped steering wheel, steering wheel adapter, manual rack and pinion steering rack.
Legend Motors Worldwide
Custom cut window glass.
Loctite
Loctite ToolBox with assorted sealers and threadlockers.
Pros-Pick
Truck bed and wood flooring kit.
Richmond Gear
Six speed overdrive transmission complete with Long shifter.
Strip Masters of Nashville
Media blasting of Chevy C-10 frame.

Video Transcript

Hey, welcome to trucks. Well, today we're checking in on some friends of ours over here at Bay One Customs in Springfield, Tennessee, one of the Nashville area's premier custom automotive shops and they say they got a little surprise cooking for us. Now, you guys have seen their work before. Bay One is responsible for this incredible Coe Chevrolet truck that we had on power block a while back.

They also finished that crazy looking 65 El Camino that looks like a full size hot wheels car.

So when TC and the guys offered to help us with one of our projects, well, we've already seen the quality work they do and we jumped at the chance to include some of their craftsmanship in one of our trucks projects. But before we get to that, we wanted to show you guys some of the finished and unfinished vehicles that you haven't seen.

Now, this beautiful 47 Ford two door sedan, it's a great mix of restoration and rest of mo

and although this thing looks like it could be a trailer, Queen Bay One builds them to be driven and this car's got the miles and the dead bugs to prove it

and check out this 46 Ford pickup. Now, this one's been updated as well. It's got an automatic transmission, nice gumpy bucket seats and air conditioning and this thing's looking pretty good, especially considering it's been completed and has been a driver for over a decade.

Hey, Ryan, take a look at this vet, these paddle gaps are perfect.

When you look at it, you can just see the attention to detail that went into this thing

from what they tell me. It started out pretty rough. These cars did not look this good from the factory. I don't think so.

Now we've seen some good looking finish vehicles and let's go find some work in process

and down this hall. That's where the heavy lifting happens.

What?

Now this is a fab shop.

Hey, Tommy, what are you doing here?

Hey, I got here a little early and these guys talked me into giving him a hand.

Day. One has a couple of part time employees and a lot of friends that help out. But the main ingredients are TC Pennock and Butch Kerr.

Both of these guys have a wide variety of skills to draw from. And together they take on almost any project from classic restorations to Wild Customs and Street rods.

Uh I've worked on cars and equipment my whole life when I was a kid. Uh My first go Kart, I disassembled. It

had it in a million parts uh,

later on I got a motorcycle and that's the first thing I did was took it apart, put it back together.

And I've just had a love of working on cars and equipment and especially the specialty cars and antiques and

custom street rods, for instance, take a look at this 1958 Chevrolet pickup. It's getting small block va power and overdrive transmission and a host of other body and suspension mods that'll make it more street rod than truck. And this international scout has had some extensive fab work including

altering the wheel arches for tire clearance, but the proportion is perfect and looks factory. Correct.

The 53 F 100 gets a one piece tilt front end along with some classic custom tricks like the French antenna.

But no matter how diverse the vehicle is. Bay one's main driving force with everything. They do

a

heartfelt passion for the hobby. We start by coming up with the theme and then we tear it down and

bag it and tag it and restore all the pieces and replace what can't be restored and then

shine it all up and sand the heck out of it and put it together. And as long as the customer will allow us to do our best,

they're always happy at the end and these are really cool projects you guys got going on. I know these guys have a ton of hours in the frame of our 37 I can't wait to see it. So, where are you hiding it? We got it waiting for you up front. Let's go see it. Let's do it, man.

Nice

man. That is impressive looking. It looks like a show quality job.

Every inch of this frame has been blocked and primed and blocked again.

Every weld is smooth and it looks like it's dipped in this flat clear TC. You guys rocked on this thing. Thanks so much for all the work you put in. We appreciate the opportunity to get to do this for you. Yeah, thanks a lot, man. Now we gotta make sure the rest of the build is on par with what was established here.

Let's go get the truck to sing back to the shop. Right? Man. That thing looks awesome.

Hey, welcome back to trucks. Now that we're back in the shop, all the hard work, the guys at bay one put into H RT S chassis really shows. So now it's up to us to make sure that the standard that bay one is already set with this frame. Well, the rest of the truck has got to meet that standard and that's gonna mean a whole lot of time put into those body panels. In fact, the whole body of the truck has to be test fit and mocked up before it even goes to paint that way. There's no surprises when it comes to final assembly.

So we're gonna start by dropping in the engine and transmission then setting the cab in place and laying out our shifter location and the rest of the interior.

You good.

Yeah, perfect.

Here it is,

the shifter gets removed for clearance and then we make sure to protect 100 hours worth of paint and body work on the frame.

The cab gets set down with the help of a couple of buddies.

There it is.

Once we make sure it's in the right place, we can trim for the shifter position,

which starts with drilling a pilot hole from the bottom

and trimming a little at a time with the reciprocating saw

with the steel floor, we could just weld in a patch if we made a mistake. But with glass, it's a little more involved and a lot more time consuming to rebuild structural strength.

So after trimming only enough of the floor to clearance the range of motion in all six gears, we can finally reinstall the shifter and start thinking about the rest of the interior.

Ok. How does that look? Is that where it's gonna sit? Yeah,

we're in good shape. Plenty of clearance. It's a R under here too.

Now, with our shifter installed, we've got a decision to make about seating. Now, there's a few obstacles we're gonna have to deal with due to limited space in the cab as well as limited visibility because of the chop top. Now we gathered up a few seats that were laying around the tech center to try out.

We've got a low back bucket out of a mustang, an old school race seat, a high back bucket seat out of a Jeep Cherokee, a full blown race seat and this seat out of an old muscle car. So we'll try these different styles out and see what works best.

The muscle car seat gave us good clearance to the shifter but restricted our view out the back window. We could live with that issue if we had to. But there's better options.

The racing seat would be cool and gives us the clearance we want.

But it's just not the right vibe for this project. Maybe

the Cherokee high back bucket was comfortable. No way.

But it made the truck feel a little like an 18 wheeler. This feels like a tractor. No,

the vintage racing seat might work in a rat rod but not in H RT.

I feel like I need some Snoopy goggles. We need something a little more classic. Wake me up in an hour.

Now, that is what I'm talking about with the steering wheel right in the middle by far. The most comfortable seat. Well, let's just say it didn't leave much leg room but it slept great. We both agreed that the style we liked was the low back bucket seat from a Vin Mustang.

It's actually pretty good.

Yeah.

Yeah, a little far back.

That could work.

This is not bad.

From a mustang. It gave us the clearance we needed for the shifter as well as the visibility we wanted out of the back glass.

Now, we've already got a manual steering rack from Flaming River in the 37. So we're gonna stick with the recommendation of Legend Motors and use this Flaming River tilt column that's specifically designed for street rods with a limited amount of space under the dash. Now, this column utilizes a double drop for support and each drop is made from billet aluminum and it's polished to a mirror finish for a great street rod look, Polish stainless steel U joints, support joint and double D shaft will take care of the connection between the column and the rack and

steering wheels. You guys already know that the sky is the limit for choices. We've got ours narrowed down to a choice between these two wheels and to be quite honest with you, I don't know which one's gonna look better. The steering column placement is probably the most important job in laying out your interior

and starts with centering the column to the driver and marking the dash with the relief cut out of the dash. We can mark the position of the drops using one inch angle, Ryan tacks in to support that gives us a pivot point to gauge the angle of the column

and tack in a second drop.

Obviously, the steering shaft needs to go through the firewall to connect with the rack. So a hole is drilled. But the important thing to remember here is not to create hard angles that might cause binding. As you turn the wheel using coat hangers or tig wire, you can create a path and make a template for routing. Then use it to measure and cut your actual double D shaft.

Once the steering shaft is test fit from the rack working our way backwards.

And since the engine and exhaust placement won't allow a straight shot to the firewalls, a support bearing is used to make the connection

cool. All we need is a bracket for the support joint and we're done.

Hey, welcome back to trucks. If you're just joining us, we're back on project H RT our 37 Ford Street Rod truck that is destined to end up in one of your garages before it's all said and done.

And today we're test fitting everything mocking things up before it goes to final paint. And that includes the glass. Now, this flat glass has already been pre cut for this truck. So it's not something that we have to worry about.

But if you've got a truck like this 1950 Chevy of Tommy's where he's top the top three inches and the factory flat glass is still the stock size. Well, you got a choice to make, you can either farm it out to a glass shop and cross your fingers and hope it turns out ok, or you can do it yourself. We're gonna show you how

now to get started, you need just a few basic tools you commonly available glass cutter and a pair of plate pliers come in handy.

And since we're dealing with the safety glass, you got to get through the laminate that separates the two pieces of glass.

That's where the flammable liquid comes in. Now, you would think since three inches was taken out of the top, you just take three inches out of your glass and everything would be ok, but it's got to be more precise than that. So you definitely want to make a template.

You can use a fiber board like we did or some heavy cardboard for your template and then just trace out the window opening

after installing the factory rubber gasket that's been cut at the windshield peak to compensate for the chop,

you can work your template into the channel for a test fit.

Now, this is why we made a template first. As you can see, we got another 3/16 to a quarter inch in the windshield rubber channel. So we'll make that adjustment before we cut our glass.

All right, with our template traced out. Now, we're almost ready to cut. But before we do that, you're gonna wanna make sure you have a lightweight oil to dip your cutting wheel in. Otherwise the wheel gets hot, the glass flakes and chips and you get an unwanted run when you go to break it

following his traced line. Ryan uses steady and consistent pressure to run the glass cutter. Being careful to use one continuous motion.

This reduces the chance of the crack drifting off the cut line that you want.

Now using the ball end of the cutter, tap along your cut line to break the glass in a controlled path along the scored surface,

flip the glass over and then follow the same line with the cutter

lightly scoring the other side and tapping and breaking the second layer of laminated glass.

Now, make sure you got a fire extinguisher on hand for this step

using a flammable liquid that will seep into the crack, lighting it on fire. It simply melts the plastic material in between the glass allowing you to separate the two pieces of your cut

and trim the laminate with the blade.

The play players just give you a little more control over a tight corner

then making sure your glass stays wet to keep it cool.

You can use a belt sander with a fine belt or a high speed rotary sander to round off the corners and trim the glass to its final size.

Now, with the glass cut, we'll use some quarter inch nylon rope to install the glass into the channel

and you've just saved yourself a couple 100 bucks.

That's, it

looks good out here

that fits like it's supposed to. That's good.

H RT uses a steel Pros pick bed with an oak wood floor. Now, oak is a natural choice for a pickup bed because it's a dense wood which makes it very strong and it's got a beautiful grain. Now, these slats have already been stained and varnished and they look great. We don't actually have to do anything to the floor here, but we wanted to do something a little different with this project. And a while back, we were at strip masters having a frame media blasted and we noticed something really cool.

They had a wooden stand on wheels that they used to roll parts into the blasting booth.

Now, just over the passage of time, the blast media had attacked the surface of the wood creating this cool topographical effect where the soft part of the wood was eaten away, leaving these ridges in the wood, which created this really neat textured effect. And that is what we're gonna do.

The oak bed slats will take a little longer than this pine. But the end result will be the same, an

interesting and unique wood treatment that raises the grain of the wood and really shows off its beauty.

Now, this probably isn't practical for a daily driver that's gonna get used for work. But H RT is a show truck and it's all about the cool factor.

And what you end up with is the coolest thing since sliced bread. This looks like a piece of 100 year old driftwood

and I prepped another piece the same way, but I use the mahogany wood stain and a clear lacquer and the results while they're outstanding. Now, this just goes to show you that it pays to think out of the box and do something a little bit different. So guys don't be afraid to take some chances because that's the only way you can make your truck your own

fine.

Hey, welcome back to trucks. We're here at one of our favorite places to visit advanced plating in Nashville, Tennessee.

Advanced plating is one of the best chrome shops in the country and we've used them several times on projects in the past.

Now, since H RT is an all glass body, we came up with a pretty cool idea. Now, our truck features a wrap around fiberglass dash

and we thought it would look really unique, totally chromed.

Now, you guys remember our friend Steve Tracy who owns advanced plating and we've got

obviously a piece of fiberglass here. So Steve explain how this is prepped to us.

Well, what we do, Kevin was we start off by prepping the surface by media blasting it and then we clean it with an anti static cleaner. We also apply studs to the back of the part for conductivity and to hang our part in the plating tank and that gets it ready for coatings. Yes, sir.

This first coating some sort of primer that is correct that is a three component adhesive filling primer. What we do is take the,

and the reducer and the catalyst

and we spray it on there and allow it to drive for 24 hours. And the other coating on the other side is that just a uh another primer. Well, that's actually a copper conductive coating and it is sprayed over the top of the pro line. It's reduced down because it's very thick material. spray it on, allow it to dry for 24 hours. That allows it to be plated. That's right. We go straight to the copper tank. Ryan, let's go check it out. All right,

the conductive primer sprays like any high build primer with a large orifice gun in a controlled environment for safety.

This completely coats the part fooling the rest of the crawling process into being able to plate it like steel.

A quick test confirms we're ready for the next step.

The parts are then dipped in the copper tank using the electrodes to deliver the current and the copper layers.

Now we told you chroming plastic is no big deal for these guys. This is actually gonna be a chrome plated plastic skid blade for a Chevy avalanche.

And I'm using the term skid plate very loosely

using Sanders and grinders to level out the copper is where the foundation of chrome plating is created

without this care and attention to detail, the reflection of the chrome can get distorted and show flaws and imperfections and that is just not their style.

Now as beautiful as this piece is, it's still not finished. So by the time our fiberglass dash is at the same stage as this fiberglass cover. Well, the process is the same as plating steel. Right exactly. Kevin True Electro plated nickel and chrome over the top of fiberglass. Your dash is going to look just like these 37 Ford grills here that are also made out of fiberglass. I can't wait to see it now, we can get these back in a couple of days. Right? Looks like we better get busy. Thank you, Steve. You're welcome.

Now, there's just some things you can't get along without no matter what you're working on and the lock tight line of products is definitely one of those. The problem starts with when you've got just one of these guys bouncing around in your toolbox, it's very easy to lose them.

Well, this is the loctite toolbox and it contains 15 of the latest and best loctite products geared to solve the most basic mechanical problems contains everything you need to stop failures at the basic level, things like thread sealer, anti CS and several different strengths of thread locker.

Now, bigger kits like this manufacturing reliability toolbox is about $250 but the line of lock tight toolboxes starts at just 100 and 10 bucks. Thanks for watching trucks. See you guys next week.
Show Full Transcript