Parts Used In This Episode
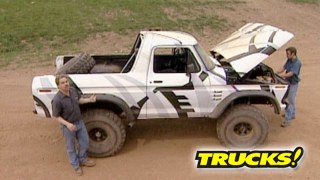
Bushwacker
Cut out flares front pair and rear pair.
Interco Tire Co.
37x12.50R 15 Super Swamper SSR Radial.
LMC Truck
Chrome bumper and bumper caps, late model Chevy and GMC.
LMC Truck
Extra capacity fuel tank.
LMC Truck
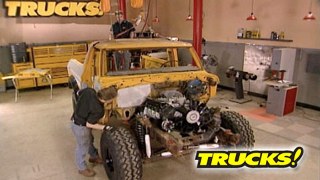
Floor pans, Rocker panels, fenders.
O'Reilly Auto Parts
Front rotor, pads, bearings, front seals.
O'Reilly Auto Parts
Shoes, hardware kit, wheel cylinders, axle seals, axle bearings, pinion seal, transfer case seals.
O'Reilly Auto Parts
Transfer case seal.
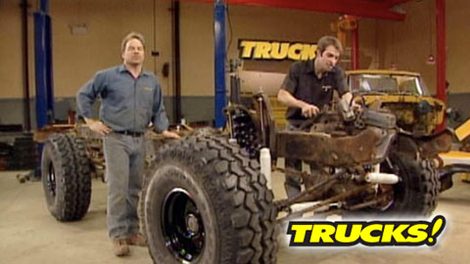
Rough Country Suspension Systems
4'' Suspension lift.
Summit Racing
15x10 5x5.5 Black Steel wheel.

Video Transcript

Today on trucks. It's the start of our low buck Bronco build up.

We're dragging a 79 Bronco out of a field and stripping it down so we can bring it back to life

and we'll spend as little cash as possible to make this Bronco a weekend warrior. We won't mind bouncing off a few trees.

Hey, welcome to trucks. I got a question for you. How many times have you seen a bunch of vehicles out in the field or behind somebody's barn or beside the garage and wondered if they're for sale, wondered if maybe you should stop and ask a couple questions about them.

Well, that's exactly what we did. We saw these trucks in the hollow from the road, asked around a little bit and struck up a conversation with Monty, the guy that owns all these trucks

and he gave us a pretty good deal on

an almost solid sort of complete 79 full size Bronco

and check it out. It's all here and some of it's over there and most of it's right there and it's got no engine in it right now. But this Bronco's got huge potential.

It's got a nine inch rear axle, a data 44 up front, heavy duty quad shocks, ac six automatic with a two or three transfer case. And did I mention it was cheap?

So we loaded up our fine.

But before we left, Monte threw in an unexpected surprise.

Now what used to be under this hood

was a 3 51 M the last of the Cleveland series of engines. And since it was long gone, I think Monty felt a little guilty. So he threw in this 460 long block to make us feel better.

The big block on the trailer, our project's got even more potential. However, in its current state,

I think the only thing still attached to this Bronco is its potential. But now that we got it here in the shop, we can see what we really got,

man. This thing is toast.

Yes.

The last time this vehicle was tagged, the Spice Girls were at the top of the charts

and it served as a trash can pretty much until now.

So we cleaned out the buried treasure and worn out parts and lift it off the tub for a better look.

God.

This thing is rusted solid. Holy cow.

I

think it's good right there. I think you're right to leave it.

Now, the first thing we wanna do is check out the front steering and suspension.

It actually feels pretty solid. The ball joints and tie rod ends are in good. Shape.

There's no excessive play in the steering box, but check this out, this is U joint

and that thing's beyond gone.

As far as the rest of the front end goes. All these shocks and coil springs and bushings. Uh, they're heavy duty components but they're 30 years old and we want to create a little extra tire clearance anyway.

So we went to rough country, picked up one of their basic four inch lift kits with coils, dual shock set up up front

steering stabilizers and polyurethane sea bushings for the axle also comes with a drop pitman arm.

Now, as far as brakes go

in the cab, we had a nice solid pedal.

Looks like we've got a little rust from sitting out in the field too long, fresh set of rotors, some new pads will be all set.

Now on our C six tranny, we won't know anything about its condition till we pull the pan, drop the valve body down and see what's going on inside.

Now, the NP 203 is a full time chain driven transfer case with a mediocre low range. It's gotten a bad rap over the years, but since we're not building a rock crawler or a highway cruiser, this thing will work great for our truck

now, a little further back.

Well, let's just say we've got some drive shaft issues that need to be taken care of.

This thing needs to be rebuilt or replaced altogether in

the rear axle. Well, it's a Ford nine inch. There's tons of options and plenty of them that won't send you to the poorhouse as far as brakes go. But we'll pull the drums off. Inspect what's going on inside

and rebuild what we have to. Now,

who knows what's in this fuel tank after it's been sitting out in the field for a couple of years. Now, you can take an old gas tank and drain it and

flush it and try to reseal it.

But for about 100 and 20 bucks in a call to L MC, you're gonna have a brand new tank one, you know, won't contaminate your fuel system.

Well, now we can take a closer look at this body. It's more than 27 years old and has been sitting out in the field. So it's no surprise that we found some rust. This is not a big deal because the L MC truck makes patch panels for almost every body part on this Bronco,

including

the stamped and coated floor pants.

So all we have to do is cut the rust out, replace it with solid metal. Now, these rocker panels, it's a rust prone area on these vehicles. Ours are good and solid, but if they weren't,

we've also got

outer and inner

rocker patches,

our rear wheel arches

and they're rusty and we could patch them with metal, but we wanna make room for a larger wheel and tire and more suspension travel. So we're gonna use these bushwhacker fender flares that are gonna enlarge this wheel opening by about three inches and just take care of that rust by eliminating it

back here. It's dented up. So what some good old fashioned body work will take care of that and we'll walk you through that repair as well.

Now, both our doors and our front sheet metal are in nice solid shape. But if they were rusty, there's lots of patch panels available for these parts as well. Lucky for us all we have to deal with is a little bit of surface rust from somebody's bomb can body work,

but this tailgate is rough. It's rusty. The back glass is busted out of it

and weighs more than I do so we can kill two birds with one stone. Here, we could put a swing gate with a tire mount on it. Shed a little bit of dead weight. Now, this body is far from perfect, but it's definitely solid enough to be repairable. All it's gonna take is a little bit of cash and a lot of sweat equity investment.

One thing we haven't talked about yet today is the engine. Now, this isn't the original 3 51 M that came in the Bronco. It's a 460

it'll bolt right up to our C six tranny

with a different oil pan and some adapters. This thing is gonna drop right in.

These engines were easily making 370 horses and over 400 ft pounds of torque from the factory.

So with a cam intake and car package, along with some freshen up, we're gonna have a torque monster that's cheap, powerful and reliable.

So what do we have? Well, we've got a solid foundation of bulletproof components wrapped by what some people consider to be the best looking Bronco body ever made.

All the pieces are here for us to build a solid, reliable weekend warrior that's not gonna bust our wallet if we bounce it off a couple of trees and rocks out on the trail

and all it's gonna take is uh a little bit of hard work just a little bit.

We'll tear apart our 460 big block to see just what kind of shape it's in and then it's the tranny turn.

Oh, man. Oh, looks like we may not be so lucky there.

Hey, welcome back.

We've got our second gen 79 Broncos spread out all over the shop. We took the rolling chassis to a car wash and cleaned off most of the mud and dirt and grease that was caked on the frame and running gear.

Now, we've already inspected for obvious damage and now we can take a closer look and really dive into this thing, get it on its way to return into the road and trail

all things considered. It's really in pretty good shape. We found normal wear and tear. Plus the signs of abuse of a vehicle that spent most of its life as a city or county service vehicle. In other words, it's been road hard and put up wet.

Now, getting a junkyard engine can be a bit of a gamble, especially if you got it for free like we did.

But there are a few things you can check to make sure you at least have a decent core.

Go ahead and rotate the crank, make sure it spins freely, then

check for bent push rods and broken valve springs.

Go ahead and take a look at the block. Make sure it hasn't spit out any freeze plugs from being full of water and sitting outside in the cold.

Let's see what we got here. Not a whole lot of carbon build up on that piston.

What you wanna check for is deep scoring in the cylinder walls or cracks or holes in the piston.

I think we're in good shape.

She's dry.

Oh, man.

What the hell is that? What first looked like? A handful of metal shavings turned out to be the remains of the nylon timing gear.

Probably not one of Ford's better ideas.

Lucky he didn't get pumped through the engine.

No, it definitely scored up a little bit and it will have to be turned down.

Looks like this. 460 is gonna be a great candidate for a rebuild. So we'll send it to a local machine shop. Have him hot tank it and clean it up for us. When we get it back, we'll try some old fashioned hot riding tricks to make some serious low end torque.

Now, from the outside, there's no real way to tell if this transmission is in good shape or not. So, we're going to tear this C six apart. See what it looks like on the inside.

The first indication of a worn out transmission is a burnt smell to the fluid.

A more telling clue are the hunks of metal and shredded clutches and that's not good.

Oh, man,

I don't know what that milky white stuff is

and there's plenty of debris in here.

I think she could use a rebuild.

Now with our automatic transmission out of the way, we can take a closer look at this NP 203 transfer case. First, I'm gonna show you guys something.

Remember that sloppy U joint we showed you earlier. Well, check it out. The U joint cap is busted, the needle bearings are gone and this thing hasn't seen grease in ages. I don't know how that thing even worked.

Now,

back in the transfer case, you can get a good idea of its condition by spinning the input shaft and running it through the gears

as you run it through each range, go ahead and spin the shaft and listen for any strange noises or feel for any binding.

This one seems to be ok.

I think maybe some new seals and a fluid change would be all right

up next.

Those rusty floors have got to go and that chassis has to go higher

and later it's a quick and easy alignment with just a tape measure.

Hey, thanks for watching trucks. We're knee deep in our low buck Bronco trying to get it a little bit closer to being back on the road like we showed you before

we got a little bit of Flintstone rod in these floors that needs to be fixed. Now, making floor patches out of flat stock is not very difficult, but it's even easier using the stamp steel patches we got

from L MC truck

just because your metal looks solid doesn't mean that it is, don't trust your surface rust, but a good rule of thumb to follow is if there's still paint attached to the metal, it's probably solid underneath.

Be aware of emergency brake cables, fuel lines and brake lines when you're cutting out floors

and now we can use a rusty floor

as a template to trim out our new patch panel.

Now, this first line that I traced represents the giant hole that we cut in the Bronco. The second line represents the metal. It's gonna lap on top of the original floor.

I'm using a pneumatic punch to punch holes all the way around the outside of my patch panel about 2.5 inches or about three fingers apart.

Now if you don't have a punch tool like this, just get a 38 inch drill bit and make sure it's sharp.

Now, if we were building a show car, we'd spend a lot more time creating a perfect but weld that would be invisible from all angles.

But an overlap weld is a common practice very strong and much faster

when you're working on a place without a pre stamped patch panel. Even an area like this with all these crazy angles is no more difficult. It just takes a different approach. I like to use cardboard and create templates.

And then once I'm happy with the shapes, I transfer it to a sheet metal about a 20 gauge flat stock, then

place them in.

Make sure I'm happy with the way everything's sitting and just burn it in like a regular wel.

Our front brakes didn't need anything except for some new pads and rotors. And since we were in there, we went ahead and serviced the wheel bearings.

So if your truck's been sitting for a while, like ours, it's a good idea to flush out the brake lines. Brake fluid, actually wicks moisture over time blowing out the lines and replacing the fluid. It's cheap and easy to do.

Now, out back, we're gonna throw in some new shoes with some fresh hardware. And since we're in there, we're gonna replace the wheel cylinders

and our drums, they're not scored up or grooved out. So we're gonna reuse them.

Now, we wanna lift this truck up. But if we go any higher than about four inches, you start having to think about custom length drive shafts and that gets expensive. Now with these bushwhacker flares, it buys us some clearance around the wheel opening and saves us from having to do this rust repair too.

Bushwhacker includes welding screw caps and detailed installation and painting instructions with their flare kits. If you're going for a more street look, but for us, they look great just the way they are and they've saved us about 15 hours worth of rust repair as well.

Yeah, man.

Now, like Kevin said, we want a little more altitude and attitude.

So we'll start by replacing the stock front suspension for this lift kit from rough country

that includes these obviously longer shocks, axle, sea bushings and check this out. They're much larger coil springs.

Now, you can see what a difference this kit makes.

They also provided us with two steering stabilizers, a track bar relocation bracket

and a drop pin arm.

Now here out back, the kids lift blocks, new U bolts and shocks allow us to use the original springs to get the height we want

during the break, our Bronco is getting a brand new pair of shoes

stick around.

Hey, welcome back. Well, our goals today have most definitely been achieved, which was to transform this worn out Bronco platform into a road and trail ready rolling chassis, not by spending a bunch of money but by rebuilding what needed to be rebuilt and getting it up in the air with an inexpensive four inch

kid.

We also took care of some bowling ball sized rust holes in the floorboards and gained a bunch of extra tire clearance by using these bushwhacker cut out fender flares, all making room for these 37 inch interco super swamper radials mounted on 15 by 10 black steel wheels that we got from summit.

Now, these flares combined with our lift, give us the room, we need to run these big meets without having to spend tons of money on some high dollar suspension.

And that is gonna be our theme from start to finish on this low buck Bronco project doing what most of you guys would probably do at home and rebuild instead of replace what's already designed to be rock solid and that's gonna get us out onto the trail faster and cheaper and we've got a heck of a start but there's plenty of work left. So stay tuned.

Now you saw us use a lot of L MC stuff on our Ford Bronco, but they're now offering chrome replacement bumpers and trim caps for your late model Silverado pickup.

These are triple nickel plated and stamp from new tooling using factory gave steel for strength. This thick nickel plating gives the bumper an extremely smooth surface before its final chrome plating, producing a high quality finish. The trim caps are made from chrome plated A BS plastic and will give your truck a fully chromed look up front.

LM C's new Chevy chrome replacement bumpers started just over 100 and 50 bucks. The chrome trim caps started just over 100

but here's something that can save you money and possibly a set of tires to boot. Now, you've seen us install lift kits and lowering systems on trucks without ever having done a wheel alignment.

The reason for that is because we get it in the ballpark and ship it off to an alignment shop. Now, this is something that you guys can do at home. It's very simple. The full weight of the vehicle has to be on the suspension. Well, if you're on a concrete floor like us, you can put your wheels in a set of these dollies, makes it real easy to adjust.

So find a common point of reference to measure from either the inside of the wheel edge or specific lug on the tread,

then just repeat that measurement on the back side of the tire in the same spot.

Now, your goal is zero toe or up to an eight inch toe in which would mean your front measurement is an eight inch shorter than your rear measurement and your tires would be pointing inward slightly.

Now, if you need to make any changes to your toe, just rotate the adjusting sleeve. Hey, thanks for watching trucks. We'll see you guys next week.
Show Full Transcript