More Haulin S-10 Episodes

Trucks! Builds

Parts Used In This Episode

Anest-Iwata Usa Inc.
LPH400LV spray gun.
Arrow Speed Warehouse
Ready lift torsion keys and shock relocation brackets.
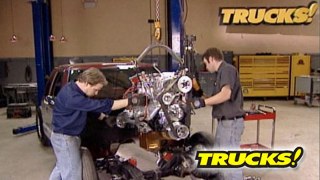
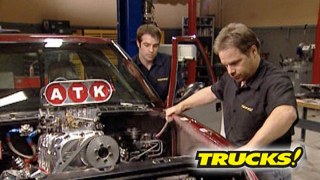
ATK Performance Engines
Engine block, prep work and final assembly.
Auto Body Color & Supply Co.
Spray booth coating from 3M, guide coat, sanding discs, scotch-brite, 3M respirator and breather hood, shooting suit, solvents.
Col-Met Spray Booths
Heated downdraft spray booth.
ITW Finishing International
Devilbiss desiccant hose assembly, pre-filter with desiccant tank.
Pattons Inc.
Compressors, lines and fittings, refrigeration unit for compressor system.

Video Transcript

Today, it's painting 101.

Ryan is doing his very first paint job ever to prove with the right approach, you can get great results. The first time you lay down paint

and later, don't worry, even if you do make a little mistake, we'll show you how to fix that too. That's all today here on trucks.

Hey, welcome to the shop.

Well, here at trucks, we've got projects sitting everywhere, vehicles on the go and like you guys, we're constantly looking out for the next coolest truck to get our hands on

and it feels like we're going 90 miles an hour sometimes trying to get these projects done and get them out on the road to where we can drive the snot out of them. And it's a great feeling to finish off a project and pay it off with lots of action shots on and off road.

But what we're really here

for other than to build cool trucks

is to show you some of the techniques and skills of our trade that we've picked up over the years and hopefully show you some things that you can use to make your projects easier to build

and that's what we'll do today. But we're gonna slow it down a little bit and pay attention to a subject that to some people of second nature and to others. Well, it's a little bit more intimidating doing your very first paint job.

Now, I'm not a certified mechanic, but I grew up around body shops and I've been in this trade a little longer than I care to admit. So, to me doing a paint job, well, it's fun and it's a lot of hard work, but it's something that I've done 1000 times.

But me, well, I've never painted with anything other than a spray can or a paint roller. And even though I've been through tech school and factory training and made my living as a mechanic for years, well, you rarely find somebody that's really comfortable in both the mechanical and the auto body worlds. So today we're gonna try a little experiment and even though I've never painted a fender, let alone a whole car truck, Kevin here thinks he can walk me through the process and show me how to get a great paint job right out of the gate. As a matter of fact, I know I can

and I know you can do it.

So if you guys are a little nervous about putting paint down for the first time, well, pay attention today because we're gonna use Ryan and Hall and S 10 and show you guys how to lay down killer paint the very first time.

All right. Now that you got me talked into doing this, where do we start? Well, let's start with some equipment. And the most important piece of gear that you can have in your shop is the air compressor. What I call the heart of the shop. Your compressor has to be able to keep up with the modern paint gun and the size of the project that you choose to paint. So does that mean we need a huge high pressure system? Not necessarily high pressure, just capable of high volume. Modern paint gun is a really sophisticated piece of gear and demands huge air volume and less pressure. So do we need a compressor this big? Well, actually this is a five horse pump with an 80 gallon tank and it is capable of about 14 CFM. Now, the general rule of thumb is that you need 5 to 7 horsepower at least 60 gallons of capacity and about 10 to 14 cubic feet per minute of air volume. So this compressor set up just about perfect for an all over paint job.

And when I'm talking about the difference between air volume and air pressure, here's a way to think of

you can have 40 P si going through this pipe and the same 40 P si going through this pipe. The obvious difference is that this is going to flow a lot more volume or CFM and air volume. CFM is what modern paint equipment depends on to properly atomize and break up the paint into a fine mist. Now, I've heard you say before that paint guns are similar to carburetors, they atomize and mix the air in liquid on a race car. You want the baddest most sophisticated

for the best performance does the same hold true with paint guns.

Well, when you're choosing a paint gun, you want to make sure that your gun matches your air compressor. And that doesn't necessarily mean reaching for the most expensive paint gun out there. Just a nice balance between supply and demand. Now, if you've got a smaller compressor, there are guns out there that require less volume, so it just requires doing a little bit of homework and figuring out what your gun demands and what your compressor can give and finding something in your budget.

Well, now that we're squared away on spray guns and the air compressor. Well, for the air hose, are there any special requirements? Well, this spaghetti is too long.

You don't wanna go any longer than 40 ft while you're spraying and make sure that your air hose is 3/8 inside diameter and your fittings are 38 ID fittings as well. Anything short of that you can cause pressure drops and rob your system of valuable CFM.

Now, every shop I've ever worked at has had some sort of basic dryer plumbed in line to keep moisture out of the air tools. I'm gonna go out on a limb and guess at a paint booth, air supply, I need something a little more elaborate. It really does. You have to keep the moisture and oil out of your system. Contamination can kill a paint job and cost you a lot of money if you guys are on a tight budget out there. Well, you've got some options. You can get a desiccate hose that goes from your air supply to your paint gun and does a really nice job of filtering things temporarily. It only cost you about 30 bucks.

The next step up is

pre filter system with a desiccant tank. The air goes through this side gets filtered three different times and then circulated in amongst moisture absorbing beads that really do a great job of winking the moisture out, cleaning your air supply before it gets to your car. But the Mac daddy of them all is a refrigeration unit. Like the one we got in our patent system.

When the air comes off the top of the manifold of your compressor, it's hot as it cools down. It separates. Well, what this unit does is it cools the air for you and separates the moisture from the air

and dumps it out. So you've got a constant supply of cool dry air for your paint job.

Now, I know we're a little bit spoiled with this nice Colt

paint booth

and I've seen guys do paint jobs in their home garages. Is that ok?

Well, the problem with that is it's just not very safe. It's not a professional environment and you can't evacuate all the air properly. You gotta remember these chemicals are hazardous. They're toxic and they're very dangerous to use. And most garages are attached to a house. What you should do is seek out a paint booth. You can rent them from body shops. You can go to a trade school or even in the larger centers, you can find a rent a booth. The bottom line, get a professional paint facility before you start.

Like I said, we gotta be safe so you can protect most of your exposed skin with the shooting suit.

What's sticking out the sleeves, you can protect with solvent proof gloves, but you gotta protect your lungs too. Now, this mask is ok for sanding, but it's not good enough for painting.

This one will protect you from the paint fumes. But the problem with this is that it's not protecting your eyes.

This one protects your eyes and your lungs. But

if you don't have a perfect seal around the edge, you can breathe in the fumes and that's not good.

But the best and safest way to paint is with a positive pressure system like this one, this has a belt pack and a battery powered turbine system that forces air up into the hose and into your helmet where you've got fresh clean air to breathe.

Well, now that I'm fully informed, I guess you're gonna make me do a little bit of work. You've got a lot of work to do

after the break. It's the job part of a great paint job. We'll show you the right way to prep your panels. Stick around.

Hey, welcome back. If you're just joining us, we're doing a little experiment sort at my expense to show you guys that with the right equipment and a little investment in preparation, you can get great results with your very first paint job.

Now, we've already talked about guns and compressors and safety gear. Now it's time for a little work. Yes, it is. And I wanna remind you guys again that Ryan has never painted before. So if he,

you can do it,

you can do it. And I guess we'll find out time will tell.

Now we've got a lot of ground that we're going to cover on today's show. So if you feel like you've missed anything, go to the truck's website, we're going to have all the basic information that we shared with you today on the website. Now, there's only two ways that you can make paint stick to a car. There's chemical adhesion and mechanical adhesion. Chemical adhesion is when two wet layers bond together as they dry or cure, then there's a mechanical adhesion

which quite literally puts a deep scratch into the surface and gives the paint something to hang on to. Now you've got everything from really coarse to really fine sandpaper and even, I know you don't need anything this coarse for paint to stick. You're exactly right. The paint and body world is kind of divided in half with grits from 36 on up to about two 20. Well, that's for shaping. What we're gonna be concerned with today is 320 on up into the thousands of grits. We're gonna start and sand our flats with 320. And then

we use these red scuffing pads that range from about 4 to 600 grit for the inside crevices and tight corners. So now we'll start with a couple of the small panels just to get you used to things.

Yeah. Soak down about half of it and then wipe it off with the one direction.

What the solvent does is it lifts the contaminations up off the surface and then you wipe them off. Then you're ready for sandy.

You want to sand the part until the gloss is gone. Checking your progress as you move over the panel.

All right. So how do I know when I'm done?

Well, look around, you see any shiny spots?

No, except on my forehead.

Well, I do, I can see it from here.

Oh, here's a holiday. Look, here's a shiny spot, darn it. There's another one

here

with the D A sander. Keep it as flat as possible and move it in even pattern over the surface. So you don't create low spots that may show through the paint,

then finish up the shiny spots with a red scuffing pad.

We've got the paint gun loaded up with an alcohol and water mix that's safe to spray so we can get Ryan up to speed on gun technique. The hose is preset at the 20 pounds inlet pressure that this gun needs and this is an Iwata LP H 400 LV. One of the guns that doesn't require a lot of air inlet pressure. Nice gun here.

Control up

there.

This is the inlet pressure control. This stays wide open.

This is the fluid control and it's adjusted by pulling the trigger fully open and turning the knob clockwise until you feel the trigger start to move.

The fan control gets set almost wide open with the control knob turned 1 to 1.5 turns in

good. Now, those are generic settings for almost any gravity fed paint gun. You might want to tweak a little bit once you get in the mix, but that's gonna get you at a good starting place.

Now, this is kind of a silly looking but effective training device that I've put together here. The brush represents the proper gun distance about six inches from the surface and you just want to brush the surface.

All right, keep in contact and stay parallel, keep your gun straight up and down as you're making your pass.

Ok. Now, make a couple of passes, but start ahead of the panel and paint past the panel. Give it a shot.

Ok. That's good technique. But what you did right there, you stopped, you keep it half triggered. So no paint comes out, but the air stays that way. You don't get paint build up on your edges. Ok?

Yeah,

perfect.

Now, starting with smaller panels is less intimidating and the Sealer is more forgiving than paint. So Ryan gets to practice maintaining proper gun distance

with color in the gun. It's easy to see if you're making a 50% overlap on each pass. That way, each code is even

when you finally get to the clear coat stage, it's very important to spray past the panels and eliminate that build up on the edges that causes runs

when we come back. It's paint by numbers, then the paint's gonna fly

and later it's easy overspray protection.

Hey, welcome back. We're in the middle of my very first paint job here on Hall and S 10

and Kevin's got me sporting this ultra cool protective suit.

Now, I've already shot Sealer color and clear on the grill bumper and tailgate. So next is the rest of the body

and we prepped the body the same way we prep the other parts with 320 on the flat surfaces and red scuffing pads in the tight corners and crevices. Now, one of the cool things about paint and body work is that there's more than one right way to do things. So I'm going to show Ryan and you guys what I consider to be the best place to start and stop on a paint job, whether you're working on a truck or any other vehicle.

But before we spray anything, we've got to clean the surface properly. So we're using a two stage cleaning system that starts with a glass cleaner. A glass cleaner will pick up things like fingerprints and organic debris that the solvent cleaner won't touch.

Now, the second step after the glass cleaner is to wipe the truck down with solvent, this will lift off any remaining contaminants. Just remember to spray on heavy and wipe off in one direction.

And what you don't want to do is start at one corner and paint your way around the vehicle. That way you end up with a lot of dry spray. So I'm going to show you a technique I call leapfrogging. So you're going to start right here at the roof,

paint your way into the middle of the roof

and once you hit the middle, come over to the other side of the truck, pick up your wet edge and paint it down to the edge of the roof. How far down do you need to drag it about six inches past your roof line?

And once you're done with the roof, you come to this rear corner of the vehicle and hit your bedside or quarter panel. Step four this side. Exactly, because step five is back on this side again. What you're doing is you're sequencing your way and you're working your way up chasing your wet edges, getting a nice uniform coat

with five being the driver's door,

passenger door is number six.

And we leap for

from that door over the fender, pick up the wet edge, work our way up the fender. Continue on to the hood, paint the hood till you get to the middle. Walk around. Pick the wet edge up from the middle. Never start in the middle. Paint your way down across this side. Continue to this fender which is going to be the last panel. Step nine.

Start your fender work your way down. If you got any dry edges, you can dust them in, then then you're ready for the next coat. Cool. Let's get started. Come ready.

As the saying goes, experience is the ultimate teacher. So after Ryan got confident with smaller parts, I mostly just stood back and let him use the techniques he learned earlier on the truck body.

But the best advice I can offer to any new painter is take your time. Don't get trapped into thinking you have to hurry because you don't

just relax and concentrate on proper gun handling technique, keeping your sleeves and air hose out of the paint and laying down even coats

up next, we'll show you how to fix any runs drips or errors. Stay tuned.

Hey, guys, welcome back to the shop. Well, we're out of the booth and the truck's painted

and I guess you're probably wondering how it all turned out because you paint body. Guys know that the last step is the clear coats and that's the most important part that makes or breaks a paint job.

And let me tell you, have you never painted before? I thought my arm was gonna fall off before it was all said and done with.

So all in all, I guess the paint job turned out. Great

Ryan hit one out of the park.

The color is even

the clear coat has a beautiful gloss

and the custom trucks yellow that we had mixed by auto body color and supply. Well, it knocks your eyes out

but it's not perfect. There's a little bit of orange peel here and there and over here on the fender. Well, let's just say we got a flow meter. There's a gravity indicator, a run of the clear coat. Now, I was pretty bummed about this, but Kevin seems to think it's no big deal and I'm hoping you've got to fix with this too. Actually, I do and it's not as complicated as you might think. So, check it out.

Now, with this technique, we're literally shaving the run down level with the surface of the rest of the paint using a single edge razor blade and dragging it

one direction on a 1000 grit paper. What does that do?

It actually creates a bur

on the edge of the blade and really evens it out and then you be a

slight U shape into it. We'll take this and playing down the run

this. I gotta see

now we can feel the run, but you can't see it very well. So we're gonna use a graphite powder that's normally used for guide coating primer surface and blocking to show it up. And you can see it right there

with the ends of the blade turned up, scrape along the top of the run with light pressure until you level it with the rest of the clear coat. Then with dry 1500 drd on ad A blend, the scraped area into the rest of the panel by sanding it,

switch to 3000 grid this time lubricated with water and go over the repair two or three times.

Finish the repair with a buffer and three M trisect

rubbing compound buffing it back to a full gloss.

Yeah, it's gone. Run your hand across that. See if you can feel it

sweet, nice and smooth. It does work quick too.

If you've got a torsion bar suspension on your truck, you know that by adjusting the bars, you can get a couple of extra inches of lift, but it messes with ride quality. Well, now ready Lift offers these forged torsion keys that re index the bars and give you the lift that you want without sacrificing ride quality. They even throw in a set of drop brackets so you can reuse your stock shocks and you can pick this set up up for less than 230 bucks at your local o'reilly's.

Well, I guess now that I'm an expert painter, here's a little tip for you earlier today when we had this thing in the paint booth, we had the tires and wheels wrapped in paper and all masked off. But Kevin warned me that overspray gets everywhere. So he passed on a pretty cool little tip. He had me cover the tires and wheels in this paint booth coating

the booth coating gets sprayed on with a regular paint gun and after it dries it forms a barrier between your painted chromed or aluminum pieces.

It just takes one wet coat and about five minutes to dry

and then the overspray sticks to the coating instead of your parts removal is just as easy. You can peel it off or hose it off with water in a matter of just a few minutes.

Now, that ought to really save you some time with the polishing cloth.

Thanks for watching trucks. We'll see you guys next week.
Show Full Transcript