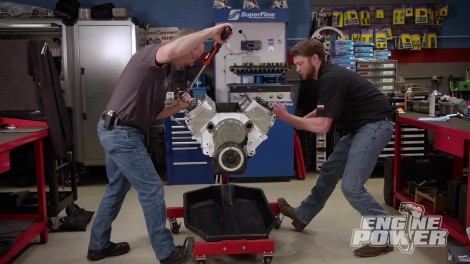
Engine Power Featured Projects

Engine Power Builds

Parts Used In This Episode

Summit Racing
ATI Super Damper Harmonic Balancer
Summit Racing
Cometic MLS Head Gaskets
Summit Racing
COMP Cams Magnum Solid Roller Camshaft
Summit Racing
COMP Cams Pushrods
Summit Racing
COMP Cams Sportsman Solid Roller Lifters
Summit Racing
COMP Cams Ultra Pro Magnum XD Rocker Arms
Summit Racing
COMP Cams Valvetrain Assembly Spray
Summit Racing
Earl's Performance Fittings & Adapters
Summit Racing
Edelbrock Super Victor II Intake Manifold
Summit Racing
Summit Racing Valve Cover Gaskets
Summit Racing
Summit Racing Valve Covers
Summit Racing
Trick Flow Specialties Rocker Stud Girdles
ARP
ARP 8740 Head Bolt Kit
ARP
Bolts & Fasteners

Episode Transcript

(Pat)>> You're watching Powernation!

(Pat)>> After several valvetrain and top end upgrades our big block Chevy will be ready for the high revving life of a hot rod engine. [ engine revving ] [ Music ]

(Pat)>> Today in Engine Power we are gonna be working on an engine you'll probably recognize. This is our 496 cubic inch big block Chevy, but it is missing one distinct thing. The other engine that used to be hooked to the front of it. Yes, this is one half of our twin engine build we did a while back where we built two identical engines, dyno'ed them separately, and then hard coupled them together and dyno'ed them at the same time on the same dyno. That was a lot of fun and a little nerve racking at times but we made it happen. To see how it all came to pass check this out.

(Frankie)>> Considering the stresses they would experience, both engines got parts designed for performance and durability including a forged rotating assembly, hydraulic roller cam shafts, Summit Racing Equipment's billet double roller adjustable timing sets, and Trick Flow Power Port 320 Fast as Cast aluminum cylinder heads, Weiand Track Warrior intake manifolds, and QFT 1050 c-f-m annular discharge carbs finished up the top end.

(Pat)>> Engine-A made 596 horsepower and 629 pound feet of torque. We swapped the engines to test Engine-B, which is the power plant we are working on today. It was good for 607 horsepower and 632-pound feet of torque. After connecting the engines and running them together they produced 1,183 horsepower and 1,229 pound feet of torque.

(Frankie)>> We had big dreams of putting both of these engines in a single project but the way the cookie crumbled Twin-A has already been put into a truck project, which was perfect for the combination it had. Twin-B however is slated for a street hot rod project. So, we're gonna have to make a few changes for that application. It's all gonna be centered around trading out our Trick Flow Power Port 320s for a set of their Power Port 365s. These are gonna be topped off with an Edelbrock Super Victor Two, and for the ultimate in valve train reliability and durability we're gonna trade ours out for a Comp Cam solid roller and their solid roller lifters. We're even gonna add some rocker stud girdles from Trick Flow that are designed specifically for their heads. Because this is gonna be a well driven street car and maybe even a daily driver we're gonna be using Holley's Terminator-X 4,500 Stealth Unit. This was designed around their Dominator carburetor and even looks like one. For accurate cam and crank signal we're gonna be using an MSD Dual Sync distributor. All these parts are gonna take that ground pounding torque, move it up in the r-p-m range, and give us some big naturally aspirated pump gas horsepower. It's also gonna be a cool representation of what a few different parts choices can result on the same bottom end. We really hate breaking these engines up, but just like in any breakup this engine has to hit the gym and get swole.

(Pat)>> GAINS! Our teardown will start with the removal of the giant Hooker Super Comp headers that were designed to fit a Corvette with side pipes. We won't be reusing a lot of these parts but since they only have a few hours of dyno time on them we'll keep them in stock for future projects. [ Music ] A lot of times big block Chevys, this is a really common thing. If the bottom of it is not sealed up it is very common that it will pull oil down an intake port and it'll smoke. We always take special care to prevent this during assembly, and ours were sealed up tight. [ Music ]

(Frankie)>> Really like to put stuff in bags because then you can keep track of everything. When you go to put it back together you're not looking around for the bolts. It's kind of a pet peeve of mine.

(Pat)>> The condition of our hydraulic roller valvetrain is excellent. There's clearly no premature wear because there's no metal shavings anywhere under the valve cover.

(Frankie)>> Although we're not reusing the valvetrain on this project we'll make sure to keep everything organized and in order, inspecting the parts as they come off. [ Music ] [ drill humming ] [ Frankie whistle ]

(Frankie)>> That looks really nice. [ drill humming ]

(Frankie)>> To perform our cam swap we'll disassemble the front of the engine and drop the oil pan enough to remove the timing cover. Finally, we can remove our hydraulic roller camshaft. This cam made big torque, and will certainly find another home in a future build. Coming up, if you want rock solid stability at higher r-p-m a solid roller valvetrain is hard to beat.

(Frankie)>> Now that we got our engine fully torn down we can start installing some of our new parts. And like we said, that's gonna be focused around switching the hydraulic roller setup for a solid roller one. People usually have some concerns with running solid rollers on the street. They think that they won't last or that you'll have to be constantly adjusting the lash, but we know from personal and professional experience this simply isn't the case. Solid rollers have some inherent benefits over hydraulic rollers. The biggest one being that the higher spring pressures allow for much more stable valvetrain at almost any r-p-m. They also have more accurate lift and duration during operation because they don't have any hydraulic action in the lifter that can fluctuate. Lastly the higher spring pressures also allow for more aggressive cam lobes, which can usually mean you can make more horsepower. There are a few negatives to solid roller valvetrains but they're not that major. The biggest one that turns people off is the fact that you will have to add a little bit of maintenance to your schedule in terms of checking the lash around every oil change, but if nothing is going wrong the lash should not change and usually only takes about 10 minutes to check. Secondly, hydraulic roller lifters were invented to have a quieter valvetrain and solid rollers can have a little bit more mechanical resonance. If you have a car with a mild exhaust or something a little bit louder that's usually not a big deal either. Lastly, because of the higher spring pressures at low idle r-p-m the cam lifters can sometimes not receive enough splash lubrication, but there's an easy fix to this. You simply raise the idle a few hundred r-p-m. For us in this street application the pros far outweigh the cons. So we went to Comp Cams and got one of their off the shelf solid rollers. This cam has 267 degrees of intake duration at 50 thousandths lift, and 276 degrees of exhaust duration at 50 thousandths lift. The lobes are set on a 110-degree lobe separation angle, and lift at the valve is 739 thousandths on the intake and 742 thousandths on the exhaust. We're also gonna pair that with a set of Comp's Sportsman solid roller lifters that have needle bearings in the rollers, which is gonna be great for longevity on the street. All we have to do now is get this cam installed and get it degreed. This cam is right out of Comp's catalog. So, it has an off the shelf grind. It's part of their Oval Track Series. We'll mock up the timing set with the timing gears aligned for zero advance or retard. Like every engine, we degree the cam, and on this setup we put the intake center line at 108.5, which is one and a half degrees advanced. A critical step on a larger cam like this one is to accurately check piston to valve clearance. With the correct head gasket installed and the cold lash set we have 140 thousandths on the exhaust side and 67 thousandths on the intake. Now that everything's all set up where we want it we can install the cam button with some orange thread locker on the bolts and torque them to 28-pound feet.

(Pat)>> With ample silicone to go with the old silicone the front cover and oil pan are bolted back on. The ARP 12 point hand bolts in black oxide finish snug it down. The ATI damper is reinstalled next.

(Frankie)>> That's where I'm from.

(Pat)>> Because the timing cover was removed we have to make sure to reset true t-d-c on the pointer. Valvetrain installation begins with Comp Cam's Sportsman solid roller lifters with needle bearings for extra durability. Our next big upgrade on our 496 is going to be the cylinder head package. Now the 320s that we pulled off are a great head and they worked fantastic for our application, but because we are changing the operating range and the horsepower of this engine with a solid cam we needed some more induction. These are Trick Flow's Power Port 365 c-n-c heads. This 365 refers to the size of the intake port, 365cc, and it is fully c-n-c ported. Moving to the combustion chamber, it is 119cc, also fully c-n-c'ed, and they house stainless valves at 2-350 on the intake, 1-880 on the exhaust. Speaking of the exhaust, our exhaust port is raised 300 thousandths fully c-n-c'ed and is 135cc in volume. The spring package on this is a serious player. This is a 1-645 diameter triple spring. Now these setup at 345 pounds of seat pressure at our install height of 2-110. They have a titanium retainer with 10 degree locks that are machined steel. Now these heads flow a ton of air, 411 c-f-m at 700 lift, and 418 c-f-m at 800 lift. Our cam's net lift is in the 750 range. So we are right in the sweet spot of that. Best of all, these will bolt right on where the old ones went no problem at all. Cometic m-l-s head gaskets in a thinner 27 thousandths thickness will tighten up our quench area nicely. Combined with our new cylinder head we have a measured static compression ratio of 10.55 to 1. These heads and gaskets were in stock at Summit Racing Equipment, and we got them in no time at all. These heads have the same bolt column heights as the 320 heads we removed. So, we're able to reuse the ARP 87-40 head bolt kit. The heads are torqued in multiple steps to a final value of 70-pound feet. Up next, the big block gets a front accessory drive that's simple to install and looks super slick.

(Frankie)>> And then we're off to the dyno cell.

(Frankie)>> We ordered these high-tech one-piece push rods from Comp Cams. They are three-eighths in diameter, have a 135 thousandths wall thickness, and are 9.750 long on the exhaust and 8.780 long on the intake. To handle our high solid roller spring pressures we're using a set of Comp's 1.7 ratio Ultra Magnum XD steel rockers. We'll install them in the firing order and temporarily set them at zero lash. We've already aligned the guide plates and torqued the rocker studs to 55-pound feet.

(Pat)>> The rocker stud girdles are installed next. These will provide extra support to minimize rocker stud deflection and improve valvetrain stability. It's very important that the lash is set with the girdles installed and tight. Our cold lash setting is 12 thousandths on the intake and 14 thousandths on the exhaust. Weatherstrip adhesive is used to hold the intake gaskets in place. These SCE gaskets are recommended by Trick Flow and are matched to these heads. We've painted this Edelbrock Super Victor Two to match our engine. It has a larger cross-sectional area to complete our upgraded induction. [ Music ] To improve coolant distribution we built these coolant crossover lines using Earl's a-n fittings and hose. They are our go-to because their swivel seal fittings are high quality and easy to assemble. Comp's Valvetrain Assembly Lube will protect the springs and rockers on initial startup. With that we'll reinstall our Summit Racing gaskets and valve covers to seal up our top end.

(Frankie)>> In order to get our engine ready for the street we're not only using Holley's fuel injection but we're also gonna be using their new big block Chevy mid mount accessory drive. It's all based around the water pump housing, which should look pretty familiar because they designed it based off an LS/LT style water pump, which means it has a cartridge style water pump and integral bracketry. So, everything in the kit bolts directly to it so it's easy to assemble. This kit comes with quality components like a type two power steering pump, an SD-7 a/c compressor, and Holley's own alternator that's based off a Corvette design. It comes with all the pulleys you need and even includes things like an idler bracket and the correct size belt, covers to give the kit a clean look, and all the fittings, hardware, and pigtails you need to put it together. It should be really easy to assemble. So, let's get it on. This pulley is designed to bolt right to the balancer, but it can be machined to fit a crank trigger system if necessary. The kit comes with O-rings or paper gaskets to seal the water pump housing. Because our stock block has a mild amount of corrosion we opted to use the gaskets and a little bit of silicone. The instructions come with torque specs for every fastener. The three-eighths upper bolts are torqued to 30-pound feet. Putting together the rest of the system is super simple. Everything bolts right in place and we don't have to worry about pulley alignment. Once the belt and all the covers are installed we'll take a good look at this slick front drive. [ Music ] We're gonna be topping this engine with Holley's Terminator-X Stealth 4,500 throttle body injection unit. Now this thing is massive. And like we said, it's based off the Dominator design, and even is supposed to look like one. But it's designed to flow a ton of air and support a bunch of horsepower. It has two and an eighth inch throttle blades that flow up to 1,440 c-f-m, and underneath the mock fuel bowls it has eight 100-pound an hour injectors. So it can support up to 1,500 horsepower naturally aspirated and 1,250 horsepower under forced induction. We're probably not gonna be using all that, but that's pretty cool and that's a ton of power. It has an o-e quality wiring harness that's nicely routed, and it goes into the same Terminator-X e-c-u that Holley uses on all their Terminator-X units. So it's really easy to hook up, and this one only took about five wires to get it ready to run. It has a really nice self-learn function that lets the unit adjust the fuel flow to match your desired a-f-r on its own, and it has a really easy startup wizard. So, it's quick and easy to get this engine running. You can do all of that with the included hand held, or if you want to get a little bit deeper in the tune-up you can use Holley's free laptop software. In order to give the e-c-u an accurate crank and cam signal we're gonna be using MSD's Dual Sync distributor. These are really nice because it's a plug and play unit, and it allows us to use the integrated ignition timing control in the unit so we can build a custom ignition curve for this engine. Because it's plug-n-play this whole thing should be really easy to install, and we should have this engine running pretty soon. With the fuel lines hooked up and the wiring harness plugged in, we're bringing it home for the big win. Up next, another good day in the dyno cell. Oh snap!

(Pat)>> For all intents and purposes we have a different engine. It's the same engine, same bottom end, but with the induction change and the stuff on the front of it it's a different engine. We're gonna have to run it different. We ran it and it actually fired up nice. We have target air fuels where we want. We messed around a little bit with timing and we made some easy pulls, and everything seems happy. I think we're gonna change the r-p-m range. So I'm gonna go 3,500 and go to 6,000 and see what that pull looks like.

(Frankie)>> This is like a street engine. So, I feel like this would be the streetable range. Where you'd be when you're driving down the street, you step on it. This is what it would be do. It's not gonna make peak power in that range. We already know that because we've cam'ed it, changed the induction to move the peak torque way up in the range, move the horsepower way up in the range, but I think this'll be a good indication of how the engine would drive down low.

(Pat)>> People think that if an engine makes power way up high in the r-p-m range that it doesn't drive well down low. Simply not the case most of the time because of gearing and because we have something that's very adjustable from a fuel standpoint. On something like this it will meter fuel and behave very well.

(Frankie)>> And a lot of times when you're driving around you're at partial throttle, you're in a transition, which is where the fuel injection is really nice because it's really easy to compensate for that. You can tune it in very easily. Let's see what she does.

(Pat)>> Love the sound of this thing already. [ engine revving ]

(Pat)>> We're already better than where we were. 642 horsepower and 567-pound feet! Now it's still learning a little bit.

(Frankie)>> 567 right at 5,000.

(Pat)>> We're nowhere near peak.

(Frankie)>> That's still gonna go up. That's pretty cool. 496 cubic inches, peak torque at 5,000 r-p-m. I think we've got to step up that range a little bit.

(Pat)>> I'm gonna step it way up.

(Frankie)>> We put this combination together where it would make good peak torque. We're down a little bit from where it was before because the combination has completely changed, but now we've changed it so that it will make peak power somewhere in the 6,800 to 7,000 range.

(Pat)>> I'm gonna say close to 7,000. To make sure we hit the peak I'm gonna go 7,200. I'm gonna make a pull from 4,500 to 7,200. [ engine revving ]

(Pat)>> Ultra clean, right through the pull. 730 horse, 574-pound feet.

(Frankie)>> Peak horsepower is still happening right at 7,200. That's right at the top of the pull.

(Pat)>> We can turn it high. We're starting to get into a piston speed situation where it's starting to get a little spicy.

(Frankie)>> At 7,200 it has an average piston speed of over 5,000 feet per minute. That's pretty fast!

(Pat)>> That's okay cause we have good parts, and we have a good crankshaft in it. We have an H-beam rod with an L-19 bolt in it, and we have a good piston in it. I think we can get a little bit better. Let's mess with the timing a little bit.

(Frankie)>> We were at 32 degrees, which was relatively conservative cause pump gas. We're on 93 octane right out of the pump. So, we usually keep'em pretty safe, but we made a big jump. 32 to 36, relatively large jump. So let her rip! [ engine revving ]

(Pat)>> I think it broke 750.

(Frankie)>> Oh snap! 752.5 at 7,100. The graph, we can overlay them, but it pretty much looks the same. Instead of looking like it was gonna keep going it kinda dipped over. 586.9-pound feet at 6,000, which that's just cause that torque curve is so flat.

(Pat)>> See how the graph is literally identical. It just moved it up. A little timing goes a long way. What do we got?

(Frankie)>> 1.517 per cube. That's pretty good for 93 pump gas right out of the pump.

(Pat)>> When you're above 1.4 on pump gas you're doing well. Anything after that is a bonus.

(Frankie)>> Having the full accessory drive and the fuel injection is kinda what helps tame it into a street engine.

(Pat)>> I'm impressed with Holley's system too.

(Frankie)>> It literally bolted right on there, it looks great, and it gets you everything you want in a nice compact space. We could drop this in anything. We could put it in a truck, car, whatever and it would fit.

(Pat)>> I dig that!

(Frankie)>> Good job!

(Pat)>> For more exciting builds like this bad to the bone big block check out Powernation.
Show Full Transcript