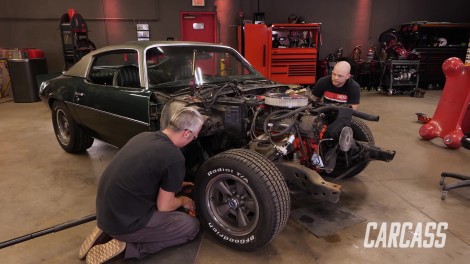
Carcass Featured Projects

Carcass Builds

Parts Used In This Episode

Summit Racing
Radium Engineering RA-Series Fuel Cell

Episode Transcript

(Jeremy)>> You're watching Powernation!

(Jimmy)>> On this episode of Carcass we have a new project in the shop. We take our ragged out 1972 split bumper Camaro and start turning it into a high performance race car.

(Jeremy)>> We discuss the power plant and start stripping it down to make room for all our new parts. We start cutting on the old body to make room for some mini tubs and a new fuel cell. [ Music ] [ engine revving ] [ Music ]

(Jeremy)>> Hey everybody, welcome to Carcass. Now we've transitioned off of our Datsun and we're finally ready to get our hands on our new project. It's actually been something that we've wanted to touch for about three to four months now, and it should be a great start to what we have in mind.

(Jimmy)>> So this is our 1972 Camaro Rally Sport with the famous split bumper on the front, and the goal with this car is just to be a full tilt race car. And we have built race cars here before, and pretty respectable at that, but this thing should be even a few levels above those.

(Jeremy)>> And this isn't the first Camaro we've built. We have done one before, but for you guys that are purist out there this isn't even as nice as a 20-footer. We have had this up on the hoist. It's got good bones underneath it. We don't have to put a floor in it or do any major rust repair, but as far as the outside of the car goes it does have its flaws. Somebody has run into something up here with the nose cone. So, there's damage up there. The hood's got two really big buckles in it either from somebody trying to close it too hard, or wind catching it and it opening up as it was driving down the road. Plus underneath the vinyl top here in the back there are a couple of bubbles forming. That means there's some rust underneath there but nothing too concerning for us as far as the way the project goes. All in all, this is a great start to what we want to do with it.

(Jimmy)>> The plan for this is to go a completely aftermarket suspension. Do a nine inch in the back so it will remain a solid axle car. Do the cage work, and it will be a little more extensive than what we've done in the past. The doors will be completely gutted. There won't be any glass in the car. We'll do a plexi-glass windshield and want to do a little bit of carbon fiber work. It's gonna have big brakes and we want to do brake ducting, things like that. So there's a lot more work to it than what we can even explain, but something that's really cool is we have a four speed dog box that ran in an actual Nascar. So, it has seen the oval. And for the engine Pat and Frankie have a great plan as to what's gonna go into this thing, and the four of us have discussed in detail what that's gonna be. So for the viewers can you explain what's gonna go in it, why is it cool, and why does it fit our car?

(Pat)>> One thing, we're gonna keep it small block because it's easier for you guys to fit things up to it, and I like the small block because it's gonna help with your weight bias, it's gonna help with handling, but that doesn't mean it's not gonna make good power.

(Frankie)>> It's gonna be a pretty unique small block. It's Motown LS, which is a hybrid block. It's actually a small block Chevy bottom end but you can bolt LS induction on it. So that allows us to have a really solid bottom end with great windage control, things like that. It's easy for you guys to get parts for, and it's easy to find parts that bolt to it, but we can get the benefits of a good LS induction. Something that'll make good power. So it'll be a high compression real race engine. It'll make over 700 very easily but it should be an anvil that you guys can beat on around the road course.

(Pat)>> It's gonna have a really wide power band. I'm not sure what you have for gearing but for this type of operation you're gonna have to have a wide power band. So no matter when you stab the throttle it'll be responsive.

(Jimmy)>> Especially for a couple of amateur drivers like ourselves that's really gonna help out. What about, you guys say it's a real race engine. Being around you guys we understand what that means now but what does that mean to someone who doesn't know about the racing world?

(Pat)>> These things have better durability parts in them, and you need the durability because of what it's gonna see for r-p-m for abuse. So it's gonna have better valvetrain, and it's gonna have high quality crank, high quality rods, high quality pistons. This particular engine it's kinda like a street engine on steroids but a true race engine does. These take a little bit more maintenance, a little bit more babysitting to make sure they're always running good. There's nothing wrong with that but that's what differs a street engine from a race engine. Race engines are higher output and they take a little bit more care to keep them running right.

(Frankie)>> Everything we build is application specific. A street engine spends 95 percent of its time idling around or low r-p-m cruising. With a race engine it's spending 95 percent of its time at its maximum output or somewhere in there. So, the parts are stressed a lot more. Even though the amount of time they're being stressed is lower, they are being stressed more. So the parts really have to be good enough to hold up to that, and there is some extra maintenance involved but that's just kinda what goes with building a race car.

(Jeremy)>> So the reality behind this car is it's gonna be a real race car. It's not gonna see any time on the road. So as far as us beating on this thing it's gonna take a beating. So, we need something that's gonna withstand how we drive.

(Jimmy)>> And we'll have you guys out at the track to maintain this for us because we don't want to be responsible for such a cool and expensive engine.

(Pat)>> We wouldn't have it any other way. Part of doing the engine is, in a real race operation, is the engine builders go with the car, and they're the ones that are responsible for how well it runs. The adage is the chassis builder gets you to the finish line, the engine builder determines when.

(Jimmy)>> I like that!

(Jeremy)>> Sounds like we have a plan. I think from here on out we know what we have to do. You guys know what you have to do. I think it's time for us to grab some tools and let's get this car apart, and we'll start on our end. You guys just let us know when we can come down and maybe hear our engine run.

(Pat)>> You'll hear it on the dyno for sure.

(Jimmy)>> Gonna rattle the building.

(Jeremy)>> Let's get some tools.

(Jimmy)>> Thanks guys! The tear down begins! We start gutting our '72 Camaro to start with a blank canvas, making way for all of our new racing components.

(Jeremy)>> Now that you guys know a little bit about what we plan on doing with the Camaro let me give you a little bit of history on the car itself. This is what's considered to be a second gen Camaro. They ran this from about 1970 to '80 or '81, and ours is a little more unique in the fact that it is considered a split bumper Camaro, and that's exactly what it sounds like. In the front you only have two small, short sections of bumper on each side of the car and that's split in half by the grille or the nose cone of the car. So they switched this up in '74 and they went with a full aluminum bumper up front, and then later on they decided to go to a urethane bumper, or the plastic bumper, just for safety regulations and stuff like that. So our car is a little unique in the fact that it is a split bumper Camaro. This is also unique in the fact that this car doesn't have a full frame underneath it, or a full chassis. It's what's considered to be a uni-body car. Uni-body pretty much means when they built the car, including the floor pan, it's a bunch of pieces of metal that are bent specifically, and it's all welded together, making kind of a frame section that's part of the entire car. Now on the other side of that it does have a subframe, which is like the front frame section that bolts into the uni-body. The subframe houses all of the front suspension and the steering. Plus it gives the engine and transmission a spot to mount to, including the cooling and the core support and stuff. So when we got to take this car apart it's actually gonna be quite simple. We're gonna take the front clip off the car, and the front clip consists of the hood, the two fenders, the nose cone, and the core support, radiator, and stuff like that. Then from there when we got to take the engine and transmission out we're just gonna unbolt the subframe, which consists of about six bolts. As we take those six bolts out we're gonna pull the subframe, the suspension, the engine, and the transmission clean out from underneath the car and it'll just give us a really good platform to start building out the roll cage and what not. Now our car does have a 350 in it, or at least that's what the air cleaner says on the top. It's also a three speed automatic car, and the odometer shows 46,000ish miles. We're not sure if that's really 46,000 or 146,000 because back then GM only ran five digits in their odometer, which means it only read up to 99,999 miles and then it restarted over. So, it started counting back from zero. So this car could either have 46 or 146,000 miles on it. Really just with the condition of the car we're probably just assuming it's gonna have 146,000 miles on it just because it's pretty beat up for what it is. Now our car is a little higher optioned car. It does have air conditioning, power steering, power brake. Plus, it's got the vinyl top and the spoiler on the back, and it also is holding the Rally Sport badges on the side. Now with this being what would be considered to be a higher optioned car. Don't get us wrong. It's not that nice of a car, but it is a perfect platform for us to start building our race car. Nothing else connected here?

(Jimmy)>> We're good.

(Jeremy)>> That's jack's spinning! It's gonna fall off. Let it fall. Oh, it's sitting on the exhaust. Look at that, that works! [ casters rattling ]

(Jimmy)>> Nice. [ drill humming ]

(Jeremy)>> Here's one thing we did notice once we got the fender off. The car's been hit over here on this side. There's an old school repair here. It's really nothing we're too concerned about, and just one more reason why this is the perfect candidate for us to build a race car. Now the structural integrity out here we're really not too worried about. Solely for the fact is we are gonna have a roll cage in the car. So, all of the strength is now gonna be in that roll cage. From here we're gonna transition inside, start getting rid of the interior, and make way for all of that to work. Stay tuned! To make sure we have plenty of traction on the track we need wider rubber. We start cutting on the body of our Chevy, making room for much larger wheels and tires.

(Jeremy)>> Hey guys, welcome back. We started gutting the inside of our Camaro including the full interior, dash, and we also removed the rear suspension. This will give us a clean slate to start with. [ saw buzzing ]

(Jeremy)>> Now that we've got everything out of our way our next task is to start removing the stock wheel tubs. With this car becoming a real race car we have to make way for a wider set of wheels and tires. Using a template, we marked out our cut lines, suited up, and got to work. [ saw buzzing ] [ Music ] [ saw buzzing ] [ Music ]

(Jeremy)>> A job like this is a whole lot simpler when you don't have to worry about any interior pieces. This process can be done without removing the full interior but it sure does make it a lot easier and a lot safer. [ saw buzzing ] [ Music ] [ saw buzzing ]

(Jeremy)>> Following our template, I'm cutting on the inside of our lines just to be conservative. I'll slowly start grinding away a little more material as we start test fitting our pieces. [ air saw vibrating ]

(Jeremy)>> So now that we have this giant hole cut in the back of the car, we're gonna be mocking up our wheel tubs. Now these are made by Detroit Speed, and we picked them up at Summit Racing. The idea here is to gain a couple extra inches on the inside of the car to run a bigger set of wheels and tires. A bigger set of wheels and tires means you have more traction, and traction can win you races. We're gonna be running a 315 square around this car, but you could possibly run up to a 335. Now with this kit they also send you some flat pieces of steel. Now they send them to you flat for a couple of reasons. One, they're just a little easier to ship. And two, the variations in your cut lines between person to person can be different and change. So, you have to bend these into shape to match the contour of your cut line. The reason why you're doing that is when you go to install your wheel tub you're gonna have to have some kind of a lip to weld this wheel tub to. So the idea here is to take these pieces of steel. You're gonna have to set them into place, and make couple of marks with a Sharpie, and you're gonna have to bend them to kinda match the contour to build this lip. Now you can do that a couple different ways. You can take this over to a bench or a vice and you can start bending them into shape. You can just use solid muscle with your hands. They're not that heavy, not that hard to push, but it could be a little bit of work. Or if you have a hammer and block of wood you could do that too. So what we're gonna end up doing here is setting them up here into place. We're gonna grab a Sharpie, make a couple of lines. We'll go over to the bench vice. That's the easiest one, and we're just gonna bend these things into shape. [ Music ] Somewhere in this general area. [ Music ] On some of these bends you need to sneak up on the radius. So little bends spaced apart evenly will give you a nice sweeping curve. We'll set this in here. It's close-ish. We've got one bend done but we've got to do a couple more bends to get it to fit right. Mark it here and we'll bend it again. [ Music ]

Other bends call for a little more persuasion. [ hammer banging ] [ Music ]

(Jeremy)>> Okay, well that fits pretty good. One thing to note is you're gonna wanna leave this little flange up a little bit from the floor of the car. The idea here is to mark a line on this big flange, take it off, cut it so it matches the floor contour, and then from there you can weld it in. It'll give you a nice corner joint to weld and give you a good finished look. Now we're not gonna be installing these. We're actually not even gonna install the inner wheel tubs, and we're gonna do that for a couple of reasons. One, we do have a roll cage that needs to get in here, and this is a good access point. Plus, we've got a fuel system to tackle. The third thing is we're gonna be doing some suspension work down here, and it's just beneficial to us to keep this all open so we can tackle that a little bit later. So what I'm gonna do is kinda finish the back. I'll create this flange, put a couple of bends in it, and we'll go ahead and tackle that fuel cell.

(Jimmy)>> Before we start building out the roll cage we need to make sure we have room for our fuel cell. We mockup and cut out the best place to accommodate the new tank.

(Jimmy)>> The next thing we're gonna work on is getting the fuel cell in the back of our Camaro. We just want to get as many components back there as we can right now. That way when we go to build the cage we kinda know what we have to work around, and that way we don't have to go back later and change some stuff. So, we've got this awesome setup from Radium Engineering. They sent us a fuel cell with all the good bits on the inside. They also sent us this cage to actually install it in there, and this saves us quite a bit of fabrication work. We'll talk about this later when we actually go to plumb the car, but for right now we're just gonna try to get this in the back of the Camaro. Now there are a few things to consider when you're deciding where you want to put your fuel cell. In most cases you'll probably end up somewhere in the back of the car just like our Camaro, and in our case we're gonna cut out a big rectangular hole and sink this thing down as far as it'll go. You still have to be mindful of how big the fuel cell actually is. If ours was a little too wide it could potentially interfere with the rear axle or other suspension components as they go through their motion. Something that's really cool in high level race cars that you could also do is put the fuel cell in the passenger compartment, and what this will do is concentrate more weight near the center of the car, making it more responsive to the driver's inputs. A good example of this is something like a figure skater. When they have their arms in they tend to spin really fast, and when their arms are extended they spin much slower. So in our case we feel like going in the back of the car's gonna be just fine. What I'm gonna do here is actually just flip this thing over, mark out the rectangle, and we'll cut it out. [ Music ]

[ saw buzzing ] [ Music ] [ saw buzzing ]

(Jimmy)>> We don't have to be too precise with the cut here because the fuel cell cage has a nice, big flange on it. [ saw buzzing ] [ Music ] [ saw buzzing ] [ Music ]

(Jimmy)>> The reason why we are sinking the cage down into the floor is because it'll help keep the center of gravity lower overall. [ Music ] [ saw buzzing ] [ Music ] [ grinder buzzing ]

(Jimmy)>> I'll clean up the edges with a grinder before grinding the paint off for future welding. [ grinder buzzing ] [ Music ] [ grinder buzzing ]

(Jimmy)>> Okay, so holes cut out. This thing should fit no problem, and it does. However, right now it's not sitting flush with the floor, and that's because on the bottom here there's these tabs, two on each side. So, I'm just gonna set this back in, mark out where these little slots need to be cut, cut them out, and then this thing will sit nice and flat with the floor. [ Music ] [ saw buzzing ] [ Music ]

(Jimmy)>> Got the cage in here now, and it sits nice and flush with the floor. I don't need to put the fuel cell in but these look really cool. So I just wanted to take a peek at it, but this will give us a pretty good idea of any obstructions we might have when we're fabricating the roll cage and the rear firewall. So, we're not going to tack anything in right now just because we'll probably be taking these out and putting them back in several times. When we go to put it in the final time I'll just do a stitch weld around the outside and that'll be a good installation.

(Jeremy)>> That looks really good! How did it go?

(Jimmy)>> All good! This will be a nice location for the fuel cell, and we're starting off in a good direction with some high quality parts.

(Jeremy)>> I've got the passenger side pretty much buttoned up for the wheel tub area. I just have to bend and add these two pieces to the drivers side and we'll be ready for the roll cage.

(Jimmy)>> With everything in it we'll have a really good idea where the rear of the cage is gonna land. We've done a lot of cages before but this one's gonna be a little different because there's a few unconventional fabrication techniques we're gonna use to build it.

(Jeremy)>> Some cut lines that are gonna be a little crazy. I'll get these in and we'll keep moving on. [ Music ]
Show Full Transcript