
More Budget Buggy Episodes

Xtreme 4x4 Builds


Want more content like this?
Join the PowerNation Email NewsletterParts Used In This Episode

A&A Manufacturing
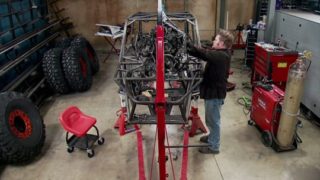
Body mount tabs.
Ballistic Fabrication
Ballistic Hybrid Coilover/Air Shock and coil springs.
Branik Motorsports
7075 Aluminum Long Arm Links, Available in 1-1/2", 1-3/4" & 2".
O'Reilly Auto Parts
Exhaust Tubing
O'Reilly Auto Parts
Torch kit
PSC Motorsports
Steering Control Valve (Orbital), HD Double Ended Cylinder Link Kit, Rear Steer Directional Valve, Double End Steering Cylinders, Performance Pump Kit, Power Steering Pulley.
Ruffstuff Specialties
Custom battery relocate box
Sniper Fabworks LLC
Mounting bracket for orbital valve.
Trail Gear Inc.
All new parts, no used housings or internal parts. Ready to drop into your axle. Third members feature top quality ring & pinion gears and lockers. V6 units feature larger OEM style V6 gear sets with longer pinion gear. Each unit is setup with solid pinion spacers for long gear life. Triple drilled flanges included covers common driveshaft patterns.
Trail Gear Inc.
Creeper GussetsTM, Upper Axle Gusset.
Trail Gear Inc.
Dirty 30's - 30 Spline Birfield/Axle Kit.
Trail Gear Inc.
TG High Pinion Housing, Ring & Pinion Set 5.29 ratio, Detroit Locker V6 & High Pinion.


