More '70 Chevy Camaro RS "Limelight" Episodes

MuscleCar Builds

Parts Used In This Episode

Auto Body Color & Supply Co.
Coker Firestone Wide Oval
Summit Racing
Summit Metal Polishing Kit
Coker Tire
Auto Body Color and Paint Supply
YearOne
Year One Kit
Yokohama Tire
Power Tool Box

Video Transcript

Today on Muscle Car, it's a lime. It's a pickle. No, it's project limelight. We're turning back the clock on our Camaro to 1970 with a groovy green paint job. Tommy shows how to refurb. A set of steel wheels and stainless trim. Plus, Rick lays down a set of Z 28 stripes.

Hey, welcome to Muscle Car project. Limelight is taking a huge step toward living up to her name.

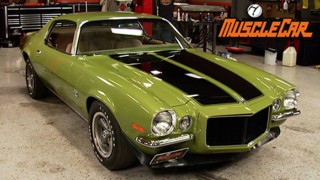
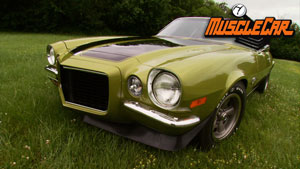
Today, she's gonna get a few coats of citrus screen, which is not only a factory color for a 70 Camaro, but it's the original color of this car.

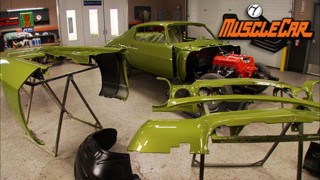
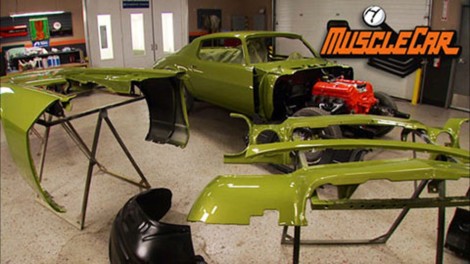
Now, we've already taken care of the little bit of sheet metal and body work. Then we went two rounds with the priming and blocking. Followed that up with the final wet set of 400 grit and now

she's ready for paint.

We've masked this car really thoroughly to prevent overspray and even mask it to the floor to keep our freshly painted undercarriage looking good.

Now, if we're doing a chalk mark restoration and we'd actually want some overspray underneath because from the factory, these things were not exactly perfect. They had visible overspray in areas like the sides of the cow and pretty much the whole underside of things, but we're going for a cleaner look. So we

got all that stuff covered up.

Well, y'all may have noticed that I'm on the injured list today. Working on cars is a pretty serious business with all the cutting and grinding and such.

Well, you wouldn't think masking up a car is all that serious of a hazard. Well, I proved that wrong. Masking the roof off. I pulled a clip off and bashed my hand against this pinch. Well, and I'm here to tell you nine stitches later. Y'all pay attention what you're doing in the shop. Always.

Now, before the color goes on, I'm gonna lay down a coat of sealer. Now, some guys think that this is kind of a wasted step, but it does serve several different purposes. It helps fill in any scratches left over from your final blocking. It creates a barrier between all of your body work and your top coat. It gives you a nice even color to lay your base coat down on

and it helps your base coat stick better.

I'll use my Awada base code gun that I got from Power toolbox.net to spray the sealer. I'm not gonna use a primer gun because primer guns have a lot larger orifice to move thicker material. Well, sealer is only slightly thicker than base coat. So I can go ahead and use the same gun.

The fluid tip used for primer also requires a different air cap to break up the larger volume of liquid. So make sure to use the right gun for the material you're spraying,

check out the full

I water line at power toolbox.net

sealer comes in many different shades but grays are more easily covered by the base coat. Make sure to pick one the same tone as your base color. This green gray will be a good match for the citrus green going over it.

I'm spraying the fenders at the same time as the body to help ensure a match. Any change in temperature or humidity can cause a color variance especially in metallics. So it's a good idea to paint as much at one time as you can.

This is why the doors and deck lid have already been mounted to the car.

Of course, you still need room to move around without bumping into your wet panels. So don't pack in too much. The hood and nose pieces will be done in a separate batch.

Now picking a color for project limelight was easy because we really like the factory color that was on it. Citrus green. All we had to do is check the trim tag for the color code and give auto body color and supply a call. A trim tags can usually be found on the firewall cowl or radio to support sometimes on the driver's side door jam. So you might have to look around a little bit

if you're trying to match an existing paint job and don't know the code, take a panel with you to your paint supplier and they can mix up a custom match.

Or if you don't know what you want, ask for a color chip book and browse until you find one, you like

always spray with the gun perpendicular to the surface and keep the overlap pattern very consistent, especially with metallics or you could get stripes and splotchiness.

Three full coats go down first, then a light dust coat that will ensure the metallic color looks even

coming up. Rick adds some more shine the limelight and later, Tommy does some shining of his own.

Hey, guys, welcome back with all the base coat down on project limelight. We can go one or two ways. If you're adding graphics to a car like stripes, you can either put them under the clear, which means I'd have to spray them now or you can go ahead and spray the clear now and add the graphics last

on limelight. I'm gonna be

and the stripes down over the top of the clear and I'm doing this for a couple of reasons. First of all, when these cars were originally built, they didn't have any clear coat. They were all shot in single stage. Second reason is these are actually Z 28 stripes if you wanted them on an SS. Well, the dealer had to add them later.

If you're doing your graphics under the clear, then make sure the panels are correctly aligned either on the car or on a rack before laying the graphics out.

Adjust like base coat, keep the pattern consistent with about 50% overlap. Pay attention to how it's acting as it hits the surface and adjust your technique as you go,

we painted the panels ran everything through a bake cycle and let it dry for a day. So we're ready for assembly. If your booth doesn't have a bake cycle, wait at least a couple of days before handling the parts,

we'll tackle the front clip first. Now the factory assembled it off the car and then drop the whole thing on as a unit. Sounds pretty good. Right. Well, they had a specialized jig to set all the parts on without running the risk of banging anything up. We don't have one of those specialized jigs so we're gonna be doing this the old fashioned way piece by piece, starting with the core support.

Everything is built off this piece. So leave it a little loose to allow for adjustment. As the front clip goes together,

the inner fenders need to go on either before or with the fenders. Don't try to jam them in after the fenders are mounted.

Assembling a car is a lot like putting together a puzzle parts need to go on in a specific order. If you get it wrong, you're gonna waste a whole lot of time having to redo it. A parts assembly manual cuts out all the guess work. Your one offers these for most muscle cars and trust me, they're worth. Every red cent assembly has also made

with a master body kit. If you're doing a chalk mark type restoration, well, odds are you're gonna be reusing some of your original hardware, but if the stuff is damaged, it's gonna have to be replaced regardless. Now, this kit from year one comes with everything pre bagged and tagged that way, there's no searching around to try to find

what you need.

This is where working with an all original car really saves a lot of frustration.

These pieces are already familiar with each other. So we're just reuniting old friends with the help of some new hardware.

And

so

I,

I am

at this point, the front clip is just about finished, but the core support and inner fender bolts are still loose to allow final filling of the hood. Once the hood and fenders are square in the line, we'll tighten them all up.

Sounds good over here.

It doesn't look bad train profession.

Ok.

We got this

up next. Turn your old steel wheels from, that ain't right to out of sight. And later, Rick earns his stripes.

Hey, welcome back to muscle car. Now that we got the body painted and looking great, we can turn our attention to the wheels. Our car came with 14 inch rallies and that doesn't exactly scream performance. So we're upgrading to the Z 28 wheels, we'll gain an inch in diameter and an inch in width. So that means we'll get a lot more rubber to the road

build on a budget muscle car projects that save you time and money,

you can buy rep pops. But we're gonna show you how to refurbish. An original set, painted steel wheels with stainless trim are really common with muscle cars. So this process can be applied to more than just the Z 28 wheels. Factory wheels are coded just like engine blocks. If you want to identify a set check for the size and date stamp on the rim. Some are also coded near the valve stem hole. Z 28 used this style wheel from 70 to 80

one. The earlier ones were painted gray and had an oval valve stem hole. The 77 ups were painted body color and had a round valve stem hole. These don't have the oval that we'd like to have but painted gray. They'll be plenty good enough for our build.

The first thing we need to do is straighten out the lip, a flat spot here and there is ok, but make sure the wheels aren't warped. If you have doubts, take them to a tire shop and have them checked

next, smooth out any gouges or Nicks use a metal file instead of a grinder to prevent scratches, don't remove too much. Just knock down the rough edges doing this step before blasting will leave a nice even surface.

You could try to chemically strip these. But believe me, it's worth a few extra bucks. It will cost to have them blasted.

I'm using glazing putty to fill in any nicks and scrapes.

Once it's dry sand, it with coarse grip paper like 80 or 120

move to 180 or 220 grid to shape it then smooth off the scratches with 320 or 400.

I've got about four hours invested in these and it's amazing how much better they look just getting the old paint off of them DP primers up next, which is the same stuff we used on the body. You can get good results out of a spray, can just be sure to use the next primer for better adhesion

after blowing them off, wiping them down and giving them a quick once over with the tack cloth. I can get the spraying.

I'm doing the backside first, then I'll flip them over and cover the rest.

I'll give them two coats for a good barrier against rust.

Early seventies Z 28 wheels used a specific paint formula that original lacquer is no longer available. So I gave our buddies a call out at auto body color and supply and they hooked us up with a formula to match that original flat gray.

The new formulation is a urethane base coat just like we used on the car.

After two coats of vase, I'll let it dry for about 15 minutes. Then lay on two coats of semi gloss. Clear.

Nothing ruins a good looking set of wheels worse than some scuffed up, dented up trim rings and center caps. If you can't find replacements or if your originals aren't messed up too bad, you might try fixing them up.

This process works for all kinds of stainless trim. As long as you can get to the backside of the damaged area,

work slowly and gently using a hammer with a tip that matches the size and shape of the area you're fixing.

I'm using a metal file to find the low spots, not to remove any metal, just skim it over the surface and you'll see what still needs work. You'll probably go through this process of hammering and filing several times to get the shape just right.

Send it with 180 grit followed by some 320 to get rid of the scratches left by the file before it's polished.

The next step is to buff out the tiny scratches left over from the sandpaper. This buffing kit from Summit Racing comes with all the compounds to shine up just about any type of metal on a car. From copper and chrome to steel and aluminum. You can even shine up plastic and the buffing wheels that come in, the kit will fit any shop grinder,

apply the compound to the wheel, not the trim and make sure to wear gloves because these things can grab the trim right out of your hand, which has been known to lead the trips to the yard,

let the wheel run over the entire surface. If you've done everything right, they should polish to a shine really quick.

I'll get the emblems glued to the center and they'll be as good as new

after the break. Learn how to lay down some lines.

You're watching muscle car for a DVD copy of this episode, just go to Power Block tv.com and order your copy for just 595 plus shipping and handling. Start your own muscle car collection delivered right to your door from the power block.

Hey, guys, welcome back while Tommy finishes up the trim rings and center caps, I'm gonna get the stripes laid out. Now, there's a few different ways that you can do this. If you're going for a non original look, then lay them out. However you want, just keep them symmetrical. But if you're going for a factory recreation of the originals, then there's a couple of ways that you can do this. You can get a stripe kit, which is basically a big sticky template

or you can use a picture of an original car and go with the measurement method, which is how I'll be doing it.

The first step is to find the center of the hood by measuring both the back and the front,

use a soft tape measure to prevent scratches. And don't worry, the marks will come off with a little polishing compound

mark, the center line with eight inch tape and this will be your main reference for laying out the stripes.

The emblem is going back in place to use as a guide.

Now, when you're using pictures to help you lay out graphics look for things like vents in the cowl, the distance to any emblems and the distance in your body lines or curves

by looking at how the stripes run from the cowl vents in my picture. I know where they should start and how wide they need to be.

I can also see how they're positioned around the emblem to get the correct length.

Now, looking at how the stripes follow the body lines on the hood will get me the rest of the way there.

And once I get the first stripe laid out, I'll take measurements to recreate it on the other side.

This way, I know that they're going to be symmetrical

with the basic shape laid out. I can come back and mark the rounded corners using rolls of tape and sandpaper as templates.

I'll run a line of quarter inch tape inside the original marks to create the outline of the outer stripe.

This will be removed before I paint and next comes another strip of quarter inch tape inside the last one,

this one marks the gap between the inner and outer stripes. Now I can remove the tape I laid to mark the outer stripe and mask it all up for paint.

I sanded down all the big areas with 400 grid. Then went back and hit all the edges with a red scotch bright. Now, if I was shooting these stripes like a high metallic silver, then I would have used something finer like a 600 grid and a gray scotch bright. That way, the sand scratches wouldn't come back through. But with a single stage black we're using on these, this prep would be just fine and we got it all scuffed up masked up. Now we're ready to lay down some black

when you're painting graphics on panels assembled to a car, make sure to mask inside all the gaps where the black will travel under the masking paper and get all over the body and interior.

After two coats, I got plenty of coverage

and here she is. After letting her sit for about four hours, I pulled all the masking off to reveal our new stripes.

I tell you, I can really see why these things were a popular dealer option. I mean, to give the whole car a new attitude, I got the trim rings and centers all finished up, then wrapped the wheels in a set of Firestone wide oval bias plies

just like it would have had when it was New Coker tire specializes in factory rubber.

So they are the place to go if you want a stock looking tire.

If you guys want more info on tires or anything else you've seen on today's show or wanna watch a full episode of Muscle Car online. Check out power block tv.com.

Well, the exterior project limelight is looking awesome and that means that we can turn our attention to the interior, but for this week we're out of time. So until next time we're out of here.
Show Full Transcript