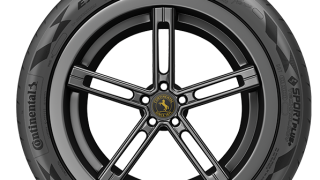
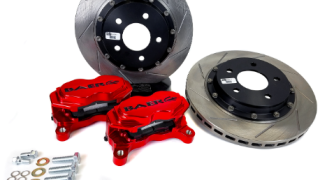
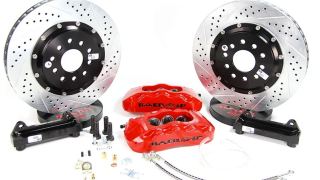
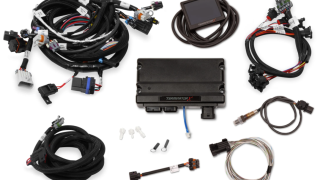
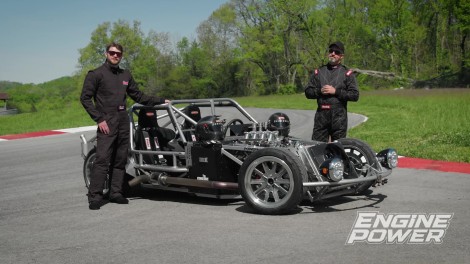
Engine Power Featured Projects

Engine Power Builds

Parts Used In This Episode

Summit Racing
Mishimoto Front Wheel Spacers
Summit Racing
Mishimoto Rear Wheel Spacers
Summit Racing
Summit Racing Fire-Retardant Clothing
Summit Racing
Summit Racing Race Harness
Summit Racing
Tremec TKX Manual Transmission

Episode Transcript

(Pat)>> You're watching Powernation.

(Frankie)>> Today on Engine Power our Dyno Sled is fully functional, and it is hitting the chassis dyno for some horsepower numbers at the tire.

(Pat)>> And we take it to the track to see how our car and our engine handles the straights and the corners at the road course. [ engine revving ] [ Music ]

(Pat)>> Hey everyone, welcome to Engine Power. Today is an exciting day in the shop because we have a fun day planned with our Dyno Sled. This engine is a 410 cubic inch stack injected LS mated to a TKX 5-speed transmission. Now you've seen us do a lot. We've dragged this car out of the woodwork and got it running, and it is strapped down to the dyno to see what it's gonna do.

(Frankie)>> This engine was tuned on our engine dyno, but that mostly deals with wide open throttle tuning. So we want to get some partial throttle tuning in to tune in that drivability for when we're ripping this thing around the track. And selfishly we also want to know what it's gonna make at the tire. We're also gonna make a few other upgrades today, maybe some brakes and new tires, and then eventually we will be ripping this thing around the truck. But if you're not familiar with this contraption that you're looking at here is a look in the way back machine.

(Pat)>> After dragging our Type-65 Coupe-R out of storage, clearing out the cobwebs, and removing our track tested 3-speed automatic we got to work on bringing new life to this project with this 410 cubic inch stack injected LS that we built on the show and it made 590 horsepower and 523 pound feet of torque at the crankshaft. We paired it with a Tremec TKX transmission setup from Summit including a Ram 10.5-inch dual disc clutch and a hydraulic throw out bearing.

(Frankie)>> After getting the powertrain in our Dyno Sled we set about converting the rest of the car to a manual system with a new clutch master cylinder, reservoir, and stainless braided lines. Then we plumbed fuel, cooling, and exhaust for the engine before installing a plug and play Holley Terminator-X e-f-i system to control it, and their 6.86-inch dash to monitor the vitals. We left off last time with successfully firing it off for the very first time in the car.

(Pat)>> One of the first things we had to get for this rig was a new battery because the one that had been sitting in it had been sitting in it for a long time and it was basically junk. So a quick call to our local AutoZone and we picked up a brand new Duralast Gold. Now Duralasts are legendary for their performance and durability, and the Gold Series are made to meet or exceed any o-e-m application for their size. These Gold have the most amount of plates and grids in them. So you get that maximum amount of cold cranking amps. Our particular car requires a Group-34 battery. So it fits great, has 800 cold cranking amps. All I've got to do is make a few simple connections and we're spinning this dyno roller.

(Frankie)>> We got power, we got everything strapped down, nothing's leaking. So we're gonna get going here. [ engine starting ]

(Frankie)>> Chassis dynoing gives us an easy way to tune the partial throttle areas of the fuel map like we aren't able to on the engine dyno. To do this we'll run the engine through the r-p-m range at varying loads below full throttle and make adjustments to the fuel table in each area based off the data. We can get the partial throttle fueling brought in really quickly, and with everything up to temp move on to wide open throttle pulls. Make a run in third with our gear. We'll go from 3,500 to 6,500, just like the engine dyno. [ engine revving ] [ engine winding down ]

(Pat)>> That's pretty good right there. 476 and 433, which is pretty interesting because think of what has changed when it went in this car. We went from a two-inch primary long tube header to a cast iron manifold with full exhaust and mufflers.

(Frankie)>> That's what is convenient to fit in the car, but it's gonna knock a little bit out of it.

(Pat)>> Everything sounded okay. Nothing fell off.

(Frankie)>> I think we're ready to make another rip here. [ engine revving ] [ engine winding down ]

(Pat)>> Wow! Overlaid almost to the number, 476 and 433 for torque again. How's everything look?

(Frankie)>> This thing was within two percent of where the fuel needs to be. I'm super happy with that.

(Pat)>> As far as tune is concerned I'm happy with where it is for a pump gas deal.

(Frankie)>> That's always our limiting factor. You've got to make a rip in this. This is awesome. Let me get out of here so you can do it.

(Pat)>> I have to put a phone book behind me cause I can't reach the pedals. [ Music ] [ engine firing up ]

(Pat)>> There's no steering wheel.

(Frankie)>> You don't need that. [ engine revving ] [ engine winding down ]

(Frankie)>> Just printing numbers. Just overlay after overlay there. So 476.34- and 435-pound feet.

(Pat)>> Everything being right that's what it should do right? When you have a stabilized temperature, you have a stabilized valve. All of your fluids in the chassis are stabilized and it should just right over the top of each other.

(Frankie)>> That's awesome! I was excited before and now I'm really excited. There's no leaks. Transmission works perfect. Couldn't get any better.

(Pat)>> Now the fun is almost ready to begin because we still have more work to do. So let's get this thing off there and get it on the lift. Not bad if I do say so myself.

(Frankie)>> Up next, we break down the rest of the upgrades on our Dyno Sled.

(Pat)>> We were very pleased by how our Dyno Sled performed on the chassis dyno. Our stack injected 410 LS ran fantastic. Even though we converted it from a full size big tube header on the engine dyno to a set of cast iron exhaust manifolds and full exhaust for the chassis dyno it still laid down an impressive number. So since we've increased its acceleration capability we now have to improve its stopping power.

(Frankie)>> This car came with SN-95 front suspension like we said before. It also has stock style SN-95 brakes, which is an 11-inch rotor and a single piston floating caliper. That's fine for street use but this car's going to the track. So we need a more performance oriented brake system for the front because the front does between 60 and 70 percent of the braking effort in a front engine car. That is why we reached out to Baer Brakes and got one of their 13-inch big brake kits for the front of this car. These are designed to bolt directly to an SN-95 spindle. So that's a 1995 to 2004 Mustang. So the kit comes with 13 inch drilled, slotted, and vented rotors that are a two piece design but they come pre-assembled, and they also have a zinc coating on the rotor for rust prevention. The big piece of this is the 6-P six piston calipers that are a fixed caliper design. So we will have to shim those out, but this is gonna greatly improve the clamping force that we can put between the pads and the rotor and increase our stopping force. The kit comes with these billet mounting brackets that bolt directly to the spindles and all the hardware we need to do it, including stainless lines and the fittings to convert it over. This should be pretty easy to just bolt right on and go, but we do have to get that stock stuff off first. The first step is to install the mounting bracket and hold the rotor in place with a lug nut so we can mockup the assembly. Because this is a fixed caliper design that means it is solid bolted in place, and because it has pistons on both sides we need to make sure that it is centered on the rotor so those pistons are equal distance from it and acting evenly on it when we apply the brake pedal. So what we're gonna do is bolt this up here with no pads in it, put these Allen bolts in, and then we will measure the gap between the rotor and the caliper on both sides, figure out the difference between the two, and then divide it by half and that will be the amount of shims we need to put behind the bracket to center up the caliper. 832 thousandths, 630 thousandths. So that's roughly 200 thousandths difference. So we need a one hundred thousandths shim to move that caliper out and center it on the rotor. With the correct shims installed between the spindle and the bracket we can put the assembly together for real. These pads come with the kit and are Baer's aggressive compound for high stopping force. The caliper's bolted down with them installed, and to wrap it up we can bolt on the stainless brake line from the car into the caliper with new sealing washers. Pat can do the same process on the other side and the front brakes are ready to be bled.

(Pat)>> We'll use this bottle bleeder to catch the fluid from the caliper, and it will keep the escaping air from going back into the system when the pedal is returned to the resting position. Hit it now?

(Frankie)>> Go ahead and give her a pump.

(Pat)>> Middle pedal.

(Frankie)>> Yeah, the middle one.

(Pat)>> Excuse me! Did you hear that?

(Frankie)>> I did hear that.

(Pat)>> I've got it all the way down. The bubbles coming out?

(Frankie)>> Yeah.

(Pat)>> It feels good.

(Frankie)>> Opened the bleeder a bit too much. I think that's it.

(Pat)>> Hold on, all the way up!

(Frankie)>> One more. That seems clear. I'm gonna tighten it back up. See what it feels like.

(Pat)>> Right there.

(Frankie)>> Alright, brakes are bleed. So the fronts are completely done but we want to upgrade the rears to match as well because the 2015 Mustang rotors are pretty big but it only comes with a single piston floating caliper. So we got one of Bear's rear brake upgrades as well. This is their drag race kit for S-550 Mustangs. So it comes with a billet four- piston fixed caliper and the matching rotors for our front. So these are drilled, slotted, vented, and zinc coated. Somehow this kit is even easier to install. All we have to do is slide our new rotor over the hub, bolt our caliper to the stock spindle, hook up lines, and bleed it just like the front. There's a lot of bleeding on this car.

(Pat)>> Indeed! We are tired of not having traction on our Dyno Sled.

(Frankie)>> So up next we get some new tires on our Dyno Sled. Maybe we wheel, maybe we won't.

(Pat)>> Our Dyno Sled laid down a nice number on the chassis dyno, and we can't wait to get this thing to a track. But like the old saying goes, baby needs a new pair of shoes. So we're rolling down to our resident tire machine and Frankie is gonna hook us up.

(Frankie)>> You're probably wondering why do we need new tires? Those ones look pretty good, but in reality tires have a life of about four to six years where the rubber starts to decompose, and these have been on there for way longer than that. So we reached out to Continental to get a new set of tires, and they hooked us up with one of their sportiest d-o-t lines, and that is the Extreme Contact Force tire. This is a great summer tires, and for reference it has a treadwear number of 200. So it's very soft, but the compound was designed to have consistent lap times at the track. For sizing we had the same as before. So a 295/30-18 in the back and a 245/40-18 in the front. This is gonna work great on our Dyno Sled. So let's get them installed. The first step is removing the valve stem cores to release all the pressure. Then using the bead breaker on the tire machine to push each side of the old tires into the center of the wheel. We'll internally clamp the wheel in the rotater and use the tire changing pry bars and the machine's duck bill to remove the old rubber. To make it easy to slide our new Continental tires over the rim we'll apply some soap compound to the bead sealing surfaces on the rim and the tire. With a low profile tire like this we'll use the machine's pneumatic arms to keep the sidewall depressed in the wheel's inner groove during installation to keep the tire bead from being over stretched. Once the tire is rolled on completely we'll use the inflator in the machine to seat the beads and set the tire pressure at 30 p-s-i.

(Pat)>> Each wheel and tire are then mounted to our in-house balancer. After getting an initial spin we can apply adhesive weights to the inside of the wheel as to not damage the wheel lips and balance all of them within one tenth of an ounce. To make the wheels clear our new calipers we are using a set of Mishimoto wheel spacers we got from Summit Racing Equipment. They have the same bolt pattern, and after being torqued onto the hub we have plenty of clearance to torque our new wheels for good. We are getting down to the final details before getting our car out on a track. Before we do that we decided we are gonna give it an oil change. It's had a bunch of engine dyno time and a bunch of chassis dyno time. So before we get pounding on this thing on a road course we decided we are gonna put in some fresh oil, and for that we contacted Shaeffer's and got some oil for our application. Shaeffer's has been manufacturing petroleum based lubricants since the mid-1800s, and they were partly responsible for the western expansion in the United States at that time. Fast forward to modern times they are synonymous with high quality racing lubricants. If you've ever been in the pits at a race you've probably seen Schaeffer products. We have a couple of different versions in front of us. First their 9,000 Series. This is a full synthetic gasoline engine oil. Their supreme 9,000 full synthetic improves engine durability and fuel economy by keeping the engine exceptionally clean and free from sludge and carbon build-up. This oil withstands high heat up to 300 degrees or more but still lubricates well at lower engine temperature. They have a variety of different weights for your daily driver applications, but we will be using their Supreme 7,000 Series that adds an additional amount of zinc. That protects not only flat tappet camshafts, but general wear in the rest of the high performance engine. Not only do they manufacture high quality oils but a lot of other things that you will find useful like spray lubricants, hydraulic oils, greases, things like that. We are gonna be using 15-40 for our rig. So let's get it changed. After draining the old oil we'll fill our new filter and tighten it down before going top side to replenish our engine with the Schaeffer's lubricant.

(Frankie)>> With fresh oil and fresh rubber we are ready to load this baby up and take it to the track. Up next on Engine Power we take our Dyno Sled to the track and we see what it can do. ( )>> Looks like those Engine Power boys have gotten themselves into a heap of trouble!

(Pat)>> We have made it to the track. It is a beautiful day, and we are out in the Tennessee countryside. Actually in Fayetteville, Tennessee at PTC, Polecat Training Center. This is an absolutely gorgeous facility and we cannot wait to put this rig through its paces.

(Frankie)>> And since the last time you've seen us we have made a few upgrades, mainly in the safety department. We added a set of Summit Racing five point harnesses to strap us in when we're going around, and also I got a Summit Racing fire suit, a set of GForce shoes, a carbon fiber helmet, and a set of Crow Safety Gear gloves so we can remain protected because with this guy you never really know.

(Pat)>> We're gonna see how long it takes to run out of talent.

(Frankie)>> Let's go!

(John)>> Polecat Driving Academy is open wheel cars where we do two day SCCA open wheel formula introductions and drivings, to where anybody who wants to have an experience or go get license for their SCCA NASA. We're on 430 acres of land. We're in kinda a boxed canyon. The track itself has 120 feet of elevation change. Everybody who has come loves it. They enjoyed the different challenges that the road course has. [ Music ]

(Pat)>> You all buckled in?

(Frankie)>> Key this thing up.

(Pat)>> It's like giving my son a first time to ride in a hot rod. [ engine revving ]

(Pat)>> First lap what we're gonna do is take it easy and warm the tires up. [ engine revving ]

(Pat)>> Whoa! How many times do we have an engine that we don't get to use in an application? People think, oh, that's just a dyno engine. Hell we're out here on the track beating on it, and it's not missing a beat. This thing runs awesome.

(Frankie)>> This is a sporty car being this light and having this much power. It is quick!

(Pat)>> I am by no means any sort of driver and this is painfully obvious. If it's not going straight I can't really drive it that good.

(Frankie)>> Looking up and seeing that stack injection is so cool! What's great is with that rear gear and the TKX with the wide ratio it's paired perfectly, and having that Holley dash in the center so we can see everything is perfect. It's a perfect fit. [ engine revving ]

(Frankie)>> It's crazy in a car this light with those Continental tires how much lateral-G you can pull. [ engine revving ]

(Frankie)>> Those Baer brakes grab. Man that's awesome! [ engine rumbling ]

(Pat)>> Wow! I think I made myself barf-y on that. I don't know how I'm gonna do when I ride with you.

(Frankie)>> My turn! We're gonna see what this thing can do here, or we're gonna pile it up. Hopefully not.

(Pat)>> Remember, this thing has lots of power, no traction. [ engine revving ]

(Pat)>> Ahh! Oh boy, oh boy!

(Frankie)>> This thing is frickin' killer!

(Pat)>> Pull in! [ Music ] Oh my god! I almost chunked right there. When you're on a track like this and we're the only ones here. You just listen to the car and you can tell what it's doing. [ engine revving ] [ Music ] [ engine revving ]

(Pat)>> When the engine stops making noise that means he's in the woods. [ tires squealing ]

(Frankie)>> Woo!

(Pat)>> Sounds like he did a boo-boo! I see dirt. ( )>> You need help?

(Frankie)>> No, I'm good, don't worry about it.

(Pat)>> I might drive bad, but I kept it on the track. [ engine revving ]

(Frankie)>> This track is definitely a little tricky to drive. It's such a technical course. This engine is not really designed for road course use, but it is eating it up! I can literally do this all day.

(Pat)>> We got to spend the entire day with the track all to ourselves, and we managed to put over 60 laps on this rig with zero problems. Well what do you think?

(Frankie)>> This thing is a frickin' rocket. It's light, nimble, and it's fast, and honestly a little sketchy to drive if you're not careful, but I'm thoroughly thrilled with the way this engine's working because this is a hot rod engine.

(Pat)>> It goes to show we don't just build them for the dyno. We build them and they work in their application. Where in a car that works great, engine works great. Not a bad day at the office!

(Frankie)>> Great success!
Show Full Transcript