More '66 Chevy C-10 Episodes

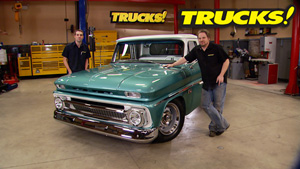
More One-Half A C-10 Episodes

Trucks! Builds

Parts Used In This Episode

Air-Ride Technologies
63-72 Chevy C-10 Rear CoolRide Kit w/Tubular Control Arms.
Air-Ride Technologies
CoolRide kit for 63-70 Chevy C10 & Suburban with upper and lower Strong Arms, 63-72 Chevy C-10 Rear CoolRide Kit w/ StrongArms.
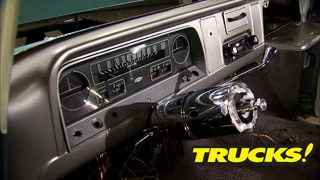
Custom Autosound
AM-FM Stereo, 240 Watts, USB Port for Flash Memory MP3/WMA Playback, Direct 10 CD Changer Control, Alpha Numeric id3 Display for MP3/WMA files, Electronic Tuning and Volume Control, 4 way Fader, Left Right Balance, Digital Clock, 2 Channel RCA Auxiliary Input for Satellite / iPod etc., 16 Pre-sets (12FM-4AM), 4 Channel RCA Pre-outs, Separate Bass and Treble, USA/Euro Tuner, Power Antenna Lead.
O'Reilly Auto Parts
Mother's Showtime Detailer, Microfiber clothes (24)

Video Transcript

Today, we're almost finished with our shortened 66 C 10. But first, we're repairing our original glass and restoring our gauge cluster. Then it's one of the baddest C tens on the planet. It's the 3000 horsepower, Miss Misery.

It's all today here on trucks.

Hey, guys, welcome to trucks. Well, today's show is all about cool Chevy trucks and we finally got our 66 here up on air. We're pretty darn proud of this thing and we've done a lot of the smaller projects, but we saved some to show you guys today

and we've obviously got our air ride strong arm suspension

just about buttoned up. We're finally able to take the Salt truck off of the roller skates. It's been cruising around on for the last year or so,

but there's some other areas we need to address as well like getting some glass in this thing. So we're gonna show you a budget minded way of trying to salvage your old windshield.

Now, this is the original windshield glass from our 66 and the gaskets obviously shot, it's gonna get replaced anyways. The glass is not broken. There's a little chip but

it's got a few other problems.

Now, this glass is more than 40 years old and it has a typical age related wear, but that doesn't mean that it's uns saveable. It's also filthy. So, before we get down to business, we got to see where we're at. So this thing needs to be cleaned.

Now, whether you're replacing your glass or saving it now is the time to replace the windshield seal. Over time they shrink crack and deteriorate and replacing it. Now, could avoid a possible leak into your new interior. Later on

that thorough cleaning with a good glass cleaner is first,

if you've got old weather beaten stickers on the inside of your glass, like we do, no matter how stubborn they are. A single edge razor blade will take care of them right away.

Now, this looks a lot better now that it's clean, but check out these stains, this brown discoloration right here is the plastic laminate that's discolored in between the upper and lower pane of glass. This just sort of happens with antique glass, but our reveal molding is gonna cover that up, so we're ok. But over here

now this right here, this is your typical wiper scrub and this is caused by either dirt under the wiper blade itself or the corner being peeled off the blade and the arm just drag it a groove into the windshield over time, but this can be fixed and we'll show you how but look at this, see these letters right here. This is the

original safety stamp or the bug on the original glass. Now, if you don't have these letters on an original restoration, you could lose points on the show field. So even if you don't have a perfect result in polishing the original glass, it still is good to have these letters here. So salvage a glass if you can.

Now, what we'll be using is a glass repair kit we got from the Eastwood Company. Its main ingredient is this rod, which is comprised of rhodium and gold ore in a powdered form. We'll be using a felt buff to polish the rod

and take the scratches out. But you've got to pre soak your felt buff like this one in water. That way it keeps down distortion and heat build up.

What you're gonna do

is take a small amount of water and pour the Rodi powder into it until it reaches the consistency of peanut butter.

Start with a small amount of water and add the

Rite powder until your mixture looks right.

And if you've ever made biscuits,

well, you know what to do.

Here we go.

That's it.

Peanut butter.

You want to start off with a small amount of compound, about a half an ounce or so,

what we're using to polish with is a rotary buffer with a speed control. It's very important to have a speed control because you want low RPM. In this case, we're using 800 to 1000 RPM.

Now, you're gonna see me moving around a lot because heat and friction are not necessarily your friend. Even though that's what's polishing the glass,

the moisture from the felt pad will help to reactivate compound but be aware and don't dry buff. This can create distortion and smudging and just give you something else to repair.

Using Stoner's aerosol glass cleaner will clean the surface and check our progress.

Now, this is a multi

step process. Don't expect miracles the very first time it's gonna take several steps.

Now, this feels a lot better, but I can still see some imperfections so,

more peanut butter.

All right. So while Kevin's finishing polishing up that windshield, I'm gonna take a few minutes and try to get our truck's original instrument cluster to look a little bit better.

Yeah.

Now, during the disassembly process, you need to keep in mind that these parts are almost half a century old and become brittle, rather fragile over time.

And once we have the cluster separated, you can see we've got a mixture of blast media and 40 plus years of dust and dirt that came out of the bottom.

Once we've got all that crud removed, we can move on to the gauge faces. The first thing we do is blow it off with light air pressure. Follow that with a rag dampened with glass cleaner to wipe off the surface follow that with a microfiber cloth.

Now, these gauge needles are not available individually. So use care when handling them a

little bit of fluorescent orange model paint from a hobby store, we'll get you fixed right up. You can clearly see the sun faded portion of the needle that's exposed.

Now, the color we picked out is almost a perfect match to the oe orange.

I don't think you'd ever be able to tell that that's not a stock needle color.

And we also noticed that the hot indicator on our temp gauge was faded from the sun pretty badly as well.

So with some fine line tape, the screwdriver and a steady hand, we got that fixed up too.

Now, don't worry if you have a little bit of paint bleed under the tape, there's a fix for that too

and it comes in the form of a sharpie to touch up any small imperfections.

Just don't drink a bucket full of coffee before you attempt to do it.

Yeah, that's looking pretty good.

All with our gauge faces taken care of. Now, we can move on to the gauge bezel. It looks like it'll clean up with a little bit of polish and a wipe down with a micro fiber cloth in case it doesn't

just hit it with some semi gloss black paint.

The mother's polish will clean without scratching and it puts a protective sheen on the bezel to make it look near new.

Most aerosol glass cleaners contain alcohol which help it become a more aggressive cleaner, which comes in real handy when trying to remove those more stubborn stains.

Just make sure you remove the big dirt first. So you don't scratch up the lens. You're trying to clean

an automotive rubbing compound, will remove any fine scratches and help you regain a little bit of clarity from the lens.

All right. What do you think about that?

Now, the easiest part was this bezel here or the trim piece, we just scuffed it down and hit it with some gray spray paint.

Now, our gauge Lynch was already in decent shape and it made it easy for us to get great results like this, but in case yours is damaged beyond repair, we can pick one up pretty cheap through L MC

man that turned out good.

Now, what I did was end up focusing right here on our wiper scrub and check it out. Take a closer look. Now, I can barely see the wiper scrub. All the discoloration is completely gone as well as the pitting around the scrub. There's a little bit of optical distortion, but we're gonna be able to see through that even at night

with headlights in her face.

Now to get the rest of the windshield as clear and as clean as this section, what it's going to take about another seven applications of road eye polish and buffing, but it's nice to know that if you're strapped for cash or if you're trying to salvage a valuable piece of auto glass. Well, thanks to the Eastwood Company, you can do it

up next. We'll show you the inner workings of Miss Misery. And later we'll hit the track for a 3000 horsepower test and tune session. Stay tuned.

Hey, welcome back to trucks. Well, recently the horsepower guys were down at one of their typical drag race weekends covering an ORSA

event and they noticed a truck that had a crowd gathered around it any time it stood still long enough. But what really got their attention was that it was a full size Chevy pickup running in the premium ultra competitive outlaw 10 5 class. And that's something that just doesn't happen.

Now, the name of this 87 Chevy short bed is Miss Misery and it features all wheel drive and 3000 horsepower. Yes, you heard me right. And with that combination, this may very well be the baddest street truck on the planet. And if you think it looks cool, standing still, we'll check this out.

And what motivates this big truck down the track is this 541 cubic inch blown and Methanol fed engine. And underneath all these go fast goodies is a classic Keith black aluminum block

way down in there.

A

P si di

rotor blower feeds the intake manifold from Indy and crams it down into dark big cheap heads, custom headers dump into sewer pipe size, exhaust then into a five inch muffler that's been shortened but still keeps them class legal

on the front of the engine. One of Sid Waterman's fuel pumps feed the Methanol while a 44 AMP, MS D Magneto lights the fire.

Now, you guys know most serious drag cars and trucks run some type of four length set up out back. Well, this thing has it on the front axle as well.

The forces that are applied to the four length is backwards of what it is on the rear of the truck on the rear end. When you throw the power to it, the the drive shafts trying to climb the ring gear.

Well, on the front,

the pin is trying to go down the ring gear

and that opens up a whole new can of worms as far as tuning is concerned because usually you only have to deal with putting the power down on the rear suspension

and to get that power to the front end. Well, they run it through an ses transfer case which is rated to 30,000 horsepower.

Then a drive shaft passes through a protective scatter shield on its way to the front axle, compressed air shifts. Liberty's pro

mod stream three speed transmission. While in the Lakewood Bell housing lives a triple disk centrifugal clutch.

Now to keep an eye on engine vitals, Bobby's got four auto meter gauges mounted on the roll cage. If he's got time to look at him, he's also got a removable dash for quick access to the drive train so we can cool it off in between rounds.

The truck also has a jungle Gins worth of roll cage tubing to protect the driver as well as hand controls with an easy reach

and just like we did on hall and S 10, he runs down bars that connect the roll cage to the rear frame section through a Lexan windshield.

The heavily trussed nine inch coil overs, wheelie bars and parachute. Tell you this is not your everyday street truck

after the break. Hang on.

We'll try to rotate the earth with all wheel drive. Stick around.

Hey, welcome back to trucks where we have Miss Misery unloaded here at our favorite eight mile drag strip us 43 Raceway Park. Now, any time you build a high horsepower high tech rig like this, well, it's a process and you're bound to undercover some weak links. Well, the one issue that Bobby and the crew have had is universal joints, which is no surprise considering this truck is all wheel drive.

Now, underneath this protective cover is the intermediate chef that connects the liberty transmission to the divorced

S transfer case. And what they had been running this typical one ton truck hardware, 1350 series U joints and they're usually strong enough, but they were popping these things left and right. So they stepped up to a giant 1480 series U joint. They even take it a step further by running solid billet joints to try to keep this thing together.

And in a couple of races they've run so far. Well, U joint failures have been their only problem. Hopefully they got it taken care of. They can hustle this animal down the track.

Us, 43 Raceway Park is perfect for our single vehicle test session. Although the track is not fully prepped and lacks the sticky layer of rubber laid down during a full race weekend.

The crew is still optimistic to see if the recent upgrades are up to the task of putting all of that 3000 horsepower down to the ground. Go out there. We're gonna give it a lick and make sure these drive shafts stay in

and uh, if everything goes good, we're gonna get a little bit more aggressive with the second time around

now getting an all wheel drive truck with slicks on all four corners to do a big smoky burnout can be a tall order. So a little extra water in the burnout box helps get the job done.

But the first run, you pretty much have to chalk up to feeling out the track and the truck.

I can tell by just even feathering the throttle a little bit that it's, it's definitely gonna try and blow the tires off. So we're gonna

adjust a couple of things on the chassis put a little bit more traction in the truck and then we're gonna come back. We're gonna do it

on the second run after making a couple of adjustments, they were able to make it to at least half track under throttle.

That was a pretty good launch there.

It, uh, it started breaking the tires a little bit. You can see out through there. But, uh,

that, that was pretty good loss. That's what we're looking for.

Smooth. We didn't break nothing, no drive shaft failures.

It felt like the truck actually hooked pretty good at that time.

And, uh,

I

think half

the

half

on

with the truck hooking up and holding together, they could lean on it a little harder.

So with another solid launch under the belt, they knew they could go all out. So, what we're gonna do this time is actually leave

just as if we were in race circumstance, we're gonna leave the starting line

flat on the floor. Give it all. It's got, at least with the tune up that we've currently got in the engine

and, uh,

just see how the truck responds to a real hard lead like that.

I have never seen anything that evil on the drag strip before. That was awesome, man. I cannot wait to see 60 ft times out of that piece of machinery. Holy cow.

The truck is just unbelievable how good it hooks and how hard it hooks and how hard it pulls the power it makes, we didn't break nothing. No drive shafts blew up next to me.

I didn't feel like I was in a war zone inside of the truck getting shrapnel shot at me. I'm, I don't miss that at all.

Uh,

so, man, I'm, I'm excited. I'm really pumped up. This Miss Misery truck is gonna get down, man. I can't wait to go to the next

Oska race and, uh, see what I can do with these guys. I think we got a little something for them.

Hey, welcome back. Well, we've had a chance to install our refurbished instrument cluster. It really came out nice and looks right at home.

Another thing that looks right at home is our custom auto sound head unit. It's a modern CD player and radio receiver, but it's got a cool old school look to it, the best part about it. Well, it fits right in the stock location.

You don't have to go hacking up your nice factory metal dash.

Now, over top of the sound insulation we put down, we threw down a molded carpet kit we got from L MC.

Once we get this air ride system finalized, all the hoses and wiring tucked away.

We can do what we can to get it covered up with the carpet, the rest of it, it's gonna be hidden by the factory bench seat anyway.

And we've been getting a lot of feedback from you guys bugging us wanting us to hurry up and get this truck finished and driven. Well, we're anxious to have this thing done. We're gonna do our best to get it finished and out on the road.

Hey, guys, we wanted to show you a quick way to knock a layer of dust off your truck without hurting its paint.

So you just pulled up the car show and you want a nice clean looking truck, but you don't have access to a hose. Well, all you need is some mother's instant detailer

and a few micro fiber cloths.

The theory is that mother's showtime detailer will lift the contaminants off the paint and suspend it so you can roll it off with a micro fiber cloth without damaging the paint.

Round two is a different micro fiber cloth used to hand buff the haze out of any leftover residue.

This way you can take care of your entire car or truck in mere minutes.

Well, there you go. We've got a show quality finish on half of our hood. It didn't leave any swirl marks or scratches and you can get a nice clean looking truck without using a single drop of water.

If you have any questions about any trucks projects or anything else you've seen on the power block, go to Power Block tv.com and to all the men and women in uniform out there. Thank you for your service and thanks for watching trucks.
Show Full Transcript