More Ford 460 Big Block Episodes

HorsePower Builds

Parts Used In This Episode

Comp Cams
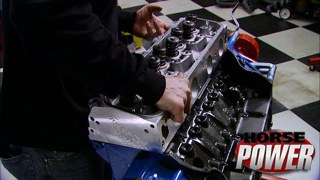
High Energy Hydraulic Flat Tappet Camshaft, Hydraulic-Good cam for everyday performance driving or heavy towing with low gears. Broad power, noticeable idle, 268H, Complete K-Kit, includes lifters, springs, retainers, seals, locks, and timing set.
Dupli-Color
Dupli-Color Engine Enamel with Ceramic, Ford Blue and Aluminum.
Flowtech
'80-'87 Ford F100/150/250 2WD: 429-460, '83-'87 F250/350: 460, Tube Size 1.75", Collector Size 3", Black High Temp Paint.
Jones Machine Racing Products, Inc.
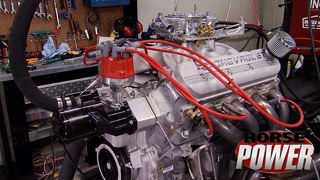
SB Ford alternator and water pump radius tooth belt drive system,includes 140 amp single wire alternator.
K&N
Carbon fiber universal air filter
Loctite
Sealants and Thread locking Compounds
Lokar
Black under dash emergency brake handle.
Pertronix
Ignitor breaker points conversion, replaces breaker point and troublesome factory electronic ignitions with a dependable, self contained and maintenance free electronic ignition system. Flame-Thrower coil, while it is the perfect coil to go with the PerTronix Ignitor breakerless ignition, our Flame-Thrower canister coil can benefit virtually any distributor type inductive system.
QA1
Mustang Pro-Active system includes tubular K-member, caster/camber plates, Mustang struts, coil-over kits with springs, tubular control arms, bump steer kit.
Summit Racing
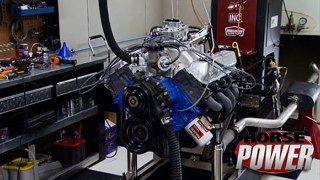
Carburetor, Summit, 750 cfm, Square Bore, 4-Barrel, Manual Choke, Mechanical Secondary.
Summit Racing
Harwood 6" Cowl fiberglass lift-off hood and fasteners
Summit Racing
Lokar floor mount gas pedal, pedal kit,60 inch throttle cable
Summit Racing
Billet Specialities 15 X 12, 5 X 4.5" Street Lite, 15 x 6, 5 x 4.5" Street Lite,Summit open end lugs 1/2"
Auto Custom Carpets INC.
1992 Ford Mustang Hatchback Carpet Set Complete, 801 BLACK CUTPILE
Hellion Power Systems
Turbonetics Turbocharger (88mm), 16 gauge Stainless Steel hot and cold parts (Mild Steel Headers), Spearco high flow air to air intercooler, High flow Turbonetics wastegate, Silicone hose kit, Stainless T-bolt clamp kit. 45 mm Blow-off valve, Oil feed and drain lines.All other necessary hardware to install kit.
Napa Auto Parts
Valvoline VR1 Race Oil -(8)qts.
O'Reilly Auto Parts
Water Pump Belt
O'Reilly Auto Parts
Intake Manifold bolt kit
O'Reilly Auto Parts
Crankshaft Key
O'Reilly Auto Parts
Hydraulic Brake Light Switch
O'Reilly Auto Parts
Electrical System Part
O'Reilly Auto Parts
Distributor cap, rotor, wire set.
O'Reilly Auto Parts
90 Deg. -4 Fitting, -10 Hose Clamps
O'Reilly Auto Parts
Flywheel
O'Reilly Auto Parts
Intake, Exhaust, and Header Gaskets
O'Reilly Auto Parts
Intake Gasket
O'Reilly Auto Parts
valley pan gasket
O'Reilly Auto Parts
Fel-Pro Gasket set, freeze plug kit.
O'Reilly Auto Parts
Harmonic Balancer
O'Reilly Auto Parts
460 Long Block Motor
O'Reilly Auto Parts
Flex hose, coil cover
O'Reilly Auto Parts
15 Amp Fuse, 30 Amp Fuse, 20 Amp Fuse, Long Nipple, Elbow, Electrical Tape, Ring Terminal, Disconnect, Disconnect, Quick Splice
O'Reilly Auto Parts
Block adapter, threaded nipple
O'Reilly Auto Parts
Oil pan and pickup '79-'93 Mustang.
O'Reilly Auto Parts
Motorcraft spark plugs.
O'Reilly Auto Parts
Thermostat
O'Reilly Auto Parts
Vacuum Control
O'Reilly Auto Parts
Water Pump
The Street Rod Manufacturing Co., Inc.
9 inch Ford Pinion mounted parking brake and cable bracket,supplied with 14' cable.
Weiand
Stealth Intake Manifold 429, 460 V8 (standard heads).

Video Transcript

Yeah.

Hey guys, I don't have to tell you that budgets are tight these days. Some of us don't have enough money to pay attention.

So when we say we're building a big block voter today on a budget, we're talking down and dirty cheap.

But first, we've got a long awaited power payoff for our turbo Mustang here. We're gonna see how it's power at the fly wheel compares to power at the rear wheels.

Weeks ago, we dived into a project we called the turbo Stay. A 382 cubic inch small block beefed up with a turbo kit from Hellion.

It made 1100 horsepower at the fly wheel on race gas,

almost a grand on 93 octane premium.

Well, later we built a complete roll cage.

Then we followed that up with 10 work to close up the cockpit.

We reinforced the sub frames

and replaced the floor board.

We bolted up a Q A one system up front that included a tubular K member

control arms and coil over a conversion kit.

We gave it a pro street brake hit

along with a front engine plate that led us both the motor right onto the sub price.

Last week, we installed the fuel delivery system from the tank to the fuel pump and filters up to the motor.

We installed a new trick dash loaded with gauges and assembled the lightweight steering setup including of course a new wheel that looks good. Next was the radiator with a low profile fan. Then we relocated the battery out back and installed a kill switch,

the rest of the drive train, including the power glide and drive shaft

and the performance shifter before it's first time, fire up inside the car.

Now it's time to see what this thing's got at the rear wheels where it really counts

because of parasitic losses in the drive train. Horsepower measured at the rear wheels is generally 15 to 20% less than the horsepower measured at the fly wheel.

Now, on our first run, we're gonna take it easy with a mild first gear pull and make sure we're not gonna tear anything up.

How hard she twisted. I thought she was rolling off first.

That was fast.

Here we go. We'll do one in a second,

do one in high gear. All right.

Did you ever wonder what 24 pounds of boot looks like?

Want to see it again.

This was a problem on the

dyno too. This thing makes so much boost. Once you get it all plumbed up, you can actually take these off, get it welded together and put in and just have one or two of your access points so you can pull it apart.

Ban clamps work real well too

well, after a quick fix, our third run confirmed our suspicions.

The low rear end gearing wanted the current converter spent fast enough to lock up.

That's why they call it test and tune.

Well, no reason pushing this thing any harder today in a few weeks. However, we will take this thing out for the ultimate workout at a local drag strip. Meanwhile, a complete turnaround coming up as we build a blue oval big block without going in the red.

Here it is the junkyard starting point of a budget engine build. Now, what is it? Well, it's a 385 series engine which was Ford's last attempt at a production big block.

There were three engines in the 385 series. The 429 got the most attention and the most use in factory muscle cars. This would be a nest,

nobody's home

while 46 were planted in a few performance cars. Most of those found homes in heavier cars like t birds, Mercury and Lincolns.

And I'm pretty surprised there's not a lot of wear on top of the valves either

where the rock arm has been running on it.

There went a hit

because of their long production run from 68 to 96 well worn. 460 motors are plentiful

and pretty cheap compared to Ford Fes

we found this one for 200 bucks at a local bone yard. Oh, that's nice. Four sixties are well known for their stout bottom ends. Parts are plentiful.

And despite that lackluster image, these motors are capable of making massive torque

and plenty of power.

Here's a little known fact, the fabled fe motor can only be stroked to 454 cubic inches

while the 460 can be stroked up to 550. All that makes the 460 block a favorite foundation for drag racer.

We got some grooves in it too. I think crank can be cleaned up with just polish

during an engine tear down. You can learn a lot about how an engine ran and how well it was treated.

For example, hammered rod bearings are signs of hard use and abuse.

No matter what they told you when you bought your old motor, you never know the real story till you get inside.

Even a budget motor build involves a trip to the machine shop

and even good blocks will need a little work.

Now, if you're reusing the crank like us, you'll probably need to have the journals polished,

but you can save money by doing some of the work yourself

like reconditioning reusable rods.

Our bill at the machine shop which included reconditioning. These iron heads was about 500 bucks kind of what we expected. So we're reusing everything here, including the rods, we preassembled.

So everything over here is either a factory replacement or came from comp cams for about 800 bucks. So with the block, the machining and the parts so far we're at 1500 not too shabby,

we also painted the block ourselves to save a few extra bucks. Now, we're gonna go ahead and install some freeze plugs. Now, here's a little tip. I see a lot of people just drop these into place and press them in. Well, that can cause water seepage. So we're gonna use a little lock tight retaining compound which will take care of that leak.

Now, using the socket slightly smaller than the freeze plug,

tap it into place.

It's also a good idea to tap the head bolt holes to make sure they're clean

otherwise machine material trapped inside could cause a problem when you torque the heads down

just like ours. Now, here's how you can do a little detective work and tell a little bit about when your motor was made and what it was made for all. Thanks to this casting number.

Yeah, ours is ad nine te dash A B. The dine we learned stands for 1979 or later.

The T means it was made for a truck and the E stands for the Ford Engineering Group.

The A B just means there was one revision to the casting.

Now we can drop in the upper half of the rear main seal. Now make sure that the larger side of the ceiling lip is towards the front of the engine.

Now, since we only had to polish our cranks journals we get by with standard size bearings like these stock replacements we got from down the street at o'reilly.

We have the usual dab of silicone on the seal ends

and some oil on the bearings.

We're ready for that crank.

Hey, here's something for your Ford buddies who are trivia freaks. The 385 series gets its name from the crank stroke of this motor. 3.85.

All right. Now, the original main cats can go on with the arrows pointing to the front of the motor. Of course,

and we'll keep them in place with factory replacement bolts that we torque to 90 ft pounds in a crisscross pattern from the center out.

The factory replacement pistons going in here are cast, of course,

good for about 6000 RPM. S and

we'll handle plenty horsepower. Yeah. Now we're gonna get ready to drop the rod and piston in and I already oiled up the rings and put lube on the bottom of the bearing.

So I think we're ready to

pound it home.

Awesome.

All right, with that, we now have ourselves a fresh 460 short block. That's

solid and also pretty cheap.

Yeah, it turns over nice too. Hey, we'll show you how we finish up the bottom end and the parts we're gonna use up top on our budget big block. When we come back,

we're back with more of our big block budget build up. Now, our reconditioned heads are almost ready to go back onto the short block. But before we do that, I wanna show you something.

Now, when you hear somebody talking about valve lapping, here's what they mean.

When a valve is lapped compound is used between the face of the valve and the head, then it's spun. What this does is it gives it a perfectly consistent circle around the face of the valve. What this boils down to is a perfectly good seal when the valve is shut and no loss of compression.

Here's a stock spring and here's one of the new ones we got from comp cams. Now it's a little bit taller and it has a higher spring rate and check this out down inside. There's a dampener and that keeps the spring from wobbling at higher RPM. S

Now, in case you're keeping score, the specs on the valves of the stock heads measure out at 206 on the intake,

165 on the exhaust side,

we can also tell you that the combustion chambers measure 88 ccs

and since they're cast iron,

they are ridiculously heavy

Velcro gaskets on a budget bill. Do you bet? Don't cut corners here unless you want to blow a head gasket.

Now, you should always Twerk your heads from the center out in three increments

in our case from 80 to 100 and 42 ft pounds.

Also, whatever you do, don't forget to install the head dials at each end of the block, they're absolutely necessary to properly locate the heads.

Our new cam is a comp hydraulic flat tap it with a 494 gross valve lift on both intake and exhaust. Now, since it is a flat tappet gotta loop up every one of these lobes. Now, this thing has a broad power band and for you guys, I love to hear them dance. You got a very noticeable idol.

The timing chain is another thing you need to replace. Ours is a stock replacement installed dot to dot

Oh, we are using the old

CBT

though torque to 45 ft pounds.

Then the comp hydraulic flat tablet lifters can go in and they need lots of lube to help break in that cam.

Then our stock replacement push rods

and finally the stamp rocker arms,

ok. Now, for the induction on our big block, this original cast iron intake manifold is not only heavy comes up way short in the plenum volume department. Now, ye

replacements, lightweight aluminum, 37 pounds lighter

and the extra volume. Well, it's gonna add up to a broad power band from 1500 to 6000 RPM. S

with the usual beat of silicone laid down on the ends of the block and new gaskets in place we can drop on the intake and this you wanna get right the first time

looks like we did.

These boats, by the way, have a torque speck of 25 ft pounds.

Our 460 big block came with an old points type distributor.

We could replace it with a new high dollar piece, but instead we're gonna save about 100 and 30 bucks with a little upgrade from patrons.

First, we remove the points condenser and gromit,

then clean out any dirt or oil between the breaker plate and cam.

Next, we can install the igniter module

and place the magnet sleeve onto the distributor shaft.

Now we can insert the black and red wires with the new grommet through the housing.

Finally, we set the air gap between the module and magnet sleeve using the provided 30,000 feeler gauge.

Now, what you don't want to do is fire off a distributor like this with a newer HE I coil because you melt the module.

Patrons

recommends something like this flame thrower that's rated at 1.5 ohms with 40,000 votes, which is just right for this application.

Back on the bottom end, we can bolt up the oil pump. Now, we went with a standard volume since we don't need the extra volume you need in a high performance application.

We got the pump, the pickup and the pan from o'reilly Auto parts. Now we can't put the pan on until the front timing cover is in place and that's part of this week's budget tip. So stick around because we're gonna have that tip and a trip to the engine dining room. Right when we get back

build on a budget horsepower projects that save you time and money

delivery horsepower.

Our low budget big block build all started with the Junkyard 460 Ford motor. We disassembled for some machining on the block heads and crank shaft.

Then we loaded it with factory replacement pistons hanging on refurbished stock rods.

We replaced the springs for taller stiffer ones from comp

and installed one of their hydraulic flat

tt cams.

After a basic timing change set up, we dropped in the rest of our valve train components

and buttoned up the top end with a new aluminum intake.

Then to save a few bucks, we upgraded the stock distributor

and bolted up a part store, replacement oil pump and pick up

to pinch your pennies on a budget bill. You gotta reuse as many original parts as possible. And for us, that means things like this timing cover,

even water neck and oh, since we like the looks of these old valve covers, well, they're on the list too.

That is after we show you how to bring them back to almost new condition starting with getting rid of this old gasket material.

Mhm.

Then we use solvent and lots of elbow grease to get rid of the caked on oil and dirt.

After 30 minutes of this your arm may be numb, but keep thinking about all the money you're saving

man for such an old valve car. These things are still in pretty good shape. They do need a little work though over the years, they're most likely used with only a court gasket. What ends up happening is the area around the bolt hole gets pulled down and that adds up to a leaky gasket around the rest of the rail. So I'm gonna use this hammer and dolly to get them back into shape

with the dolly on the top of the rail. I'll tap the bottom side to flatten them out

while we're here, a little face slip won't hurt either.

We're using duple color high heat ceramic paint with an aluminum finish,

more Ford blue for the timing cover.

Finally, we knock in a new seal and it's ready to go back on the motor.

Unlike aftermarket crank shafts that are mostly all internally balanced. Our 460 crank shaft is externally balanced, so we gotta run this counterweight on the front of the crank shaft. Now make sure when you do your tear down to keep track of this piece because they're really hard to come by.

We're dumping our four sixties exhaust into some headers. We got from flow tech, the pipes measure an inch and three quarter and feed into a three inch collector

summit racing has just come out with a new street strip carburetor. That's perfect for this project,

they got three versions. We got the 750 CFM version with a manual choke and mechanical secondaries and

at 330 bucks it sure fit our budget. Yeah. And they use a tumble polishing process that makes it look a lot more expensive than it really is.

Now, let's see if she'll run.

How about you guys? But there's nothing like the sound of a big L going through a set of super for

listening.

You ready?

Just for reference. Factory four sixties after 79 like ours had a horsepower rating of 215

447 ft pounds. 348 horse,

that's still 130 over stock.

Now, let's find the rest.

472 ft pounds. 366 horsepower

getting

up.

It's liking the timing. It is loving it,

man. For a motor that was a dog back in the day. This thing's making 493 ft pounds at 3400,

378 horsepower at 4700 RPM. Yeah, I'm pretty happy and we only spent a shade over 2300 bucks. That's pretty low budget. Well, we gotta go but uh we're gonna keep playing. We'll see you next time with a special engine builder challenge.

We try to beat that. Yeah, let's try it.
Show Full Transcript