HorsePower Builds

Video Transcript

We're gonna give Chuck's old grocery getter a classy new chassis loaded with all the hottest hardware. Stay put

today on horsepower TV. It's a cool chassis build up for a classic Chevelle with new tubular control arms springs,

brake rotors and calipers, a quick ratio steering box and even a 12 bolt rear end.

We'll go drag racing at the hub city shootout in Mississippi plus offer some hot tips on welding, both stick and me.

So hang on for horsepower TV.

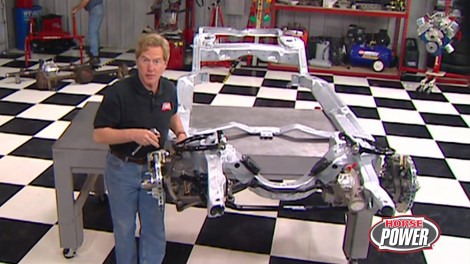
Welcome to the shop. Hey, we're finally gonna give those Fords a break and work on some Chevys today. Now y'all know how I like my Chevelle, especially my old grocery getter here. Now, this 60 five's got some cool classic lines, but like a lot of other muscle cars, the chassis could show you some updating. For instance, it's got 9.5 inch drum brakes all the way around. A

sloppy suspension and a worn out steering box that's about six turns, lock to lock.

Yeah, we're gonna start from the frame up. This one came from a 65 El Camino and unlike a hard top or sedan, well, it fits right under that wagon. Plus it's a factory box frame, which means it's a lot stiffer and that's important with all the suspension upgrades we'll be making. Now, if you ever go shopping for a frame, first check for excessive rust that might weaken the frame, then check, especially here at the frame horn for any signs of damage from a collision.

Finally measure the frame diagonally side to side.

And if you're within a quarter inch, which we are, you got a square frame.

Now, we also had this one sandblasted and powder coated and I think you'll agree. Sure came out looking good.

I've got some good looking suspension pieces to hang on it too. Now, up front, we're using Hotchkiss springs, sway bar and tubular control arms. Now, the springs are just a little bit stiffer than stock, but at the same time, they're gonna lower the ride height by about an inch and a half. Now, the sway bar measures an inch and a quarter and that's a full 30% larger than the stalker. Plus it uses these end links with the urethane bushings that won't mash out like the rubber ones do on the stalkers. And finally, the tubular control arms are shorter from here to here to help improve suspension geometry.

And the ball joint has the right taper to work with those spindles on that bear brake system that we'll be using

for lower control arms. We're using the stockers, but we've upgraded them with urethane bushings like these, we got from performance suspension components in Phoenix Plus, we've installed the ball joints here from our bear brake kit. As you can see, the studs are a lot longer

in stock. Plus, they've been machined down to fit the opening in the control arms. Now, whenever you reuse control arms, make sure you check their condition because over time they tend to develop cracks around the ball joint area. And well, this one is not worth welding. In fact, it's just junk.

There we go.

These springs can store a lot of energy. So make sure you use a spring compressor like this one,

any time you install yours.

Of course, we want to match our high tech suspension with an equally high tech braking system and that's why we ordered this track system from beer. Now, it comes with 13 inch cross drilled rotors and a two piston aluminum PB R caliper. Plus it's already mounted on this heavy duty spindle, like what you'd find on a full size Chevy car. Now, that's why we need those ball joints that Joe was talking about

after supporting the lower control arm, just dropped the spindling brake assembly onto the lower ball joint

and hand, tighten the nut,

then push the upper control arm down to engage the ball joint into the spindle

and hand, tighten the nut here.

Well, now we're ready to install these stainless braided lines that are also included in the kit.

Hey, we wouldn't steer you in the wrong direction. So we're gonna be using this quick ratio steering box. We got from a gr it's 2.5 turns, stop to stop and it's got special valving to give you more road feel. Of course, we got to link this box to our spindles. So we got this rebuild kit also from PSC that includes a new center link

idler arm and inner tie rod ends. Now, remember we are using those big car spindles. So the outer tie rod ends are included in the bear kit

while Joe's hanging that steering box. I'm gonna go ahead and pre assemble our tie rods using these solid steel sleeves from Hotchkiss. Now, just check out the difference between them

and this flimsy stock sleeve here. Now, what they're gonna do is eliminate all the deflection in our tie rods.

Well, now that we've got everything all back together, all we have left to do now is torque everything down

and install the cutter pins. Hey, it looks pretty good. Well, keep your cutter pin to the couch. You can't say that I just did. Anyway, we'll be back to attack the rear end of our classy chassis right after this.

Hi, welcome back to the shop and our Chevelle chassis build up, but I just installed our front sway bar and that wraps up our front end suspension. Now, as usual, guess who's uh bringing up the rear?

Well, as usual, I guess I'm the butt of one of your jokes. Seriously. Finding a 12 bowl we're in for an early model Chevelle or Camaro can be almost impossible. And if you do find one,

they're outrageously expensive. Now, Moser engineering just stepped up with their own heavy duty version of the 12 B

and I brought this original one in so we could show you the differences.

The upper control arm mount is a lot beefier than stock. In fact, it's about a third thicker. Plus the bushing location has been moved upward to improve the rear suspension geometry by changing the instant center. Of course, that means better launches. Well, there are other improvements in this thing we wanna show you. So let's get it on the stand for an inside look

with the cover off. You can get a better look at those oversized main caps that use half inch bolts. Plus it uses three inch axle tubes with 250,000 small thickness. Now, for differential, we got an eating posse

with 342 gears. Oh, we also ordered this optional cover to reinforce the main caps and reduce ring gear deflection. Well, looks like we're ready to bolt some brakes on this thing

and we're using bear brakes on the rear end too. Now, this is their touring set up and it uses 12 inch rotors

just like the fronts. These are cross drilled and slotted. Plus they use aluminum PB R calipers. Now, these are single piston style though

the rest of the kit includes these mounting brackets and parking brake cables. These brackets though are the first pieces to get bolted up,

position it. So the caler mounting holes point towards the front of the car, then torque the bolts down to 35 ft pounds.

Then you can install the axles,

the sea cliffs,

the rotors

and finally the calipers.

Now, you need at least 35 thousand's clearance right here on each side of the road or between it and the anchor bracket,

we're looking good. But if you don't have it, just add shims right here between the anchor and the mounting bracket to move it out or in. Once you get that clearance and all you gotta do is torque the bolts down to 85 ft pounds.

We're using stainless braided lines for our rear brakes as well and they attach to the calipers with this banjo boat and crush washer set up

and once we torque them to 20 ft pounds,

we'll be ready to install that parking brake cable. And hey, we're good to go

or stop as the case may be.

Well, we got the frame on the ground and now we need something to hold that rear end in place. So we're gonna go with the Hotchkiss set up back here too.

Now, this includes a set of their high rate lowering springs, upper and lower control arms and a one inch sway bar. Now just check out the difference between this original control arm and its rectangular tub and replacement.

Of course, the upper control arms are adjustable so you can fine tune your suspension by changing your opinion angle. And all the suspension bushings are urethane

to help reduce any unwanted suspension deflection

where the lower control arm is first with the sway bar mounting holes towards the rear of the car

where the upper control arms are next. And since they're adjustable, you need to give them a nominal setting and to do that just back this jam nut off and bottom out the adjuster.

Now you wanna turn it out three turns.

Here we go,

tighten the jam nut back up

and we're ready to install

the diagonal support tubes are next.

Now, once they're installed,

you just torque the nuts down to 50 ft pounds,

we're now ready to bolt this rear into our control arms by first jacking it into position, putting our springs in place and then installing our bolts. Now, once everything is torque down, we can install our sway bar between the two lower control arms.

Well, here's the final phase of our suspension upgrade. These

Brock ias shocks,

the internal valving adjust to all kinds of road conditions. So when we drive aggressively, we've got control when we're out cruising. Well, we got a smooth ride. Well, it's gonna be a while before we go for a ride in this project. But

in a couple of weeks we're gonna install a fuel injected 350

overdrive automatic and some high tech accessories. Well, I think it's high time. We took a break but we'll be back with more horsepower TV right after this

horsepower T V's race of the week, trackside reports from America's best grass roots drag racing events.

Ladies and gentlemen, welcome to the first annual Hub City. Shoot out with the National Street Car Association. We're going drag racing Southern style you

there, you see

they roll down the window, baby. We're gonna get louder.

That's right now, Tucci in our class of the week, this time is Nostalgia Pro Street, a high thrill, low et class that keeps the street and street car racing.

We'll just ask John CVAs,

the driver of this Nostalgia Pro Street chall

last season, he escaped injury in a nasty nitrous fire at this race in Bowling Green, Kentucky torching among other things is carburetors.

John went on to win the year end championship.

But then in this season's opener at riddles, Georgia, it was a bit wheelie far that may have got in the way of a win in the finals.

The horsepower so much on this thing that it was actually tweaking the wheelie bars allow me is allowing the car to get up in the air and it stayed up quite a way about 300 ft in the air. And uh it was hard to control and this time we come down here. I said we gotta change this. So that's what we have

and God willing everything goes right. We're gonna rock and roll, get Johnny in the car so I can do the wheel

so I can reset this,

check your leverage. Make sure everything's ok.

All the F

man.

Yes.

You ready?

Are we ready? Rod

brand new Willie bars installed. John went to the line for first qualifying when this time the rear end went out,

we believe it's a ring opinion that's broke right now.

So we'll tear it apart and see what happens and go from there.

You know,

we

we ain't done yet,

you know,

by now.

Meanwhile, while John's crew hunts for a new gear to replace this chewed up piece. There's a newcomer to the class, former pro Streeter Ross Stump, laying down top qualifying numbers and having a ball in his new 62 in power.

Well, I like them because they're actually real street cars. You know, they have roll up and down windows in them, they have the factory dashboards in them and everything and they look like a real car. It's a car that the average guy can relate to

and if they got one at home, they can come play with us. It's one stage of nitrous. It, it gives everybody a fair chance

and uh, they're heavy. So the guy doesn't have to spend a ton of money. Lightning car up to make the class.

You know, the car, this car weighs 30,300 pounds.

Ross Powers is in power with a 632 big blow. We got a fairly mild tune up in it. Uh We're a little bit under the maximum we're allowed.

It's

a

14.5 compression motor.

Uh It's got a Pro Systems car

later

on it. Uh run through an KNN air filter, actually actually picked up horsepower with that air filter.

Meanwhile, pulling up the rear, literally, John found a replacement gear for a chave,

not a pro gear, but maybe enough to make it through the weekend. We chased all over the place trying to find a gear and we did find one

and uh it's not a pro gear yet,

but

it'll make us to this race when we get home. We have to definitely go

and

check out

over

there.

Then as he pulled up to make his first qualifying run, his luck turned worse

when I talked to clutch and uh and then pulled second gear, I said, oh boy, we're on a mission, you know,

and uh as soon as I pulled third gear is, is when I said I just share that ring, uh the opinion

and I was like, wow, I was upset but, hey, you know, getting upset isn't gonna solve the problem. So

we come back and we just uh try to get back in it and we just, they can lack of parts this time. That's all

in Sunday's eliminations. Stop continued to stop the competition

here running a 776 to beat Kevin Tart in round two.

This set up a final showdown with Bruce Paulus in the dark green Chappelle

here downing Darryl Thomas in the semifinals

in the finals of our featured class. And stop does it again at 777 and 100 and 73 miles an hour easily taking his first ever to

challenge

pro street victory. I'm just really excited. I didn't really think we'd go this fast, but luck was on our side and the Lord was following us.

Congratulations. Thank you very much. All

right,

man.

And with that, we take this up city, shoot out to the house, but stay tuned. More shows ahead.

Oh,

hey, if you fool around with cars long enough, sooner or later, you're gonna need a welder and with the current crop of machines that are available, hey,

using metal with an electric arc has never been easier or more affordable. Now, today on quick tech, we're gonna take a look at a couple of the most popular types of welders, stick and mig

stick welders are popular because they're inexpensive and they're available in both 110 and 220 volt models.

Plus you can also change both the material and the thickness of the material that you're welding on simply by swapping out the rods.

Now striking and holding an arc used to be kind of a tricky deal. But with the improvements in welders and rods like these stick welding has gotten a whole lot easier

with a stick welder strike and hold the arc by keeping the electrode about an eighth to a quarter inch away from the work.

After forming a metal pool, move the electrodes side to side or in small circles while keeping it at about a 65 degree angle in the direction of travel.

After completing the weld, you need to chip the slag off so you can check the quality of the bead

and the penetration.

Now, good penetration will discolor the backside like that.

A mig welder is even easier to use. It feeds a wire through a gun like this

and the weld is shielded by gas to protect it from impurities. In fact, that's how the welder got its name. Mig stands for metal inert gas.

Now, just by changing the wire here, you can switch from steel to stainless and even aluminum.

Now, this welder is also available in 110 and 220 volt models. But since 100 and 10 current is available just about anywhere. It's the most widely used by hobbyists

with a mig, hold the tip of the gun about a half inch from your work and squeeze the trigger.

This will feed the wire allow the gas to flow and start the arc.

The type of weld and thickness of the material will determine the motion of the gun and the speed of travel.

Unlike stick welding, there's no slag to chip off. So what you see is what you get,

but again, good penetration will discolor the backside like this.

Now, regardless of what kind of welding you're doing, you're gonna need good safety equipment like a pair of heavy gloves and a welding helmet. Now, I'm using one with an automatic darkening lens that costs about $200.

Well, that's it for quick tech hot parts is next. So stick with us

horsepower TV.

S hot parts. A close up. Look at the latest in high performance hardware.

Everybody knows it takes fuel and air to make horsepower. But getting the right mixture can be a tricky ordeal. Well, now you can fine tune your fuel air mix with one of these monitors from K and N.

It comes with an 02 sensor that you install in your exhaust and it tells the monitor when your mix is rich lean or just right comes in two versions. The surface mount cost about 100 and 42 bucks. The N dash about 100 72.

Hey, I'm not full of hot air. When I tell you that I'm blown away by this next hot part. It's called the power tank and it's great for changing that pressure in your tires when you're at the track or for operating your air tools.

Now it uses Liquid Co2 which has 10 times the volume of compressed air. Once it's released from the tank,

they're available in 5, 10 and 15 pound bottles and they come with regulators, a quick disconnect and 25 ft of hose. Now, if you want one of these prices start at about $300. Well, we got a show that'll blow you away next week and here's a look at it.

It's Mopar

mayhem on the show as we build a 426 cubic inch small block with new state of the art heads, high performance carb and intake. Plus we'll

dyno this baby as we shoot for 600 horsepower at the crank.

Plus you asked for it. More horsepower bloopers. Our best of the worst.

That felt good

and remember high performance fun is what this show is all about

for information about the products used in today's show. And more. Check us out online at horsepower tv.com

Horsepower TV is an RTM production.
Show Full Transcript