

In This Episode
- 0:01 Introduction to the project
- 1:00 Plans for the build
- 1:51 Modifications to the engine
- 2:04 Interior modifications
- 3:02 Dyeing the interior panels
- 3:51 Applying the dye
- 5:00 Dyeing the fabric
- 6:01 Repairing the door panels
- 7:41 Rewrapping the vinyl
- 13:00 Preparing the panel for vinyl
- 14:00 Applying the vinyl
- 15:00 Smoothing the vinyl
- 16:00 Trimming the vinyl
- 17:00 Reattaching the plastic panels
- 18:00 Finalizing the interior
- 19:00 Separating the body from the chassis
- 20:00 Preparing for paint
Video Transcript
[Jason] You're watching Powernation.
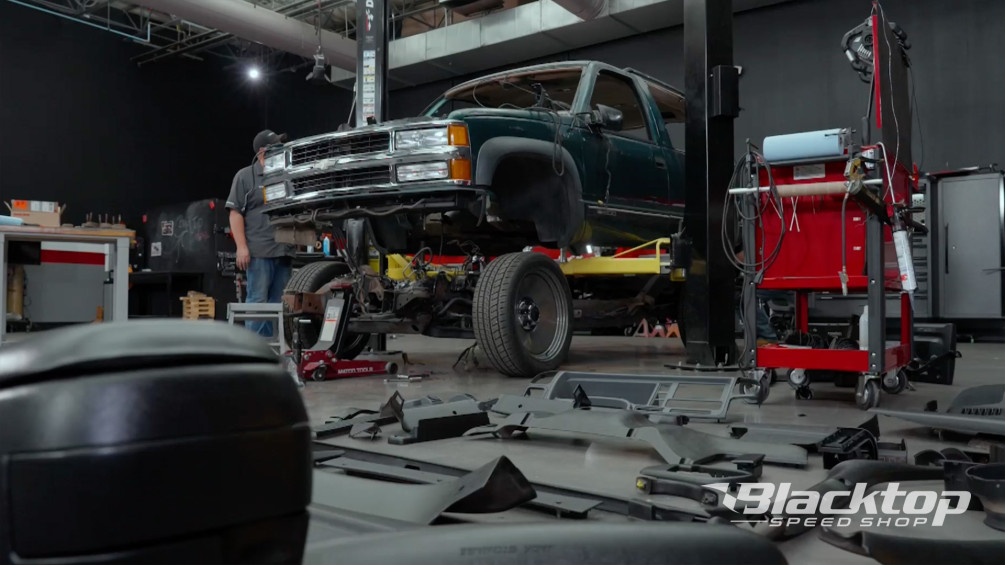
[Brian] Today on Blacktop Speed Shop. The hell was that? Yeah baby! [Jason] It's off! -We're tackling an unfinished '90s icon and turning a toothless Tahoe into a ride you can hear come down the street. -This truck came with 250 horsepower from the factory and this makes 650. What more could you ask for? We're gonna completely change the look but keep it old school. A few touches that'll kick it up a notch. Hopefully it looks good. [ Music ] -Back in the '90s you were really cool if you had a Chevy Tahoe. You were extremely cool if you had a two door two-wheel drive Chevy Tahoe and that's exactly what we have here. So we found this unfinished project here in the warehouse we've had our eye on since our show began and we want to give it the Blacktop treatment. Here it is, our new build. This is a 1996 Chevy Tahoe. Definitely unfinished as you can see but we do have plans for it. Why don't you tell me a little bit about it? -We want to keep this build '90s inspired. We're gonna start with some paint and body work. We got some wheels and tires. We got suspension, brakes. We also have to redo the whole interior. We're gonna do a couple of modern things in there. The biggest thing I'm ready to do is this. This is our 383 small block Chevy that Engine Power built for us. They did a new rotating assembly, new top end, big turbo. Ready to for the Tahoe. This truck came with 250 horsepower from the factory and this makes 650. What more could you ask for? Single turbo, new style fuel injection on the old school platform. Paint match the valve covers. They put this beautiful billet front drive on it. Most people go turbo LS. I wanted something a little different. So I asked for a small block with a turbo instead. This is gonna make this thing really fun to drive. -Before we do anything we've got to get the interior out of this thing. We are gonna retain a lot of the factory interior and we're gonna do some dyeing to change the color. Ready to get started? -Let's go! [ Music ]
We're not doing that? Okay. Sorry. -Violence! [ Music ]
-Be careful with these seats. I need them. What's this? -Snake. -Watch out, there's a snake. [ snake hiss ]
Got another snake. -Freshly soiled carpet. [ Music ]
Sticking to our '90s themed build we're reusing all the trim panels inside of our '96 Tahoe but we are gonna update the color. So we want to change the color of our trim panels, the dash, the headliner. We're putting different carpet in it cause the carpet is destroyed in this thing. To do that we're using some spray can vinyl fabric dye is what we're using. I've got this trim panel already addressed, rough scuffed. All I used was glass cleaner and a red ScotchBrite pad. So around 320 grit or so. I've taped off the fabric portion of my trim panel because we are gonna two tone these. Just adding a bit more flare. I want to show you what actual rattle can looks like, or spray can as people call it. This piece looks brand new. This was just like this. Had some repair area in it we had to do. All in all, sticking to the '90s theme, you can't even tell. We just gotta get it done. [ Music ]
I'm staying six to eight inches away from my panel and still using it just like I would a gun. Around a 50 percent overlap but I am not getting full coverage with my coats. One thing these cans do offer is a pretty nice fan pattern. It doesn't spray a round cone pattern like most spray cans do. That's still impressive as well. Makes you feel like you're behind the gun while not being behind the gun. Make sure you get all your surfaces especially color change. We're going from a tope or tan color, buck skin if you will, to black. So we're making sure to get all of our edges. Even if you think it's not gonna show coat it anyway. If you don't it'll show, Murphy's Law. Once we get it on we'll wait about 10 or 15 minutes. Then apply my next coat. What I have learned from previous panels we have done. Two to three coats seem to be the sweet spot of the coverage. We may need to do more or less but on average two to three will get you. It's been about 10 minutes in between my first coat. I'm getting ready to apply the second but I want you to notice what I've done as far as see-thru coat. This is our orientation coat if you will and it gives my next couple of layers something to stick to. When you spray it like this it dries super quick. You don't have to worry about it running and you can control your spray a lot better. [ Music ]
We're gonna get down in the holder here. The side panel pouch as much as we can. It's not gonna be perfect but you won't see it. [ Music ]
[ spray can hissing ] Next thing we gotta do is dye this fabric. Up next, is this interior too far gone to repair? I hope this looks better once it's set and dried.
[Brian] We're repurposing our door panels cause they were worn out. The wrong color for what we wanted. We added some rattle can dye and the plastic looks brand new. Now we've masked that off and we're starting on the fabric, which does have a couple of tricky things you have to look out for. Now we're gonna apply gray on the fabric to break up the black we laid down on the rest of the panel. [ Music ] Same rules apply here. Spray a nice, even coat six to eight inches away from the surface. Let that flash off so the carpet don't become stiff.
To keep the carpet from being matted up and stiff. A nylon bristle brush would be a lot better but we had chip brushes in the shop. So that's what we're using. Light coats, multiple coats, and keeps the carpet pliable, moveable. [ aerosol can hissing ] [ Music ]
Crazy man! I'm gonna criss cross my pattern to make sure it gets down in the fabric to make sure it doesn't look motely and everything's in a uniform color. I've been going horizontally and now I'm going diagonally across it. I'm gonna do the same thing with the bottom of the panel. [ Music ]
As you can see the top door trim panel is the color and the look that we were going for. This paint's fantastic. Definitely something you could do at home in your garage with a simple ScotchBrite, some glass cleaner, and some vinyl and fabric dye. This was the original door panel. This was the factory color. If you noticed how stained up they are as well. This stuff covers like a dream. We got the rear panels to do still but all in all super excited. Sticking with our '90s theme build we want to reuse as much of this vehicle as we can. This being a two door Tahoe it's hard to find parts, especially trim panels, things like that. Obviously we've got some wear and tear issues. It is a '96 model vehicle. So we're gonna do some vinyl repair. We'll just get started. First it says to cut some pieces we want to fill in as a backer, and then we'll put some stuff over top, some adhesive. Make sure you cut your patch larger than your repair area. Basically this is gonna take up the space that's missing where the foam's dug out of this panel. Once we put the adhesive over the top it should take care of everything else. Make sure it's spread out in there. Next we'll take our adhesive. This particular adhesive is one part. So basically you just squirt it out, wipe it on, and it dries on its own. There's no catalyst or activation required with this brand. Make sure you get it good and covered. We could go back and address it as it starts to dry. Make sure your area is fully covered. It's not gonna be perfect but with the pattern duplication pieces they have once we get everything where we want it and it recreates the grain pattern in your vinyl or leather. This is just a plunger to push the grain back in it. If this don't look the way we want it to we may go back and wrap these in vinyl but I think this repair will work good before we dye them. [ Music ] Here I'm using a razor to scrape off any excess material so it's nice and flat. [ Music ]
Let that one set up. I hope this looks better once it's all set and dried. [Jason] Coming up, if at first you don't succeed just bury your mistakes. -Welcome to Halloween decorations with Brian and Jason.
[Brian] After our repair attempt it doesn't look the way we want it to, especially for a SEMA build of this quality that we're doing. As you can see, we did get the tears repaired. However, they are lumpy and this adhesive is old. It's wanting to roll up. So we're gonna go a different route. We're gonna show you a different way. We're gonna pull the panel off and rewrap the vinyl. To do so you've got to turn the panel over. On the back side of this panel they are heat melted to this panel. So if want to remove that we have reverse this process. The easiest way we have found is with a plastic iron. We tried a heat gun but it heats a large area and we want to keep it precise. All you've got to do is put some pressure on it and we'll pop the panel out. Come on Jason. Let's get this done buddy. I'm using a pry bar cause I want a longer reach. You could use a flat blade screwdriver as well. You see it don't take a whole lot of heat for it to remove. [Jason] No heat necessary. -Lack of adhesive is all I heard. -One stop shop for all your upholstery needs. -Brian and Jason's custom upholstery. [ Music ]
-Done! The factory put staples in the edges of these. Probably to keep it from fraying. It staples the vinyl into the plastic to keep the vinyl itself from peeling off from the panel. They don't seem like they're in there super well. They just kinda pop out with a screwdriver. -1996 dude and it's still sticky, tacky, and stringy when it's coming off. Is that not crazy. All the heat from the sun, being in the elements. Look at it. Next step, after we got our panel off we ScotchBrited it. Took some wax and grease remover and got everything off of it. It's prepped and ready to go. We have our vinyl laid out. We've already pre-measured it. We want around a half inch overlap for the back of the panel. That's pretty much what we got now, right? -Grab you some sharp scissors. Measure twice, cut once. This vinyl here we went down the road to the local crafts store. Just picked up some regular black vinyl. It's nothing special. It's not automotive grade or anything. Just something that looks nice, has the pattern on it that you want. -This is something you could do at home in your garage no problem. You know what I mean? -We're doing it right now. -Ow! Just kidding. Keep going. -I'd rather not cut your finger off. -I'd rather you not either. -Was you in boy scouts? You know how to fold it like a flag? -Do I look like I was in boy scouts to you? -Yeah, kinda. -This stuff comes out in a string or a fog almost. Eight to 10 inches away it recommends. Then you want to spray it to where it goes all over the floor and everything at the same time. Not really but this tip's clogged up. So we're making do with what we got. You want to get an even coat though so as it tacks up it'll stick evenly across your panel. -You making spider webs over there? -I am. Welcome to Halloween decorations with Brian and Jason. 10 minute sticky time. -Who sprayed that on there? -Spiderman. You never seen that before? -You got a good amount of overhang? -Well no. That's much better. We got it laid as flat as we can lay it. I'm going back with the roller now and pushing it tight. We're starting at the top seam and work our way down. That way we can put pressure on the vinyl and keep any creases and rolls out of it. You see how flexible this is? It's almost impossible to keep it from moving. With this roller it helps the adhesion and to smooth out any wrinkles or anything. Once it dries up then we can go back with a steamer and steam the vinyl like you do leather to get anything else out of it that we need. For right now this is the best way we can do this by hand. We want a quarter inch lip all the way around. That's pretty much what we have across the top, but on the ends one's a little longer than the other, which is fine. The bottom one definitely has gotta be trimmed. Slide it off the end of the table this way. I want to push it and let it cut it but they ain't that sharp or I ain't that smart. One of the two. -Something's not that sharp here. -Combined effort here. -I'm observing the first one and I'll do the second one. [ Music ]
It's also funny you can spray that stuff into a cap and then hang it on. -I try to pull it as tight as we can get it. Start at one end and work your way down. Once you get it pulled over and tacked then we'll roll it with the roller. Just try to keep it tight. That's phenomenal I think. How does it get any better than that. That looks killer to be some drugstore vinyl if you will. -$20 dollars in vinyl. -Up next, nothing is as simple as it seems. -I don't mean to burst your bubble but there's another attachment point.
[Brian] Now that we've got our vinyl replaced the next step is to reattach our plastic panels back to our quarter panel trim. As you seen before, use a plastic welder iron to heat up the factory glue seams so remove the panel. All we're gonna do is reverse that process. A couple of things you need to remember. Whatever type plastic you're welding you need to do a stick test with your filler rods or pieces. If you don't have that like us we created a two wheel drive out of a four wheel drive. I just cut pieces of the shift lever box out of the floor. This is ABS plastic and you know it will stick because it's the same type of material. All we're gonna do is heat it up. We're gonna melt this tab flat right back where it goes. Always do that stick test though because it may not be the corresponding plastic and stay. Just gonna heat it up as much as I can with what's already here and I'm gonna add some material to it. Make it look as smooth as I can. Then the rest of it's fine. It's gonna be hidden in the back. Good idea, you can quench it with water or air and we've been using the air hose as Jason's been holding the panel up. Let's see what it looks like. [Jason] Hopefully it looks good. -That's awesome. -How's the gap look? -Just like the factory. That is ridiculous. It's hard to believe it's 20 bucks worth of vinyl. It's a spray adhesive and two hours worth of work or three for both maybe? Looks brand new. -I'm impressed. -We got all of our interior parts dyed from the tope or tan color from the factory to all black. We're gonna stick with the '90s theme we had talked about and we're gonna put a two tone paint job on our '96 Tahoe. We are gonna stick with black and red just like our black top colors. However in doing so we've got to separate the body from the chassis. -One you get the body and the chassis separated I'm gonna wire brush the chassis while he's prepping the body for paint. I'm gonna brush on some red paint and help break up the engine bay. -Look at this bolt right here. Jason look at this. This was a wish and a promise away from breaking. [ Music ]
I pushed the harness through the taillight holes already too. I have very low hopes it's going to but come on. -Anything's possible. -I already got all three of mine. I'm taking them out. -My question is what does that hold? -We'll find out when it falls. -I don't think it's the bumper. I don't mean to burst your bubble but there's another attachment point. [ Music ]
[ metal clanging ] -Bingo! [ lift – mechanical humming ] -Oh yeah, that's better. -I can go ahead and disconnect the heater hoses. What the hell was that? -It might have been the fuel neck. [ lift humming ] -Yeah baby! -It's off. -Sticking with our '90s traditional build we really wanted to reuse as much of this vehicle as we could. I feel like we've really done that. Everything in here is the factory plastic that came with the vehicle. We're even gonna re-dye the headliner. We've got new carpet, new seats coming, and we're gonna put a dash cover on it. After all of this is complete this will be the '90s Tahoe build you really wanted to drive even if you couldn't afford it.
Show Full Transcript
[Brian] Today on Blacktop Speed Shop. The hell was that? Yeah baby! [Jason] It's off! -We're tackling an unfinished '90s icon and turning a toothless Tahoe into a ride you can hear come down the street. -This truck came with 250 horsepower from the factory and this makes 650. What more could you ask for? We're gonna completely change the look but keep it old school. A few touches that'll kick it up a notch. Hopefully it looks good. [ Music ] -Back in the '90s you were really cool if you had a Chevy Tahoe. You were extremely cool if you had a two door two-wheel drive Chevy Tahoe and that's exactly what we have here. So we found this unfinished project here in the warehouse we've had our eye on since our show began and we want to give it the Blacktop treatment. Here it is, our new build. This is a 1996 Chevy Tahoe. Definitely unfinished as you can see but we do have plans for it. Why don't you tell me a little bit about it? -We want to keep this build '90s inspired. We're gonna start with some paint and body work. We got some wheels and tires. We got suspension, brakes. We also have to redo the whole interior. We're gonna do a couple of modern things in there. The biggest thing I'm ready to do is this. This is our 383 small block Chevy that Engine Power built for us. They did a new rotating assembly, new top end, big turbo. Ready to for the Tahoe. This truck came with 250 horsepower from the factory and this makes 650. What more could you ask for? Single turbo, new style fuel injection on the old school platform. Paint match the valve covers. They put this beautiful billet front drive on it. Most people go turbo LS. I wanted something a little different. So I asked for a small block with a turbo instead. This is gonna make this thing really fun to drive. -Before we do anything we've got to get the interior out of this thing. We are gonna retain a lot of the factory interior and we're gonna do some dyeing to change the color. Ready to get started? -Let's go! [ Music ]
We're not doing that? Okay. Sorry. -Violence! [ Music ]
-Be careful with these seats. I need them. What's this? -Snake. -Watch out, there's a snake. [ snake hiss ]
Got another snake. -Freshly soiled carpet. [ Music ]
Sticking to our '90s themed build we're reusing all the trim panels inside of our '96 Tahoe but we are gonna update the color. So we want to change the color of our trim panels, the dash, the headliner. We're putting different carpet in it cause the carpet is destroyed in this thing. To do that we're using some spray can vinyl fabric dye is what we're using. I've got this trim panel already addressed, rough scuffed. All I used was glass cleaner and a red ScotchBrite pad. So around 320 grit or so. I've taped off the fabric portion of my trim panel because we are gonna two tone these. Just adding a bit more flare. I want to show you what actual rattle can looks like, or spray can as people call it. This piece looks brand new. This was just like this. Had some repair area in it we had to do. All in all, sticking to the '90s theme, you can't even tell. We just gotta get it done. [ Music ]
I'm staying six to eight inches away from my panel and still using it just like I would a gun. Around a 50 percent overlap but I am not getting full coverage with my coats. One thing these cans do offer is a pretty nice fan pattern. It doesn't spray a round cone pattern like most spray cans do. That's still impressive as well. Makes you feel like you're behind the gun while not being behind the gun. Make sure you get all your surfaces especially color change. We're going from a tope or tan color, buck skin if you will, to black. So we're making sure to get all of our edges. Even if you think it's not gonna show coat it anyway. If you don't it'll show, Murphy's Law. Once we get it on we'll wait about 10 or 15 minutes. Then apply my next coat. What I have learned from previous panels we have done. Two to three coats seem to be the sweet spot of the coverage. We may need to do more or less but on average two to three will get you. It's been about 10 minutes in between my first coat. I'm getting ready to apply the second but I want you to notice what I've done as far as see-thru coat. This is our orientation coat if you will and it gives my next couple of layers something to stick to. When you spray it like this it dries super quick. You don't have to worry about it running and you can control your spray a lot better. [ Music ]
We're gonna get down in the holder here. The side panel pouch as much as we can. It's not gonna be perfect but you won't see it. [ Music ]
[ spray can hissing ] Next thing we gotta do is dye this fabric. Up next, is this interior too far gone to repair? I hope this looks better once it's set and dried.
[Brian] We're repurposing our door panels cause they were worn out. The wrong color for what we wanted. We added some rattle can dye and the plastic looks brand new. Now we've masked that off and we're starting on the fabric, which does have a couple of tricky things you have to look out for. Now we're gonna apply gray on the fabric to break up the black we laid down on the rest of the panel. [ Music ] Same rules apply here. Spray a nice, even coat six to eight inches away from the surface. Let that flash off so the carpet don't become stiff.
To keep the carpet from being matted up and stiff. A nylon bristle brush would be a lot better but we had chip brushes in the shop. So that's what we're using. Light coats, multiple coats, and keeps the carpet pliable, moveable. [ aerosol can hissing ] [ Music ]
Crazy man! I'm gonna criss cross my pattern to make sure it gets down in the fabric to make sure it doesn't look motely and everything's in a uniform color. I've been going horizontally and now I'm going diagonally across it. I'm gonna do the same thing with the bottom of the panel. [ Music ]
As you can see the top door trim panel is the color and the look that we were going for. This paint's fantastic. Definitely something you could do at home in your garage with a simple ScotchBrite, some glass cleaner, and some vinyl and fabric dye. This was the original door panel. This was the factory color. If you noticed how stained up they are as well. This stuff covers like a dream. We got the rear panels to do still but all in all super excited. Sticking with our '90s theme build we want to reuse as much of this vehicle as we can. This being a two door Tahoe it's hard to find parts, especially trim panels, things like that. Obviously we've got some wear and tear issues. It is a '96 model vehicle. So we're gonna do some vinyl repair. We'll just get started. First it says to cut some pieces we want to fill in as a backer, and then we'll put some stuff over top, some adhesive. Make sure you cut your patch larger than your repair area. Basically this is gonna take up the space that's missing where the foam's dug out of this panel. Once we put the adhesive over the top it should take care of everything else. Make sure it's spread out in there. Next we'll take our adhesive. This particular adhesive is one part. So basically you just squirt it out, wipe it on, and it dries on its own. There's no catalyst or activation required with this brand. Make sure you get it good and covered. We could go back and address it as it starts to dry. Make sure your area is fully covered. It's not gonna be perfect but with the pattern duplication pieces they have once we get everything where we want it and it recreates the grain pattern in your vinyl or leather. This is just a plunger to push the grain back in it. If this don't look the way we want it to we may go back and wrap these in vinyl but I think this repair will work good before we dye them. [ Music ] Here I'm using a razor to scrape off any excess material so it's nice and flat. [ Music ]
Let that one set up. I hope this looks better once it's all set and dried. [Jason] Coming up, if at first you don't succeed just bury your mistakes. -Welcome to Halloween decorations with Brian and Jason.
[Brian] After our repair attempt it doesn't look the way we want it to, especially for a SEMA build of this quality that we're doing. As you can see, we did get the tears repaired. However, they are lumpy and this adhesive is old. It's wanting to roll up. So we're gonna go a different route. We're gonna show you a different way. We're gonna pull the panel off and rewrap the vinyl. To do so you've got to turn the panel over. On the back side of this panel they are heat melted to this panel. So if want to remove that we have reverse this process. The easiest way we have found is with a plastic iron. We tried a heat gun but it heats a large area and we want to keep it precise. All you've got to do is put some pressure on it and we'll pop the panel out. Come on Jason. Let's get this done buddy. I'm using a pry bar cause I want a longer reach. You could use a flat blade screwdriver as well. You see it don't take a whole lot of heat for it to remove. [Jason] No heat necessary. -Lack of adhesive is all I heard. -One stop shop for all your upholstery needs. -Brian and Jason's custom upholstery. [ Music ]
-Done! The factory put staples in the edges of these. Probably to keep it from fraying. It staples the vinyl into the plastic to keep the vinyl itself from peeling off from the panel. They don't seem like they're in there super well. They just kinda pop out with a screwdriver. -1996 dude and it's still sticky, tacky, and stringy when it's coming off. Is that not crazy. All the heat from the sun, being in the elements. Look at it. Next step, after we got our panel off we ScotchBrited it. Took some wax and grease remover and got everything off of it. It's prepped and ready to go. We have our vinyl laid out. We've already pre-measured it. We want around a half inch overlap for the back of the panel. That's pretty much what we got now, right? -Grab you some sharp scissors. Measure twice, cut once. This vinyl here we went down the road to the local crafts store. Just picked up some regular black vinyl. It's nothing special. It's not automotive grade or anything. Just something that looks nice, has the pattern on it that you want. -This is something you could do at home in your garage no problem. You know what I mean? -We're doing it right now. -Ow! Just kidding. Keep going. -I'd rather not cut your finger off. -I'd rather you not either. -Was you in boy scouts? You know how to fold it like a flag? -Do I look like I was in boy scouts to you? -Yeah, kinda. -This stuff comes out in a string or a fog almost. Eight to 10 inches away it recommends. Then you want to spray it to where it goes all over the floor and everything at the same time. Not really but this tip's clogged up. So we're making do with what we got. You want to get an even coat though so as it tacks up it'll stick evenly across your panel. -You making spider webs over there? -I am. Welcome to Halloween decorations with Brian and Jason. 10 minute sticky time. -Who sprayed that on there? -Spiderman. You never seen that before? -You got a good amount of overhang? -Well no. That's much better. We got it laid as flat as we can lay it. I'm going back with the roller now and pushing it tight. We're starting at the top seam and work our way down. That way we can put pressure on the vinyl and keep any creases and rolls out of it. You see how flexible this is? It's almost impossible to keep it from moving. With this roller it helps the adhesion and to smooth out any wrinkles or anything. Once it dries up then we can go back with a steamer and steam the vinyl like you do leather to get anything else out of it that we need. For right now this is the best way we can do this by hand. We want a quarter inch lip all the way around. That's pretty much what we have across the top, but on the ends one's a little longer than the other, which is fine. The bottom one definitely has gotta be trimmed. Slide it off the end of the table this way. I want to push it and let it cut it but they ain't that sharp or I ain't that smart. One of the two. -Something's not that sharp here. -Combined effort here. -I'm observing the first one and I'll do the second one. [ Music ]
It's also funny you can spray that stuff into a cap and then hang it on. -I try to pull it as tight as we can get it. Start at one end and work your way down. Once you get it pulled over and tacked then we'll roll it with the roller. Just try to keep it tight. That's phenomenal I think. How does it get any better than that. That looks killer to be some drugstore vinyl if you will. -$20 dollars in vinyl. -Up next, nothing is as simple as it seems. -I don't mean to burst your bubble but there's another attachment point.
[Brian] Now that we've got our vinyl replaced the next step is to reattach our plastic panels back to our quarter panel trim. As you seen before, use a plastic welder iron to heat up the factory glue seams so remove the panel. All we're gonna do is reverse that process. A couple of things you need to remember. Whatever type plastic you're welding you need to do a stick test with your filler rods or pieces. If you don't have that like us we created a two wheel drive out of a four wheel drive. I just cut pieces of the shift lever box out of the floor. This is ABS plastic and you know it will stick because it's the same type of material. All we're gonna do is heat it up. We're gonna melt this tab flat right back where it goes. Always do that stick test though because it may not be the corresponding plastic and stay. Just gonna heat it up as much as I can with what's already here and I'm gonna add some material to it. Make it look as smooth as I can. Then the rest of it's fine. It's gonna be hidden in the back. Good idea, you can quench it with water or air and we've been using the air hose as Jason's been holding the panel up. Let's see what it looks like. [Jason] Hopefully it looks good. -That's awesome. -How's the gap look? -Just like the factory. That is ridiculous. It's hard to believe it's 20 bucks worth of vinyl. It's a spray adhesive and two hours worth of work or three for both maybe? Looks brand new. -I'm impressed. -We got all of our interior parts dyed from the tope or tan color from the factory to all black. We're gonna stick with the '90s theme we had talked about and we're gonna put a two tone paint job on our '96 Tahoe. We are gonna stick with black and red just like our black top colors. However in doing so we've got to separate the body from the chassis. -One you get the body and the chassis separated I'm gonna wire brush the chassis while he's prepping the body for paint. I'm gonna brush on some red paint and help break up the engine bay. -Look at this bolt right here. Jason look at this. This was a wish and a promise away from breaking. [ Music ]
I pushed the harness through the taillight holes already too. I have very low hopes it's going to but come on. -Anything's possible. -I already got all three of mine. I'm taking them out. -My question is what does that hold? -We'll find out when it falls. -I don't think it's the bumper. I don't mean to burst your bubble but there's another attachment point. [ Music ]
[ metal clanging ] -Bingo! [ lift – mechanical humming ] -Oh yeah, that's better. -I can go ahead and disconnect the heater hoses. What the hell was that? -It might have been the fuel neck. [ lift humming ] -Yeah baby! -It's off. -Sticking with our '90s traditional build we really wanted to reuse as much of this vehicle as we could. I feel like we've really done that. Everything in here is the factory plastic that came with the vehicle. We're even gonna re-dye the headliner. We've got new carpet, new seats coming, and we're gonna put a dash cover on it. After all of this is complete this will be the '90s Tahoe build you really wanted to drive even if you couldn't afford it.