MuscleCar Builds

Parts Used In This Episode

XS Power
XS Power Starting Battery
Advanced Plating
Polishing and plating of all chrome and stainless pieces
Air-Ride Technologies
Front Strong Arm System with Shockwave Tubular Upper and Lower Control Arms, Lower Cross-shafts, Bushings, Ball Joints, Shockwave Airbags and Bracketry, Rear Strongarm System with Tubular Upper Arm, Lower Control Arms, Adjustable Panhard Bar, Airsprings, Shocks and Bracketry
Dakota Digital, Inc.
1961-1962 Chevy Impala Digital Instrument Panel System
Doug's Headers
58-64 Full Size Chevy Ceramic Coated Headers
Flowmaster
Dual Exit before Rear Tire Exhaust System
Lamar Walden Automotive Inc.
Bracket and Pulley Set for 348 & 409 Engines
M&M Hot Rod Interiors
Custom Interior Fabrication
MHT Luxury Alloys
20 X 8.5 Nitrous 5X4.75 Chrome Foose Wheels, 22 X 10.5 Nitrous 5X4.5 Chrome Foose Wheels
Nitro-Plate
Coating of Headers
Video Transcript

Today on Muscle Car project. Red Sled is ready for her big finale. See what it takes to turn back the clock on a piece of muscle car history. Find out why this race ready Mustang marked the end of an era

and Rick steers us in the right direction with a low buck steering box

rell,

hey guys, welcome to muscle car. A lot of vehicles have gone through our shop and some as I'm sure you've noticed have a tendency to stick around a little bit longer than others. Now, we knock out a few of them in just a couple of days like a year, one track car or the Magni

Mustang. Now, others would transform in just a couple of months like blue collar buick or the UFC

Ka. And then there are those that have their way of hanging around for a while, like altered Eagle. Now, some of y'all give us a hard time about these type of projects. But if you've ever tried to roll the clock back on a 50 year old piece of Swiss cheese, you know, it can't be done overnight. And that brings us to project red slit

straight out of a corn field. This poor thing was hanging around since the very first episode of Muscle car. When we finally decided to roll it into the shop and we knew it was gonna be our biggest challenge yet.

But we didn't let that stop us. We got right to work, blowing it apart, then cleaned up the X frame and got busy adding some braces.

We mocked up the air ride strapped on the foose wheels and stood back to watch it do its thing.

Next. The frame got a layer of powder coat because it's tough and beautiful.

Back at the shop, the body got some major surgery including new pans, water tubs, patch panels, hammer and dolly work and new braces.

We got some of the panel smoothed out primer and test fitted and check the gaps before going any further time to drop in the heart of this project. Our 500 horse Chevy 409 backed up by a four speed.

The true test of our devotion came when we pulled the body back off and dedicated untold hours to the body work.

This layer, Philip primer was blocked, then we re primed blocked again and sealed it up before we finally let the old girl live up to her name.

We each added our own custom touch Rick with an airbrush emblem and I

fed up a one off console

after taking care of a few more details and final assembly. It was ready to head out to the upholstery shop for the final phase of this total restoration.

Today, we can finally say the words that we've been waiting so long to hear. Project red sled is done

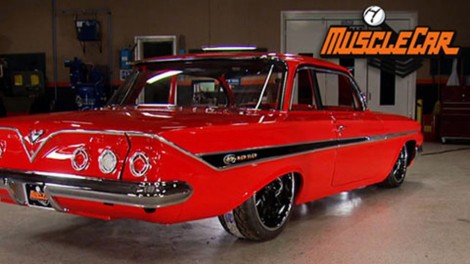
and here she is looking 50 years younger. Thanks to guys like advanced plating year one and di code to digital

drenched in chrome rolling on 20 twos and sporting eye popping pain and graphics. There's no danger of losing red sled in any crowd.

The Flowmaster exhaust snakes its way under a well detailed chassis fed by a nitro plated set of Doug's headers.

Lamar Walden's accessories and pulley set along with excess powers, compact battery and the final details to our dual quad 409.

The last time you saw red slit, it was headed out for a major upholstery makeover M and M hot rod interiors is known for their custom work and I thought it'd be cool to see how the pros would handle this kind of job. So I headed down to Alabama to take a look at the progress,

Wayne and Pamela mcgriff not only own M and M, they do a lot of the work too

and they were ready for Redlin

with dozens of high profile builds under the belts. It's no wonder they were able to come up with a plan to make the interior as unique as the rest of the car

in the old panels. As a guide, Pamela started making fresh ones out of aluminum.

Meanwhile, Wayne worked on recovering our old bucket seats.

It takes true craftsmanship and a lot of patience to do what these guys do. And for everyone at Eminem, it's a real labor of love

and the results speak for themselves. They knock this one out of the park

with a look that's classy with a sinister edge.

The Dakota digital gauges give a modern twist while still blending in with the classic styling.

There's only two things missing. Now, a passenger and a driver

up next giddy up 409. It's the big payoff for years of hard work

and later Rick put some wow into rebuilding your steering box.

We've all got a top 10 list of cars we want to drive and high up on my list has always been a 409, a four speed Impala

red sled was born during a time when they weren't shy about chrome fins may have been on their way out. 1961 marked a new direction for GM styling,

smooth and clean with plenty of eye candy.

And in case you're wondering how big her lungs are, once you crack open those two fours,

you know, pass just about anything on the road.

It's kind of cool to finally be driving it.

You know, it is weird though when you think about all the work and stuff that goes into them

and then the actual joy of getting to drive it around. It kinda

blurs all them memories of words.

Don't go

ride,

man.

It does,

dude.

For one reason, I'm not really worried about driving. I'm sitting too good to have to worry about driving.

There is a pothole there

where,

and this old girl is a cruiser. I'd love to take her to a car show or better yet. No. Drive in movie theater. Yeah, that sounds cool. I know where one's at. Not too far from here if you want to check it out. Oh, heck yeah. You mind if we pick up a girl, nothing personal dude, but I don't know if I want to sit in a dark car with you for two hours. Now. That's cool. Let's pick her up right on,

honey. This is so romantic.

Um But where's Tommy?

No, that's all right. Don't worry about Tommy. I gave him some food and water in a bowl. What?

Sorry

man, Rick. Come on, man.

After the break. Mustang plus Shelby plus cover jet equals one mean muscle car

and later give your biceps a break with a steering box rebuild.

Today's flashback. A 1969 Mustang, Shelby GT 500.

The man. Carol Shelby engineer, race driver,

the car, the Shelby Mustang GT

when Carol Shelby and Ford joined forces in the sixties to make a race ready. Mustang, it was a perfect match.

The GT 350

GT 500 would cement the Mustang's muscle car reputation for.

But as the six wore on. The happy couple started drifting apart. Shelby was all about racing and Ford wanted more luxury. Shelby gave it one last go in 69 and then called it quits.

Yeah. But he went out with a bang

numbers matching GT 500 dipped in candy apple red is a fitting end to a great era of performance

outfitted with a Ram Air 428 Co

Jet. It cranked out well over the officially rated 335 horsepower

and it could hit 60 in just 5.5 seconds.

It's got the stock 735 carburetor

original exhaust manifolds, original intake

and

of course, we had

it dyno and it was pushing right at four

50 horsepower. Mustangs had a whole new look for 69 and so did the Shelby, previous models had all been built at Shelby American in L A. But as the relationship with Ford went south, production went north and east to Michigan where it was built right alongside its stablemates. All GT 500 started off as Mach One. A specially designed full width grill was fitted with fog lights underneath. Fiberglass had been used on the hood and spoiler before. But this marked

a

first time it was used for the fenders too

in the rear. The dual exhaust was routed to the center with newly styled tips. Oh, and how about those scoops? This thing's got more scoops than a Baskin Robbins

there are five just on the hood alone, three face forward and two faced backwards for maximum air flow.

They were called NASA Ducks, which I think stood for not another scoop already.

The front fenders and the rear quarters each got a scoop too which fed air to cool down. The

performance enhancements were the same as a mach one traction lock, rear axle and heavy duty suspension. It all rolled on E 70 by 15 wide ovals wrapped around unique cast aluminum five spoke wheels inside was a mixture of race features and creature comforts.

There was a roll bar and harness plus a console shifter with light switches and gauges, a radio and a nifty fold down rear seat known as a sport deck. The rising cost of the GT 500

4200 bucks

along with competition from the mock one and Boss Mustangs cause sales to Plumb.

Shelby parted with Ford in the summer of 69

which would have been the end of the Shelby Mustang.

Yeah, it would have been except Ford, still had 789. Shelby's left at the end of the year.

So they added a couple of tweaks and resold them as 70 models. Now that makes the 69 Shelby's for all practical purposes. The last of that fine breed of performance cars

coming up,

Rick pitches a how to project. You won't want to miss, stop having a boring box stop having a boring life.

You're watching Muscle Car for a DVD copy of this episode, just go to Power Block tv.com and order your copy for just 595 plus shipping and handling. Start your own muscle car collection delivered right to your door from the power block.

You know, if you're looking to get a really good work up for your arms and drive to work at the same time, you can do both simultaneously. Just pop in an old greasy steering box like this. You get this camera man, stop having a boring box. Stop having a boring life. It's not gonna help you steer your wheels, but it will help you get those biceps. You've always wanted that leaking fluid moves up your tire rods and when it gets on your exhaust, it gives you that great burning oil smell that always attracts the ladies. You ready for it? Here's how to order.

All right guys, I think you get the point if you'd rather actually enjoy driving your car than an old busted up leaking steering box. So it can pretty much turn your pleasure cruise into a real drag. Now, the good news is it's a pretty easy fix and you can save about 100 and 50 bucks by rebuilding your unit versus buying a refurbished one off the shelf.

Build on a budget muscle car projects that save you time and money.

And when you call at the part store to get a rebuild kit you can just go by the year make and model of the vehicle. But if you're thinking the box may have been swapped out at some point, then your best bet is go by the numbers that you see stamped right in the top of the box. Now, removing the steering box is pretty straight forward. So I went ahead and dropped it out and got this one cleaned up. Now, once you get it on the bench, the first thing you need to do is get that pitman arm pulled off.

Now, these things can be really tough to remove. So have a puller and torch ready just in case it's got an attitude.

Try to heat the arm but not the shaft and you don't have to get a cherry red. You just want it hot enough to expand a little allowing it to come loose.

And before you put the time and money in the rebuilding the box, a quick and easy thing to check is make sure that your sector shaft right here is straight because if the car has ever been in a collision, the wheels have been hit.

It can actually take that pitman arm run all the way to one side and twist that shaft right there. So just make sure that your blinds are straight

before you pull it apart, make sure to center the steering shaft and that's too, that's centered.

The sector shaft comes out by removing the sea cliff and bolting the cover and tapping the shaft out with the soft hammer

to access the rack. Piston. Use an all to push the retaining ring out of the groove. Don't worry about saving it. A new one comes in the rebuild kit

to push the end plug out, rotate the input shaft to the left

just like that. Now, you can pull the piston out and be careful because there's gonna be some ball bearings falling out here in a second

and keep those bearings because you are gonna need them.

Next. Remove the C clip from the adjuster plug, then use a brass punch to loosen the lock knife.

Now, using a spanner wrench, remove the adjuster plug and pull the stub shaft and steering worm gear from the housing.

Where'd you

go

next? Try out the outer and inner sector shaft seals and washers, then flip the housing over and tap out the needle bearing.

I got the housing blasted and painted looking good and I got all the rest of the parts here cleaned up and ready for reassembly. I ran down and bought a kit that came with all of these parts and it ran under 50 bucks.

Replace all the seals on the stub shaft, making sure not to pinch or damage,

press the new needle bearing into the adjuster plug, lube, the plug with some petroleum jelly and see it on the stub shaft.

The rack piston gets a new seal. Then those barons you save, come into play line the bearings up in the guide.

There are two different color coded sizes and you need to make sure to alternate them

reinstall the guide to the piston.

The rest of the bearings go inside the bore using petroleum jelly to keep them in place. Now again, alternate the sizes the worm should drop right in if you did this all correctly.

Now you can pull the worm gear back out, attach it to the stub shaft and insert the assembly into the housing.

After reinstalling the adjuster plug, tighten the lock nut with a brass drift.

The rack piston goes in next and must be threaded onto the worm gear inside the housing. It's really easy to knock the ball bearings out of the grooves. So just take your time,

the end plug and O ring go in next secured by a new retaining ring.

The sector shaft bearing is tapped in next, followed by new seals and washers

and make sure to install the double lip seal on the outside.

The sector shaft gets a new gasket, then gets tapped in, just make sure everything is centered before you put it in. Then tighten down the cover,

check the box for smooth operation lock to lock.

The final step in rebuilding the steering box is adjusting the preload on the pitman arm. It's kind of the same thing as adjusting preload on a wheel bearing.

You don't want it too tight

otherwise it'll start galling parts. You don't want that too loose and you can have problems also.

That feels pretty good right there.

Now, remember if you guys got any questions about anything that I've used today, hop online and go to Power Block tv.com. You can check it all out.

I gotta go put this back on the car, but for this week we're out of time. So until next time we're out of here.
Show Full Transcript