HorsePower Builds
Want more content like this?
Join the PowerNation Email NewsletterVideo Transcript
The Bel Air is back and ready for a new rear end. So keep yours planted
today on horsepower TV. We're bringing back our Bel Air bracket racer for a new nine inch rear end along with heavy duty bullet control arms and high performance drag shocks.
We'll have a quick tech on the best way to start up your street machine
and visit a California car collection representing over 60 years of high performance history.
So hang on for horsepower TV.
Hi, welcome to horsepower TV. And more of our Bel Air bracket racer build up.
We got a whole parcel of parts for a white lightning here today in the shop. But first, what do you say? We take a look at what we've done so far on this project.
We took a GM performance parts 502 short block
added Edelbrock heads and induction,
plus the comp cams roller set up,
then backed it up with a four L AD E overdrive automatic from jet performance.
Finally, we installed a mallory ignition, a
Griffin radiator
and A B and M shifter.
Since we're adding all that power and we plan to bracket race our Bel Air we're gonna need a more substantial rear end. Now, that thing originally came with a 12 bolt on, but somewhere it got swapped out for a week or 10 bolt.
So we called our friends at Curry Enterprises and they sent us this new rear end using their nine plus race carrier.
Now, the housing itself is the stock width and it uses the original GM brackets. So it's a direct bolt in
the center section, however, uses a 350 gear with a torque sensing limited slip. And of course, we finished the package off by ordering a set of their 31 supplying axles and hit them drilled for a Chevy bolt pattern.
Well, we got the bel air supported on jack stands for safety. We got the wheels off so we can get started here by removing the shocks.
Now that I got the rear end supported on this jack,
I can start removing the rubber brake hose.
The panhard bar is next.
Finally, we can end both the lower control arms at the forward attaching points.
All right. That ought to be low enough to clear. Yeah, it's getting on the other the way
you
start setting up that other rear end.
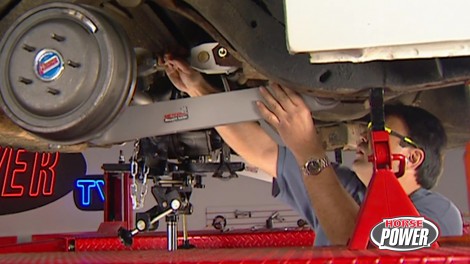
Now, before we both that new rear end in place, we're gonna install a set of control arms to help keep it properly located.
We got these from Metco and they're made from solid billet aluminum for strength and lightweight. Now, they use urethane bushings with metal sleeves to help minimize deflection. Now, the uppers are adjustable to get the best bite at the track and this narrow design allows the use of large diameter exhaust pipes.
Oh, we got lucky. The brake lines transferred perfectly from the old rear end of the new one. Now, once we get it bolted up in place, all we gotta do is reconnect this hose and leave the brakes. That's gonna save a lot of time. And
well, I guess I'm right on time with these control arms. Got some hardware
right here.
Thanks.
And while I've got easy access to the filler plug, I'm gonna go ahead and top off our rear end with gear loop.
Now, what we're using here is royal purple synthetic. It's a multi viscosity loop.
It's got a limited slip added, have already blended in.
Once we're done here, we can get this thing back on the jack.
Since we're setting up our suspension for the drags, we went ahead and ordered a full set of these three way adjustable shocks from competition engineering. Now,
they're gonna allow us to fine tune our suspension for the best traction
to adjust them. All you do is compress the shock,
then match up the indexing mark here on the shaft and turn the shaft until it lines up with the appropriate marks on the body.
And over the years you've heard drag racers refer to 90 1080 20 even 5050 shock settings.
Well, that first number refers to shock compression.
The second number is shock extension.
A 9010 front setting requires only 10% of the force to extend the shock. So the front end lifts quickly
and transfers weight immediately.
Yeah, but it takes 90% of the force to compress the shock. So the front end is gonna settle slowly and extend the amount of weight transfer for a longer period of time. Now, if you've got a lightweight car or the track has plenty of bite, well, you might want to try an 8020 setting or probably even a 6040.
Of course, the rears are just the opposite. Generally, you want stiffer compression back here to help you plant the rear tires. But hey, enough shock talk, let's get back to work
well with the rear end in place and the vehicle at normal ride height, we can go ahead and measure for our drive shaft and get it ordered from our friends at the drive line shop in Springfield, Missouri.
Now, what you wanna do is measure from the back of the tail shaft housing
to the center line of the Pinion Yoke.
It looks like we got about 61 inches there. Now, we also want to tell them what kind of transmission that we're using so they can include the appropriate slip yoke and
the type of pinion yoke that we've got back here. Now, this one happens to be a heavy duty 1350 series. Well, it's my opinion that we should take a break now so my partner can rest his rear end. Uh, keep yours in place though. We'll be back with more of our build up right after this
later in the show, a California car collection and the high performance family that made it possible.
Hi. Welcome back to the shop and more of our build up on Chuck's Bel Air bracket racer. Well, so far today we got our nine inch rear end bolted up along with new shocks and rear control arms.
Now we gotta tackle another issue and that's how to get more fuel to that 502 big block we dropped in recently.
Well, one thing's for certain, a mechanical fuel pump isn't gonna be part of the program
since the 502 just doesn't have a place to mount it.
So instead, what we're gonna use is this mallory high performance electric fuel pump. Now, it's got a fully machined housing that contains a G rotor pump assembly for constant stable pressure.
And of course, the oversized inlet and outlet make for unrestricted flow.
It also comes with this matching fuel pressure regulator.
Well, any time you're flowing that much fuel, you increase the possibility of pushing debris into your system. So to keep your floats from sticking or your jets from clogging, you also need a high flow filter like this one we got from Mallory. Now it's machined aluminum housing features, dual inlets
and outlets so you can feed a multi
carb set up. Let's check this out.
It uses a replaceable filter element to help you maintain your system's efficiency.
Now, when you're plumbing your fuel system, you wanna go ahead and install a fuel filter between the tank and the fuel pump. I got this one all ready for you. Oh, great, good timing.
Now, that way you're gonna keep the trash out of your pump and reduce the possibility of any damage. Now, we also mounted the pump close to the fuel tank because an electrical pump pushes the fuel a whole lot better than it pulls it.
Now, we're gonna go ahead and mount the fuel filter right up here
where it'll be out of the way.
Well, now that we've got the pump and the filter mounted, we can go ahead and start plumbing the system using some A N fittings, some stainless line, a
barb fitting and just a little bit of 38 rubber hose.
We'll finish plumbing the fuel system using this half inch aluminum line. And well, since we plan on mounting the battery in the trunk, we'll route this battery cable along with it and secure them both with zip ties. Of course, we'll keep it away from exhaust heat, moving suspension parts and the drive shaft. And well, here's a little tip for you. If you cap the fuel line like this, you'll keep debris out while you're routing it.
You know, racers have been mounting their batteries in the trunk for years. And for good reason,
the extra weight over that right rear tire helps plant the power. And believe me, this Holly Annihilator race cell has got some extra weight to it. Of course, it's also got 800 cold cranking apps more than enough to spin over the biggest big block. Now, we're gonna hold it in place using their billet aluminum, hold down bracket
and I think that,
uh, right about there is a good place for it. Now, I'm gonna go ahead and mark the holes for the mounting bolts while I'm at it. I'm gonna drill a couple more to drag those cables through
while Chuck's handling the battery back there. I'm gonna finish plumbing the fuel system by installing this fuel regulator here in a hole that was already in the inner fender. Now, once I get this nut started, we can cut this fuel line to the proper length.
After it's cut, we slip on a tube coupling, followed by this crush leave
then double flare to the end of the tube.
Then we connect it to the A N adapter here on the fuel regulator. Now, coming out of the regulator to the car, we follow pretty much the same procedure except here. We're using steel braided line because hard line would crack with all that engine vibration and movement.
Well, speaking of movement, we're gonna wanna move that old bel air off the starting line. It'd be kind of tough with regular street tires. So we ordered a set of these dot Legal et street slicks from Mickey Thompson. Now, these are 20 to 11 fifties. They'll fill up those wheel wells and give us a substantial footprint on the track.
Well, up front,
we're using their sportsman rubber measuring 28 7 50. Now, this lighter weight and taller diameter is gonna give us less rolling resistance. And for a classic nostalgic racer look well, we mounted them on these American torque thrust wheels. 15 by six is up front 15 by 8.5 in the rear.
Hey man, I gotta tell you, oh, white lightning is looking pretty good and it won't be long before we're ready to make some thunder with it. Well, I hate to rain on your parade but it's time for us to put the tools up for a while, take a break and hey, check this out.
It's good having them and looking at them, but you still wanna go out and grab him any chance
they make the parts that make enthusiasts go fast.
The Edel Rock Fun team coming up next.
Horsepower happenings is brought to you by Wyotech, the nation's premier technical training school.
Well, this week, how about a sneak peek at a unique car collection here in Southern California?
It's a show place that celebrates over 60 years of high performance history.
Great tribute to my grandfather and,
and my father and what they've done and,
and the company that they've built from just an idea.
Vic Edelbrock senior practically grew up with a wrench in one hand and a steering wheel in the other.
And although he broke racing records in his fame number 27 midget,
he had an even greater passion for developing ways to make more power.
A passion that would eventually help change the way we felt about our cars.
When World war two ended a new supercharged love of the automobile was beginning
along with the need for speed parts to make cars go faster.
V
senior was a pioneer in the high performance aftermarket and opened his first speed shop in 1949.
By then a younger Edelbrock was growing up in the business. Vic Junior
who took the company's reins after his father's untimely death in 1962.
Today, the family business has grown from that little speed shop to a publicly traded worldwide leader in the design and development of high quality high performance parts
in a way this unique collection called Vic's Garage symbolizes a family success story
and an ongoing passion for building bridges to better performance.
The idea that if you work hard enough,
you can do it.
I think that's an important thing
and it's something that we try to reinforce in our own families every day
that will really kick in the the fact of the history of the company,
the history of the industry and how it started in the,
in the early days and, and, and educate, you know, especially the young people that really don't know where all this came from.
Vic's Garage has everything from a replica of Vic Junior's first Triumph motorcycle to one of Big Senior's first roadsters.
It should come as no surprise that most cars are Edelbrock red and made to go faster than stock 80 Corvette and uh with a Donovan aluminum
uh engine in it and Nitrous, some vehicles are famous for breaking speed records like this socal car that was king of the Salt Flats in the fifties.
This recently acquired galaxy of Junior Johnson's caused quite a stir at NASCAR
in the mid sixties. This galaxy has got more tricks and cheating in it than,
than you ever ever want to see. In fact, it was a car that caused the templates to be made.
Uh NASCAR finally realized they had to do that after they saw this car.
Now, some of the cars you might find here on any given day aren't here because they're headed to the track.
The ow
Brocks, not only believe in driving these things,
they believe in racing them.
The whole Edelbrock family believes in walking the walk and living the high performance lifestyle.
You'll find the family fun team at vintage car racing events everywhere
big behind the wheel of his rare 59 custom body blister
daughters Cammy and Christy driving their vintage 67 Shelby Mustangs,
Vic's wife, Nancy is the official timekeeper and crew manager.
It's good having them and looking at them, but you still want to go out and drive them when you join them.
Big garage may be the showplace of the new corporate headquarters edition. But on the other side, as Cammy shows us, there's a massive modern new warehouse.
This uh warehouse has 35 ft high ceilings
and we can go six pallet, we're six pallets high right now
and we can go an additional seventh row if we wanna expand in the future, which with the way we're going these days, I, I might happen soon
with technology that looks straight out of Star Trek. This warehouse is the only way to keep pace with the growing demand for the company's products. A
list that keeps growing with the Edel Rock store.
A story that's never ending. Never finished just like the new show place called Big Garage.
I had a painting instructor once who told me that a painting is never finished
because if you, if you finish it, then it's overdone.
So I'd like to say that this is a work in progress.
Vic's Garage. A work in progress, celebrating the first family of high performance.
Yeah.
Hey, let's face it.
The reason many of us spend a lot of our money and most of our time working on our cars is so that we can be seen at our local cruise spot on a Saturday night,
but it's hard to go cruising if you can't crank your motor. Now, you chevy guys know exactly what I'm talking about, especially if you've got a big block with high compression and a set of headers.
Now, the problem stems from a heat sink condition in the starter. Now, here's some things that you can do to help alleviate that problem first, make sure that your ignition is set to factory specs and I'm not talking about just your initial timing. I'm also talking about your mechanic
and advance. Now, too much timing is gonna cause your engine to kick back against the starter and make it difficult to turn over.
Also make sure you have a high torque starter to help overcome the high compression in big cubes. Now, you can identify it
by this spacer here at the back of the solenoid. Now that spacer is required because the starter uses a longer armature and more windings. By the way, this is what a standard starter looks like.
Of course, if you've already got a high torque starter, then the heat sink problem that I told you about earlier can be helped out tremendously with a heat shield like this one from moroso. Now, it's made from aluminum and installs right on the starter like that
to keep it away from exhaust heat.
Of course, many starters have become popular too, not only because of their lightweight, but their diminutive size also keeps them further away from your headers.
Well, needless to say you also wanna make sure that you have good grounds, no corrosion on your battery terminals and that your battery cables are of adequate size.
Well, I hope these tips have been adequate enough to keep you cranking cruising and looking good on Saturday night.
Well, here's some good looking hot parts coming up for you next
horsepower TV S hot parts. A close up. Look at the latest in high performance hardware.
Well, here's the latest version of Holly's popular modular carburetor. It's their street Avenger and they claim it's the most trouble free carb ever
with everything from easily adjustable vacuum, secondary and blow proof power valve to range, restricted float adjustment and electric choke. Of course, each one comes with close limit jetting
and CFM ratings that range from 570 to 870. Prices start at 350
now to keep your Holly Carb jets organized.
How about this billet pro jet holder from DS S performance products. Now it'll hold 100 and 44 jets and its layout allows you to arrange them for easy access. Of course, if you've got access to an extra 40 bucks, hey, you can get one of these.
Of course, you can get more power from your engine with Edelbrock
Nitro system kits are available for carburetors from 50 to 250 horsepower and for popular fuel injection applications from 50 to 120.
Now, the aluminum spray plate is fully machined and works with a pair of high flow solenoids to introduce the Giggle Gas.
Now, the kit also includes a 10 pound bottle, stainless steel lines and all the hardware that you need to install the kit.
Of course, you're gonna have to squeeze your wallet a little bit. Prices start at $350. Well, we're about out of gas for today, but we have time to tell you about next week's show. And here's a look.
Will it be the Mopar,
the Ford or the Chevy three muscle cars loaded with big block cret motors from the big three. It's a, one of a kind crate motor challenge to see who makes the most power.
Plus we'll take you to a school in Las Vegas where the curriculum is driving 140 miles an hour in an open wheel champ car.
And remember high performance fun is what this show is all about
for information about the products used in today's show and more. Check us out online at horsepower tv.com
Horsepower TV is an RTM production.
Show Full Transcript
today on horsepower TV. We're bringing back our Bel Air bracket racer for a new nine inch rear end along with heavy duty bullet control arms and high performance drag shocks.
We'll have a quick tech on the best way to start up your street machine
and visit a California car collection representing over 60 years of high performance history.
So hang on for horsepower TV.
Hi, welcome to horsepower TV. And more of our Bel Air bracket racer build up.
We got a whole parcel of parts for a white lightning here today in the shop. But first, what do you say? We take a look at what we've done so far on this project.
We took a GM performance parts 502 short block
added Edelbrock heads and induction,
plus the comp cams roller set up,
then backed it up with a four L AD E overdrive automatic from jet performance.
Finally, we installed a mallory ignition, a
Griffin radiator
and A B and M shifter.
Since we're adding all that power and we plan to bracket race our Bel Air we're gonna need a more substantial rear end. Now, that thing originally came with a 12 bolt on, but somewhere it got swapped out for a week or 10 bolt.
So we called our friends at Curry Enterprises and they sent us this new rear end using their nine plus race carrier.
Now, the housing itself is the stock width and it uses the original GM brackets. So it's a direct bolt in
the center section, however, uses a 350 gear with a torque sensing limited slip. And of course, we finished the package off by ordering a set of their 31 supplying axles and hit them drilled for a Chevy bolt pattern.
Well, we got the bel air supported on jack stands for safety. We got the wheels off so we can get started here by removing the shocks.
Now that I got the rear end supported on this jack,
I can start removing the rubber brake hose.
The panhard bar is next.
Finally, we can end both the lower control arms at the forward attaching points.
All right. That ought to be low enough to clear. Yeah, it's getting on the other the way
you
start setting up that other rear end.
Now, before we both that new rear end in place, we're gonna install a set of control arms to help keep it properly located.
We got these from Metco and they're made from solid billet aluminum for strength and lightweight. Now, they use urethane bushings with metal sleeves to help minimize deflection. Now, the uppers are adjustable to get the best bite at the track and this narrow design allows the use of large diameter exhaust pipes.
Oh, we got lucky. The brake lines transferred perfectly from the old rear end of the new one. Now, once we get it bolted up in place, all we gotta do is reconnect this hose and leave the brakes. That's gonna save a lot of time. And
well, I guess I'm right on time with these control arms. Got some hardware
right here.
Thanks.
And while I've got easy access to the filler plug, I'm gonna go ahead and top off our rear end with gear loop.
Now, what we're using here is royal purple synthetic. It's a multi viscosity loop.
It's got a limited slip added, have already blended in.
Once we're done here, we can get this thing back on the jack.
Since we're setting up our suspension for the drags, we went ahead and ordered a full set of these three way adjustable shocks from competition engineering. Now,
they're gonna allow us to fine tune our suspension for the best traction
to adjust them. All you do is compress the shock,
then match up the indexing mark here on the shaft and turn the shaft until it lines up with the appropriate marks on the body.
And over the years you've heard drag racers refer to 90 1080 20 even 5050 shock settings.
Well, that first number refers to shock compression.
The second number is shock extension.
A 9010 front setting requires only 10% of the force to extend the shock. So the front end lifts quickly
and transfers weight immediately.
Yeah, but it takes 90% of the force to compress the shock. So the front end is gonna settle slowly and extend the amount of weight transfer for a longer period of time. Now, if you've got a lightweight car or the track has plenty of bite, well, you might want to try an 8020 setting or probably even a 6040.
Of course, the rears are just the opposite. Generally, you want stiffer compression back here to help you plant the rear tires. But hey, enough shock talk, let's get back to work
well with the rear end in place and the vehicle at normal ride height, we can go ahead and measure for our drive shaft and get it ordered from our friends at the drive line shop in Springfield, Missouri.
Now, what you wanna do is measure from the back of the tail shaft housing
to the center line of the Pinion Yoke.
It looks like we got about 61 inches there. Now, we also want to tell them what kind of transmission that we're using so they can include the appropriate slip yoke and
the type of pinion yoke that we've got back here. Now, this one happens to be a heavy duty 1350 series. Well, it's my opinion that we should take a break now so my partner can rest his rear end. Uh, keep yours in place though. We'll be back with more of our build up right after this
later in the show, a California car collection and the high performance family that made it possible.
Hi. Welcome back to the shop and more of our build up on Chuck's Bel Air bracket racer. Well, so far today we got our nine inch rear end bolted up along with new shocks and rear control arms.
Now we gotta tackle another issue and that's how to get more fuel to that 502 big block we dropped in recently.
Well, one thing's for certain, a mechanical fuel pump isn't gonna be part of the program
since the 502 just doesn't have a place to mount it.
So instead, what we're gonna use is this mallory high performance electric fuel pump. Now, it's got a fully machined housing that contains a G rotor pump assembly for constant stable pressure.
And of course, the oversized inlet and outlet make for unrestricted flow.
It also comes with this matching fuel pressure regulator.
Well, any time you're flowing that much fuel, you increase the possibility of pushing debris into your system. So to keep your floats from sticking or your jets from clogging, you also need a high flow filter like this one we got from Mallory. Now it's machined aluminum housing features, dual inlets
and outlets so you can feed a multi
carb set up. Let's check this out.
It uses a replaceable filter element to help you maintain your system's efficiency.
Now, when you're plumbing your fuel system, you wanna go ahead and install a fuel filter between the tank and the fuel pump. I got this one all ready for you. Oh, great, good timing.
Now, that way you're gonna keep the trash out of your pump and reduce the possibility of any damage. Now, we also mounted the pump close to the fuel tank because an electrical pump pushes the fuel a whole lot better than it pulls it.
Now, we're gonna go ahead and mount the fuel filter right up here
where it'll be out of the way.
Well, now that we've got the pump and the filter mounted, we can go ahead and start plumbing the system using some A N fittings, some stainless line, a
barb fitting and just a little bit of 38 rubber hose.
We'll finish plumbing the fuel system using this half inch aluminum line. And well, since we plan on mounting the battery in the trunk, we'll route this battery cable along with it and secure them both with zip ties. Of course, we'll keep it away from exhaust heat, moving suspension parts and the drive shaft. And well, here's a little tip for you. If you cap the fuel line like this, you'll keep debris out while you're routing it.
You know, racers have been mounting their batteries in the trunk for years. And for good reason,
the extra weight over that right rear tire helps plant the power. And believe me, this Holly Annihilator race cell has got some extra weight to it. Of course, it's also got 800 cold cranking apps more than enough to spin over the biggest big block. Now, we're gonna hold it in place using their billet aluminum, hold down bracket
and I think that,
uh, right about there is a good place for it. Now, I'm gonna go ahead and mark the holes for the mounting bolts while I'm at it. I'm gonna drill a couple more to drag those cables through
while Chuck's handling the battery back there. I'm gonna finish plumbing the fuel system by installing this fuel regulator here in a hole that was already in the inner fender. Now, once I get this nut started, we can cut this fuel line to the proper length.
After it's cut, we slip on a tube coupling, followed by this crush leave
then double flare to the end of the tube.
Then we connect it to the A N adapter here on the fuel regulator. Now, coming out of the regulator to the car, we follow pretty much the same procedure except here. We're using steel braided line because hard line would crack with all that engine vibration and movement.
Well, speaking of movement, we're gonna wanna move that old bel air off the starting line. It'd be kind of tough with regular street tires. So we ordered a set of these dot Legal et street slicks from Mickey Thompson. Now, these are 20 to 11 fifties. They'll fill up those wheel wells and give us a substantial footprint on the track.
Well, up front,
we're using their sportsman rubber measuring 28 7 50. Now, this lighter weight and taller diameter is gonna give us less rolling resistance. And for a classic nostalgic racer look well, we mounted them on these American torque thrust wheels. 15 by six is up front 15 by 8.5 in the rear.
Hey man, I gotta tell you, oh, white lightning is looking pretty good and it won't be long before we're ready to make some thunder with it. Well, I hate to rain on your parade but it's time for us to put the tools up for a while, take a break and hey, check this out.
It's good having them and looking at them, but you still wanna go out and grab him any chance
they make the parts that make enthusiasts go fast.
The Edel Rock Fun team coming up next.
Horsepower happenings is brought to you by Wyotech, the nation's premier technical training school.
Well, this week, how about a sneak peek at a unique car collection here in Southern California?
It's a show place that celebrates over 60 years of high performance history.
Great tribute to my grandfather and,
and my father and what they've done and,
and the company that they've built from just an idea.
Vic Edelbrock senior practically grew up with a wrench in one hand and a steering wheel in the other.
And although he broke racing records in his fame number 27 midget,
he had an even greater passion for developing ways to make more power.
A passion that would eventually help change the way we felt about our cars.
When World war two ended a new supercharged love of the automobile was beginning
along with the need for speed parts to make cars go faster.
V
senior was a pioneer in the high performance aftermarket and opened his first speed shop in 1949.
By then a younger Edelbrock was growing up in the business. Vic Junior
who took the company's reins after his father's untimely death in 1962.
Today, the family business has grown from that little speed shop to a publicly traded worldwide leader in the design and development of high quality high performance parts
in a way this unique collection called Vic's Garage symbolizes a family success story
and an ongoing passion for building bridges to better performance.
The idea that if you work hard enough,
you can do it.
I think that's an important thing
and it's something that we try to reinforce in our own families every day
that will really kick in the the fact of the history of the company,
the history of the industry and how it started in the,
in the early days and, and, and educate, you know, especially the young people that really don't know where all this came from.
Vic's Garage has everything from a replica of Vic Junior's first Triumph motorcycle to one of Big Senior's first roadsters.
It should come as no surprise that most cars are Edelbrock red and made to go faster than stock 80 Corvette and uh with a Donovan aluminum
uh engine in it and Nitrous, some vehicles are famous for breaking speed records like this socal car that was king of the Salt Flats in the fifties.
This recently acquired galaxy of Junior Johnson's caused quite a stir at NASCAR
in the mid sixties. This galaxy has got more tricks and cheating in it than,
than you ever ever want to see. In fact, it was a car that caused the templates to be made.
Uh NASCAR finally realized they had to do that after they saw this car.
Now, some of the cars you might find here on any given day aren't here because they're headed to the track.
The ow
Brocks, not only believe in driving these things,
they believe in racing them.
The whole Edelbrock family believes in walking the walk and living the high performance lifestyle.
You'll find the family fun team at vintage car racing events everywhere
big behind the wheel of his rare 59 custom body blister
daughters Cammy and Christy driving their vintage 67 Shelby Mustangs,
Vic's wife, Nancy is the official timekeeper and crew manager.
It's good having them and looking at them, but you still want to go out and drive them when you join them.
Big garage may be the showplace of the new corporate headquarters edition. But on the other side, as Cammy shows us, there's a massive modern new warehouse.
This uh warehouse has 35 ft high ceilings
and we can go six pallet, we're six pallets high right now
and we can go an additional seventh row if we wanna expand in the future, which with the way we're going these days, I, I might happen soon
with technology that looks straight out of Star Trek. This warehouse is the only way to keep pace with the growing demand for the company's products. A
list that keeps growing with the Edel Rock store.
A story that's never ending. Never finished just like the new show place called Big Garage.
I had a painting instructor once who told me that a painting is never finished
because if you, if you finish it, then it's overdone.
So I'd like to say that this is a work in progress.
Vic's Garage. A work in progress, celebrating the first family of high performance.
Yeah.
Hey, let's face it.
The reason many of us spend a lot of our money and most of our time working on our cars is so that we can be seen at our local cruise spot on a Saturday night,
but it's hard to go cruising if you can't crank your motor. Now, you chevy guys know exactly what I'm talking about, especially if you've got a big block with high compression and a set of headers.
Now, the problem stems from a heat sink condition in the starter. Now, here's some things that you can do to help alleviate that problem first, make sure that your ignition is set to factory specs and I'm not talking about just your initial timing. I'm also talking about your mechanic
and advance. Now, too much timing is gonna cause your engine to kick back against the starter and make it difficult to turn over.
Also make sure you have a high torque starter to help overcome the high compression in big cubes. Now, you can identify it
by this spacer here at the back of the solenoid. Now that spacer is required because the starter uses a longer armature and more windings. By the way, this is what a standard starter looks like.
Of course, if you've already got a high torque starter, then the heat sink problem that I told you about earlier can be helped out tremendously with a heat shield like this one from moroso. Now, it's made from aluminum and installs right on the starter like that
to keep it away from exhaust heat.
Of course, many starters have become popular too, not only because of their lightweight, but their diminutive size also keeps them further away from your headers.
Well, needless to say you also wanna make sure that you have good grounds, no corrosion on your battery terminals and that your battery cables are of adequate size.
Well, I hope these tips have been adequate enough to keep you cranking cruising and looking good on Saturday night.
Well, here's some good looking hot parts coming up for you next
horsepower TV S hot parts. A close up. Look at the latest in high performance hardware.
Well, here's the latest version of Holly's popular modular carburetor. It's their street Avenger and they claim it's the most trouble free carb ever
with everything from easily adjustable vacuum, secondary and blow proof power valve to range, restricted float adjustment and electric choke. Of course, each one comes with close limit jetting
and CFM ratings that range from 570 to 870. Prices start at 350
now to keep your Holly Carb jets organized.
How about this billet pro jet holder from DS S performance products. Now it'll hold 100 and 44 jets and its layout allows you to arrange them for easy access. Of course, if you've got access to an extra 40 bucks, hey, you can get one of these.
Of course, you can get more power from your engine with Edelbrock
Nitro system kits are available for carburetors from 50 to 250 horsepower and for popular fuel injection applications from 50 to 120.
Now, the aluminum spray plate is fully machined and works with a pair of high flow solenoids to introduce the Giggle Gas.
Now, the kit also includes a 10 pound bottle, stainless steel lines and all the hardware that you need to install the kit.
Of course, you're gonna have to squeeze your wallet a little bit. Prices start at $350. Well, we're about out of gas for today, but we have time to tell you about next week's show. And here's a look.
Will it be the Mopar,
the Ford or the Chevy three muscle cars loaded with big block cret motors from the big three. It's a, one of a kind crate motor challenge to see who makes the most power.
Plus we'll take you to a school in Las Vegas where the curriculum is driving 140 miles an hour in an open wheel champ car.
And remember high performance fun is what this show is all about
for information about the products used in today's show and more. Check us out online at horsepower tv.com
Horsepower TV is an RTM production.