Classic Trucks! Builds
Want more content like this?
Join the PowerNation Email NewsletterVideo Transcript
Today on trucks, the Dodge RT already packs plenty of punch. But the things we plan on doing with ours will blow your mind.
We'll get it started with a performance suspension, wheels and tires. The PT cruiser is the latest debate, but the Chevy Nomad got it all started in the fifties. We'll explain
and we'll show you how to save some money by installing your own exhaust system.
That's all today on trucks.
Welcome to this week's show, everybody, you know, it seems like almost everybody wants performance these days and if you're the type that wants to walk into a dealership, plop down a check and write off with some serious muscle. The Ford Lightning is pretty much the king of the hill with the Dodge RT running a close second.
The comparison between the two however, has never really been that fair. Especially when you consider that the lightning is a limited production supercharged hot rod with a $30,000 price tag.
Now, the RT rolls in without a super charger, but it's a good 10 grand cheaper, which makes this the perfect platform to build a vehicle comparable to the lightning
and still keep some money in your pocket.
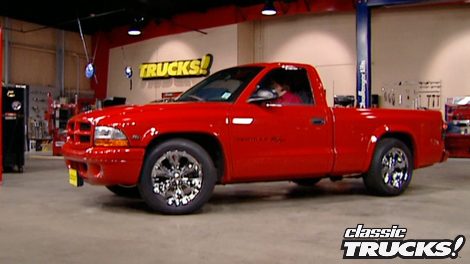
So we picked up this 98 standard cab that we're gonna call project Rolling Thunder
because we're going after the lightning.
The first thing we're gonna tackle is the suspension. And for that, we went to Hodgkiss
performance for one of their kits that includes brand new front and rear springs, front and rear sway bars with polyurethane bushings, bill steen shocks and all the hardware you're gonna need to complete the job.
Now, this kid's gonna lower the truck two inches in the front and three in the rear, but we're not just lowering it for looks. This is actually a performance suspension
will make this thing handle as well as anything out there, car or truck. Now, we're using a lift to get this thing up in the air so you can see what's going on.
But the good news is you can really do this project in your garage with a floor jack and jack stands.
First thing we need to do is lose the stock shocks that unbolt from the top and the bottom
and slide out through the lower a arm.
After that, we can unbolt the sway bar and remove it.
Now, we can get those coil springs out of there. Now, the good news is you can do this without taking the breaks and the spindle completely off.
Now, to do it this way, you
need to get a floor jack, put it up under the lower a arm
and then jack it up to compress the spring,
then we can knock loose the lower ball joint,
the tie rod end
and then block the whole assembly up out of the way.
Then we'll carefully lower the jack to release the tension on the spring
so we can get it out of there.
Now, remember a coil spring is extremely dangerous. So if you come in here and that spring is still tight in the pocket,
don't try to pry it out. What you need to do is stop and go get a coil spring compressor
to help you get it out of there.
Now, we will have to modify the bump stop since we're dropping the front end two inches and to do that,
we'll just take a hacksaw and cut about an inch and a half off the factory stop, which will give our suspension a full range of motion.
Now it's time for the new coil springs. Now, you can see these new sprays
are a whole lot different than these old stalkers,
but installation is no problem.
All you need to do
is make sure that they're seeded into the spring pocket,
jack up the lower a arm
and then reconnect this lower ball joint.
Now that we have the spring in place, we can go ahead and get the new shocks in that come with the kit.
Now they slide in the same way the stalkers do and bolt up to the top and bottom. Now, the only thing you have to watch out for here is you don't crank down too tight on the top
or you could crush the urethane bushing.
Now, the new front sway bar just like the coil springs is considerably beefier than this old stock unit.
And the urethane bushings that come with the kit will way outperform these old rubber ones problem is they'll tend to squeak on you a little bit if you don't keep them well, greased
Hotchkiss takes care of that problem with these greasy brackets.
Now that we have the front end taken care of, we can dive into the rear. First thing we have to do is get a jack under the rear end to support things. When we start tearing everything down
after that,
go ahead and lose the stock shocks.
Now, as you can see, somebody has put some traction bars on this truck, the problem is
they're too short.
The snub here should contact right up here at the front spring eye.
Now, by hitting back here at the spring, it pushes up on the spring and that gives you the axle wrap that you're trying to get away from. Now. A bar like this does a good job. But if you use them, make sure that they're the right length, we're gonna go ahead and take these off for good
next up. We need to unbolt the axle from the spring by popping off the U bolts. Now, we didn't mention this up front, but you will reuse a lot of the stock hardware which keeps the cost of the kit down. So, whatever you do, don't toss anything until you're done with the project.
Sure.
Now the mill has the axle freed up. I can go ahead and jack it up a little bit
and take off these old leaf springs to make room for the new ones that we showed you earlier.
Now, the neat thing about these new springs is instead of using a lowering block, they've got these removable spacers that are bolted right to the spring.
Now, this keeps them from moving around when you're doing any kind of hard cornering. Now, for some reason, you don't want the full three inch drop that these springs will give you, you can adjust that by removing some of those spacers.
All right, I'm gonna set this thing in place if you can get that bolt started. Let's do it
pro
with the axle back in place. It's time to deal with the sway bar and just like the front, the rear is much bigger has polyurethane bushings as well as in lens.
Now, if your truck already had a sway bar on it, like ours did the new piece bolts right up to the stock locations. If not, the kids
comes with all the bracketry, you'll need to run. One. Of
course, the last thing we need to do is put on the new shocks and the bump stops and we're done with this kit. See, I told you it wasn't that hard, but it is time to take a break. So if you wanna see what kind of wheels and tires we're gonna put on project rolling thunder. Well, you're just gonna have to stick with us
later in the show. We'll take you step by step through the installation of an exhaust system on the trail boss.
But that's after we finish up with Project Rolling Thunder for this week.
Welcome back to trucks. Now that we have a hotch kiss performance suspension on our truck. Well, we need to put on a performance tire that'll enhance that and not hinder it.
So for that, we went to a V rated toy Prox
ST
in the size 2 55 55 18.
That's because that's about the biggest tire you can put on a Dakota without rubbing.
Of course, we had to have an aggressive looking wheel to match our performance tire. And for that, we went to Foose design for these angry looking things, they're calling the thrust and just in case you're wondering, we're going with 18 by nines all the way around.
Well, as you can see, it's amazing what a little bit of a drop and the right wheel and tire combination can do.
Now, just a reminder before you put the vehicle back on the ground, you need to grease the ball joints and the bushings and double check and make sure you haven't left anything loose. Also,
anytime you've done any major suspension work, you've got to get to an alignment shop before you put any major miles on it. If you want those tires to last.
Now that we have a little attitude with our new stance, wheels and rubber, we thought we'd finish things off today by giving Project Rolling Thunder a new hood.
What we got is this all steel cow induction style hood from reflection, automotive products
that not only has this really cool scoop but also has a factory style undercarriage. So you can use all the factory hardware. In fact, the only thing you need to do with this hood is shoot a little paint on it
now, like Mel just said, we're gonna reuse all this factory hardware under the hood. So before we can put the new hood on,
all this junk has to come off. Now, on a dodge, the grill is bolted right to the hood.
So that's gonna be the first thing we take off.
After that, we can take off the hood latch.
We'll follow that by taking out the under hood pad. Now, these plastic clips are really easy to break. So you wanna be careful here.
But the big thing is
you don't wanna rip this pad
once it's out of the way,
we'll pull off the light and unbolt the hood itself.
Now it's time to set the new hood in place. Keep in mind it's always a good idea to a little masking tape all the way around that way. You don't nick it up when you're moving it around and getting it in place.
Once you have it bolted on, remove the masking tape and carefully lower the hood to check your alignment. We're dead on here, Steve. Oh, this looks great.
Now, with the hood all lined up, now you can start putting on your factory parts. We're gonna get started
with this emergency light,
then we can put the insulator back on. Now, for those of you that want to make this hood functional, of course, you won't want to use this and you wanna come in here and cut out some of this inner structure. Of course, we have our own plans on how we're gonna get air into this engine. So we're not gonna do that,
then you can put on the hood latch followed by the grill
and you are done. Don't forget your hood emblem.
Now, we have a whole bunch of upgrades in mind for the exterior of our RT. But one thing we want to show you today is another piece we got from reflection and that's this all steel bumper. Now, this thing is a direct replacement for the stock plastic bumper and comes fully crumb just like you see it here. Of course, if you're not into the
look, well, you can easily scuff this sucker up and paint it the color of the truck, which is probably what we're gonna do.
But since it is steel, you can cut out these bars and weld them up or put in a custom grill or heck anything you can imagine. Uh Just in case you're wondering,
the kit does come with some new driving lights.
Well, as you probably figured out by now, we've only just begun to transform our stock RT into rolling thunder and in the weeks to come we've got some projects for you. That'll definitely blow your mind. But right now we need to take a break. Don't go away. We got more trucks for you. Right after this,
the PT cruiser didn't even start the debate.
That's because it was the Chevy Nomad five decades ago that had everybody talking.
Thanks for staying with us. Everybody.
You know, one of the biggest debates right now revolves around the PT cruiser.
What is it? A truck car van or SUV?
Well, that's a debate that will probably rage on for quite some time.
But the truth is the cruiser isn't the first vehicle to hit the road, but people didn't know exactly how to categorize.
Never was that more true than in the mid 19 fifties when Chevy came out with the nomad, now it was part truck, part car, part wagon, but a sporty one,
no matter what you called it, people either love these things or they hated them.
And since they have super low production numbers. It's pretty rare that you get a chance to take a really good look at one
this 56 owned by Tony Carpenter has been treated to a restoration that starts in the interior. And since Tony loves to scrounge around junkyards,
the seats are out of a Nissan pickup, the steering column straight out of a cutlass and the consoles from a Camaro.
Oh, and the seats floor and door panels were all upholstered to work together.
The gauges look stock until you turn the key and get a digital readout
and check out these original air conditioning vents. Those were a rare option in 56.
The theme continues on the headliner and into the back seat where you'll notice there aren't any back doors. That's because all nomads were two door wagons.
The rear cargo area is access to this unique tailgate window combination that's reminiscent of a cameo pickup. Of course, all the chrome trim just screams fifties, but one of the coolest features on this vehicle came straight from the factory in this full down tail light that hides the gas filler neck.
Of course, under the hood, things have been considerably modified
in the form of a punched out 350 that's filled with all the speed parts and has a blower sitting on top of it
which Tony says kicks out about 500 horses. And for that, he gets a major thumbs up. Of course, if you wanna just look at it and that's cool too because there's a lot of chrome in there. Now, the motor is supported by a fully detailed suspension and everything rolls on billet wheels.
Hopefully everybody knows that to mess with the classic styling of a nomad. It would be a big mistake. So the awesome front bumper and grill has been painstakingly restored but not modified.
Now, let's see with the classic look modern running gear, cool color
and the fact that only about 10,000 of these were made in 56. We'd definitely like to have one of these parked next to a PT cruiser in our garage. Stay with us. We'll be right back,
just can't get enough of trucks. Check us out online at trucks, tv.com.
Welcome back to the truck shop. Now, a few weeks ago, we did some motor upgrades on project Trail boss and it's pretty much ready to go except for an exhaust system.
Now, as with most older vehicles, nobody makes a complete bolt on system for these. So you've got a couple choices.
You can either go somewhere and have it done for you
or you can do it yourself. We're gonna show you how to do it yourself.
The first thing you're gonna need is a new catalytic converter. And for that, we went to random technologies and picked up one of their performance high flowing cats that will also keep us legal. Now, for the muffler, as well as the pipe kit, you're gonna need to put everything together,
paid a visit to flow master
with the old system removed and set aside for reference, we can start putting in the new pieces. Now, this may sound obvious, but you do want to start at the header and work your way back.
Now,
grab a pipe from the kit that's got the proper bend in it,
set it into place
and then market,
then we'll make this cut and weld on the collector flange.
We also got some adapters from the local auto parts store that'll need to be welded to our catalytic converter to fit our 2.5 inch pipe.
Now with the head pipe in place, it's time for the catalytic converter. Now don't even think about not putting one of these on because unless your vehicle is old enough to be exempt,
the law says that you got to have one.
Now, we're gonna slide it onto the pipe up over the top of this cross member where the stock one was that'll protect it.
Then we'll slide in the muffler
and check our dimensions and measurements to make sure everything is where it needs to be.
Now, remember any time that you build a system like this,
it's a good idea to come up here and weld up as many of these seams as you can,
it'll give you a nice clean look and guarantee you don't have any leaks. However you do need to be able to take the system apart in case you need to replace the cat or the muffler. So for this seam here and back here,
we're gonna use the stainless steel bands that we got from Dyna Max
that will give us a nice leak proof seal
that won't bend the pipe.
Now with the cat and the muffler in place, it's time for the tailpipe.
Now, if you don't want to mess with going over this axle, you can always put a 90 degree angle on here, be done with it. Of course, trust me, you definitely wanna get the fumes as far out the back of the vehicle as you can.
Now, fortunately for us, our CJ has got enough lift to where we can run the pipe over the axle and not have to have any special bends in it.
So with that in mind,
we'll take a 45 degree and some straight pipe from the kit
and hook it to the muffler,
then we can shoot the tail pipe out in stock location
and weld up the seams.
Now, the payoff here is, you can definitely save yourself some money
if you do this yourself. But you will need some special tools like a welder
pipe cutter and some way to get the vehicle up in the air.
Also, in some cases, you may even need to have access to a pipe bender. But if this is a project, you feel like tackling. There's plenty of really good kits available to help you do it right.
So you've decided to do some finessing on your paint and need to do a little wet sanding. Well,
the old saying you get what you pay for definitely applies to sandpaper. Now, make sure that you get the good stuff like three M or Maguire's because the cheap stuff won't last very long and actually can do you more harm than good
and make sure you soak the paper for a while and use plenty of clean water when you're sanding. And finally,
it's always a good idea to put just a shot of dish soap in there that lubricate the paper,
keep it from loading up and make it cut better and last longer.
And now truck gear, parts, tools and equipment for pickups and sport utilities,
as you probably know, custom doing brake lines in the past always meant going back and forth to the parts store to get the right hoses and lines and hardware and trying to make it all work together so it doesn't leak. Well, Speedway Motors has come up with an answer to that problem with their stainless steel brake line
kit.
Now, it comes with stainless steel lines,
braided hoses, some really nice hardware
and these really slick through the frame fittings for a clean look up front. Now you can get everything in one box from Speedway Motors for about 220 bucks.
Now, when it comes to a good looking bed, it's safe to say most people would agree. You can't do much better than wood and stainless steel strips. However, pros pick thought they could. And for our money did with these wild strips. Now, they are a polished stainless steel, but the fastening bolt is actually hidden underneath for a super smooth look. So if you want to eliminate the carriage bolt heads in the bed of your truck, pro's pick has the answer for about 210 bucks.
That's gonna do it for truck gear. Here's a quick look at next week's show.
Project Rolling Thunder picks up some speed next week when the guys strap a super charger on their stock 5.9 L Dodge Power Plant.
After that, they've got one wild machine to show you that GM will make available to anyone who wants one, the Hummer H two.
Finally, we'll give you some more ideas for your toolbox and shop. That's all next week on trucks.
Well, that's gonna do it for our 50th show. We appreciate you hanging out with us. Yeah, we got more trucks for you next week. What are you doing?
This thing was running a little rough thought. I was gonna tweak it up a little bit here. Are you authorized to do that?
Absolutely.
Trucks is an RTM production.
Show Full Transcript
We'll get it started with a performance suspension, wheels and tires. The PT cruiser is the latest debate, but the Chevy Nomad got it all started in the fifties. We'll explain
and we'll show you how to save some money by installing your own exhaust system.
That's all today on trucks.
Welcome to this week's show, everybody, you know, it seems like almost everybody wants performance these days and if you're the type that wants to walk into a dealership, plop down a check and write off with some serious muscle. The Ford Lightning is pretty much the king of the hill with the Dodge RT running a close second.
The comparison between the two however, has never really been that fair. Especially when you consider that the lightning is a limited production supercharged hot rod with a $30,000 price tag.
Now, the RT rolls in without a super charger, but it's a good 10 grand cheaper, which makes this the perfect platform to build a vehicle comparable to the lightning
and still keep some money in your pocket.
So we picked up this 98 standard cab that we're gonna call project Rolling Thunder
because we're going after the lightning.
The first thing we're gonna tackle is the suspension. And for that, we went to Hodgkiss
performance for one of their kits that includes brand new front and rear springs, front and rear sway bars with polyurethane bushings, bill steen shocks and all the hardware you're gonna need to complete the job.
Now, this kid's gonna lower the truck two inches in the front and three in the rear, but we're not just lowering it for looks. This is actually a performance suspension
will make this thing handle as well as anything out there, car or truck. Now, we're using a lift to get this thing up in the air so you can see what's going on.
But the good news is you can really do this project in your garage with a floor jack and jack stands.
First thing we need to do is lose the stock shocks that unbolt from the top and the bottom
and slide out through the lower a arm.
After that, we can unbolt the sway bar and remove it.
Now, we can get those coil springs out of there. Now, the good news is you can do this without taking the breaks and the spindle completely off.
Now, to do it this way, you
need to get a floor jack, put it up under the lower a arm
and then jack it up to compress the spring,
then we can knock loose the lower ball joint,
the tie rod end
and then block the whole assembly up out of the way.
Then we'll carefully lower the jack to release the tension on the spring
so we can get it out of there.
Now, remember a coil spring is extremely dangerous. So if you come in here and that spring is still tight in the pocket,
don't try to pry it out. What you need to do is stop and go get a coil spring compressor
to help you get it out of there.
Now, we will have to modify the bump stop since we're dropping the front end two inches and to do that,
we'll just take a hacksaw and cut about an inch and a half off the factory stop, which will give our suspension a full range of motion.
Now it's time for the new coil springs. Now, you can see these new sprays
are a whole lot different than these old stalkers,
but installation is no problem.
All you need to do
is make sure that they're seeded into the spring pocket,
jack up the lower a arm
and then reconnect this lower ball joint.
Now that we have the spring in place, we can go ahead and get the new shocks in that come with the kit.
Now they slide in the same way the stalkers do and bolt up to the top and bottom. Now, the only thing you have to watch out for here is you don't crank down too tight on the top
or you could crush the urethane bushing.
Now, the new front sway bar just like the coil springs is considerably beefier than this old stock unit.
And the urethane bushings that come with the kit will way outperform these old rubber ones problem is they'll tend to squeak on you a little bit if you don't keep them well, greased
Hotchkiss takes care of that problem with these greasy brackets.
Now that we have the front end taken care of, we can dive into the rear. First thing we have to do is get a jack under the rear end to support things. When we start tearing everything down
after that,
go ahead and lose the stock shocks.
Now, as you can see, somebody has put some traction bars on this truck, the problem is
they're too short.
The snub here should contact right up here at the front spring eye.
Now, by hitting back here at the spring, it pushes up on the spring and that gives you the axle wrap that you're trying to get away from. Now. A bar like this does a good job. But if you use them, make sure that they're the right length, we're gonna go ahead and take these off for good
next up. We need to unbolt the axle from the spring by popping off the U bolts. Now, we didn't mention this up front, but you will reuse a lot of the stock hardware which keeps the cost of the kit down. So, whatever you do, don't toss anything until you're done with the project.
Sure.
Now the mill has the axle freed up. I can go ahead and jack it up a little bit
and take off these old leaf springs to make room for the new ones that we showed you earlier.
Now, the neat thing about these new springs is instead of using a lowering block, they've got these removable spacers that are bolted right to the spring.
Now, this keeps them from moving around when you're doing any kind of hard cornering. Now, for some reason, you don't want the full three inch drop that these springs will give you, you can adjust that by removing some of those spacers.
All right, I'm gonna set this thing in place if you can get that bolt started. Let's do it
pro
with the axle back in place. It's time to deal with the sway bar and just like the front, the rear is much bigger has polyurethane bushings as well as in lens.
Now, if your truck already had a sway bar on it, like ours did the new piece bolts right up to the stock locations. If not, the kids
comes with all the bracketry, you'll need to run. One. Of
course, the last thing we need to do is put on the new shocks and the bump stops and we're done with this kit. See, I told you it wasn't that hard, but it is time to take a break. So if you wanna see what kind of wheels and tires we're gonna put on project rolling thunder. Well, you're just gonna have to stick with us
later in the show. We'll take you step by step through the installation of an exhaust system on the trail boss.
But that's after we finish up with Project Rolling Thunder for this week.
Welcome back to trucks. Now that we have a hotch kiss performance suspension on our truck. Well, we need to put on a performance tire that'll enhance that and not hinder it.
So for that, we went to a V rated toy Prox
ST
in the size 2 55 55 18.
That's because that's about the biggest tire you can put on a Dakota without rubbing.
Of course, we had to have an aggressive looking wheel to match our performance tire. And for that, we went to Foose design for these angry looking things, they're calling the thrust and just in case you're wondering, we're going with 18 by nines all the way around.
Well, as you can see, it's amazing what a little bit of a drop and the right wheel and tire combination can do.
Now, just a reminder before you put the vehicle back on the ground, you need to grease the ball joints and the bushings and double check and make sure you haven't left anything loose. Also,
anytime you've done any major suspension work, you've got to get to an alignment shop before you put any major miles on it. If you want those tires to last.
Now that we have a little attitude with our new stance, wheels and rubber, we thought we'd finish things off today by giving Project Rolling Thunder a new hood.
What we got is this all steel cow induction style hood from reflection, automotive products
that not only has this really cool scoop but also has a factory style undercarriage. So you can use all the factory hardware. In fact, the only thing you need to do with this hood is shoot a little paint on it
now, like Mel just said, we're gonna reuse all this factory hardware under the hood. So before we can put the new hood on,
all this junk has to come off. Now, on a dodge, the grill is bolted right to the hood.
So that's gonna be the first thing we take off.
After that, we can take off the hood latch.
We'll follow that by taking out the under hood pad. Now, these plastic clips are really easy to break. So you wanna be careful here.
But the big thing is
you don't wanna rip this pad
once it's out of the way,
we'll pull off the light and unbolt the hood itself.
Now it's time to set the new hood in place. Keep in mind it's always a good idea to a little masking tape all the way around that way. You don't nick it up when you're moving it around and getting it in place.
Once you have it bolted on, remove the masking tape and carefully lower the hood to check your alignment. We're dead on here, Steve. Oh, this looks great.
Now, with the hood all lined up, now you can start putting on your factory parts. We're gonna get started
with this emergency light,
then we can put the insulator back on. Now, for those of you that want to make this hood functional, of course, you won't want to use this and you wanna come in here and cut out some of this inner structure. Of course, we have our own plans on how we're gonna get air into this engine. So we're not gonna do that,
then you can put on the hood latch followed by the grill
and you are done. Don't forget your hood emblem.
Now, we have a whole bunch of upgrades in mind for the exterior of our RT. But one thing we want to show you today is another piece we got from reflection and that's this all steel bumper. Now, this thing is a direct replacement for the stock plastic bumper and comes fully crumb just like you see it here. Of course, if you're not into the
look, well, you can easily scuff this sucker up and paint it the color of the truck, which is probably what we're gonna do.
But since it is steel, you can cut out these bars and weld them up or put in a custom grill or heck anything you can imagine. Uh Just in case you're wondering,
the kit does come with some new driving lights.
Well, as you probably figured out by now, we've only just begun to transform our stock RT into rolling thunder and in the weeks to come we've got some projects for you. That'll definitely blow your mind. But right now we need to take a break. Don't go away. We got more trucks for you. Right after this,
the PT cruiser didn't even start the debate.
That's because it was the Chevy Nomad five decades ago that had everybody talking.
Thanks for staying with us. Everybody.
You know, one of the biggest debates right now revolves around the PT cruiser.
What is it? A truck car van or SUV?
Well, that's a debate that will probably rage on for quite some time.
But the truth is the cruiser isn't the first vehicle to hit the road, but people didn't know exactly how to categorize.
Never was that more true than in the mid 19 fifties when Chevy came out with the nomad, now it was part truck, part car, part wagon, but a sporty one,
no matter what you called it, people either love these things or they hated them.
And since they have super low production numbers. It's pretty rare that you get a chance to take a really good look at one
this 56 owned by Tony Carpenter has been treated to a restoration that starts in the interior. And since Tony loves to scrounge around junkyards,
the seats are out of a Nissan pickup, the steering column straight out of a cutlass and the consoles from a Camaro.
Oh, and the seats floor and door panels were all upholstered to work together.
The gauges look stock until you turn the key and get a digital readout
and check out these original air conditioning vents. Those were a rare option in 56.
The theme continues on the headliner and into the back seat where you'll notice there aren't any back doors. That's because all nomads were two door wagons.
The rear cargo area is access to this unique tailgate window combination that's reminiscent of a cameo pickup. Of course, all the chrome trim just screams fifties, but one of the coolest features on this vehicle came straight from the factory in this full down tail light that hides the gas filler neck.
Of course, under the hood, things have been considerably modified
in the form of a punched out 350 that's filled with all the speed parts and has a blower sitting on top of it
which Tony says kicks out about 500 horses. And for that, he gets a major thumbs up. Of course, if you wanna just look at it and that's cool too because there's a lot of chrome in there. Now, the motor is supported by a fully detailed suspension and everything rolls on billet wheels.
Hopefully everybody knows that to mess with the classic styling of a nomad. It would be a big mistake. So the awesome front bumper and grill has been painstakingly restored but not modified.
Now, let's see with the classic look modern running gear, cool color
and the fact that only about 10,000 of these were made in 56. We'd definitely like to have one of these parked next to a PT cruiser in our garage. Stay with us. We'll be right back,
just can't get enough of trucks. Check us out online at trucks, tv.com.
Welcome back to the truck shop. Now, a few weeks ago, we did some motor upgrades on project Trail boss and it's pretty much ready to go except for an exhaust system.
Now, as with most older vehicles, nobody makes a complete bolt on system for these. So you've got a couple choices.
You can either go somewhere and have it done for you
or you can do it yourself. We're gonna show you how to do it yourself.
The first thing you're gonna need is a new catalytic converter. And for that, we went to random technologies and picked up one of their performance high flowing cats that will also keep us legal. Now, for the muffler, as well as the pipe kit, you're gonna need to put everything together,
paid a visit to flow master
with the old system removed and set aside for reference, we can start putting in the new pieces. Now, this may sound obvious, but you do want to start at the header and work your way back.
Now,
grab a pipe from the kit that's got the proper bend in it,
set it into place
and then market,
then we'll make this cut and weld on the collector flange.
We also got some adapters from the local auto parts store that'll need to be welded to our catalytic converter to fit our 2.5 inch pipe.
Now with the head pipe in place, it's time for the catalytic converter. Now don't even think about not putting one of these on because unless your vehicle is old enough to be exempt,
the law says that you got to have one.
Now, we're gonna slide it onto the pipe up over the top of this cross member where the stock one was that'll protect it.
Then we'll slide in the muffler
and check our dimensions and measurements to make sure everything is where it needs to be.
Now, remember any time that you build a system like this,
it's a good idea to come up here and weld up as many of these seams as you can,
it'll give you a nice clean look and guarantee you don't have any leaks. However you do need to be able to take the system apart in case you need to replace the cat or the muffler. So for this seam here and back here,
we're gonna use the stainless steel bands that we got from Dyna Max
that will give us a nice leak proof seal
that won't bend the pipe.
Now with the cat and the muffler in place, it's time for the tailpipe.
Now, if you don't want to mess with going over this axle, you can always put a 90 degree angle on here, be done with it. Of course, trust me, you definitely wanna get the fumes as far out the back of the vehicle as you can.
Now, fortunately for us, our CJ has got enough lift to where we can run the pipe over the axle and not have to have any special bends in it.
So with that in mind,
we'll take a 45 degree and some straight pipe from the kit
and hook it to the muffler,
then we can shoot the tail pipe out in stock location
and weld up the seams.
Now, the payoff here is, you can definitely save yourself some money
if you do this yourself. But you will need some special tools like a welder
pipe cutter and some way to get the vehicle up in the air.
Also, in some cases, you may even need to have access to a pipe bender. But if this is a project, you feel like tackling. There's plenty of really good kits available to help you do it right.
So you've decided to do some finessing on your paint and need to do a little wet sanding. Well,
the old saying you get what you pay for definitely applies to sandpaper. Now, make sure that you get the good stuff like three M or Maguire's because the cheap stuff won't last very long and actually can do you more harm than good
and make sure you soak the paper for a while and use plenty of clean water when you're sanding. And finally,
it's always a good idea to put just a shot of dish soap in there that lubricate the paper,
keep it from loading up and make it cut better and last longer.
And now truck gear, parts, tools and equipment for pickups and sport utilities,
as you probably know, custom doing brake lines in the past always meant going back and forth to the parts store to get the right hoses and lines and hardware and trying to make it all work together so it doesn't leak. Well, Speedway Motors has come up with an answer to that problem with their stainless steel brake line
kit.
Now, it comes with stainless steel lines,
braided hoses, some really nice hardware
and these really slick through the frame fittings for a clean look up front. Now you can get everything in one box from Speedway Motors for about 220 bucks.
Now, when it comes to a good looking bed, it's safe to say most people would agree. You can't do much better than wood and stainless steel strips. However, pros pick thought they could. And for our money did with these wild strips. Now, they are a polished stainless steel, but the fastening bolt is actually hidden underneath for a super smooth look. So if you want to eliminate the carriage bolt heads in the bed of your truck, pro's pick has the answer for about 210 bucks.
That's gonna do it for truck gear. Here's a quick look at next week's show.
Project Rolling Thunder picks up some speed next week when the guys strap a super charger on their stock 5.9 L Dodge Power Plant.
After that, they've got one wild machine to show you that GM will make available to anyone who wants one, the Hummer H two.
Finally, we'll give you some more ideas for your toolbox and shop. That's all next week on trucks.
Well, that's gonna do it for our 50th show. We appreciate you hanging out with us. Yeah, we got more trucks for you next week. What are you doing?
This thing was running a little rough thought. I was gonna tweak it up a little bit here. Are you authorized to do that?
Absolutely.
Trucks is an RTM production.