MuscleCar Builds

Parts Used In This Episode

Mr. Gasket
Hood Pins, Hairpin-Style, 4 in. Long, 7/16 in. Diameter, Steel, Chrome Plated, Kit
Auto Body Color & Supply Co.
Instead of the conventional method of mixing the flakes in a liquid vehicle such as a clear coat, it is actually blown onto the wet clear coat in a dry form using very low pressure. This gives the user much more control over the flakes being applied. The Flake Buster shoots any size flake up to 1/8 inch hexagon. The conventional method used the spray gun's fluid needle/nozzle combination to determine the size flake used. This meant the bigger the nozzle, the bigger the flake... and unfortunately
Auto Body Color & Supply Co.
PPG, grey primer sealer
Auto Body Color & Supply Co.
PPG, grey primer sealer
Auto Body Color & Supply Co.
The Flake Buster ® -- an innovative new way to apply metal flake.
Gary Mizar
Artist, Penstripper, Customer Painter. Over all a Cool Guy!
Urban Gorilla Tools Inc.
Monkey Spit thread locker, 3 bottle kit, 100 strength for assemble re-assemble of parts, 200 which requires strong torque to remove bolts, and 300 for permanent bonding of nuts and bolts.
Video Transcript

Today on Muscle car, it's all about altered

digo our 64 comma takes a ride in the way back machine with a 60 style drag racer paint job. We even got a helping hand from one of

Ross original artist.

Hey guys, welcome to Muscle Car. I gotta admit lately the comet's been a little neglected, but today that's gonna change because for the next half hour alter

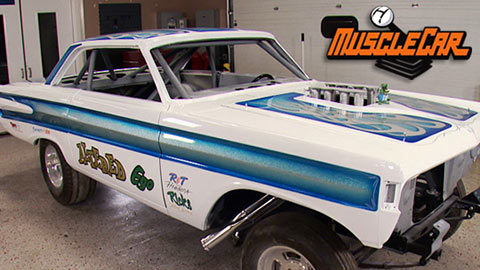
Diego here is gonna be front and center getting a brand new air correct paint job, getting the comet ready for a splash of color and a bunch of shine has been one long road. But by the end of the day, this thing is gonna look better than a million bucks

and we got a surprise guest today. That's a good friend of mine. It's got some pretty cool history.

I'm Gary

Miser.

I do automotive illustration. I do custom painting and pinstriping

and I do uh graphic art for people for T shirts. My hero is Ed Roth

and I love the Rat Fink character and the monsters and the cars.

And I met Ed Roth in 1988 and he goes, have you ever drawn Rat Fink and I says, have I ever drawn Rap Fink? I says I've been drawn since nine years old.

And then that's when I started doing the Rat Fink art for him until he passed away in 2001. I'm a self taught artist. I never had anybody really to teach me because nobody wanted to give away their trade secrets. So I just picked up a brush and that's what started it all.

And Gary is not here just for audio input either before this paint job's done, he's gonna have a brush in his hand. Now, these paint jobs are known for bright colors and graphics that run from one panel to the next. So before we lay anything out, we need to get everything lined up.

She's gonna be a wheel standard with a cutting edge mod motor, but the Comet will also support a sixties drag racing exterior right down to some

Mr gasket hood pins,

not a whole lot putting in a set of hood pins. All it needs is a hole, tighten up to do jam nuts. You're good to go. Looks like we may have some flopping back here on the tail end, but I wanted to put something across this cow to kind of keep it stiff anyways, let's just build like a bridge

for it. So you mount this into it.

After marking where the pins go, I'll punch a few holes in the hood and we should be all set.

If it's off, you get to fill the holes,

it's time to bring Gary in so we can get our game plan together. What this thing is gonna look like? Well, I've been studying the cars so I've been looking at it. I've been

thinking, well, what are we gonna do with this?

And,

uh,

I see candy fades

and I see Pinstripe.

What

would plant this in the area that we're going for is basic panel painting with the fades on it. I don't know if we do like a silver inset and then fade it in or just forget the flake and just stick with the, with the heavier pearls or flake is hard to do. Especially if you're wanting to do the Big Boat flake.

It's a lot of time involved. Well, the Big boat flake is what I really want to do. It looks good. These things scream flake, whether it's in

the lettering of it or a graphic or something. I mean, I, I just really believe that it should have some flake on it. I know a lot of the old gassers they made it look like a rocket in here. So we're gonna do a

lot of work. A lot of work.

It will mask off the panels, do the blue candy on it. Pinstripe, do the altered eagle logos

and uh

it'll look awesome. Sure will.

It's

better than

it's gonna twinkle like you said,

right.

Get out your sunglasses. Rick's throwing metal flake at the comet like there's no tomorrow. Plus Gary shows us how they hand painted back in the day.

All right, to bring you guys up to speed. We got all our body panels mounted and adjusted the body final sanded. Now we're ready to hose on some sealer. But first we gotta get this dude masked up. That means covering up everything that we don't wanna get paint on.

A

poor masking job can lead to a ton of extra work when you have to either remove the over spray or repaint the service you didn't want painted in the first place.

A nice paint job starts right here.

All right. Time to put the sealer down. I'm laying down AD P 50 which is a gray sealer.

This will reduce the coats of silver that I have to lay on it. And the less coats at this point the better because there's gonna be a lot of material going on this car.

Metallic panel really highlight any imperfections in your surface. So the sealer needs to be as smooth as glass

as I said earlier. We are gonna flake this car but it's not quite ready yet. So we're gonna lay down a silver for background because the silver is gonna help us fill in with the flake a lot easier. So we don't have to put down quite as much

we're using what's known as a flake buster to apply the big metal flakes to alter ego.

I'm also mixing in some small flakes to the first coat of clear to add another layer of sparkle.

We're ready to rock.

The clear goes on first acting as an adhesive for the big flakes. I'll be firing at it.

Then while it's still wet, I hit it with a flake buster,

a brine and auto body color and supply came through for us with the metal flakes along with all the materials were thrown at altered digo. Today,

this thing is swimming in flakes. Some people would be happy with this, but we ain't done yet.

Another layer of clear will lock in the sparkle

and let us get to work knocking down the rough edges,

but the D A won't get in all the nooks and crannies.

Whose idea was it to flake this?

I just really believe that it should have some flake on it.

Ok. What we're trying to do is relevel the surface, the flake is actually poking through

which you'll be able to see it in the candy. So we've got to get all this leveled back down

so we can start that next process.

Luckily, Gary is not afraid to pick up a piece of sandpaper and get his butt to work.

So, what are we there? 49.

Ok. Right there.

What we're doing here is measuring the letter to find the center of it

because we're getting ready to spray the candy on the door

from here. To here, right. We're gonna fade candy gold in here

for the altar letters

and then we're gonna go in here and do this solid green candy on E gold. So what do you think it's gonna look like it's gonna look good? Yeah. Yes, there is gonna have Glow with all that flake popping underneath it,

buddy.

Still ahead. The arsonist sets altered ego on fire

and Gary's got a few tricks up his sleeve. Wait till you see what he can do.

Hey, guys, welcome back. You can see we got clear over the candy. It's not looking like a whole lot yet, but this is the base colors for what will eventually be the altered eagle logo. Now is the fun part. We actually get to start laying out the graphics.

It's like Gary's already got a head start on me here. A lot of guys will take and just do a little bit at a time.

You wanna steer this tape

with a length on it, so you'll have a good straight line. So I shouldn't be doing it like this.

No, I don't think

that's

what you want.

How

far is that?

The layout stuff right here? And the brainstorming that we're doing,

that's what makes this car look like. What it's gonna look like.

The spray is just spraying, it's the tap and it's the layout that really dictates

the, the overall feel of the car. Are you just gonna pinstripe the outside edge

I wanted to leave this part right here in the trunk lid open

for doing like sponsorship name or something.

This is a good chance to bounce ideas off of Gary.

I'm thinking kind of run the fade all the way around. Yeah, I think you're right that, that would finish that detail. That would kind of give this a little shape to it being white, baby blue around that. Yeah, that, that really look good. If you look, I'm actually laying this line just on the outside

of the role of the body line

and that makes it a lot easier to come back later with a pinstripe

and lay a stripe down over the top. If you put it right on that edge, then your brush is always wanting to walk off the sides as you're trying to pull a line. So bring it up onto your flat surface just a little bit.

But when you Pinstripe,

you can go over the top of the line that's on a more flat surface.

I

think it's a lot easier to stripe it. And what we're doing is smoothing this out to lay the lettering down.

And then after I get it all smoothed out and laid down, I'll have a transfer paper where I can

pencil out the lettering for each letter and then I've got to come back

and hand cut each one of the letters out. And when we peel that back, the lettering will just be masked on there

and we can shoot the white. We'll be ready to roll

that time to live up to my nickname the Arsonist.

It looks a little confusing, but it's really not. If you look at it, you just have to pay attention to positive and negative space. This look right here that I pulled up is actually gonna be kind of weaving through. They're almost like a snake down underneath and back over and back down underneath and come back up and around. It's gonna make it just a completely three dimensional, especially when all the drop shadows and stuff go in over the top of the flake with the candy.

This is gonna be hot

to make a mirror image of the flames.

I use a pants wheel and dust carbon onto the opposite side to make my pattern.

I like doing it this way because any slight variation in symmetry is gonna be easily seen.

Now, once it's all massed up, alter

ego is finally ready for some color,

I'm fitting multiple layers of blue candy on the edges that we taped off,

it gets more vibrant with each coat.

And before long,

boom goes the dynamite.

Next, it's the big reveal. Altered ego is ready for the dance.

You're watching Muscle Car for a DVD copy of this episode. Just go to Power Block tv.com and order your copy for just 595 plus shipping and handling. Start your own muscle car collection delivered. Right to your door from the power block.

Ok, guys, we got all the candy down

trying to get an idea of what the overall design here is gonna look like

and stay tuned because once we get all this thing on mass, we get to re mask it.

Yeah.

Looking like a drag car. Now,

right now, the flames look kinda two dimensional,

but just wait till we get them all shadowed and pinstriped and buried under the clear and

they're gonna look like they're about 10 miles deep.

All right. Now, I need to reverse the mask and cover up all the blue that we just laid down.

That's really good to know your materials

because things may not be happy underneath other things. A good example of this is candy, candies will bleed through just about anything that you put on over the top of it.

So that's why we did all the flake first

and then laid down all the candy. And

now we're gonna mash the candy. You have to lay down the white. If we tried to put white over the top of this blue, it would bleed through and we would have a whole bunch of really ugly baby blue

blood through white, which is not cool.

We're using a 1684 toner on this car which is a pure white with no added colors. The outright flatness is definitely old school

for this mid coat. I'm gonna bust out some pearls

it'll keep the look authentic and give it a little bit of extra pop as well

and it's time for the big reveal, but we're not done yet.

Now it's time to do the drop shadows on the flames and kind of break up

this massive silver a little bit.

So I'm not gonna be spraying a lot out of the airbrush, but I don't want to do that overspray to get on my white. So I'm just gonna do a quick mask over that.

The shadowing adds a lot of depth to the fire giving it a more three dimensional appearance.

One more coat of clear really brings out the shine and helps all that flake come alive.

Well, guys, we're all done in the booth. It's time to lay down some lines. Now. Pay attention old Gary over there because that dude's been striping for about as long as I've been alive

and he just may learn you something.

It's all right to make mistakes. Don't worry about it because

believe me, I've made mistakes all through the years and I've been doing this 35 years.

So get out there and get you a brush and start doing it.

We're coming into the home stretch now, all of the brushed on graphics go on as the final touch

and Gary's got the sixties style lettering down.

It's a real trip to watch.

He's also dreamed up a few custom logos for us and of course he's doing them all by hand. This is what it looks like to watch. A true master at work.

Leonardo, who

I'm working on pulling lines all over the place. A lot of these cars had miles of stripe on them.

We thought a few of our friends deserved to mention too. And these guys help bring this whole thing together. We couldn't have built this car without him.

Oh man. Take a look after some fitting sanding sealer base, little flake, big flake, clear sanding again. Candy, more base mid coat with pearl airbrushing,

more clear pinstriping, outlining logo

and sign painting.

This is what we've got.

Yeah,

Gary's adding a personal touch with a couple of custom logos for me and Rick,

man. I wish I could paint like that.

If you guys have any questions about anything you saw on the show today or if you just wanna see some more of Gary's work hop on over to Power Block tv.com and check it out. Yeah, and big thanks to Gary for showing us how they did it back in the day. No problem, bro.

Well, guys, this has been a fun project, but we're out of time. So until next time

we're out of here.
Show Full Transcript