Classic Trucks! Builds
Want more content like this?
Join the PowerNation Email NewsletterVideo Transcript
Today on trucks, we'll show you what to look for in a new or even used trailer.
After that, we have a pro treated 1970 C 10 Chevy to show you that has no trouble finding the winners circle at shows all across the country.
Then we'll finish the show with a hitch or at least uh some important information you need to know about them.
That's all today on trucks.
Hey, everybody. Welcome to this week's show. Now, if you're hanging around with us, you're probably already a truck enthusiast. But even if you're not, most people know there's one job a truck is uniquely suited for and that's towing stuff, whether that's a jet ski motorcycle or even a custom show truck getting your toys at the playground also means you have to have the right kind of trailer.
The problem is most people usually spend a ton of money on their truck and their toys and end up towing those toys around on an old nasty unsafe trailer. It usually has bald tires and lights that don't work and you can forget about brakes and don't even act like you haven't used this kind of trailer before because we all have at one time or another. So this week we're gonna show you what to look for in a car hauling trailer and also how to set up a utility box. So you'll have all the tools you need right there where you need them
for our trailer. We went to Trailer World in Bowling Green, Kentucky and got one of their super duty 20 ft aluminum setups that are available with a squared front like ours or a tapered front, if that's what you really need. Now, the entire frame is made of T six high strength aluminum
and the floor is made of aluminum as well to help keep the weight down. As a matter of fact, our trailer only goes about 1600 pounds.
We also had Trailer World outfit us with 2 5200 pound axles as well as some eight ply tires. So we can carry some heavy loads.
Now, anytime you're looking at a trailer, whether it's a brand new one like this or a used one,
make sure that you find out the carrying capacity, so you don't overload it.
Unfortunately, most of us think, well, if I can get it on the trailer, it'll carry it. Well, that's not the case. Also, when you're looking at a used trailer, make sure that you check the tires and the axles and especially the bearings because they're almost always neglected.
This trailer also comes with these really slick slide in ramps
that lock into place when they're not in use. It's also been fully wired for tail lights, brake lights, turn signals as well as load lights to keep everything legal. Keep in mind if you are looking for a used trailer, take the time to really check out the wiring to make sure everything is fully operational.
Finally up here on the front, we have this emergency breakaway switch. Now what this does it activates the brakes on the trailer? If your truck and trailer should ever become disconnected from each other when you're tooling down the road,
important safety feature and most older trailers won't have that.
Now, like we said before, we're gonna put a utility box on here about this area.
So I'm gonna get started taking off these D rings and this light while mel shows you the box
for the box, we wanted something large enough to store plenty of accessories, but low enough. So it wouldn't interfere with any front ends or bumpers. So we went to DZ and got one of their all aluminum fifth wheel utility boxes. Now, this thing features a weatherproof lockable top as well as a low profile design that still has plenty of room to store all the towing accessories we're gonna need
not to mention it matches the look of our trailer perfectly. Go
ahead and get it on there matches our table too
to mount the box. All you have to do is center it up,
drill some holes down through the box and the floor of the trailer and bolt it on. Now, a lot of times when you're using a trailer, you're pulling a project vehicle or something that doesn't run,
that makes getting it up on the trailer a major pain. So to take care of that problem, we're gonna mount a winch inside the box. So the first thing we need to do
is measure where we're gonna mount our fair lead roller,
then cut it out with a saw
zone.
Now, while Stacey is cutting out the box, I can go ahead and show you the winch we're gonna use. It's a super winch S 9000 electric model
that comes with an X nine remote
cyano switch as well as a handheld remote. Now, we're also gonna go with their accessory bag. It includes a nylon strap block pulley shackles as well as a good old thick set of gloves. Believe us, all this stuff can really be a lifesaver. So it's all going into the box
with the whole cup for our rollers.
Now it's time for the winch. Now we've already drilled holes down through the bed, but that's not gonna be strong enough by itself even if you have a steel floor. But especially if you have aluminum like we've got.
So
we made this plate out of thick steel, drilled some holes in it to match our winch mounting holes. Now, we'll take the winch, set it in the box,
then we'll take this plate, go down under the trailer, run the bolts up through the plate and into the winch. That will give us plenty of support when we're doing some heavy pulls.
Next up is the X nine solenoid switch that's gonna activate the motor on our winch. Now you can mount this thing anywhere you want to, but keep in mind
you need to have good access to it so you can plug in your remote. Now, with that in mind,
we're gonna mount ours inside the box here so we can lock it up with everything else and keep it safe from the elements at the same time.
Of
course, the power that winch, we need a good 12 volt power source. Of course, we can always run cables all the way up to the front of the tow vehicle and hook up to the battery, but
we don't want to mess with those connections all the time. So we're gonna rig up our own power source. Now for that, we went to Mr Gasket, got one of these battery kits like before we're gonna bolt it to the bottom of our new box. Now, the neat thing about this set up is it not only holds the battery securely
but also comes with all the hardware to hook it up
for our battery. We knew we had to have something that packs plenty of power and can recover quickly. As well. So we went to Optima and got one of their yellow top deep cycle batteries. That's really perfect for this application. Now, before you mount it into the box, you have to decide if you're gonna use the top or the side post. Now, for our application,
we're gonna use the side post to run the power connections to our winch through the side of the battery box.
Hey, man. Guess what time it is. What's that time for a break? Let's do it, man.
Stay with us. We'll be right back
later on trucks. We've got a 1970 C 10 to show you that's about as good as it gets.
But up first, we're gonna finish showing you how to set up the ultimate toy hauler.
Welcome back to truck.
Now, if you've ever done any kind of winching, you know that that battery is not gonna last very long without some sort of charging system, even if it is an optima.
So we went to Solar
Jr and got one of their solar battery chargers. Now, it consists of a circuit box as well as a solar panel. Now, what this does is continually charge your battery to keep it at full capacity,
but it also shuts off automatically so you don't overcharge the battery. Now, another thing it does, it emits a pulsating DC current keeps the sulfate deposits from building up on the plates of your battery
and killing it before it's time Now, this is a perfect application for a trailer. It's only gonna be used every other week or so.
Now to mount the solar panel, you need to put it someplace where it's gonna have access to direct sunlight.
So we're gonna put ours right here on top of the box in this corner,
the circuit box needs to go on next and even though it is waterproof so you can mount it on the outside,
we're gonna go ahead and put ours inside the box along with everything else.
Now, post tech recommends you keep it as close to the battery as possible. So with that in mind,
we're gonna put ours right here on the back of the box itself. That's also gonna keep it nice and close to the solar panel up on the lid.
The last thing that we need to do is make the electrical connections to the solar Jr
and we're done. Now, remember any time that you drill holes in the top of the box, make sure you put a little silicone around them so that they don't leak. Now, I know a lot of you are probably thinking, oh, this thing's phony, that's not gonna work. Well, all you have to do is grab these two ends when that panel is in the sunlight
and you'll get a shocking reminder that this thing actually converts solar power into electricity.
The last thing we got for our trailer, we're definitely gonna wanna keep in the box is a good set of straps and ratchets. Now, keep in mind these pieces are gonna be securing all your toys to the trailer. So you don't wanna skimp in this area. We got some longer straps with hooks on the end
that tie right down to the brackets on our trailer, as well as some shorter straps. It'll go over axles or even frames. Now, the nylon straps are weatherproof, incredibly strong and almost impossible to cut. Not to mention you can get them in just about any color you want.
Finally, we can show you how this custom towing box is gonna work.
Y'all step back there, man. Yeah, we're clear. Go ahead
one last thing. Make sure that the load capacity of your winch is compatible to the weight capacity of your trailer.
Hopefully now you have plenty of good ideas that will help you build your own safe and functional move or even used trailer. Stay with us. We got more truck for you right after the bridge.
Then it should be pushing it up, doesn't it? Yeah, I tell you what
later in the show, the guys are going to run into a few hitches, a class one through class five to be exact.
But after that, they take a look at a Chevy C 10 that will take your breath away.
Thanks for staying with us. Everybody.
You know when it comes to truck design, some are just destined to be classics right from the start and nowhere has that been more true than in the 67 through 72 Chevy truck design with their smooth almost Carli styling. People started customizing these rigs almost immediately.
Now, these days, both customizer and restorers are all drooling to get their hands on one of these classic Chevys. Now, of course, the most popular seems to be the short wide body,
but if you really wanna tuck some fat tires on one of these things, step side is hard to beat and
nowhere is that more evident than in Gary Donegan's 1970
Pro Street at hauler.
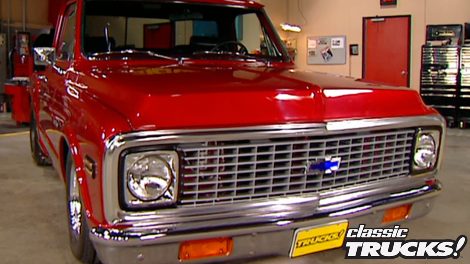
The first thing that catches your eyes, the super slick laser red paint job
and the direction Gary decided to go with this project. Now you won't see any shaved door handles, emblems or billet grills on this truck. But what you will see are all the factory pieces, including the bumper restored to absolute perfection,
which gives you a real good idea just how nicely these original pieces all work together.
Now, the hood is an area that has an estimated 300 hours of labor in it.
Of course, it's as straight as an arrow and all the seas are right on,
but it's not obvious where all those hours went until you slide it forward on a hinge that was robbed out of a late model buick and tilt the whole thing up, by the way, this is not the direct
and these hoods were originally intended to open.
Now under the hood is a full house big block, 454 punched out to 468 cubes and that's enhanced with all the necessary hot rod parts to really make this thing run.
Of course, comfort hasn't been forgotten either with power steering, power brakes and air conditioning.
Speaking of comfort, the interior is no slouch either. Thanks to these big black leather seats that were borrowed from a caddy.
The dash and instruments were fully restored and detailed to retain the stock look.
Now, power was added to the door windows and vent wings
as well as the back glass behind the seats. The stock gas tank was removed and replaced with a flush mount speaker box for a hot stereo system.
Body modifications on this truck are few but the ones that were done are as tasteful and well executed as the hood.
Now on the driver's door, we have a French power antenna because that's just cool. And if you're looking for the gas cap, forget it because it's hidden behind a pivoting side marker light that's opened by remote
at the rear of this thing. The tailgate
has been modified to open sideways and those are Ford model, a tail lights just to make people ask questions.
The bed is also up to the same standards. The rest of this truck carries with its polished bolts, red paint and stainless strips. But the real eye catcher is the handmade black walnut planks that make up the floor. Now, the rear fenders we alluded to earlier are stuffed with huge tires that are bolted to a narrowed nine inch rear with disc brakes.
The stance of this truck is right on the money with a nice rake and the nose down on the weeds. Now, that's done with spindles and springs that results in a 4.5 inch drop in the front
and the rear is held by adjustable coil springs and trailing arms to get that right. Look. Now, finally, the exhaust blows out through these evil looking tips that poke out in front of the rear tires.
Well, after taking a serious look at this pick up, it's pretty obvious to us why it makes that trip to the winner's circle at just about every show it enters. Stay with us. We'll be right back
up next on trucks. We've got all the information you need to know about. Class one through class five hitches.
Just can't get enough of trucks. Check us out online at trucks, tv.com.
Welcome back to the shop. Now, like we said before, most truck enthusiasts eventually are gonna wanna tow a trailer with their truck or SUV.
The question is, what kind of hitch do you have to have to tow safely?
But that's just it, most people don't know. So we're gonna show you what kind of options you have.
That's right. And the number one rule is you can't tow more than your vehicle is rated for. So, the first thing you need to do is find out what your truck's towing capacity is as well as the gross trailer and tongue weight.
Now you're ready to choose your hitch. Now, for that, we went to hidden hitch and got a sample of what they've got in all five classes. Now, first up is a class one. Now, this is a light duty application usually goes on a small car or a minivan
has a gross trailer weight of 2000 pounds and installation is pretty simple. Usually to the back of the frame or the bumper
up. Next is a class two hitch. And as you can see, it's a little more stout than a one and has a capacity of 3500 pounds, which is perfect for medium duty towing with a car even once again a minivan. Now, one of the coolest things about a class one or two hitch is that usually they're a lot smaller than all the others. So once you have them mounted, you can't even really tell they're there.
Now, we have a round tube class three.
This is where things get a little more serious. Now, these are rated at 5000 pounds and actually need to go in a full size pickup or an SUV.
You can see the construction is a lot more heavy duty than what we've seen. So far.
An application
definitely needs to be bolted to the frame. Now, class four is similar to a three
but ups the payload to 6000 pounds. Also, the overall construction is a little bigger and stronger,
but the major difference is the mounting points. As you can see, they're spread out to help evenly distribute the weight on your truck's frame.
Finally,
we got the class five. Now, this is the big boy, this is rated at 10,000 pounds and obviously is for commercial or heavy duty towing.
And you can see this thing is built out of very thick steel, all kinds of plates and gusset for support
and the mounting points just like the class four go all the way up the frame.
Now, installation of one of these guys is a two man job
and usually involves drilling the frame. Well, that's gonna do it for rear mounted hitches. But if you ever decide you wanna tow something heavier than 10,000 pounds, you need to look into 1/5 wheel or even a goose neck, but whatever you decide to tow, make sure your equipment can handle the payload capacity.
Now, when it comes to maintenance, most of you are pretty good about changing your oil every three or 4000 miles or so. But when was the last time you changed the oil in your differential or your transmission
didn't know you had to do that. Did you?
Well, it might come as a surprise to you. But most of the major manufacturers recommend changing those oils every 30,000 miles or so.
The spark plugs every 10,000 and these old spark plug wires that you never touch,
they should go after 50,000 miles
and now truck gear parts, tools and equipment for pickups and sport utilities.
Now, if you've been hanging around the sport truck and SUV market a while, you've probably noticed a trend towards larger diameter tires with twenties,
pretty much being the norm. Well, Toyota tires is up the ante with their brand new prox
sts
that'll handle a 23 inch.
That's right. 23 inches. Of course, you don't give up any of the great performance or good looks at the prox ST is famous for and if you don't mind dropping about 550 bucks a tire, you'll definitely grab some attention when you hit the street with these.
Nothing quite sets. The look and attitude of your truck, like a custom set of wheels. Of course, up to now that involves a lot of measurements and a fair amount of guess work. Well, wheel works has changed all that with this measuring tool. Now, it gives you an exact measurement of the size of rim that you'll need from back spacing
to width to the diameter. So if you want your wheels to fit right, the first time the wheel works is for you with a price of about 425 bucks.
It won't take long for this to pay for itself, especially if you own a tire shop.
If you ever thought it'd be cool to build your own Ford Lightning, believe it or not. Now, you can,
of course, it's a little smaller than the factory version. A tent scale to be exact, but it still has some really cool features like all wheel drive and independent suspension as well as enough speed to live up to the lightning legend. Now, Ford Collection offers everything you'll need, including the truck radio and battery charger for about 250 bucks. Now, you really can drive a lightning without the payments or the speeding tickets.
That's gonna do it for truck year. Here's a preview of next week's shift.
We'll dive into the cab of the harry hauler and show you how to lay down some brand new custom floor pans. We'll also steer you in the right direction on a couple other goodies for our 34 international.
After that, we'll introduce you to a post doc truck pilot who's making a difference in the lives of kids from the inner city of Atlanta.
That's all next week on trucks.
Well, that's gonna do it for this week's show. We appreciate you hanging out with us. Yeah, we got more trucks for you next week. All right. Track is set.
Oh,
forget those cones, man. These are wheelie monsters.
Oh, I see.
No, cause w
what happened to my steering
trucks is an RTM production.
Show Full Transcript
After that, we have a pro treated 1970 C 10 Chevy to show you that has no trouble finding the winners circle at shows all across the country.
Then we'll finish the show with a hitch or at least uh some important information you need to know about them.
That's all today on trucks.
Hey, everybody. Welcome to this week's show. Now, if you're hanging around with us, you're probably already a truck enthusiast. But even if you're not, most people know there's one job a truck is uniquely suited for and that's towing stuff, whether that's a jet ski motorcycle or even a custom show truck getting your toys at the playground also means you have to have the right kind of trailer.
The problem is most people usually spend a ton of money on their truck and their toys and end up towing those toys around on an old nasty unsafe trailer. It usually has bald tires and lights that don't work and you can forget about brakes and don't even act like you haven't used this kind of trailer before because we all have at one time or another. So this week we're gonna show you what to look for in a car hauling trailer and also how to set up a utility box. So you'll have all the tools you need right there where you need them
for our trailer. We went to Trailer World in Bowling Green, Kentucky and got one of their super duty 20 ft aluminum setups that are available with a squared front like ours or a tapered front, if that's what you really need. Now, the entire frame is made of T six high strength aluminum
and the floor is made of aluminum as well to help keep the weight down. As a matter of fact, our trailer only goes about 1600 pounds.
We also had Trailer World outfit us with 2 5200 pound axles as well as some eight ply tires. So we can carry some heavy loads.
Now, anytime you're looking at a trailer, whether it's a brand new one like this or a used one,
make sure that you find out the carrying capacity, so you don't overload it.
Unfortunately, most of us think, well, if I can get it on the trailer, it'll carry it. Well, that's not the case. Also, when you're looking at a used trailer, make sure that you check the tires and the axles and especially the bearings because they're almost always neglected.
This trailer also comes with these really slick slide in ramps
that lock into place when they're not in use. It's also been fully wired for tail lights, brake lights, turn signals as well as load lights to keep everything legal. Keep in mind if you are looking for a used trailer, take the time to really check out the wiring to make sure everything is fully operational.
Finally up here on the front, we have this emergency breakaway switch. Now what this does it activates the brakes on the trailer? If your truck and trailer should ever become disconnected from each other when you're tooling down the road,
important safety feature and most older trailers won't have that.
Now, like we said before, we're gonna put a utility box on here about this area.
So I'm gonna get started taking off these D rings and this light while mel shows you the box
for the box, we wanted something large enough to store plenty of accessories, but low enough. So it wouldn't interfere with any front ends or bumpers. So we went to DZ and got one of their all aluminum fifth wheel utility boxes. Now, this thing features a weatherproof lockable top as well as a low profile design that still has plenty of room to store all the towing accessories we're gonna need
not to mention it matches the look of our trailer perfectly. Go
ahead and get it on there matches our table too
to mount the box. All you have to do is center it up,
drill some holes down through the box and the floor of the trailer and bolt it on. Now, a lot of times when you're using a trailer, you're pulling a project vehicle or something that doesn't run,
that makes getting it up on the trailer a major pain. So to take care of that problem, we're gonna mount a winch inside the box. So the first thing we need to do
is measure where we're gonna mount our fair lead roller,
then cut it out with a saw
zone.
Now, while Stacey is cutting out the box, I can go ahead and show you the winch we're gonna use. It's a super winch S 9000 electric model
that comes with an X nine remote
cyano switch as well as a handheld remote. Now, we're also gonna go with their accessory bag. It includes a nylon strap block pulley shackles as well as a good old thick set of gloves. Believe us, all this stuff can really be a lifesaver. So it's all going into the box
with the whole cup for our rollers.
Now it's time for the winch. Now we've already drilled holes down through the bed, but that's not gonna be strong enough by itself even if you have a steel floor. But especially if you have aluminum like we've got.
So
we made this plate out of thick steel, drilled some holes in it to match our winch mounting holes. Now, we'll take the winch, set it in the box,
then we'll take this plate, go down under the trailer, run the bolts up through the plate and into the winch. That will give us plenty of support when we're doing some heavy pulls.
Next up is the X nine solenoid switch that's gonna activate the motor on our winch. Now you can mount this thing anywhere you want to, but keep in mind
you need to have good access to it so you can plug in your remote. Now, with that in mind,
we're gonna mount ours inside the box here so we can lock it up with everything else and keep it safe from the elements at the same time.
Of
course, the power that winch, we need a good 12 volt power source. Of course, we can always run cables all the way up to the front of the tow vehicle and hook up to the battery, but
we don't want to mess with those connections all the time. So we're gonna rig up our own power source. Now for that, we went to Mr Gasket, got one of these battery kits like before we're gonna bolt it to the bottom of our new box. Now, the neat thing about this set up is it not only holds the battery securely
but also comes with all the hardware to hook it up
for our battery. We knew we had to have something that packs plenty of power and can recover quickly. As well. So we went to Optima and got one of their yellow top deep cycle batteries. That's really perfect for this application. Now, before you mount it into the box, you have to decide if you're gonna use the top or the side post. Now, for our application,
we're gonna use the side post to run the power connections to our winch through the side of the battery box.
Hey, man. Guess what time it is. What's that time for a break? Let's do it, man.
Stay with us. We'll be right back
later on trucks. We've got a 1970 C 10 to show you that's about as good as it gets.
But up first, we're gonna finish showing you how to set up the ultimate toy hauler.
Welcome back to truck.
Now, if you've ever done any kind of winching, you know that that battery is not gonna last very long without some sort of charging system, even if it is an optima.
So we went to Solar
Jr and got one of their solar battery chargers. Now, it consists of a circuit box as well as a solar panel. Now, what this does is continually charge your battery to keep it at full capacity,
but it also shuts off automatically so you don't overcharge the battery. Now, another thing it does, it emits a pulsating DC current keeps the sulfate deposits from building up on the plates of your battery
and killing it before it's time Now, this is a perfect application for a trailer. It's only gonna be used every other week or so.
Now to mount the solar panel, you need to put it someplace where it's gonna have access to direct sunlight.
So we're gonna put ours right here on top of the box in this corner,
the circuit box needs to go on next and even though it is waterproof so you can mount it on the outside,
we're gonna go ahead and put ours inside the box along with everything else.
Now, post tech recommends you keep it as close to the battery as possible. So with that in mind,
we're gonna put ours right here on the back of the box itself. That's also gonna keep it nice and close to the solar panel up on the lid.
The last thing that we need to do is make the electrical connections to the solar Jr
and we're done. Now, remember any time that you drill holes in the top of the box, make sure you put a little silicone around them so that they don't leak. Now, I know a lot of you are probably thinking, oh, this thing's phony, that's not gonna work. Well, all you have to do is grab these two ends when that panel is in the sunlight
and you'll get a shocking reminder that this thing actually converts solar power into electricity.
The last thing we got for our trailer, we're definitely gonna wanna keep in the box is a good set of straps and ratchets. Now, keep in mind these pieces are gonna be securing all your toys to the trailer. So you don't wanna skimp in this area. We got some longer straps with hooks on the end
that tie right down to the brackets on our trailer, as well as some shorter straps. It'll go over axles or even frames. Now, the nylon straps are weatherproof, incredibly strong and almost impossible to cut. Not to mention you can get them in just about any color you want.
Finally, we can show you how this custom towing box is gonna work.
Y'all step back there, man. Yeah, we're clear. Go ahead
one last thing. Make sure that the load capacity of your winch is compatible to the weight capacity of your trailer.
Hopefully now you have plenty of good ideas that will help you build your own safe and functional move or even used trailer. Stay with us. We got more truck for you right after the bridge.
Then it should be pushing it up, doesn't it? Yeah, I tell you what
later in the show, the guys are going to run into a few hitches, a class one through class five to be exact.
But after that, they take a look at a Chevy C 10 that will take your breath away.
Thanks for staying with us. Everybody.
You know when it comes to truck design, some are just destined to be classics right from the start and nowhere has that been more true than in the 67 through 72 Chevy truck design with their smooth almost Carli styling. People started customizing these rigs almost immediately.
Now, these days, both customizer and restorers are all drooling to get their hands on one of these classic Chevys. Now, of course, the most popular seems to be the short wide body,
but if you really wanna tuck some fat tires on one of these things, step side is hard to beat and
nowhere is that more evident than in Gary Donegan's 1970
Pro Street at hauler.
The first thing that catches your eyes, the super slick laser red paint job
and the direction Gary decided to go with this project. Now you won't see any shaved door handles, emblems or billet grills on this truck. But what you will see are all the factory pieces, including the bumper restored to absolute perfection,
which gives you a real good idea just how nicely these original pieces all work together.
Now, the hood is an area that has an estimated 300 hours of labor in it.
Of course, it's as straight as an arrow and all the seas are right on,
but it's not obvious where all those hours went until you slide it forward on a hinge that was robbed out of a late model buick and tilt the whole thing up, by the way, this is not the direct
and these hoods were originally intended to open.
Now under the hood is a full house big block, 454 punched out to 468 cubes and that's enhanced with all the necessary hot rod parts to really make this thing run.
Of course, comfort hasn't been forgotten either with power steering, power brakes and air conditioning.
Speaking of comfort, the interior is no slouch either. Thanks to these big black leather seats that were borrowed from a caddy.
The dash and instruments were fully restored and detailed to retain the stock look.
Now, power was added to the door windows and vent wings
as well as the back glass behind the seats. The stock gas tank was removed and replaced with a flush mount speaker box for a hot stereo system.
Body modifications on this truck are few but the ones that were done are as tasteful and well executed as the hood.
Now on the driver's door, we have a French power antenna because that's just cool. And if you're looking for the gas cap, forget it because it's hidden behind a pivoting side marker light that's opened by remote
at the rear of this thing. The tailgate
has been modified to open sideways and those are Ford model, a tail lights just to make people ask questions.
The bed is also up to the same standards. The rest of this truck carries with its polished bolts, red paint and stainless strips. But the real eye catcher is the handmade black walnut planks that make up the floor. Now, the rear fenders we alluded to earlier are stuffed with huge tires that are bolted to a narrowed nine inch rear with disc brakes.
The stance of this truck is right on the money with a nice rake and the nose down on the weeds. Now, that's done with spindles and springs that results in a 4.5 inch drop in the front
and the rear is held by adjustable coil springs and trailing arms to get that right. Look. Now, finally, the exhaust blows out through these evil looking tips that poke out in front of the rear tires.
Well, after taking a serious look at this pick up, it's pretty obvious to us why it makes that trip to the winner's circle at just about every show it enters. Stay with us. We'll be right back
up next on trucks. We've got all the information you need to know about. Class one through class five hitches.
Just can't get enough of trucks. Check us out online at trucks, tv.com.
Welcome back to the shop. Now, like we said before, most truck enthusiasts eventually are gonna wanna tow a trailer with their truck or SUV.
The question is, what kind of hitch do you have to have to tow safely?
But that's just it, most people don't know. So we're gonna show you what kind of options you have.
That's right. And the number one rule is you can't tow more than your vehicle is rated for. So, the first thing you need to do is find out what your truck's towing capacity is as well as the gross trailer and tongue weight.
Now you're ready to choose your hitch. Now, for that, we went to hidden hitch and got a sample of what they've got in all five classes. Now, first up is a class one. Now, this is a light duty application usually goes on a small car or a minivan
has a gross trailer weight of 2000 pounds and installation is pretty simple. Usually to the back of the frame or the bumper
up. Next is a class two hitch. And as you can see, it's a little more stout than a one and has a capacity of 3500 pounds, which is perfect for medium duty towing with a car even once again a minivan. Now, one of the coolest things about a class one or two hitch is that usually they're a lot smaller than all the others. So once you have them mounted, you can't even really tell they're there.
Now, we have a round tube class three.
This is where things get a little more serious. Now, these are rated at 5000 pounds and actually need to go in a full size pickup or an SUV.
You can see the construction is a lot more heavy duty than what we've seen. So far.
An application
definitely needs to be bolted to the frame. Now, class four is similar to a three
but ups the payload to 6000 pounds. Also, the overall construction is a little bigger and stronger,
but the major difference is the mounting points. As you can see, they're spread out to help evenly distribute the weight on your truck's frame.
Finally,
we got the class five. Now, this is the big boy, this is rated at 10,000 pounds and obviously is for commercial or heavy duty towing.
And you can see this thing is built out of very thick steel, all kinds of plates and gusset for support
and the mounting points just like the class four go all the way up the frame.
Now, installation of one of these guys is a two man job
and usually involves drilling the frame. Well, that's gonna do it for rear mounted hitches. But if you ever decide you wanna tow something heavier than 10,000 pounds, you need to look into 1/5 wheel or even a goose neck, but whatever you decide to tow, make sure your equipment can handle the payload capacity.
Now, when it comes to maintenance, most of you are pretty good about changing your oil every three or 4000 miles or so. But when was the last time you changed the oil in your differential or your transmission
didn't know you had to do that. Did you?
Well, it might come as a surprise to you. But most of the major manufacturers recommend changing those oils every 30,000 miles or so.
The spark plugs every 10,000 and these old spark plug wires that you never touch,
they should go after 50,000 miles
and now truck gear parts, tools and equipment for pickups and sport utilities.
Now, if you've been hanging around the sport truck and SUV market a while, you've probably noticed a trend towards larger diameter tires with twenties,
pretty much being the norm. Well, Toyota tires is up the ante with their brand new prox
sts
that'll handle a 23 inch.
That's right. 23 inches. Of course, you don't give up any of the great performance or good looks at the prox ST is famous for and if you don't mind dropping about 550 bucks a tire, you'll definitely grab some attention when you hit the street with these.
Nothing quite sets. The look and attitude of your truck, like a custom set of wheels. Of course, up to now that involves a lot of measurements and a fair amount of guess work. Well, wheel works has changed all that with this measuring tool. Now, it gives you an exact measurement of the size of rim that you'll need from back spacing
to width to the diameter. So if you want your wheels to fit right, the first time the wheel works is for you with a price of about 425 bucks.
It won't take long for this to pay for itself, especially if you own a tire shop.
If you ever thought it'd be cool to build your own Ford Lightning, believe it or not. Now, you can,
of course, it's a little smaller than the factory version. A tent scale to be exact, but it still has some really cool features like all wheel drive and independent suspension as well as enough speed to live up to the lightning legend. Now, Ford Collection offers everything you'll need, including the truck radio and battery charger for about 250 bucks. Now, you really can drive a lightning without the payments or the speeding tickets.
That's gonna do it for truck year. Here's a preview of next week's shift.
We'll dive into the cab of the harry hauler and show you how to lay down some brand new custom floor pans. We'll also steer you in the right direction on a couple other goodies for our 34 international.
After that, we'll introduce you to a post doc truck pilot who's making a difference in the lives of kids from the inner city of Atlanta.
That's all next week on trucks.
Well, that's gonna do it for this week's show. We appreciate you hanging out with us. Yeah, we got more trucks for you next week. All right. Track is set.
Oh,
forget those cones, man. These are wheelie monsters.
Oh, I see.
No, cause w
what happened to my steering
trucks is an RTM production.