Classic Trucks! Builds

Video Transcript

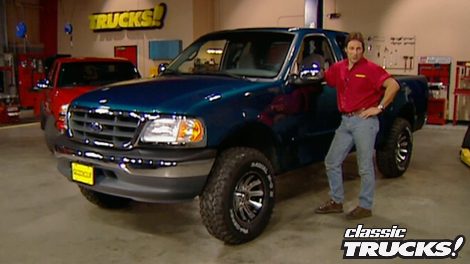
On this week's show, the guys take a brand new two wheel drive Ford F 150

make it a prerunner.

After that. You'll be inspired by the never give up attitude of off road racing champion Evan Evans and then it's back to the truck shop where Stacy has some new joint and drive shaft tech to fill you in on,

that's all today on trucks.

Welcome to this week's show, everybody. We're really glad you're with us. Now in the past, you've seen us do plenty of lift kits on four wheel drive vehicles, but two wheel drive trucks can benefit from a lift as well. And since we know a lot of you guys out there are doing just that, we thought we'd show you how easy it is

to put a 3.5 inch lift on our brand new Ford.

Now, I know a lot of you guys are thinking why in the world would you wanna lift a two wheel drive truck? Well, the truth is that most people that own four wheel drive trucks

never put them in four wheel drive. And unless you're into some serious trail riding,

a two wheel drive truck will take you just about any place you wanna go, especially if you stick locker in the back of it.

Now, two wheel drive trucks a lot cheaper right off the bat and they're also cheaper when it comes to fuel and insurance too.

And the good news doesn't stop there either. The kit we're gonna do today is about as straightforward as you can get and can really be done in your own driveway with a floor jack and a pair of jack stands. But before we can do anything, we need to lose the stock wheels and tires.

Now, one of the cool things about this kit is that we're gonna get our full lift just by replacing the spindles, which means we don't have to replace the control arms or the springs or anything like that. And that's really nice.

The first thing that we need to take off are these brake calipers. Now, like we've told you before, don't let them just hang by the hose, take a wire tie

and tie him up out of the way.

Once that's taken care of, pull off the rotor

up next,

we need to unbolt the A BS sensor from the spindle,

then we can move up to the upper control arm

and pop off this plastic retaining clip.

Now, it's also a good idea

to make sure the sensor is up out of the way.

So you don't damage it.

Now, this is where your floor jack comes in and

put it underneath the lower control arm and then jack it up.

Now what this does is compress your coil spring,

so it's safe to take off the spindle.

Now, all you have to do is disconnect the tie rod ends

and the ball joints,

then you can remove the stock spindle.

Well, now that we've held you in suspense long enough, we can go ahead and tell you the kit we're using today is from Fab

Tech. And as you can see, it comes with everything from the spindles and shocks for the front to the blocks and shocks in the rear. Also with this kit, all the hardware you're gonna need to complete the job is already included.

Here's one of those spindles man. Thank you.

Now, the new spindles slide right onto the stock ball joints. But let me show you where Fab tech gets their lift.

And compared to the stock spindle, they've lowered the shaft 3.5 inches.

It gives you a nice safe lift and doesn't affect any of the stock steering geometry

with the spindle in place. We can go ahead and reconnect our A BS sensor

and make sure you have plenty of slack in the line so you can crank your wheel lock to lock. Also,

don't forget to reconnect your plastic clip on the upper A R.

Now it's time to grease the spindle

slide on the rotor

followed by the freshly greased outer wheel bearing.

Now, these tapered bearings have to have a preload set on them.

We're gonna show you how to do that,

take your wrench

and then while you spin the hub crank down the nut to about 15 to 25 ft pounds and this seats the bearings

and back it off a little bit and then crank it down to about 1015 ft pounds. Now, most mechanics will do this by feel like I did right there. But if you're new to this or if you're not quite sure,

use a torque wrench.

Of

course, now that we have our rotors back on, we can bolt the calipers in place. Also, don't forget to check your brake pads for excessive wear because this would be the perfect time to change them. Fortunately for us, our truck's brand new. So we don't have to worry about that for a while.

The last thing that we need to do on the front before we stick on some new rubber is to swap out the shocks.

Now, like before you'll want to stick a floor jack underneath the lower control arm,

this will allow you to compress the shock and that makes it a lot easier

to get that thing out of there.

Also don't forget you need to slide these shocks out through the bottom. So be careful where you set your jack. So you don't have to move it

for the wheels. We went to American racing and picked up a set of what they're calling the Hurricane 2000, which is basically an upgraded version of their classic. It was really popular in the seventies. Now, this wheel just like the original has a signature spoke design. But the best part is you get to spend more time on the trail than in your driveway because these are powder coated and clear coated, which means all you have to do is hose them off when you're done getting them dirty

for tires. We went to Dick CPC

and they turned us on to the radial MC twos. Now, these are gonna be perfect for our application because like you can see they've got a real aggressive tread for mud or sand,

but they're not gonna be overly noisy for when we're buzzing down the interstate. Now we're gonna go with 2 85 75 16, which basically translates into a 33 inch tall tire,

which is exactly what Fab

Tch recommends

for this application.

Well, now that we're finished with the front assembly, we can go ahead and get started on the rear. By the way, if you thought the front was easy, you're really gonna like the rear assembly. But before we can get started, we need to get this floor jack under the axle for support.

Next, we need to take off these stock U bolts, followed by this lower shock mount.

Then we'll get metal to drop down the rear end

and then we can slide in the lift blocks. Now, it's really important that these fit flush against the spring perch and up against the spring

in our application, we had to drill a hole out a little bit so it would fit up against there.

Now, all you have to do is jack it back up

and then bolted together with a new U bolts,

believe it or not, all we have left to do back here is swap out the stock shocks for the new longer ones. After that,

it'll be time to put our forward, back on the ground.

I tell you what this truck has a stance to it. Now, now, of course, if this isn't radical enough for you, Fab

Tech also has six inch long travel kits. If you feel like you want to do a little desert racing, but whatever you're into, we need to take a break. Don't go away. We'll be right back

later in the show. Stacy has some U joint and Driveshaft tech to take you through.

But up first, we need to finish putting our Ford free runner together.

Welcome back to trucks. We've already put a 3.5 inch lift and brand new wheels and tires on our two wheel drive Ford,

but that's only part of the prerunner look that we're after. Of course, you can't have a prerunner without some sort of cool bumper. So we went to Fab Tech and got one of their desert guard bumpers.

Now, obviously, a prerunner bumper is a little different than most off road bumpers because you don't have a place for a win, but you do have an oversized skid plate and lightweight tubing for buzzing through the desert as fast as you can.

Now, the installation of the bumper guard is pretty straightforward. It bolts right to the stock bumper and then down to the lower frame rails.

Now you wanna put down a piece of masking tape so you don't scratch up your bumper when you're setting that thing into place, you ready for this thing, man.

Alright. Slide it on here.

Now we'll hold it in place with sea clamps on the lower frame rails.

Now that we have everything mocked into place, we come to the most important part of this install and that's making sure everything is level

and straight. Also, you need to make sure it tucks in nice and tight here on the bottom. Now, once you have everything exactly where you want it,

go ahead and mark your holes, pull off the guard and drill them.

Now, the kit comes with two different types of hardware up on top. You use a standard style bolt

down on the bottom.

You use a self tapping bolt.

That's because this frame is boxed in

and there'd be no way to get a nut on the backside.

Oh

yeah. Starting to look like a desert runner. Now

she's starting to get some attitude,

but we're not done just yet. One of the hottest boltons out there right now are hoods and we have something really cool in mind for this truck. But before we show you what it is, we gotta lose this stock hood

free over here, man. Yeah, me too.

Well, that hood's light. Yeah, it is.

The hood we're gonna use is called the F one from American auto designs. And it features two very cool contoured hood scoops. Now it's also completely finished top and bottom and uses all the factory mounting hardware. Now,

another cool thing to note about this hood, it's made out of hand laid fiberglass, which is a lot stronger

and a lot smoother than a piece shot with a chop gun. Now, keep in mind it's a whole lot easier with the hoods off the vehicle to swap out some of the factory hardware as you can see on our hood, there's already a cutaway for the windshield washer nozzle and I'll go ahead and pop that in right now

with the hood in place and loosely bolted on carefully, lower it down

and check your alignment.

Now, you'll notice we don't have our latch on yet. That's because that allows you to move the hood around till you get the alignment just perfect.

Now, once you have it there, go ahead and tighten down your hinges and put on your latch.

Another really neat thing about this hood is all the holes are already drilled for your wiring harness as well as your under hood light, which makes things a whole lot easier to deal with. Now, all that's left to do is hooking up the hose for your washer fluid.

Wow, that hood and bumper really finished this thing off. It really looks good, man. You know, the one thing we do need to do, we need to paint that bumper black to match the wheels

killer. We need to take a break right now, but stay with us. We got more trucks for you right after this

black is the way to go. Yeah, it would look better

up. Next is a story that exposes the true heart of an off road racing champion.

A lot of people don't understand just because you're disabled doesn't mean you're unable. You just have to get out there and try

the legs of off road racer. Evan Evans no longer work

a motorcycle accident more than 10 years ago, took away the use of those.

But his heart,

well,

that's a completely different story.

A

lot of people don't understand just because you're disabled doesn't mean you're unable, you just have to get out there and try

just because my legs weren't working doesn't mean I couldn't drive. I still had my mind. I still had my arms and I was gonna drive.

Evan began his desert off road racing career in 1988

the following year, his father off road legend Walker Evans offered his son a full time ride with his team.

Electrical problems marred his first run but a trip to the winner's circle at the fireworks 250 in the California Desert marked his fourth consecutive victory

tragically. However,

it was a cruel twist of fate that served notice just five days later,

that left this young gun paralyzed from the chest down

when he was laying on the operating table just before they went in to open his back hall up. He said

I will be back.

And I said, I know you will. I know you will. I had no idea

that he had the confidence, the desire

he possessed way more than, than me.

Look where he's at. He builds his own cars, hand controls goes out there and wins races,

a paraplegic bouncing through that kind of stuff. Phenomenal.

At the point when I was laying in the hospital, I don't think my dad really wanted to hear me say I can go, go race again, dad. But, but that's the way he raised me and that's the way he's gonna have to put up with me.

Miraculously, four months after the accident, Evans strapped himself in for the famed ball

hall 1000 and ran the 1st 72 miles before giving way to a relief driver.

It was that never give up attitude that helped Evan take home his first championship crown as well as the respect and admiration of the entire off road racing community.

A lot of people ask, well, did you have, did you, did you want to use your feet? Not really because I went through four months of rehabilitation. And in those 34 months, you

kind of forget about using the use of your legs because you have to adapt and use your arms to do everything else. Get dressed, get in a car or whatever, you have to use your arms. So you kind of forget about using your legs. So that wasn't a big transition for me. The biggest thing was being comfortable in a car and finding hand controls that would adapt to the type of racing that I'm doing.

In fact, Evans went through numerous hand controls before designing the perfect setup that allows him to steer and shift with his left hand, accelerate and break with his right.

It was also during the research and development of those hand controls that he found he preferred short course racing to the desert.

So in 1996 he turned his attention to the short course off road Drivers Association. His goal was to grab rookie of the year honor,

but winning seven of eight races on the season also earned him the distinction of being the first paraplegic to win a professional off road championship.

In 1998 the Soda Series became core and during the 2000 season, Evan became the first pro two driver to win three

consecutive main event

in a way. I, I, I'm kind of a hurting unit because I don't think I could get out of racing if I had to. This is all I've ever done. This is all I know and, and, uh, to be my dad's son and to follow in his footsteps is just unbelievable for me.

You know, even though the driver has enjoyed 28 career short course victories as well as a pair of off road driving titles.

It'd be completely understandable if the man wanted to play the more

from time to time.

Should anybody shed a tear for heaven and his plight? Oh, heck no, no way

if anything they should, uh they should be very happy for me because I am doing what I'm doing,

you know, and,

and there's no, no reason anybody should build his head for me because I got the best job in the world. I got the, the nicest office to work out of and this is my desk. It's the fastest desk around and it's a Chevy

just can't get enough of trucks. Check us out online at trucks, tv.com.

Thanks for staying with us, everybody.

All right. So you've got all kinds of horsepower under your hood, big tires, gears, axles.

Unfortunately, that's not gonna do you any good if you can't get that horsepower down to those tires.

So for the next couple of weeks, we're gonna deal with an area that's almost always overlooked

and unusually a problem and that's drive shafts and new joints.

Now, this drive shaft is out of a jeep. And as you can see, it's, uh,

seeing the beatings of a few backyard mechanics.

Unfortunately,

they didn't realize that there's some tricks of setting up a drive shaft.

So follow along as we show you what was done wrong and how you can avoid making the same mistakes

first off and most glaring, the two ends of the drive shaft were slid together on the splines with the ends out of phase with each other.

Always remember these yolks have got to be in alignment

or you're gonna have vibration. There's just no way around it.

Also see how the caps are spinning inside the yoke. That's bad.

They should spin on the needle bearings inside, not inside the yoke. If you let that go too long and it wallows out that yoke, you'll have to replace that too.

Now to remove the U joint, take out the snap ring,

then press or hammer out the caps.

Now, for new U joints, you've got some choices. So we went to Tom Woods custom drive shafts, picked up an assortment of spicer U joints. Now, the first one we're gonna look at is the 5153. Now, this is a good joint only costs about 12 bucks.

And as you can see, it's got a grease fitting in the cross of the body

and the best way to get some performance out of. One of these is to map it when you install it. And what that means say this is the output of the transfer case rotates this direction

the joint should be installed to where the grease fitting is under compression. When the load is on the shaft, this will make it stronger

if you install it. This way,

the hole is being opened up when the load is on the shaft and that makes it weaker.

Now, obviously, we've got a lot more, we'd like to show you, but unfortunately, we've run out of time.

Make sure you watch us next week. We'll pick up right where we left off.

Now, if you've just put new wheels on your vehicle, it's a good idea to check your lugs after you've driven in a little while. And that's because lugs can work loose on a new wheel and you'll end up wallowing out the lug holes or you'll lose the wheel completely, which is never a good thing.

Now, you can prevent all this.

If you periodically check the lugs for the 1st 100 miles or so.

After that, the lugs will have taken a seat

and you won't have to worry about

it. And this is especially true for aluminum wheels, but no matter what kind of wheels you got, it's better to be safe than sorry.

And now truck, gear, parts, tools and equipment for pickups and sport utilities.

Just recently, Edelbrock came out with their R PM air gap intake manifolds. Now, this unique design

places an air gap between the intake runners and the lifter valley.

And this gives you a cooler, more dense air fuel mixture

and more power from idle all the way up to 6500 R PM.

Now the intake itself is amazing enough. But the really big news is now these are available for small block Chevys running late model Vortec heads

pick up one of these intakes for about 200 bucks.

Now, if you've always thought differential covers are all created equal mag view, just might be able to change your mind.

Their cast aluminum cover has a side window so you can check your fluid as well as twin parallel magnets to pull any metal shavings out of your loop. This cover also has a temperature sending port as well as an easy access drain plug cover your gears with a mag view cover for about 230 bucks.

That's gonna do it for truck gear. Here's a preview of next week's show.

The guys roll project trail boss into the shop and tear into the top end of their stock street six as they wring out as much horsepower as possible from their CJ seven.

Then they've got the latest from Ford to show you. It's part truck, part SUV and it's called the sport track.

After that, we'll finish up with our U joint and drive shaft tech that's all next week on trucks.

Well, that's gonna do it for this week's show. We appreciate you hanging out with us. Yeah, you're gonna love what we got for you next week.

Let's go

home.

All right.

Trucks is an RT M production.
Show Full Transcript