Classic Trucks! Builds

Video Transcript

Welcome to trucks, the show where it is ok to get dirty.

Matter of fact,

we've raised it to an art form.

Now, one question that I get a lot is what is a good project to get into

something that you can do on a budget

that won't take forever and that you can drive every day and enjoy.

Not necessarily a full blown show truck, just something really cool.

Well, in the world of trucks, you've got a lot of choices, anything from the late seventies, all the way up to the early nineties

because they're relatively cheap,

they're all over out there and the after market is full of parts to make them really cool. So, doing a body makeover on one is pretty simple and that is what we're gonna show you today.

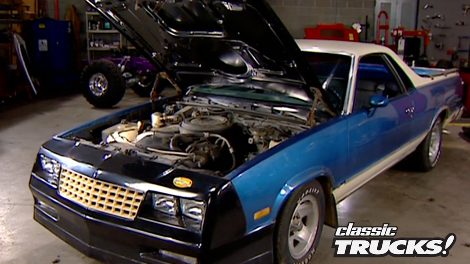
What we've got here is a 1983 El Camino.

That's actually in really good shape. Very little rust, very little damage.

It's just a little tired. Now, most of these late model El Caminos came fully loaded with power steering and power brakes and

power door locks and air conditioning, which means you don't have to put it on

that keeps the cost of the project down

and also gives you a reliable vehicle that you can drive every day. That's two of the criteria that we talked about.

Now, you can pick up one of these things from anywhere from 1500 bucks

all the way up to around 3500 bucks depending on the shape of the vehicle.

And of course your bargaining ability,

the body style of these particular El Caminos is very cool and they're a little rare. So you're not gonna see them just anywhere and that is good. It gives you something that's a little bit unique. However,

there are some things about these trucks stylistically,

that kind of looks like something that your uh

grandmother would drive and that is not good. So today we're gonna turn this into an Ss El Camino

and let it start to become the hot rod that it needs to be.

The first thing we're gonna do is deal with that front end in that grill. And for that, we went to the legendary honest Charlie speed shop and got one of their one piece Ss El Camino noses. Now, this thing looks just like the original Ss El Camino nose. But there is a big difference.

This is made out of strong fiberglass. The originals were urethane plastic and

they got soft out in the sun warped all up and looked terrible in a couple of years. These will hold their shape.

Now, all the mounting phalanges are built right into the molding

and this nose is completely assembled with headlights, turn signals, the spoiler, even the grill. Now, this nose does not go over the top of the old original front end. This completely replaces it.

We'll get started

by breaking out the penetrating lube,

unbolting the bumper

and setting that aside to be modified.

Then we'll come in here to these aluminum mounting plates and get those and we'll also need to take off all this plastic

and this spoiler. Now

make sure that you're organizing all your hardware because you're gonna have to reuse some of it.

Pull off the headlight trim,

then

remove the outer headlight

and the lower marker lights.

Finally

just done, bolt the old nose

and get rid of it.

Ok? To put on that new nose.

This tab here has got to come off. So the front nose will sit back flush against this fender. So

we're gonna break out the Sawzall and say goodbye to that.

Next up are these factory aluminum bumper mounting brackets? Now, these need a two inch hole punched in them right here so you can run wiring through them.

Now, a few minutes with a whole saw

is all it takes to take care of that.

The original bumper will be reinstalled because without it, well, we're not gonna have any crash protection. Now, the bumper will bolt on

and then the nose will go over the top of that and it'll sit behind the nose.

Unfortunately, the bumper is gonna be too wide to fit inside the nose. So we're gonna have to cut it down.

And also we're gonna have a problem with these lower turn signal lights. So we're gonna have to modify the bumper

and this is how to do it.

The first step is to whack four inches off of each end. Now I'm using a plasma cutter, but a torch or a Sawzall or even a jigsaw will do it too,

just a little slower.

Then we'll cut slots in each side according to honest Charlie's measurements

and finally

put the mounting planes back on the bumper

and then loosely put the bumper back on the vehicle so you can adjust it later on.

The last thing that we're gonna take off is this trim that goes around the wheels because

it's gonna be in the way of the nose here.

And also we're eventually gonna shave all of the trim off this vehicle. Give it a nice, smooth clean look. Now, if you do this shave all the trim off your rig,

make sure that you don't just throw it away because this stuff is like gold to a restorer. So take it to a swap meet, put some money back in your pocket.

Yeah.

Now we're ready for this ss nose and all you do is just set it in place, line it up here with the top of the fenders and clamp it on. Now, you'll notice that I have the headlights in the grill out.

That is because

they got some mounting holes that we have to mark in here. You can't do that

with the headlights in

with the nose back off, drill out the mounting hole.

Now, just bolt on the nose

using the supplied hardware

and make sure that you're spending some time aligning and fitting this thing

because nothing looks worse than a bunch of gaps or overhangs. And don't think for a second

that you're gonna take any fiberglass part and just bolt it on and, ah, it'll be perfect.

It doesn't work that way,

be prepared. Spend some time with a file working some of these edges and seams to make them perfect.

That is just the nature of fiberglass. Also,

when you bolt this down, make sure you don't over tighten the bolts or you can crack the glass. Now, once it's all on, go ahead and hook up your headlights

and that takes care of the nose. What do you think?

That's quite a difference, isn't it?

Now, this hood, this hood is ticking me off because

you don't put on a nose like this and leave an old nasty rusty hood.

We're gonna deal with that after the break.

Welcome back to trucks. We are in the process of showing you just how big of a difference a

facelift can make.

Not the Hollywood kind, the trucks kind. Now, what we're doing is an 83 El Camino, turning it into an SS getting rid of the old stock. Look. Now we've already got the SS style nose on here. It's looking good fitting right now. It is time to move on to the hood.

Now for that, we went back to honest, Charlie Speed Shop

got one of these good mark, all steel cow induction hoods. Now, not only is this all steel,

but it looks like something that you would have gotten from the factory. You got all this original style bracing,

got your opening for your air cleaner. Heck, it's all there. Now, to put this thing on, all you do is take the spring and the latch off your original hood, bolt it on in the stock location,

then bolt the hood to the original hinges. Spend a little bit of time getting it all lined up

and close the hood down. Look at this, all your creases, all your body lines are exactly where they need to be.

You've got a two inch tall cow induction scoop going down the center and this is functional

now as cool as this is

the best thing about a good mark hood is the way it fits, check out these seams and these lines.

That is awesome.

Now, we got to have something cool running down the side of the truck.

We're doing a makeover. So we went back to honest Charlie's and got yet another accessory that they call the ground effect style side exhaust system.

Now, this is for the El Camino, but you can also get them for S tens and other trucks. Now, the piece is a big tapered piece of fiberglass runs down the side of the truck.

Then you've got this opening here in the back. Now, what goes in there? Well,

check this out, big rectangular stainless steel tip tucks in there for a slick side exhaust system

to mount the shields, clamp them in place.

They come up underneath with the drill drill through the shield into the rocker. Now, you wanna make sure that these things are sitting level. You don't want them to tip down because,

well, that look kind of dorky. Now, once you have your holes drilled,

take the supply of hardware and bolt them on.

Now we are ready for the tip. Now, the first thing that you need to do, if you're gonna make these functional

and you are gonna make these functional

is make sure they fit the opening.

Now, you're gonna want a good quarter inch of clearance all the way around the tip. This will make sure that the fiberglass doesn't get too hot and warp on you and don't be surprised if you need to come in with your trusty file. Make a little more clearance.

Ah,

once that's done,

take the brackets to come with the kit,

mount them to the pinch weld,

then we are ready for the tip.

Now, don't be surprised if you need to do a little bending and fitting here to make this tip just right.

Remember the more time you spend here, the better this is gonna look,

you don't wanna just hack this together

right there. That looks good.

Well, that finishes up

the installation of our ground effects with the side exhaust dumps.

The only thing we have left to do is run the exhaust down to this tip and we will be in business. Simple, easy

and it looks great, especially if you slam this thing down on the ground.

Now, I'm not done yet. Still have a lot more to do if I'm gonna finish up this truck today

and I'm already on my second dirty shirt, take a break, get something to drink and I'll see you back here.

Just can't get enough of trucks. Check us out online at trucks, tv.com.

Welcome back to trucks.

We are coming down the final stretch of this El Camino build up and

what we're doing here is showing you just how much you can change the look and the attitude of your truck

just by bolting on some aftermarket parts. Now, we've already put on an ss nose cow induction hood, got some side pipes down along the side.

Now, we come to two of the most popular upgrades that you can do to a truck, a tunnel cover and a rear roll pan.

The stock El Camino bumper is not bad. It's actually got the tail lights already mounted down into it,

which means you don't have to come up into here, remove a tail light weld in a feller panel and finish that off. These trucks already come from the factory this way. But this,

they had the right idea here. This can just be a little smoother and a little cleaner and a roll pan is gonna do that for us. So what we're gonna do is pull out these tail lights, take off this bumper, remove this plastic everything.

Follow that with the tailgate,

then we'll flatten this pinch weld. So the new roll pan will lay flat.

Ok. Now it's time to take a look at this new roll pan.

And once again, we went to honest, Charlie's got this nice thick fiberglass piece

that's got the tail lights molded right into it. Now, I know you're thinking, oh, that looks just like the bumper.

No,

no, this is much better. The bumper sat out here. This tucks the tail lights right underneath the tailgate. Very smooth.

Now, to mount this just set it in place,

then just check your seams. Now, if you need to do any tweaking or fitting now is the time to do it.

And once you have it fitting exactly how you want, take the supplied hardware

and just bolt it here along the top,

you still need a little bit of adjustment here.

Follow that with the tail lights, put on the tailgate

and that takes care of the roll pan. That is how the back of an El Camino should look.

Ok. Ok. I know we're running out of time,

but I'm down to my last part and that is the tunnel cover because we don't want a bed full of water every time it rains, that

eventually turns into a bed full of rust.

So

for the

tono cover, we went to,

yeah, you guessed it on Charlie's

and got a fiberglass tunnel cover specifically for the El Camino. Now, as far as tunnel covers go, this is one of the easiest to put in that. I've seen

all of your hinges are already installed

as well as your gas struts.

And you've got a nice thick piece of weather stripping that runs all the way around this thing

and you also have locks already installed so you can lock this thing. People won't get in, steal your stuff. Now, obviously, this is the bottom part, but the top is all finished, smooth and slick as a baby's butt. I'm gonna show you that as soon as I get this thing installed.

As you can see, a few body modifications can literally give you a totally different truck

and you don't have to have an El Camino to do this.

Like I said before, just about any truck can benefit from some body mods. So what are you waiting for? Get out there? Work on your truck. Well,

you know, wait till after the show.

Welcome back. There is no doubt that street performance trucks are popular, whether you build it yourself or you buy it from the factory. That way everybody wants to squeeze the most power that they can out of their truck.

And the manufacturers have been jumping into this game too and one truck that consistently stays at the top is the Ford SVT lightning.

But why, what makes it so special? Well, we're gonna take you on a ride and show you

the lightning remains virtually unchanged for 2003 and that's ok

because why mess with success.

Make no mistake. This is a factory muscle truck pure and simple. What does that mean

for the truck part? It has the ability to comfortably carry an 800 pound payload in the bed

and the hitch is not fake. This thing will pull a 5000 pound trailer without even breathing hard

for the muscle part. You've got a 5.4 Triton V8 with an eaten supercharger ramming eight pounds of boost down his throat

while a watered air inner cooler removes excess heat

and adds even more power. This adds up to 380 horsepower and 450 ft pounds of torque.

A special four speed automatic tranny channels that power to 373 gears in a limited slipper in

ensuring that you leave two cool black marks instead of just one dorky. One

of course, all that power is no good if you can't handle it.

But the lightning can, it's got quick ratio steering box along with SVTS, special springs, gas shocks and stabilizer bars in front and the rear.

And this not only lowers the truck but makes it extremely agile in turns with very little body b

rounding out. The package are special Goodyear tires for gripping the road so you can flog this thing like a sports car, but you still have some side wall string if you need to do some towing,

obviously, braking is important and the lightning shines there too with four wheel discs

with a DS to stop this thing in a hurry.

However, the awesome drive train and suspension aren't just for the drag strip or a twisty road course,

the lightning will also hit a blistering 142 miles an hour if you like running fast and

of course, you have a place to do it legally

inside the truck. The seats have enhanced side bolsters to help keep you in the seat during hard cornering.

And just in case you forget that you're in a lightning

special svt white face gauges will remind you when you look down.

Of course, the lightning does have some weaknesses.

It can be a little expensive, both in the $33,000 purchase price

and in the area of tire wear and fuel consumption if you really drive this thing.

But if you want a factory hot rod that will run with the big boys and it has to be a truck.

Your first stop should be a Ford dealership to check out the svt lightning.

One thing that never ceases to amaze me is how a person can spend thousands of dollars on their engine or suspension in their street or off road truck

and then they put the stock seat belts back in.

Mm mm mm. Guys, a modified rig needs

a modified restraint system and if you wanna use what the pros use,

you need to look no further than Crow Enterprises. And these guys have everything from a two point harness all the way up to a serious five point harness. They've got a quick release so you can get out of there in a hurry if things go bad on you

and you can get these harnesses in the two inch wide belt

or the stronger three inch wide belt. And obviously you've got a choice of colors. You got purple and black, but you also have red and blue. So if it's important that you stay in your seat, you need to quit goofing around and get you some crow belts

since today's truck gears are about six safety.

What about your hands?

A

mechanic style glove is great. Obviously, I use these all the time,

but they do have a serious drawback. You can't feel intricate parts through the fingertips

and this is pretty important when you're trying to thread a blind bolt up underneath a manifold or something.

Well, Ringers has a new glove called the CT glove and it not only has the fingers cut out for unrestricted feel,

but it also has special pads in the palm with an opening right here

for where the nerves come through the carpal tunnel into the hand.

Now, this takes the stress of impacts or air tools, keeps them off of the nerves and that can help prevent carpal tunnel syndrome.

They look cool too. Yet. Another glove option from ringers that

you need to have in your toolbox, that's gonna do it for today.

We'll see you next week.
Show Full Transcript