Classic Trucks! Builds
Want more content like this?
Join the PowerNation Email NewsletterVideo Transcript
Today off trucks,
the guys roll an 88 Blazer into the truck shop and tear into the suspension of their stock Chevy. They'll get started with a six inch lift before swapping out the axles, front and rear. All that to make room for the 37 inch tires. They'll stuff into the wheel wells. After that, we'll bring you back to earth with a Ford duly that breaks all the rules.
That's all today on trucks.
Welcome to this week's show everybody. We're glad you're with us. Now, when it comes to hunting down a project truck, whether it's a sport truck or a four wheel drive without a doubt, some of the best deals out there are trucks from the late seventies up through the early nineties. Now, these are all new enough to have things like power steering, power brakes and air conditioning, but they're also old enough that you can usually get a really good deal on one. Now, what we've got here,
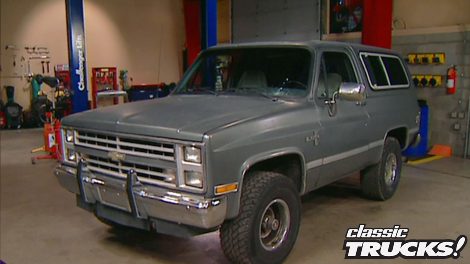
a 1988 Chevy K five Blazer that we're gonna call Project Big Blaze.
Now, the neat thing about these old blazers is that they're a big, rugged, full size pickup with V8 power, but they've also got a shorter wheelbase than a standard full size pickup, which means they're a lot more agile and nimble out on a tight trail. Of course, the best thing about the Blazer and its counterpart, the Ford Bronco,
they've got a removable hard top.
Our truck is pretty standard of what you'll find out there and that it's been subject to years of neglect has almost 300,000 miles on the clock and everything on. It's pretty well worn out. But as you can see,
the body is still very straight with almost no rust on it. And all of that, along with the $1600 price tag makes this rig a perfect candidate for our project.
The first thing we're gonna deal with on project Big Blaze are the axles and the suspension. Now we're gonna use Goodyear's new 37 inch tall tires on this thing. So we need to have some sort of a lift to make sure we have some clearance in here. We also need some stronger axles to handle the abuse. So the first thing we're gonna do is get this thing on the lift, take off the tires and the shocks and then get a jack under the rear end to support it
for our lift kit. We went to skyjacker and got one of their six inch list for a full size blazer. Now, this kit comes with brand new leaf springs as well as a drop steering arm,
nitro gas shocks, dual steering stabilizers, as well as brake hoses and all the hardware. You're gonna need to get a good safe six inches a lift.
Now, since we're gonna replace this rear end completely, there's a few things we need to take off that you wouldn't normally take off if you were just doing a lift kit,
like these emergency brake cables, the drive shaft,
this vent tube
and of course your brake lines. Now, a little tip here, make sure you put a little cap on your brake line, that'll keep it from dripping and draining your master cylinder. Now, all we have to do is take off these U bolts
and lower the rear end
with the axle out of the way. It's time to get rid of the stock lease springs. Now, the bolts that hold them in place are gonna be pretty rusty at this point.
So you need to hit them with a good shot of penetrating lube to help knock them loose. Also, don't be surprised if you have to work at these dogs a little bit to get them loose.
Now, with the stock springs off, you can see the considerable difference between those and these monsters from skyjacker. Now, these are gonna give us a full six inch lift without the use of blocks.
And they also have these wedges bolted right on to help correct severe drive shaft angles.
Now that we have the rear end completely apart. We need to do some clean up under here. Now, we're gonna get rid of all the dirt and grease with a good all purpose cleaner. Then once everything's dry, we'll hit it with a semi gloss paint. Now, the reason this step is so important is because it helps you locate any potential rust problems you might have.
Now, we know you've just been dying to know what kind of rear axle we're gonna use on this thing. But the first thing you need to decide is what size tires you're gonna use that way, you'll know what kind of gears to put in a differential.
Another problem with these old blazers is that the rear axle is narrower than the front axle around four inches actually. So
we went to drive train specialists and had them custom make us a Dana
60
with a wider housing. So it matches the track of the front axle, but we didn't stop there.
We had them stuff it with 35 flying axles and 488 gears, which will work perfect with our 37 inch tall tires.
Of course, any time you put on bigger tires braking can become an issue and these old stock drum brakes just aren't gonna be enough to stop us with the kind of responsiveness we're after, especially at 6065 miles an hour. So we went to stainless steel brakes and got one of their rear disc brake kits to go on to our rear DTs axle. Now, this kit bolts right into place and includes everything from the caliper and rotor
as well as the emergency brake. Now, for traction, we want this sucker to lock up when things get serious off road.
But when we're tooling down the street, well, we'd like it to act like an open differential. So that's where the A RB air locker comes in.
Now, this thing acts just like an open differential when it's off. But when you need that traction, you flip a switch air runs down through this airline activates a piston in the case here and locks everything up just like a spool. Now, finally,
we got this special girdled cover
that allows you to put a preload down on these bearing caps.
Now, this keeps the housing from flexing. It makes a little stronger,
looks good too.
Now, we're ready to install the new lease springs that slide right into the stock hangers. Now, since our stock bolts did get rusty, we're gonna go ahead and replace them with brand new grade eight hardware and to keep these from sticking in place and getting rusty on us, all we have to do is give them a light coat of grease before we slide them in.
Now, we're ready to get our rear end in place, set our pin angles. Now, as you can see, we have the rear end jacked up against the springs with the perches in place, everything's held loosely on with the U bolts.
Now, if you're gonna use a standard two U joint drive shaft,
the output of your transfer case
and the yoke of your rear end need to be at the same angle. If you want to stay away from vibration,
problem is when you add a lift, you increase the angle of the drive shaft through your U joints causes them to wear out quicker. So the ways to fix this
is to lower the transfer case just a little bit
and use shims to pitch up the front of the rear end
problem is
that'll throw your angles out of whack,
vibration will sneak in. So the best way to fix it and what we're gonna do
is use a drive shaft that has a CV joint up here,
single, you join back here. Now keep in mind when you do it this way,
the rear end
has to point right at
the transfer case,
we're gonna get it in place right now.
Finally, with the trucks sitting at ride height,
we'll tack the spring perches in place
and then weld them on
with our rear axle welded up and ready to go. We hit it with a coat of paint and hung it in place with the supplied hardware. We'll follow that up with these brand new gas shocks
and replace the stock bump stop with the huge red ones made specifically for our six inch lift we need to take a break but stay with us because we got more project Big Blaze right after this.
Later in the show, we've got an F 250 duly to show you that's not afraid to be different.
But up next, we need to finish bolting our six inch lift kit and beefy front axle onto project big blaze.
Welcome back to trucks. Now, if you're just joining us, we just finished putting a six inch lift and a DA is 60 in the rear project big blaze. Now, we're gonna get started on the front. Now, these old blazers are set up pretty nice from the factory with a steering stabilizer and dual shocks.
But these old 10 bolt axles leave a little to be desired as far as heavy duty. So we're gonna deal with that as soon as we get everything disassembled here.
Now that we have the rear end six inches in the air, we need the front to match it. And for that, we're also gonna use Skyjacker and their brand new lease springs with polyurethane bushings, four new shocks to replace the Stockers, dual steering stabilizers as well as a lowering kit for the sway bar.
Now, with our front axle unbolted from the springs and the steering linkage and the brake lines,
we'll go ahead and roll it out of the way to show you what's gonna go in its place.
Now, for that, we also went to DTs
and got one of their upgraded Blazer 10 bolts. Now, this thing's been converted to 30 flying axles
and Moser front shafts. These are 35% stronger. We also had them put in an eaten carbon fiber posit track, which is great for a front axle.
And finally, we had them stuff it with the same 488 gears
that were running in the back
to get the new leaf springs ready for installation.
You wanna put a coat of grease on the bushing
and then slide it into the spring.
You also wanna put some grease on the metal sleeve
before putting it in place.
Now, the grease not only helps the installation go a little easier,
but it's also gonna keep your bushings from squeaking on it. Now, all we have left to do is bolt the springs in place.
Now with the springs in place, it's time for the axle and like we said, this is just a stock blazer housing. So it's as simple as just putting it in place, bolt it down with the hardware that comes with a kit.
Now is also a good time to put on the new drop steering arm
that goes right in place of the stock arm. Now, the purpose of this
is to make sure your drag link doesn't get in a bind because of your lift kit.
Next up are the lowering brackets
for the sway bar. Now, what these do is lower the sway bar. So it'll still be usable on your lifted truck and they bolt right up to the frame where the old brackets used to be. Now, once you have the new bushings installed into the factory brackets, you can go ahead and bolt up the sway bar.
Now, like we said before, the original Blazer came with a steering stabilizer, but the Skyjacker kit upgrades it to duals. So the first thing you wanna do is put this bracket on the axle,
then take your steering stabilizers, pull them out halfway,
mount the tie rod bracket on one end
and then slide it up onto the axle bracket,
then bolt the tie rod bracket to the tie rod
and then turn the wheels lock to lock to make sure you have proper adjustment.
Finally, we're ready for the front shocks. Now, obviously, they're gonna bolt right up to the stock locations. But one thing you will notice about this kit is that each side comes with a gas as well as a hydraulic shock. Now, this is gonna give you all the performance you need, but it's also gonna keep your suspension from being too stiff. We need to take a break right now, but stay with us. We'll be right back
up next on trucks. We've got an aggressive wheel and tire combination to stuff into the wheel wells of our 88 blazer.
After that, we'll drop things into the weeds with a blue oval that's in a league of its own.
You just can't get enough of trucks. Check us out online at TRUCKS, tv.com.
Thanks for staying with us. Everybody. Now that we have our lift kit and axles in place, we need to do some of the detail work like the brake lines. Now, these longer steel braided hose came with the kit because the stock ones are too short. These are also a lot stronger than the stock lines. Now, once you have all your lines connected, go ahead and tie them up out of the way and bleed the system.
Of course, we also have to hook up this air locker, which means running an airline from the differential, up the passenger side frame rail to the engine compartment where we'll put in the compressor.
Now to actuate the locker, you got a couple switches that you mount inside the cab, one controls the compressor, the other engages the locker. It's that simple and the traction you'll get out of one of these things is second to none.
Now, the axles we're gonna run are shipped empty. So we'll need to fill them with some gear lube for that.
We're gonna use royal purple synthetic gear lube. Now, this stuff's not only gonna keep things well, lubricated to handle all the abuse we're gonna throw at it, but it's also gonna help keep our temperatures down.
Now, here's another couple tips for you while you're buttoning everything up underneath here. Take a few minutes and check your body mounts, make sure that they're still soft and that they're not cracked and replace them if they're bad.
Ours are in good shape so we're not gonna have to mess with those. Also. Check your steering arms and your tie rod ends. Ours were completely shut. Somebody forgot to grease them. So we had to replace those.
Well, now that we have the suspension taken care of on big blaze, our big old bow tie needs a wheel entire combination. And for the wheels, that was a really easy choice in these Mickey Thompson 15 by 10 classic twos. Now, these wheels have fully polished, bigger openings and the lug holes have steel inserts for greater strength.
Now, I know we've mentioned before the size tires we're gonna use on this project and now you get a chance to see them up close. Now, what we've got here is the Goodyear Wrangler MTR, which is an awesome off road and rock tire
and also does really well on a highway, especially for a real aggressive tire.
The big news here is, and now Goodyear is making these 37 inches tall, 12.5 inches wide for the rock crawling competitions and that is the perfect size for this project.
Now, we're ready to start dealing with that tired old small block we told you about at the top of the show.
But for that, you're gonna have to tune in next week.
So you've decided to upgrade your old brake lines with high tech stainless steel. Well, that's great, but there is something that you do need to know. A
regular steel brake lines are double flared at a 45 degree angle.
Stainless steel. On the other hand, should never be double flared
because it's too hard and it'll split on you.
It needs to be single flared at a 37 degree angle, which means you need a special 37 degree flaring tool and fittings like these that we get from speedway motors
and that's the only way to get stainless steel to seal up on you and not leak
when it comes to building a custom truck. Most people don't think about using a big one ton duly to build a show truck out of.
But the potential of these big trucks didn't go unnoticed by Rick bottom of Mendota Illinois.
He used one as the foundation for project hot shot that he built for Alcoa wheels. Of course,
didn't waste any time jumping right into the suspension to get this F 350 sitting on the ground. A complete four corner airbag suspension controls the ride height from normal to way down in the weeds. And that allows the truck to still be used for towing around all the other toys.
The interior is a place where you definitely wanna spend some time thanks to these leather seats that have alligator inserts.
Now, a custom made console holds an incredible speaker system in the back and in front, you have airbag controls, a stereo as well as a DVD systems.
Now, the dash is decked out with white face gauges and also it's got an entertainment center so you can check out your favorite movies.
The body of the truck also received some attention in the form of a super slick Mandarin copper paint job
that really comes to life with magenta flames that flicker down the sides all the way to the rear of the vehicle where a smooth roll pan was added and a custom exhaust system pokes through it
and believe it or not, those are the stock tail light lenses that have been given a few custom paint touches
up front. You can see that the bumper's been smooth
and a trick billet grill put some tooth into the front of this thing
and also has a custom fiberglass hood that features carbon fiber and a ram air scoop,
but it's what's under that hood that'll really get you going. We got a V 10 with a super charger sitting on top of it. That'll put some power to those dual rear wheels
all the way to the rear. We have yet another surprise in this matching Magenta Rhino liner that's great for durability. A storage box was also added to keep junk from rolling around in the bed, which is proof positive that this truck really is used to haul stuff.
Well, this is a great example on how the bigger trucks can look just as good as the smaller ones. They're just a little harder to turn around in the parking lot. But out on the freeway is where these things really shine.
And now truck, gear, parts, tools and equipment for pickups and sport utilities.
You know, every vehicle has to have a fuel line running from the gas tank to the engine. Question is where do you find those really cool stainless steel lines and braided hoses you see on all those show trucks and race cars out there. Well, the answer is as close as your nearest summit catalog and their fuel line kits. Now, their kits include everything from the stainless steel hard lines and braided hoses to the fuel pump and filter as well as all the fittings you'll need. Now you really do have enough to run your lines exactly the way you want them. And the cost for this entire kit from Summit is only $220
without a doubt. One of the coolest things to come along in a while is color changing paint
and this stuff actually changes color depending on how the light hits it.
Unfortunately, it's also very expensive until now, duplicate colors come out with their color changing paint in a can that they're calling their Mirage paint. Now, it includes the base coat,
the color coat and the clear coat. Once you put this stuff on,
you, honestly, won't be able to tell it came out of a can
dup color offers the whole kit for around 20 bucks.
Now, if you're restoring an old truck or Jeep, there's one area most people overlook that's definitely worth upgrading and that's the heater. Now, most people do recognize vintage air as a company that makes awesome air conditioning systems.
But they also have this universal heating unit that's common
packed enough to fit in tight spaces and also includes all the ducting wiring and controls. You'll need to hook it up, take the edge off a cold morning with this heater from vintage air for about 100 and 60 bucks. That's gonna do it for truck gear. Here's a preview of next week's show.
The guys continue the build up of their 88 bow ties.
Next week they'll work on the pulse by dropping a GM freight motor into project big blaze. After that, they'll show you how to get the most out of your tow vehicle with an easy do it yourself. Suspension upgrade.
Finally, they'll show you some shop tools designed to make your life a whole lot easier.
That's all next week on trucks.
Well, it's gonna do it for this week's show. We appreciate you hanging out with us. Yeah, we got more trucks for you next week.
Oh, no, no, no, no. This is the engine for the
boys.
I can't even, you can't, don't even breathe
on it. Don't even click back, get back,
go
away,
get out of there.
Trucks is an RTM production.
Show Full Transcript
the guys roll an 88 Blazer into the truck shop and tear into the suspension of their stock Chevy. They'll get started with a six inch lift before swapping out the axles, front and rear. All that to make room for the 37 inch tires. They'll stuff into the wheel wells. After that, we'll bring you back to earth with a Ford duly that breaks all the rules.
That's all today on trucks.
Welcome to this week's show everybody. We're glad you're with us. Now, when it comes to hunting down a project truck, whether it's a sport truck or a four wheel drive without a doubt, some of the best deals out there are trucks from the late seventies up through the early nineties. Now, these are all new enough to have things like power steering, power brakes and air conditioning, but they're also old enough that you can usually get a really good deal on one. Now, what we've got here,
a 1988 Chevy K five Blazer that we're gonna call Project Big Blaze.
Now, the neat thing about these old blazers is that they're a big, rugged, full size pickup with V8 power, but they've also got a shorter wheelbase than a standard full size pickup, which means they're a lot more agile and nimble out on a tight trail. Of course, the best thing about the Blazer and its counterpart, the Ford Bronco,
they've got a removable hard top.
Our truck is pretty standard of what you'll find out there and that it's been subject to years of neglect has almost 300,000 miles on the clock and everything on. It's pretty well worn out. But as you can see,
the body is still very straight with almost no rust on it. And all of that, along with the $1600 price tag makes this rig a perfect candidate for our project.
The first thing we're gonna deal with on project Big Blaze are the axles and the suspension. Now we're gonna use Goodyear's new 37 inch tall tires on this thing. So we need to have some sort of a lift to make sure we have some clearance in here. We also need some stronger axles to handle the abuse. So the first thing we're gonna do is get this thing on the lift, take off the tires and the shocks and then get a jack under the rear end to support it
for our lift kit. We went to skyjacker and got one of their six inch list for a full size blazer. Now, this kit comes with brand new leaf springs as well as a drop steering arm,
nitro gas shocks, dual steering stabilizers, as well as brake hoses and all the hardware. You're gonna need to get a good safe six inches a lift.
Now, since we're gonna replace this rear end completely, there's a few things we need to take off that you wouldn't normally take off if you were just doing a lift kit,
like these emergency brake cables, the drive shaft,
this vent tube
and of course your brake lines. Now, a little tip here, make sure you put a little cap on your brake line, that'll keep it from dripping and draining your master cylinder. Now, all we have to do is take off these U bolts
and lower the rear end
with the axle out of the way. It's time to get rid of the stock lease springs. Now, the bolts that hold them in place are gonna be pretty rusty at this point.
So you need to hit them with a good shot of penetrating lube to help knock them loose. Also, don't be surprised if you have to work at these dogs a little bit to get them loose.
Now, with the stock springs off, you can see the considerable difference between those and these monsters from skyjacker. Now, these are gonna give us a full six inch lift without the use of blocks.
And they also have these wedges bolted right on to help correct severe drive shaft angles.
Now that we have the rear end completely apart. We need to do some clean up under here. Now, we're gonna get rid of all the dirt and grease with a good all purpose cleaner. Then once everything's dry, we'll hit it with a semi gloss paint. Now, the reason this step is so important is because it helps you locate any potential rust problems you might have.
Now, we know you've just been dying to know what kind of rear axle we're gonna use on this thing. But the first thing you need to decide is what size tires you're gonna use that way, you'll know what kind of gears to put in a differential.
Another problem with these old blazers is that the rear axle is narrower than the front axle around four inches actually. So
we went to drive train specialists and had them custom make us a Dana
60
with a wider housing. So it matches the track of the front axle, but we didn't stop there.
We had them stuff it with 35 flying axles and 488 gears, which will work perfect with our 37 inch tall tires.
Of course, any time you put on bigger tires braking can become an issue and these old stock drum brakes just aren't gonna be enough to stop us with the kind of responsiveness we're after, especially at 6065 miles an hour. So we went to stainless steel brakes and got one of their rear disc brake kits to go on to our rear DTs axle. Now, this kit bolts right into place and includes everything from the caliper and rotor
as well as the emergency brake. Now, for traction, we want this sucker to lock up when things get serious off road.
But when we're tooling down the street, well, we'd like it to act like an open differential. So that's where the A RB air locker comes in.
Now, this thing acts just like an open differential when it's off. But when you need that traction, you flip a switch air runs down through this airline activates a piston in the case here and locks everything up just like a spool. Now, finally,
we got this special girdled cover
that allows you to put a preload down on these bearing caps.
Now, this keeps the housing from flexing. It makes a little stronger,
looks good too.
Now, we're ready to install the new lease springs that slide right into the stock hangers. Now, since our stock bolts did get rusty, we're gonna go ahead and replace them with brand new grade eight hardware and to keep these from sticking in place and getting rusty on us, all we have to do is give them a light coat of grease before we slide them in.
Now, we're ready to get our rear end in place, set our pin angles. Now, as you can see, we have the rear end jacked up against the springs with the perches in place, everything's held loosely on with the U bolts.
Now, if you're gonna use a standard two U joint drive shaft,
the output of your transfer case
and the yoke of your rear end need to be at the same angle. If you want to stay away from vibration,
problem is when you add a lift, you increase the angle of the drive shaft through your U joints causes them to wear out quicker. So the ways to fix this
is to lower the transfer case just a little bit
and use shims to pitch up the front of the rear end
problem is
that'll throw your angles out of whack,
vibration will sneak in. So the best way to fix it and what we're gonna do
is use a drive shaft that has a CV joint up here,
single, you join back here. Now keep in mind when you do it this way,
the rear end
has to point right at
the transfer case,
we're gonna get it in place right now.
Finally, with the trucks sitting at ride height,
we'll tack the spring perches in place
and then weld them on
with our rear axle welded up and ready to go. We hit it with a coat of paint and hung it in place with the supplied hardware. We'll follow that up with these brand new gas shocks
and replace the stock bump stop with the huge red ones made specifically for our six inch lift we need to take a break but stay with us because we got more project Big Blaze right after this.
Later in the show, we've got an F 250 duly to show you that's not afraid to be different.
But up next, we need to finish bolting our six inch lift kit and beefy front axle onto project big blaze.
Welcome back to trucks. Now, if you're just joining us, we just finished putting a six inch lift and a DA is 60 in the rear project big blaze. Now, we're gonna get started on the front. Now, these old blazers are set up pretty nice from the factory with a steering stabilizer and dual shocks.
But these old 10 bolt axles leave a little to be desired as far as heavy duty. So we're gonna deal with that as soon as we get everything disassembled here.
Now that we have the rear end six inches in the air, we need the front to match it. And for that, we're also gonna use Skyjacker and their brand new lease springs with polyurethane bushings, four new shocks to replace the Stockers, dual steering stabilizers as well as a lowering kit for the sway bar.
Now, with our front axle unbolted from the springs and the steering linkage and the brake lines,
we'll go ahead and roll it out of the way to show you what's gonna go in its place.
Now, for that, we also went to DTs
and got one of their upgraded Blazer 10 bolts. Now, this thing's been converted to 30 flying axles
and Moser front shafts. These are 35% stronger. We also had them put in an eaten carbon fiber posit track, which is great for a front axle.
And finally, we had them stuff it with the same 488 gears
that were running in the back
to get the new leaf springs ready for installation.
You wanna put a coat of grease on the bushing
and then slide it into the spring.
You also wanna put some grease on the metal sleeve
before putting it in place.
Now, the grease not only helps the installation go a little easier,
but it's also gonna keep your bushings from squeaking on it. Now, all we have left to do is bolt the springs in place.
Now with the springs in place, it's time for the axle and like we said, this is just a stock blazer housing. So it's as simple as just putting it in place, bolt it down with the hardware that comes with a kit.
Now is also a good time to put on the new drop steering arm
that goes right in place of the stock arm. Now, the purpose of this
is to make sure your drag link doesn't get in a bind because of your lift kit.
Next up are the lowering brackets
for the sway bar. Now, what these do is lower the sway bar. So it'll still be usable on your lifted truck and they bolt right up to the frame where the old brackets used to be. Now, once you have the new bushings installed into the factory brackets, you can go ahead and bolt up the sway bar.
Now, like we said before, the original Blazer came with a steering stabilizer, but the Skyjacker kit upgrades it to duals. So the first thing you wanna do is put this bracket on the axle,
then take your steering stabilizers, pull them out halfway,
mount the tie rod bracket on one end
and then slide it up onto the axle bracket,
then bolt the tie rod bracket to the tie rod
and then turn the wheels lock to lock to make sure you have proper adjustment.
Finally, we're ready for the front shocks. Now, obviously, they're gonna bolt right up to the stock locations. But one thing you will notice about this kit is that each side comes with a gas as well as a hydraulic shock. Now, this is gonna give you all the performance you need, but it's also gonna keep your suspension from being too stiff. We need to take a break right now, but stay with us. We'll be right back
up next on trucks. We've got an aggressive wheel and tire combination to stuff into the wheel wells of our 88 blazer.
After that, we'll drop things into the weeds with a blue oval that's in a league of its own.
You just can't get enough of trucks. Check us out online at TRUCKS, tv.com.
Thanks for staying with us. Everybody. Now that we have our lift kit and axles in place, we need to do some of the detail work like the brake lines. Now, these longer steel braided hose came with the kit because the stock ones are too short. These are also a lot stronger than the stock lines. Now, once you have all your lines connected, go ahead and tie them up out of the way and bleed the system.
Of course, we also have to hook up this air locker, which means running an airline from the differential, up the passenger side frame rail to the engine compartment where we'll put in the compressor.
Now to actuate the locker, you got a couple switches that you mount inside the cab, one controls the compressor, the other engages the locker. It's that simple and the traction you'll get out of one of these things is second to none.
Now, the axles we're gonna run are shipped empty. So we'll need to fill them with some gear lube for that.
We're gonna use royal purple synthetic gear lube. Now, this stuff's not only gonna keep things well, lubricated to handle all the abuse we're gonna throw at it, but it's also gonna help keep our temperatures down.
Now, here's another couple tips for you while you're buttoning everything up underneath here. Take a few minutes and check your body mounts, make sure that they're still soft and that they're not cracked and replace them if they're bad.
Ours are in good shape so we're not gonna have to mess with those. Also. Check your steering arms and your tie rod ends. Ours were completely shut. Somebody forgot to grease them. So we had to replace those.
Well, now that we have the suspension taken care of on big blaze, our big old bow tie needs a wheel entire combination. And for the wheels, that was a really easy choice in these Mickey Thompson 15 by 10 classic twos. Now, these wheels have fully polished, bigger openings and the lug holes have steel inserts for greater strength.
Now, I know we've mentioned before the size tires we're gonna use on this project and now you get a chance to see them up close. Now, what we've got here is the Goodyear Wrangler MTR, which is an awesome off road and rock tire
and also does really well on a highway, especially for a real aggressive tire.
The big news here is, and now Goodyear is making these 37 inches tall, 12.5 inches wide for the rock crawling competitions and that is the perfect size for this project.
Now, we're ready to start dealing with that tired old small block we told you about at the top of the show.
But for that, you're gonna have to tune in next week.
So you've decided to upgrade your old brake lines with high tech stainless steel. Well, that's great, but there is something that you do need to know. A
regular steel brake lines are double flared at a 45 degree angle.
Stainless steel. On the other hand, should never be double flared
because it's too hard and it'll split on you.
It needs to be single flared at a 37 degree angle, which means you need a special 37 degree flaring tool and fittings like these that we get from speedway motors
and that's the only way to get stainless steel to seal up on you and not leak
when it comes to building a custom truck. Most people don't think about using a big one ton duly to build a show truck out of.
But the potential of these big trucks didn't go unnoticed by Rick bottom of Mendota Illinois.
He used one as the foundation for project hot shot that he built for Alcoa wheels. Of course,
didn't waste any time jumping right into the suspension to get this F 350 sitting on the ground. A complete four corner airbag suspension controls the ride height from normal to way down in the weeds. And that allows the truck to still be used for towing around all the other toys.
The interior is a place where you definitely wanna spend some time thanks to these leather seats that have alligator inserts.
Now, a custom made console holds an incredible speaker system in the back and in front, you have airbag controls, a stereo as well as a DVD systems.
Now, the dash is decked out with white face gauges and also it's got an entertainment center so you can check out your favorite movies.
The body of the truck also received some attention in the form of a super slick Mandarin copper paint job
that really comes to life with magenta flames that flicker down the sides all the way to the rear of the vehicle where a smooth roll pan was added and a custom exhaust system pokes through it
and believe it or not, those are the stock tail light lenses that have been given a few custom paint touches
up front. You can see that the bumper's been smooth
and a trick billet grill put some tooth into the front of this thing
and also has a custom fiberglass hood that features carbon fiber and a ram air scoop,
but it's what's under that hood that'll really get you going. We got a V 10 with a super charger sitting on top of it. That'll put some power to those dual rear wheels
all the way to the rear. We have yet another surprise in this matching Magenta Rhino liner that's great for durability. A storage box was also added to keep junk from rolling around in the bed, which is proof positive that this truck really is used to haul stuff.
Well, this is a great example on how the bigger trucks can look just as good as the smaller ones. They're just a little harder to turn around in the parking lot. But out on the freeway is where these things really shine.
And now truck, gear, parts, tools and equipment for pickups and sport utilities.
You know, every vehicle has to have a fuel line running from the gas tank to the engine. Question is where do you find those really cool stainless steel lines and braided hoses you see on all those show trucks and race cars out there. Well, the answer is as close as your nearest summit catalog and their fuel line kits. Now, their kits include everything from the stainless steel hard lines and braided hoses to the fuel pump and filter as well as all the fittings you'll need. Now you really do have enough to run your lines exactly the way you want them. And the cost for this entire kit from Summit is only $220
without a doubt. One of the coolest things to come along in a while is color changing paint
and this stuff actually changes color depending on how the light hits it.
Unfortunately, it's also very expensive until now, duplicate colors come out with their color changing paint in a can that they're calling their Mirage paint. Now, it includes the base coat,
the color coat and the clear coat. Once you put this stuff on,
you, honestly, won't be able to tell it came out of a can
dup color offers the whole kit for around 20 bucks.
Now, if you're restoring an old truck or Jeep, there's one area most people overlook that's definitely worth upgrading and that's the heater. Now, most people do recognize vintage air as a company that makes awesome air conditioning systems.
But they also have this universal heating unit that's common
packed enough to fit in tight spaces and also includes all the ducting wiring and controls. You'll need to hook it up, take the edge off a cold morning with this heater from vintage air for about 100 and 60 bucks. That's gonna do it for truck gear. Here's a preview of next week's show.
The guys continue the build up of their 88 bow ties.
Next week they'll work on the pulse by dropping a GM freight motor into project big blaze. After that, they'll show you how to get the most out of your tow vehicle with an easy do it yourself. Suspension upgrade.
Finally, they'll show you some shop tools designed to make your life a whole lot easier.
That's all next week on trucks.
Well, it's gonna do it for this week's show. We appreciate you hanging out with us. Yeah, we got more trucks for you next week.
Oh, no, no, no, no. This is the engine for the
boys.
I can't even, you can't, don't even breathe
on it. Don't even click back, get back,
go
away,
get out of there.
Trucks is an RTM production.