Classic Trucks! Builds

Video Transcript

Today on trucks, we'll bring back Project Sport Sierra. This time we'll take you step by step through the installation of a lowering kit.

After that, we'll take you for a ride in a big rig that pumps out a ground pounding 35,000 horsepower.

Then it's back to the shop for the first of a three week series that will show you how to lay down a show quality paint job.

That's all today on trucks.

Welcome to this week's show everybody. A few weeks ago, we introduced Project Sports Sierra and as promised, we took our 99 GMC to the paint booth and shot all the pieces we installed the last time you saw our extended cab in the truck shop. Now, if you missed the introduction of Project Sports Sierra, here's what we've done so far. Put on a billet grill from Hunter's custom automotive, a Ram style good hood from Keystone restyling products.

We topped off the sport truck with a smooth to

tunno

cover from California customs

added an arrow wing also from Keystone and topped everything off with the Sir Michael steel roll pan.

Of course. Now that project Sport Sierra is fully clothed. We need to give it the proper stance. We're gonna give our ride a 34 drop with DJ MS level one lowering kit. The front end drop is gonna come entirely from these lower control arms that have the pivot bushings sleeves and ball joints already installed. The kit also comes with sway bar in lengths and gas shocks.

Once we have this truck lowered, there is no way we're leaving those stock weenies on there. Check out these toy

proxy

sts. Now, this is a performance tire designed especially for a light truck with a tall side wall. We've wrapped those around these cool inky 17 inch wheels that'll give us the sport truck load that we're out.

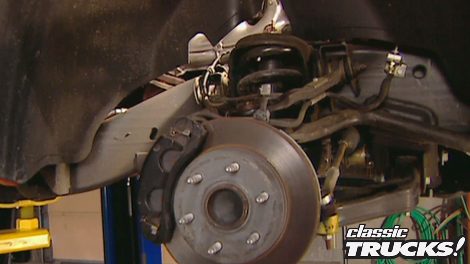
The front suspension on all 99 GM trucks has been totally redesigned and DJ M was one of the first companies to get their hands on the brand new half to pick up what they discovered is that a new lower control arm could drop things as much as five inches and still keep the stock coil springs and alignment specs.

Now, before we can take the suspension apart, I'm gonna take out the shocks and loosen these upper and lower control arm bolts. Now that allows everything to rotate real nice, makes this assembly much easier.

We're gonna take off the tie rod ends,

the sway bar end links and then loosen the nut of the lower ball joint, but don't take it off.

So

now we need to slide the jack under the lower control arm to support it on all the new G MS, the ball joint points downward. So we need to raise the jack to compress the spring.

Then we can pry the ball joint loose

next, you'll want slowly lower the jack to release the coil spring. Now, I know we keep harping on this, but it's real important. A compressed spring is very dangerous. So under no circumstances, should you ever try to pry one loose on our application? We had to use a spring compressor to free it up.

Finally, unbolt a lower control arm and remove it.

Now, granted these old pieces look a lot bigger than the new stuff, but these are actually much stronger and they eliminate tire clearance problems. Now, a good tip when you install these is take a little bit of grease,

wipe it around these bushings

on the level two and three kit by DJ M. You have to replace the bump stop. We don't need to do that on the level one kit because it's already short enough. Well, it looks like you're ready for this. Let's slide it in there

that

little lower

there.

Now, we only need to make one modification and that's to slightly enlarge the hole of the spindle with the supplied grinding stone.

Now, we're not gonna change the taper.

We're just gonna open the hole up a little bit. So the threads of the new ball joint will slide right through.

Now, we can slide the stock spring back in place. Don't forget the rubber pad on top.

Also, don't forget to slide the bolt for the spring compressor through the top shock hole.

Then we can slide a jack under the lower control arm and reconnect the spindle.

After that, you can go ahead and release the spring compressor.

Now that the arms are in, we can mount the sway bar.

You can see the new piece is considerably shorter than the stalker.

That's because the new mounting point on the arm is a lot closer to the end of the sway bar

before you hook up your tie rod ends. It's a good idea to knock this nut loose and then roll it in about three turns. That way your alignment won't be totally out of whack. Now, this is only good enough to get you to an alignment shop, make sure that you have it professionally aligned

when you're done.

The last thing we need to do to get our three inch drop in the front

is install the gas shocks,

only tighten the top nut until the rubber bushing flares out. Even with the washer,

make one last check to make sure all your bolts are tied. It's easy to forget those control arms. After that, we're done with the front, we can start on the rear. But before we do, we need to pay some bills. Don't go away. We'll be right back

later on trucks will make a run with a father son team that chases down airplanes in their big rig.

But up first, we're going to finish putting the slam on project sport. Sierra,

welcome back to the shop. Now that we've got a three inch drop on the front of Project sports Sierra, we're gonna slam the rear four inches.

Now, we can get that kind of a drop without using a flip kit or notch in the frame.

I can see right now we're gonna have to drain this gas tank and remove it and that'll make things a lot easier

while space gets started on the disassembly. I'll go ahead and show you the hardware we're gonna use on the business end. The level one kit by DJ M comes with longer spring shackles and hangers,

bump stops and of course, brand new gas shocks. Our 34 drop on Project Sports Sierra is only gonna run about $450.

I'm gonna get started on the rear by unbolting the shocks. Now you heard me mention a flip kit earlier. Let me explain to you what that is.

It's where you take the axle and move it from below the leaf spring, put it up on top

and you can get up to seven inches a drop out of a flip kit, but it's not quite that easy. It takes special brackets

as well as a frame knot. So the axle doesn't come up and hit the frame. These are important things to remember if you're considering an extreme drop

before we can take the shackle bolts off. We need to get some support under the pumpkin so we don't have to dance with the axle. What you need to do here is lift the jack until the weight is off the leaf spring.

Then you can

remove the stock shackle, be careful when doing this because the rear spring can move on you

and grab a few fingers.

As you can see, the new hardware is a lot longer than the stock piece and has two holes. The whole farthest from the bushing here is gonna give you the most drop. And that's exactly what we're after.

Now, we come to the worst part of this project and that's getting these front hangers off.

The rivet needs to come out so we can use the holes to bolt on the new bracket.

Now, you can do this a few different ways. You can use a grinder, a drill or an air chisel.

You'll even be tempted to use explosives. But, uh, that's not an option,

whatever you use, make sure you allow yourself a couple of hours and keep reminding yourself how good the truck's gonna look when you're done with the project.

After you clear that hurdle, the rest of the project is pretty much straight bolt

on

and that's where I come in.

The new hardware is shorter than stock and relocates the front of the leaf spring, which is gonna give us our four inch slam in the rear

DJ M also provides a shock extender for the right side that allows the shock to perform at a much better angle. Just slide the bracket over the factory mount and bolt it in place.

Then you can use the extender as a guide to drill through the factory

after that slap on the bump stops and the shocks and we're almost done in the rear

almost but not quite. Unfortunately, on the extended cab, we need to raise this carrier bearing to prevent any drive shaft vibration. Now, the only way to do this properly

is to cut the bracket,

raise it

and rewelded.

There's no doubt, a 34 drop looks great on our truck. The best part is we still have a functional vehicle that we can tow our toys with. But before we hook it up to a trailer, we need to get to an alignment shop, which is always important. Whenever you do any kind of suspension work, we need to take a break right now. But the next time you see project sports Sierra, we're gonna address some sound issues with a new exhaust and stereo system. This is perfect. That came out great

up. Next is a shocking display of raw power. It's a Peterbilt that's motivated by three jet engines.

I can't wait to drop the hammer on this thing. It's gonna be awesome. Thanks for staying with us. You know, when most of us think about an outing with our dad, it usually means a trip to the ballpark or some hunting and fishing.

The key phrase here is most of us up next. We're gonna show you a father son team that's playing way outside those lines.

Welcome to the world of less and Kent Shockley, these guys are putting a whole new twist on father son outings.

Wait a minute. Did I say twist? What I really meant was twisted

because when the shock leaves do a little male bonding, it involves 36,000 horsepower and a Peter built big rig that goes by the name of Shock Wave.

My oldest boy actually talked me into building a twin engine jet truck that's originally what we were gonna build here.

And after we got two engines in it, I thought, oh, that doesn't look all that special because the tires and wheels more or less had the engine. So

I had a spare engine sitting in the shop. I set it on top and I looked at it and I went,

that's it. That's awesome.

We just go through the engines and that's how it actually got created.

They

come off of a T two A Buckeye they call it, which is a navy trainer, fighter

aircraft. Uh one engine powered a 20,000 pound airplane.

Uh We build our own after burners to produce twice the power with one engine, plus we put three of them on this 7000 pound truck. So, uh, this thing's got about a 3 to 1 power to weight ratio. It's a 7000 pound hot rod. So it's a little sluggish

but not

the line.

But, uh,

it still runs good for what it is

in 1996. After 37 years of racing that produced three national jet car championships less turned over the weekly driving chores to his son, Kent who spends the majority of his time chasing down airplanes.

80% of our business is, uh, air shows

and what we do there is

we set still with the engines wound up. No burner fuel

aircraft

come in at 200 miles an hour. My crewman will

wind me up, uh,

tell me when to turn the burner fuel on and launch me and, uh, we'll chase a 200 mile an hour airplane down. We normally run this thing 300 miles an hour on a, on a

airstrip. Obviously, it's

so big and heavy. It won't do that on the drag strip. It won't compete with force or anybody like that. But, uh,

it'll still run 303 176 miles an hour to be exact making shock wave, the fastest jet truck on the planet and with enough power to accelerate a three G's vertical, it's nearly twice as fast as the space shuttle.

There's a lot to do in there as far as controls, buttons, switches, gauges to watch things like that. But, uh,

as far as the actual control of the vehicle, it's

most stable piece I've ever been

in.

Ok. So it's really, really fast and easy to handle. But come on, how do you stop? 7000 pounds going? 300.

We got six wheels, six wheel disc brakes. We use 2 16 ft ring slots, uh, parachutes to stop it.

If those fail, we have two more in the backup can. So we carry four chutes,

six brakes and, uh,

if that don't work, we can stick our foot out the door and Fred Flintstone, this thing to a stop.

The whole purpose of this truck is for the enjoyment of the spectator. Uh,

we just got everything that we can possibly think of on this thing to

entertain people and give them something they'll never forget.

Well, let's see, a semi that's motivated by three J 34 Pratt and Whitney jet engines that gulp down 100 and 20 gallons of diesel fuel per run.

Yeah,

I'd say that's pretty unforgettable.

Coming up next on trucks. We'll show you how to prep your project for a show quality paint job.

Welcome back to trucks. Now, we're gonna deal with the most feared area for the do it yourselfer. And that's paint and bodywork.

Now, nothing makes a bigger statement than having a killer paint job,

but nothing will kill your bank. Account quicker

than having somebody do it for you.

So, in the next three weeks, we're gonna take you through some basic steps, that'll show you what's involved in doing a great paint job without breaking the bank. Also, keep in mind if you're willing to put in the time you can overcome your lack of experience in this area. Now, if your truck's wearing its original paint and that's in good shape, you can usually get by with just scuffing it and shooting a new color over it.

This generally won't make the paint too thick, which of course is a no, no, because that makes it prone to cracking.

But if it's ever been refinished or you're changing the color, we strongly recommend that you get meld at strip it. Oh, you're all heart pal, you can do this with chemicals, a sander or you can take it somewhere to have it dipped. We like to use the first two because you can do it in your driveway

and you don't have to tear your truck apart

when using a chemical stripper. Safety is obviously important as well as adequate ventilation.

Just put the stripper on,

let it work for a few minutes,

then scrape it off.

Now, depending on the thickness of the paint, you may have to repeat this process. It's also real important to dispose of the waste properly because it's highly caustic.

Now, if you're gonna go the chemical route, make sure you wipe it down. Good to neutralize the acid. That way you won't end up with bubbles in your finished paintwork.

Another option is to use a sander. Now, this basically rips the paint off of the surface and can destroy the metal if you use too thick of a grit.

This special pad by the Eastwood company leaves a really nice scuffed finish.

It's great to put primer on.

It also eliminates excessive heat which causes warpage.

And as you can see, it's a whole lot quicker than using chemicals.

The only problem with this method is it's hard to get into little corners and your shop will be covered in dust.

If you decide to do it. This way, you have to wear a particle mask,

no matter what you choose to do, you're gonna have a mess on your hands. But after you've stripped your project, then you can assess what needs to be done next, whether it's welding in a rust hole or using some body filler in the weeks to come, we'll show you all the steps you need to know to lay down your own signature paint job.

So

when you have a major spill of oil, gasoline or antifreeze, most guys run for a big old handful of shop towels problem is they don't do a very good job.

Now, the answer could be as close as your local pet store. I'm not kidding. It's called cat litter.

Just pour it on the spill and let it absorb

and then sweep it up and having a little extra cat litter around the shop is always a big uh relief to the neighborhood cats.

American Bannon went out of business in 1956. But in late 1939 they built a small go anywhere four wheel drive vehicle that hit the road in 1940 as the original Jeep

and now truck gear, parts, tools and equipment for pickups and sport utilities.

One of the biggest problems with restoring an old truck or customizing a new one is what to do with the steering column. You used to have to hunt down the junk yards, hoping to find one that would fit and then pray that somehow just somehow the wiring would hook up. Fortunately, those days are over. Thanks to I did it steering columns. They're available in paint steel chrome or polished aluminum for standard shift or automatic. And best of all they come totally prewired, steer yourself in the right direction with an I did it steering column,

performance enthusiasts on the street strip and off road know that you gotta have low gears if you're gonna get off the starting line or crawl those big rocks.

The problem is low gears, take a toll in the form of bad gas mileage engine wear and forget about driving home on the interstate.

Well, Richmond has the answer with their six speed overdrive transmission.

This transmission with a 308 gear in the rear will have the same low end grunt as a 456 and you can still drive home on the interstate bottom line. Leave your gears alone, change to a six speed Richmond for about 2800 bucks.

Finally, today, if you drive a dodge ram diesel pickup, your stock fan could be pulling up to 25 horsepower from your motor, which is a lot when you consider the fan only needs to operate about 10% of the time

the Horton Corsair on off fan clutch engages the fan only when necessary. With the thermal switch in the engine block that automatically senses changes in your coolant. It'll also help your gas mileage and performance. Keep things cool with a Horton Corsair for about $700. That's gonna do it for truck. Ge here's a preview of next week's show.

We will finish up project outdoorsmen by bolting on a brush guard and removable winch. After that, it's time to find out if the totally redesigned Jeep Grand Cherokee for 1999 is everything. It's cracked up to be on road and off.

Then it's back to the shop for week two of paint tech. We've already shown you how to prep your project next week, we'll show you how to use filler and lay down primer.

That's all next week on trucks.

All rights. It's time to say goodbye this week. But I want to do something different. I always say the same thing. Not that there's anything wrong with what we say necessarily. I mean, how many ways can you say goodbye? Right.

That's not

trucks is an RTM production.
Show Full Transcript