
Truck Tech Builds


Want more content like this?
Join the PowerNation Email NewsletterParts Used In This Episode
Matco Tools
MATCO Tools are the Official Tool Supplier to PowerNation
The Industrial Depot
Tools, Hardware, Shop Supplies
Episode Transcript
(Jimmy)>> You're watching Powernation!
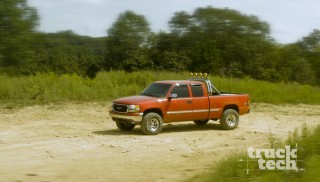
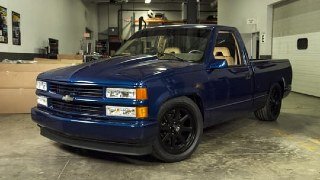
(LT)>> Today on Truck Tech we're gonna breathe some new life into our retro Sierra build by adding a posi rear end, dual exhaust, and rebuild the worn out front suspension. It's gonna be great! [ MUSIC ] [ engine revving ] [ MUSIC ]
(LT)>> Yeah baby, woo hoo! [ MUSIC ] Today we're gonna be spending a little more quality time with our 2002 GMC Sierra that's built in throwback style, and last time we installed its center piece, the chrome double hoop roll bar with a set of four KC Hi-liters on top. Last time we also installed a set of long tube headers to help this 5-3 put down just a little bit more power, but the exhaust system isn't done yet. We're also gonna be installing a Flowmaster American Thunder dual exhaust kit. Now I can't wait to hear how this 5.3 is gonna sound with the Flowmasters and the long tubes, but before I get these dual tailpipes wrapped up and over the axle there's something that I need to take care of inside the axle. So first it's time to get it up in the air. [ MUSIC ] [ mechanical humming ] [ MUSIC ] [ drill buzzing ] [ MUSIC ]
(LT)>> There are three main styles of differential that you'll find in a solid rear axle. Number one is an open differential. Now those are great for driving on the street but pretty poor for performance driving because when you apply horsepower usually only one wheel is gonna spin, which isn't great for accelerating. The second major style is a limited slip, and there are several sub-sets of limited slip but they all work essentially the same way. Basically there's some sort of a clutch mechanism inside that will distribute power between both rear wheels. So when you're on the gas you'll spin both wheels but when you're driving on the street it will still allow for a difference of speed. So when you're cornering you won't be chirping the tires and wearing them out prematurely. The third major set of differential is some sort of a locker or a spool. Now those provide great traction whether you're off road or at the drag strip. However when you're driving on the street you're gonna be chirping a tire, which can lead to handling problems, premature tire wear, and just a general annoying sound. Now this particular type of truck GM calls this differential a gov-lock or a locking differential, but technically it's not a locker, not in the traditional sense. It's more of a limited slip that can engage or disengage. Here's kinda how it works. On this cross shaft there's a little counterweight that flips out as there's a difference in wheel speed. Now centrifugal force will fling this thing out, and when the wheels are about 200 r-p-m difference it'll catch on this little engagement plate, which forces out a wave plate, which engages a clutch pack and it's making it locking but technically limited slip. Now the nickname for this thing is gov-bomb based on its nickname of gov-lock, and that kinda gives you an idea of what happens. Basically these small pieces, as the truck's mileage increases or maybe it's seen some abuse, these little pieces can fling off and fall in the bottom of the case, but usually they don't go straight down. They'll get caught in between the ring and pinion, and when that happens all sorts of carnage will ensue and usually you have to replace everything inside the carrier. We don't want to have that happen. So we're gonna replace this with something a little bit better, but we've got to get started by pulling off the tires. [ drill buzzing ]
(LT)>> While our first job of the day will be in the center of the differential we first need to get the rear brakes out of the way so we can work with the axle shafts. With the center pin removed from the G-80 the axles push in slightly and the C-clips can be fished out with a magnet. Got ya, number one and number two, easy as that. Finally we can unbolt the bearing caps and the stock carrier can be removed from the housing. Our GMC is equipped with an 8.6 inch 10 bolt rear differential with a 30 spline shaft, and for that application Summit Racing sells just about every style of differential that we talked about. Lockers, spools, limited slip, and even an open, but the style that I chose was a traditional posi traction limited slip. Now this has clutch packs on either side of the spider gears just like the G-80. However instead of a complicated mechanism it just uses springs to apply constant pressure to the clutch pack, making that limited slip action work. Now this is the same style of differential that you'd find in your traditional old school muscle car that everyone loves from back in the day, and they work great for general all-around performance driving. They work okay for mild off roading, and of course they're great for just doing burnouts with both back tires spinning. Now we don't need a master install kit because we're just gonna be swapping out the carrier. So you can actually buy a carrier installation kit, which comes with both bearings, a shim pack, and 10 bolts to hold the ring gear onto the carrier. So the first thing I'm gonna do is get the new bearings pressed on. Then we'll swap over the gear. Whether you use a shop press like ours, or simply a hammer and a punch, it's always a good idea to push from the inner race of the bearing rather than on the rollers directly as to not cause damage. [ mechanical humming ]
(LT)>> I've got the ring gear cleaned up and it slides onto the new posi. I'll apply some orange thread locker onto the bolts, which for this 10 bolt are left hand thread. [ MUSIC ] They torque to spec at 65 foot pounds. We've got the new differential loaded up and we have no more worries about that old G-80 exploding and taking out that 10 bolt. Now the stock 3.73's on here are gonna work great for what we have in mind. So there's no need to re-gear, and we could just slap this thing in and be good to go. However there is a problem on the far outer end of the axle tube that I want to take care of first. [ MUSIC ] A common problem on a higher mile truck is leaky axle seals, and ours are definitely letting out oil and it's a simple repair. Once the seal is persuaded out of its home I'm gonna use a slide hammer to remove the old wheel bearings so we can replace those as well. Next we need to do a little housing keeping to clean up all the oil and brake dust. The new bearing installs with an aluminum driver and a few taps from a hammer. [ metal banging ]
(LT)>> And the oil seal follows suit. [ MUSIC ] Next how exactly does a posi track rear end work? It just does!
(LT)>> I've got our 10 bolt axle assembly cleaned up, stripped down. The axle bearings are in along with the seals and we're ready to start reassembly. Now if you've never worked on a rear differential before it can be a little bit intimidating, especially if you're gonna change the gear ratio because there are a lot of parameters that you have to nail spot on. Otherwise the rear end's gonna run hot, make a lot noise, and the gear set is gonna wear out early. Now because all we're changing today is the carrier the only thing that we're gonna have to adjust is carrier backlash, and that's controlled by shifting it further away from or closer to the pinion gear. And you've got to start somewhere just to get a baseline measurement. So I always throw in the stock cast carrier shims just to measure a baseline, and I make a handy little chart just to kinda see where I'm at. I've got 230 on the left, 245 on the right, which gives me the important number, 14 thousandths of an inch of backlash on the carrier. Now that's not awful but it's not acceptable either. On a 10 bolt like this one we need somewhere between six to 10 thousandths of an inch. So I need to shift the carrier closer to the pinion, which means I've got to start stacking some shims. This system includes shims of 5, 7, and 10 thousandths of an inch thick. So depending on how you stack them you can make very fine adjustments. With my selection made the carrier and shim stack goes into the housing and the caps are tightened up. [ drill buzzing ]
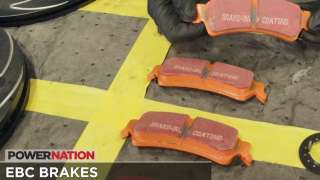
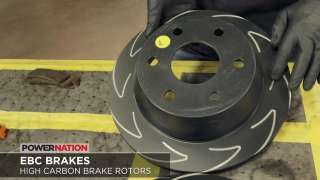
(LT)>> So that was still quite a bit too loose. So I'm gonna take one of the 10 thousandths shims out of the stack that's on the right hand side and I'll switch it over to the left, which will shift the carrier over and hopefully tighten up the backlash just enough. With a quick swap of one shim I'll re-install the carrier into the housing and once again install the bearing caps. Now they say if you're good, I'm not saying that I am, you can nail backlash just by the feel and sound. This one feels close but let's find out for sure. [ MUSIC ] Oh yeah! With the carrier sitting exactly where it should the axles can now slide back in. The C-clips are re-installed along with the cross pin. Finally it's time to seal this thing up for good with some Permatex Optimum Gray Gasket Maker, and the stock cover finishes the job. When I removed the rear brakes from our Sierra to take apart the axle I noticed the pads were quite worn out, and in fact one of them the friction material had separated entirely from the backing plate. So it's time for a brake job because this is just plain unsafe. Now EBC Brakes makes pads and rotors for a wide range of vehicles. Just about everything that you'll see on the road. So for our GMC I got a set of pads and rotors. The rotors are from their high carbon Blade Series, have these cool looking grooves in them, which will help remove a lot of heat and help them run cooler, and the high carbon alloy that's gonna resist heat better. As far as the pads go we chose their Extra Duty line, which are designed specifically for trucks and s-u-v's, and this is one of their longest lasting compounds, and it has a lot more grip than an o-e-m replacement does. Now all told this is gonna make our GMC stop a lot shorter and be a lot safer than these old worn out pads that it came with. Since we're working with on the back axle that's where we'll get started. Also ahead we'll give our 5.3 some rumble.
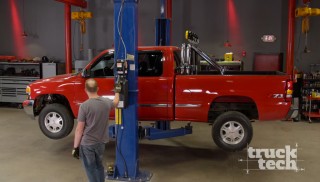
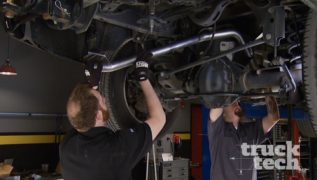
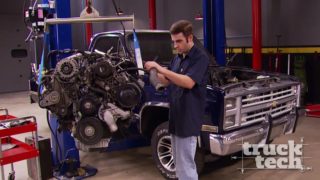
(LT)>> Over the last couple of decades Ford produced millions of the 4.6 liter V-8. Whether it was the earlier 2 valve version or the later 3. Now either way they had their fair share of problems and would occasionally need to be replaced, but rather than waiting around for a machine shop to get yours done you should check out Powertrain Products because they have both two and three valves in stock and ready to ship, and when they rebuild these things they don't take any chances with the block. If it's cracked, or needs a heli-coil thread repair, or if the deck surface needs more than 5 thousandths of an inch taken off they just trash the block and move on to the next one, and the cylinder heads receive a similar treatment. They're pretty much all brand new. They've got new springs, guides, seals, and even the valve seats. So basically you're getting a 100 percent brand new engine, and they have different warranties available all the way up to seven years. So to get your Ford back on the road be sure to check out Powertrain Products. Since we're building our GMC to be sort of like a throwback to a mid '90's truck there's one thing it absolutely has to have, dual exhaust. Now we picked this up from Flowmaster and it's one of their American Thunder exhaust kits, and it splits from a single exhaust up front to dual tail pipe. Now you have the choice with this particular setup to either run the tips turned out to the side or straight out the back, which is what we're gonna do. This is their American Thunder kit and it has a Super 40 muffler in the middle, and that's what's gonna give this truck that iconic throwback rumble. I just can't wait to hear how this thing sounds. Now the kit is made from 409 stainless steel, which means it's gonna last a lifetime, and number two it's gonna bolt on easily because it uses all the factory hanger locations and there's no drilling or fabrication required. Now before we get this thing on though we've got to get the old parts off. [ MUSIC ] Now I have been known to get just a little bit overboard when it comes to building an exhaust, especially if we have a situation where there's nothing readily available or off the shelf. Now take project Red Tide for example. It was our '88 Chevy K-1,500 that started out life as a four wheel drive truck. We lowered it down, converted it to all-wheel drive, and then put in an LS engine with a long tube header. So needless to say there was no exhaust kit of the shelf that would fit the needs that we wanted to accomplish. So we started out and built a 100 percent custom stainless steel three inch dual exhaust complete with an X-pipe, dual tailpipes, and quad exhaust tips resembling a C-5 Corvette. Now as fun as that was it took about four days of building, especially considering we have to make television, to get that exhaust done, fully welded, and installed. Now if you're working at home you don't want to spend 4 days on your back on your floor building a custom exhaust, and that's where the appeal of a bolt on kit like this comes in. Everything is engineered to fit, it goes in the stock hangers, and it'll sound great and you can do it in probably a half hour. Let's grab that muffler. [ MUSIC ] [ drill humming ] [ engine starting & idling ]
(LT)>> The Flowmaster Super 40 has a nice aggressive rumble. [ engine revving ]
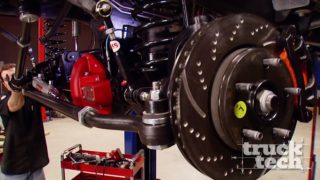
(LT)>> Without being overly loud or obnoxious, and it'll give this truck an unmistakable sound. Now with the tailpipes on this particular kit there's a couple different ways that you could arrange them. I have them sort of set on an inboard arrangement because to me it lines up nicely with the kickers of the roll bar that's in the bed, but if you prefer a more wide set look you can do that as well simply by loosening the rear most clamp and twisting the last pipe 180 degrees, or of course if you want a side exit the kit also comes with that pipe which will exit just on the lower part of the bed side. Again it's totally up to you. Now the exhaust is done and we're ready to move on to the next job of the day, which is the front suspension. Our '02 Sierra has just under 260,000 miles on the odometer, but I'm really not too worried about the major mechanical parts because these GM full size pickups will pretty much last forever. But that doesn't mean you won't have to do the odd repair every now and again, especially in the front end. Now in the future we plan on running a little bit taller wheel and tire, and that's gonna accelerate wear on some already worn out front end parts. So I just figured we'll get ahead of the curve and replace everything. Rock Auto offers replacement parts for just about any vehicle on the road, and there are different grades to choose from depending on your budget and application. Whether that's economy, daily driver, or even heavy duty. Now whenever possible I prefer to grab pre-loaded control arm assemblies because of how much work it's gonna save you. The lower bushings, ball joints, and shock mounts have already been pressed into position and it's all painted. So it's gonna look good and last for a very long time. Now these upper control arms, it's kinda neat because they're specific for a lifted application with the offset hole in the upper bushing, which is gonna help that front end alignment get into spec. So we have everything we need, we just have to tear apart the old parts. Coming up we'll put our posi to the test.
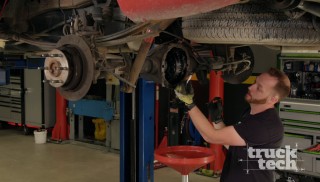
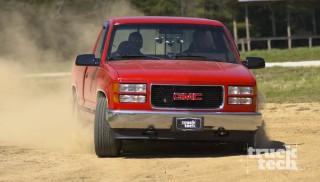
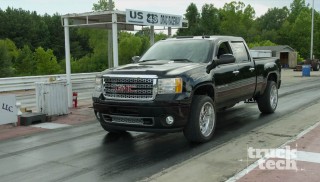
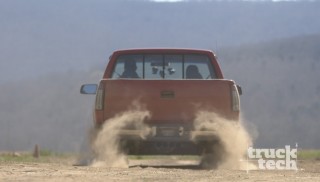
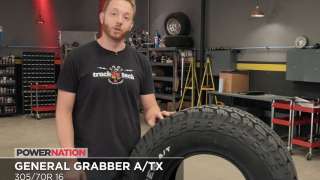
(LT)>> An i-f-s, or independent front suspension, makes for a lot smoother ride and better handling than a solid front axle, which is found on some heavy duty trucks. This is because when one side of the truck hits a bump in the road the other side remains unaffected. The down side of i-f-s is there are a lot of moving parts, which can wear out as the years go by, especially when larger tires are thrown into the mix. By swapping out the old control arms we're gonna be replacing eight bushings, four ball joints, and two shock mounts, all of which should restore the factory handling and ride quality. These old rusted out quarter million mile shocks are gonna stay right here just for a little while longer. They're not gonna stay for good. I have a new set coming with a leveling kit, and I'll get to that next time but for now the teardown is complete. The only thing that I found that I wasn't really anticipating was the c/v axles. The outer boot on the driver's side was really torn up and all the grease had flung out and basically put a nice layer of greasy oil over everything in the front suspension, and the joint was just a little bit worn. So I've ordered a new set of replacement c/v axles for both sides, but I can still continue progress on the suspension and I can get the A-arms bolted back into place. The rebuild starts with a torsion bar sliding through the control arm, and then lining up the bushings with the mount holes in the lower frame. Next the shock goes back into place, which holds the suspension in position. The upper arm now goes in and I'll set the alignment bolts to roughly mid-way through their travel. The spindle attaches to both the lower and upper ball joint, the castle nuts are torqued, and the cotter pin slides in, which keeps it from loosening up. Our new unit bearing assembly bolts onto the spindle, followed by the c/v axle shaft which slides into position. A single nut secures it to the wheel bearing, and six bolts hold it to the front differential. The EBC rotor goes on along with the caliper bracket, the brake pads, and finally the caliper. Last thing going on up front is a new sway bar end link. With the suspension raised roughly half way I'll tighten the lower and upper control arm bolts. Finally the torsion bar keys are re-installed, which means this suspension job is complete. Well that wraps up the rebuild of our front suspension, and you can more or less use these steps on any GM truck from '88 on up, and if you were paying attention you probably noticed that there were a couple of bolts that I didn't tighten up. Mainly the ones that hold the control arms on to the chassis. Now the reason I didn't tighten them up yet is because the suspension is drooped out, and wherever you tighten up a rubber bushing it's gonna get kinda tight and it'll bind as you try to twist it up or down. So I just prefer to tighten these when the suspension is at ride height. Now normally that would require bolting the wheels on and putting the truck on the ground but because I haven't indexed the torsion bars yet into the crossmember I can easily do it now with a pole jack. The new tires for our GMC have just arrived and I chose a 305/70 on a small by today's standards 16 inch wheel for that old school look. Plus it'll go along nicely with the raised white letters on the sidewall. This is a General Grabber ATX, and it's an all-terrain tire, which is gonna work great on the street. It'll drive nice and quiet but you can also use it year round in the ice and the snow. Now our new wheels have also just showed up and I'm tempted to get this mounted on the truck right away but we also just installed a new posi and some loud exhaust. So as a car guy there's one thing that I'm obligated to do first with these old tires. [ MUSIC ] You guys probably know what's coming next because as far as I'm concerned there's only one way to properly test that all these upgrades have worked. There it goes, she's coming alive. Both tires spinning, exhaust sounds great. [ engine revving ]
(LT)>> You guys have any questions about anything you've seen today be sure to check us out at Powernation TV dot com.
Show Full Transcript
(LT)>> Today on Truck Tech we're gonna breathe some new life into our retro Sierra build by adding a posi rear end, dual exhaust, and rebuild the worn out front suspension. It's gonna be great! [ MUSIC ] [ engine revving ] [ MUSIC ]
(LT)>> Yeah baby, woo hoo! [ MUSIC ] Today we're gonna be spending a little more quality time with our 2002 GMC Sierra that's built in throwback style, and last time we installed its center piece, the chrome double hoop roll bar with a set of four KC Hi-liters on top. Last time we also installed a set of long tube headers to help this 5-3 put down just a little bit more power, but the exhaust system isn't done yet. We're also gonna be installing a Flowmaster American Thunder dual exhaust kit. Now I can't wait to hear how this 5.3 is gonna sound with the Flowmasters and the long tubes, but before I get these dual tailpipes wrapped up and over the axle there's something that I need to take care of inside the axle. So first it's time to get it up in the air. [ MUSIC ] [ mechanical humming ] [ MUSIC ] [ drill buzzing ] [ MUSIC ]
(LT)>> There are three main styles of differential that you'll find in a solid rear axle. Number one is an open differential. Now those are great for driving on the street but pretty poor for performance driving because when you apply horsepower usually only one wheel is gonna spin, which isn't great for accelerating. The second major style is a limited slip, and there are several sub-sets of limited slip but they all work essentially the same way. Basically there's some sort of a clutch mechanism inside that will distribute power between both rear wheels. So when you're on the gas you'll spin both wheels but when you're driving on the street it will still allow for a difference of speed. So when you're cornering you won't be chirping the tires and wearing them out prematurely. The third major set of differential is some sort of a locker or a spool. Now those provide great traction whether you're off road or at the drag strip. However when you're driving on the street you're gonna be chirping a tire, which can lead to handling problems, premature tire wear, and just a general annoying sound. Now this particular type of truck GM calls this differential a gov-lock or a locking differential, but technically it's not a locker, not in the traditional sense. It's more of a limited slip that can engage or disengage. Here's kinda how it works. On this cross shaft there's a little counterweight that flips out as there's a difference in wheel speed. Now centrifugal force will fling this thing out, and when the wheels are about 200 r-p-m difference it'll catch on this little engagement plate, which forces out a wave plate, which engages a clutch pack and it's making it locking but technically limited slip. Now the nickname for this thing is gov-bomb based on its nickname of gov-lock, and that kinda gives you an idea of what happens. Basically these small pieces, as the truck's mileage increases or maybe it's seen some abuse, these little pieces can fling off and fall in the bottom of the case, but usually they don't go straight down. They'll get caught in between the ring and pinion, and when that happens all sorts of carnage will ensue and usually you have to replace everything inside the carrier. We don't want to have that happen. So we're gonna replace this with something a little bit better, but we've got to get started by pulling off the tires. [ drill buzzing ]
(LT)>> While our first job of the day will be in the center of the differential we first need to get the rear brakes out of the way so we can work with the axle shafts. With the center pin removed from the G-80 the axles push in slightly and the C-clips can be fished out with a magnet. Got ya, number one and number two, easy as that. Finally we can unbolt the bearing caps and the stock carrier can be removed from the housing. Our GMC is equipped with an 8.6 inch 10 bolt rear differential with a 30 spline shaft, and for that application Summit Racing sells just about every style of differential that we talked about. Lockers, spools, limited slip, and even an open, but the style that I chose was a traditional posi traction limited slip. Now this has clutch packs on either side of the spider gears just like the G-80. However instead of a complicated mechanism it just uses springs to apply constant pressure to the clutch pack, making that limited slip action work. Now this is the same style of differential that you'd find in your traditional old school muscle car that everyone loves from back in the day, and they work great for general all-around performance driving. They work okay for mild off roading, and of course they're great for just doing burnouts with both back tires spinning. Now we don't need a master install kit because we're just gonna be swapping out the carrier. So you can actually buy a carrier installation kit, which comes with both bearings, a shim pack, and 10 bolts to hold the ring gear onto the carrier. So the first thing I'm gonna do is get the new bearings pressed on. Then we'll swap over the gear. Whether you use a shop press like ours, or simply a hammer and a punch, it's always a good idea to push from the inner race of the bearing rather than on the rollers directly as to not cause damage. [ mechanical humming ]
(LT)>> I've got the ring gear cleaned up and it slides onto the new posi. I'll apply some orange thread locker onto the bolts, which for this 10 bolt are left hand thread. [ MUSIC ] They torque to spec at 65 foot pounds. We've got the new differential loaded up and we have no more worries about that old G-80 exploding and taking out that 10 bolt. Now the stock 3.73's on here are gonna work great for what we have in mind. So there's no need to re-gear, and we could just slap this thing in and be good to go. However there is a problem on the far outer end of the axle tube that I want to take care of first. [ MUSIC ] A common problem on a higher mile truck is leaky axle seals, and ours are definitely letting out oil and it's a simple repair. Once the seal is persuaded out of its home I'm gonna use a slide hammer to remove the old wheel bearings so we can replace those as well. Next we need to do a little housing keeping to clean up all the oil and brake dust. The new bearing installs with an aluminum driver and a few taps from a hammer. [ metal banging ]
(LT)>> And the oil seal follows suit. [ MUSIC ] Next how exactly does a posi track rear end work? It just does!
(LT)>> I've got our 10 bolt axle assembly cleaned up, stripped down. The axle bearings are in along with the seals and we're ready to start reassembly. Now if you've never worked on a rear differential before it can be a little bit intimidating, especially if you're gonna change the gear ratio because there are a lot of parameters that you have to nail spot on. Otherwise the rear end's gonna run hot, make a lot noise, and the gear set is gonna wear out early. Now because all we're changing today is the carrier the only thing that we're gonna have to adjust is carrier backlash, and that's controlled by shifting it further away from or closer to the pinion gear. And you've got to start somewhere just to get a baseline measurement. So I always throw in the stock cast carrier shims just to measure a baseline, and I make a handy little chart just to kinda see where I'm at. I've got 230 on the left, 245 on the right, which gives me the important number, 14 thousandths of an inch of backlash on the carrier. Now that's not awful but it's not acceptable either. On a 10 bolt like this one we need somewhere between six to 10 thousandths of an inch. So I need to shift the carrier closer to the pinion, which means I've got to start stacking some shims. This system includes shims of 5, 7, and 10 thousandths of an inch thick. So depending on how you stack them you can make very fine adjustments. With my selection made the carrier and shim stack goes into the housing and the caps are tightened up. [ drill buzzing ]
(LT)>> So that was still quite a bit too loose. So I'm gonna take one of the 10 thousandths shims out of the stack that's on the right hand side and I'll switch it over to the left, which will shift the carrier over and hopefully tighten up the backlash just enough. With a quick swap of one shim I'll re-install the carrier into the housing and once again install the bearing caps. Now they say if you're good, I'm not saying that I am, you can nail backlash just by the feel and sound. This one feels close but let's find out for sure. [ MUSIC ] Oh yeah! With the carrier sitting exactly where it should the axles can now slide back in. The C-clips are re-installed along with the cross pin. Finally it's time to seal this thing up for good with some Permatex Optimum Gray Gasket Maker, and the stock cover finishes the job. When I removed the rear brakes from our Sierra to take apart the axle I noticed the pads were quite worn out, and in fact one of them the friction material had separated entirely from the backing plate. So it's time for a brake job because this is just plain unsafe. Now EBC Brakes makes pads and rotors for a wide range of vehicles. Just about everything that you'll see on the road. So for our GMC I got a set of pads and rotors. The rotors are from their high carbon Blade Series, have these cool looking grooves in them, which will help remove a lot of heat and help them run cooler, and the high carbon alloy that's gonna resist heat better. As far as the pads go we chose their Extra Duty line, which are designed specifically for trucks and s-u-v's, and this is one of their longest lasting compounds, and it has a lot more grip than an o-e-m replacement does. Now all told this is gonna make our GMC stop a lot shorter and be a lot safer than these old worn out pads that it came with. Since we're working with on the back axle that's where we'll get started. Also ahead we'll give our 5.3 some rumble.
(LT)>> Over the last couple of decades Ford produced millions of the 4.6 liter V-8. Whether it was the earlier 2 valve version or the later 3. Now either way they had their fair share of problems and would occasionally need to be replaced, but rather than waiting around for a machine shop to get yours done you should check out Powertrain Products because they have both two and three valves in stock and ready to ship, and when they rebuild these things they don't take any chances with the block. If it's cracked, or needs a heli-coil thread repair, or if the deck surface needs more than 5 thousandths of an inch taken off they just trash the block and move on to the next one, and the cylinder heads receive a similar treatment. They're pretty much all brand new. They've got new springs, guides, seals, and even the valve seats. So basically you're getting a 100 percent brand new engine, and they have different warranties available all the way up to seven years. So to get your Ford back on the road be sure to check out Powertrain Products. Since we're building our GMC to be sort of like a throwback to a mid '90's truck there's one thing it absolutely has to have, dual exhaust. Now we picked this up from Flowmaster and it's one of their American Thunder exhaust kits, and it splits from a single exhaust up front to dual tail pipe. Now you have the choice with this particular setup to either run the tips turned out to the side or straight out the back, which is what we're gonna do. This is their American Thunder kit and it has a Super 40 muffler in the middle, and that's what's gonna give this truck that iconic throwback rumble. I just can't wait to hear how this thing sounds. Now the kit is made from 409 stainless steel, which means it's gonna last a lifetime, and number two it's gonna bolt on easily because it uses all the factory hanger locations and there's no drilling or fabrication required. Now before we get this thing on though we've got to get the old parts off. [ MUSIC ] Now I have been known to get just a little bit overboard when it comes to building an exhaust, especially if we have a situation where there's nothing readily available or off the shelf. Now take project Red Tide for example. It was our '88 Chevy K-1,500 that started out life as a four wheel drive truck. We lowered it down, converted it to all-wheel drive, and then put in an LS engine with a long tube header. So needless to say there was no exhaust kit of the shelf that would fit the needs that we wanted to accomplish. So we started out and built a 100 percent custom stainless steel three inch dual exhaust complete with an X-pipe, dual tailpipes, and quad exhaust tips resembling a C-5 Corvette. Now as fun as that was it took about four days of building, especially considering we have to make television, to get that exhaust done, fully welded, and installed. Now if you're working at home you don't want to spend 4 days on your back on your floor building a custom exhaust, and that's where the appeal of a bolt on kit like this comes in. Everything is engineered to fit, it goes in the stock hangers, and it'll sound great and you can do it in probably a half hour. Let's grab that muffler. [ MUSIC ] [ drill humming ] [ engine starting & idling ]
(LT)>> The Flowmaster Super 40 has a nice aggressive rumble. [ engine revving ]
(LT)>> Without being overly loud or obnoxious, and it'll give this truck an unmistakable sound. Now with the tailpipes on this particular kit there's a couple different ways that you could arrange them. I have them sort of set on an inboard arrangement because to me it lines up nicely with the kickers of the roll bar that's in the bed, but if you prefer a more wide set look you can do that as well simply by loosening the rear most clamp and twisting the last pipe 180 degrees, or of course if you want a side exit the kit also comes with that pipe which will exit just on the lower part of the bed side. Again it's totally up to you. Now the exhaust is done and we're ready to move on to the next job of the day, which is the front suspension. Our '02 Sierra has just under 260,000 miles on the odometer, but I'm really not too worried about the major mechanical parts because these GM full size pickups will pretty much last forever. But that doesn't mean you won't have to do the odd repair every now and again, especially in the front end. Now in the future we plan on running a little bit taller wheel and tire, and that's gonna accelerate wear on some already worn out front end parts. So I just figured we'll get ahead of the curve and replace everything. Rock Auto offers replacement parts for just about any vehicle on the road, and there are different grades to choose from depending on your budget and application. Whether that's economy, daily driver, or even heavy duty. Now whenever possible I prefer to grab pre-loaded control arm assemblies because of how much work it's gonna save you. The lower bushings, ball joints, and shock mounts have already been pressed into position and it's all painted. So it's gonna look good and last for a very long time. Now these upper control arms, it's kinda neat because they're specific for a lifted application with the offset hole in the upper bushing, which is gonna help that front end alignment get into spec. So we have everything we need, we just have to tear apart the old parts. Coming up we'll put our posi to the test.
(LT)>> An i-f-s, or independent front suspension, makes for a lot smoother ride and better handling than a solid front axle, which is found on some heavy duty trucks. This is because when one side of the truck hits a bump in the road the other side remains unaffected. The down side of i-f-s is there are a lot of moving parts, which can wear out as the years go by, especially when larger tires are thrown into the mix. By swapping out the old control arms we're gonna be replacing eight bushings, four ball joints, and two shock mounts, all of which should restore the factory handling and ride quality. These old rusted out quarter million mile shocks are gonna stay right here just for a little while longer. They're not gonna stay for good. I have a new set coming with a leveling kit, and I'll get to that next time but for now the teardown is complete. The only thing that I found that I wasn't really anticipating was the c/v axles. The outer boot on the driver's side was really torn up and all the grease had flung out and basically put a nice layer of greasy oil over everything in the front suspension, and the joint was just a little bit worn. So I've ordered a new set of replacement c/v axles for both sides, but I can still continue progress on the suspension and I can get the A-arms bolted back into place. The rebuild starts with a torsion bar sliding through the control arm, and then lining up the bushings with the mount holes in the lower frame. Next the shock goes back into place, which holds the suspension in position. The upper arm now goes in and I'll set the alignment bolts to roughly mid-way through their travel. The spindle attaches to both the lower and upper ball joint, the castle nuts are torqued, and the cotter pin slides in, which keeps it from loosening up. Our new unit bearing assembly bolts onto the spindle, followed by the c/v axle shaft which slides into position. A single nut secures it to the wheel bearing, and six bolts hold it to the front differential. The EBC rotor goes on along with the caliper bracket, the brake pads, and finally the caliper. Last thing going on up front is a new sway bar end link. With the suspension raised roughly half way I'll tighten the lower and upper control arm bolts. Finally the torsion bar keys are re-installed, which means this suspension job is complete. Well that wraps up the rebuild of our front suspension, and you can more or less use these steps on any GM truck from '88 on up, and if you were paying attention you probably noticed that there were a couple of bolts that I didn't tighten up. Mainly the ones that hold the control arms on to the chassis. Now the reason I didn't tighten them up yet is because the suspension is drooped out, and wherever you tighten up a rubber bushing it's gonna get kinda tight and it'll bind as you try to twist it up or down. So I just prefer to tighten these when the suspension is at ride height. Now normally that would require bolting the wheels on and putting the truck on the ground but because I haven't indexed the torsion bars yet into the crossmember I can easily do it now with a pole jack. The new tires for our GMC have just arrived and I chose a 305/70 on a small by today's standards 16 inch wheel for that old school look. Plus it'll go along nicely with the raised white letters on the sidewall. This is a General Grabber ATX, and it's an all-terrain tire, which is gonna work great on the street. It'll drive nice and quiet but you can also use it year round in the ice and the snow. Now our new wheels have also just showed up and I'm tempted to get this mounted on the truck right away but we also just installed a new posi and some loud exhaust. So as a car guy there's one thing that I'm obligated to do first with these old tires. [ MUSIC ] You guys probably know what's coming next because as far as I'm concerned there's only one way to properly test that all these upgrades have worked. There it goes, she's coming alive. Both tires spinning, exhaust sounds great. [ engine revving ]
(LT)>> You guys have any questions about anything you've seen today be sure to check us out at Powernation TV dot com.


