


Truck Tech Builds


Want more content like this?
Join the PowerNation Email NewsletterParts Used In This Episode

DuramaxTuner.com
Stealth 67 VGT
Matco Tools
MATCO Tools are the Official Tool Supplier to PowerNation
The Industrial Depot
Tools, Hardware, Shop Supplies
Episode Transcript
(LT)>> Today on Truck Tech it
just might be the day that we get our LML back under
the hood of our GMC.
(Austin)>> Then time for a new school twist on an old school method for making some exhaust sound just a little bit louder. [ Music ] [ engine revving ]
(LT)>> Yeah baby!
(Austin)>> Woo hoo! [ Music ]
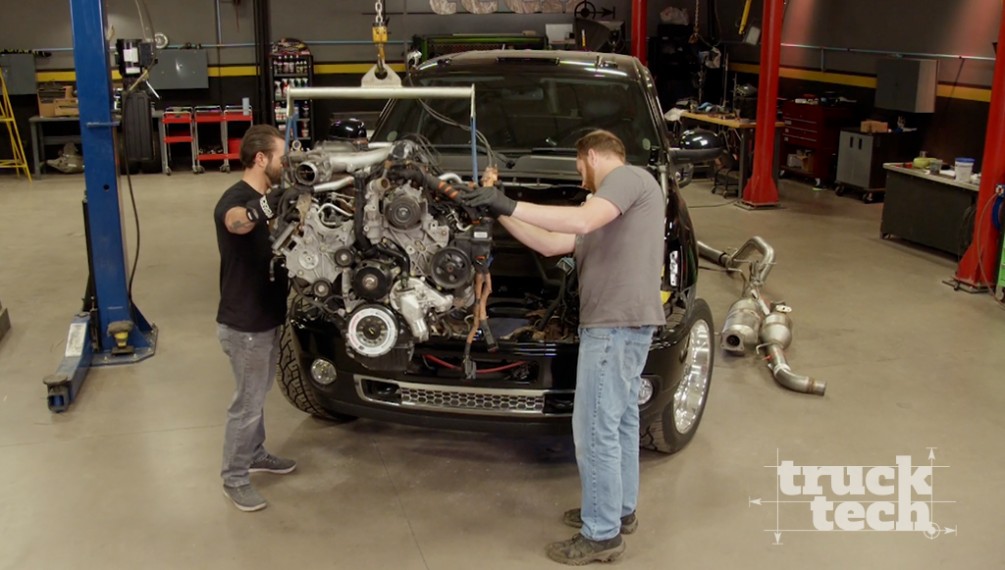
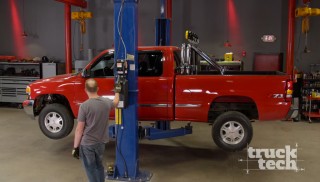
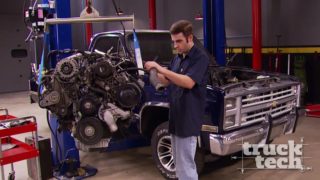
(LT)>> Hey guys welcome back to the shop. Today we're gonna be spending some more time on Dragonali, our 2011 GMC Sierra 2500 HD Denali quad cab, four wheel drive, automatic, awesome sorta fast truck. Now normally it's powered by this guy right here. A 6.6 LML Duramax and today is gonna be the day, we hope, that this thing goes back under the hood.
(Austin)>> Now it has been a minute since we had it rolled in the shop and we've actually done a lot of work on the engine that you guys haven't seen. I mean the last time you saw it, it was pretty much just a bare block and now what, we've got about 10 miles of fuel lines, wiring harnesses, hoses, all kinda wrapped in one, and not an easy task.
(LT)>> Well I am sure glad we took a whole bunch of pictures when this thing was disassembled because without exception this is the most complicated engine that I've had to reassemble, and it's mostly just all the stuff that's intertwined on the top. You've got high and low pressure fuel systems. You've got a wiring harness. You've got an injection pump that's buried way down there in the valley, and just everything has a very specific order that it needs to go in, but we've got it all together and the engine's just about ready to go. However there is gonna be a pretty big change that we make in the direction of this build.
(Austin)>> Just as many projects go they always have a change in plans, and this one definitely took a hard left turn, but that's okay. We originally built the bottom end to handle 1,000 horsepower and all the torque that comes with it, and well we decided to take the emissions intact route. So we know it's gonna handle it.
(LT)>> Now here's the thing. To make that 1,000 horsepower we would have had to remove a lot of the emissions components that came on this LML. You know things like e-g-r, d-p-f, and the catalyst in the exhaust. However we do realize that this truck is going to be spending a lot of time on the street. It's just too nice of a vehicle to cut up and to make a dedicated race truck. So we want to do the responsible thing and make this truck emissions legal so we can still enjoy it every day on the streets.
(Austin)>> Now it doesn't mean we still can't have fun with it. We can change a lot of components on the engine and still make a high horsepower number, and still end up pretty cool.
(LT)>> And I'm actually excited. I'm kinda up for the challenge to see how much power we can make, and one of the first parts that we actually can change is the turbocharger and that's where we're gonna get started.
(Austin)>> And that goes right there. And since we now know we're going emissions intact we obviously can't run that cool compound turbo setup we wanted but it doesn't mean we still can't upgrade this guy, and it sits right in the valley.
(LT)>> Yeah you know the primary charger, as long as we keep the v-g-t function, there's no reason we can't upgrade it to almost any size that we want. And the stock turbo is pretty small. It measures in at just under 60 millimeters. We're replacing it with this Stealth 67 G-2 we picked up from Calibrated Power. Now this will support 800 horsepower and it still has all the v-g-t functionality, which means we can still tow with it cause the turbine braking will still work, and it's gonna be nice and responsive.
(Austin)>> Yeah spool up fairly quickly and another cool thing is it sits on the same exact platform as the factory one. So we swap some lines, swap some sensors, and it bolts right in.
(LT)>> Yeah you know a lot of guys will convert to like an S-400 but there's a lot of other stuff that you need to do to make those fit. So that's the best part. It's a drop in turbo, hooks right up. So all you've got to do is swap over a few coolant tubes and we're good to go.
(Austin)>> Sweet we'll get to that and I'm gonna pick up a truck and do some exhaust man.
(LT)>> Sounds tiring cause it's "exhausting"! This style of turbocharger has a vein position sensor as well as a turbine outlet temp sensor and a pair of water lines, which will all need to be transferred from the stock turbo to the Stealth 67. And with the provided gaskets it'll be a leak free installation. [ Music ] So to make life just a little bit easier we're gonna throw the Y-bridge in before the turbo. On a Duramax the turbocharger sits in the rear of the valley, and while this type of turbo can be dropped in with the engine still in the truck it's so much easier to access everything with our engine on the stand. Just about every single diesel engine produced in the United States for on road use over the last 15 or so years has come fitted with one of these, an e-g-r or exhaust gas recirculation system. Now it's quite heavy, it looks complicated, and it takes up so much space it makes it almost impossible to get to anything on the top of our LML, but it does reduce the pollution that comes out of the tailpipe of our LML. So we're happy to reinstall it. Now there's a lot going on here but it's actually quite simple, the path that the exhaust takes. Now this is the up pipe and it connects the exhaust manifold to the turbocharger. That's where we want most of the exhaust gas to go, however a small percentage is diverted into the e-g-r system. The first stop is a valve, which controls exactly how much exhaust gas proceeds on. Now because the temperature of the exhaust gas is so warm it first passes through an e-g-r cooler, which reduces the temperature of the gas. Now the hotter the exhaust gas is entering the engine the more temperature of combustion is gonna be, and therefore the more pollution it's gonna create. So as we lower the temperature of the exhaust gas we lower the temperature of combustion, which again reduces the harmful pollution. We're happy to install it, it just takes a couple of extra steps. [ Music ] There are several smaller pieces that make up the e-g-r system, and I'll start with the main lengths of the e-g-r cooler, and then I'll attach the forward e-g-r valve between the cooler and the intake, and then I'll connect the secondary tube to the top of the valve. On the back side of the engine the primary valve connects everything together, and again this work is so much simpler to do with the engine not in the truck. Next rat rod rumble by pushing a button.
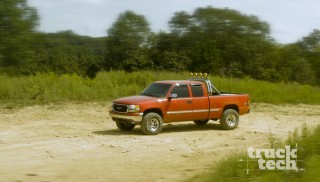
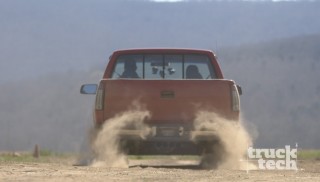
(Austin)>> Well we have a pleasant little surprise for you here today in the shop. I know a lot of you guys are driving late model pickups such as this, and what's the first thing you want to do when you take it off the lot? Put your custom touches to it and make it your own. Well that's the purpose of this. We're gonna enter the first stage of the build. We're not getting in the suspension, we're not getting into the engine, but we'll do some simple things that'll get air in, get air out, even give you some power and fuel efficiency, and this is a 2016 Ram 1500. It's rocking the 5-7 Hemi and from the factory it's putting down about 395 horse, about 410 pounds of torque. We're gonna do exactly that. That's its purpose. Show you how easy it is. We'll get that air. We'll put a proper tune on it, and then we'll let it breathe and we just might have a special twist with that exhaust that might surprise you. So you may remember those old school hot rods with the exhaust cutouts. They pull up at the light. It's got a nice rumble to it, and then the next second bam, nice, loud, and aggressive. Well that's exactly what we have here. This is Flowmaster's Flow FX direct fit dual mode muffler, and that's exactly what it does. It gives you the best of both worlds. One mode the exhaust gas passes straight through the high flow muffler straight out the tailpipes. Then with the touch of new technology and a button bam, the power chamber has an actuator valve that will rotate and redirect the exhaust gas straight out a three inch turn down pipe, which will give you that nice, loud, aggressive sound when you want it. And the best part is this replaces the factory muffler, pops right in in no time at all. Let's get this truck on the lift and get it done. [ mechanical humming ]
(Austin)>> The nice thing about the upgrades we're giving this Ram is you don't have to do all of them at the same time. Performance exhaust boom! You're gonna get instant gratification as soon as you turn that key. When you budget allows you can all the cold air kit and tuner later. Right now all this junk's got to go. Got her! Once the supplied actuator is bolted to the power chamber... [ drill humming ]
(Austin)>> ...it's ready to go under the truck. This upgrade from Flowmaster keeps the factory converters and tailpipes intact. Bolts right in the stock location for a perfect fit. Redirecting that exhaust through that turn down instantly gives the truck multiple personalities. So all that's left to do is to mount the module that's actually gonna send the power to the actuator to turn the system on and off, and it's fairly simple. It comes with all the wiring harnesses needed. All we've got to do is find a 12 volt power source somewhere behind the dash, tap in with a fuse, and we'll be in business. [ Music ] And no worries about any part of this installation. The kit comes with easy to read instructions. I mean even LT could figure this one out. I already ran the harness under the truck and through the firewall, and it connects straight to the module under the dash. To compliment the straight through muffler design Flowmaster's Delta Force performance air intake will move more air through its high flow eight layer filter. Now for the last piece of the puzzle, tuning, and we're using the Diablo Sport Trinity 2 EX, and it's pretty simple. It plugs into the o-b-d-2 port right to the back of the device, mounts on the windshield. Now the best thing about this it'll read d-t-c codes. So if your check engine light comes on you can figure out what the problem is, monitor a bunch of different gauges, and also choose from different power levels whether you're wanting fuel economy, towing, or even high performance, and it's pretty simple, straight forward and we'll just go through the steps and take this truck outside and see what it actually sounds like. [ bell dinging ] [ Music ]
(Austin)>> When we first pulled this truck in the shop I've got to say it didn't sound like much at all. [ engine revving ]
(Austin)>> But in quick time we made some progress and it sounds a whole lot better. We'll see what LT thinks about it.
(LT)>> Well the good thing is I can actually tell it has a V-8 just from listening to it now.
(Austin)>> Right it sounds pretty good now. I like it!
(LT)>> So how hard was the install? Did it take too long?
(Austin)>> Dude super quick, seamless, easy.
(LT)>> Alright now the valve right now is closed right? It's running through the mufflers?
(Austin)>> Yeah we are closed.
(LT)>> Rev it up a couple of times, let's hear it. [ engine revving ]
(LT)>> Well it certainly is a lot more aggressive than it was stock and it gives it nice tough sound, but like we came to hear a cutout right? So let's hear this thing wide open.
(Austin)>> Let's see the difference. Okay open!
(LT)>> Oh yeah you can definitely tell. Rev it up a little bit. [ engine growling ]
(LT)>> Yeah for sure. I like it! I'd probably leave it like that and drive around but here's the thing. You just made this truck louder. I'm gonna go make our Denali a little bit quieter.
(Austin)>> True that buddy.
(LT)>> Next Duramax goes back home.
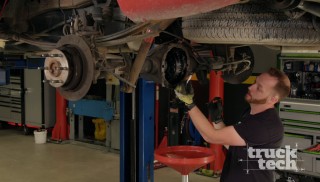
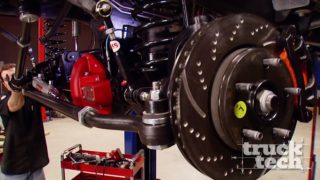
(LT)>> Even though we're building this LML to be emissions intact there are still parts of the exhaust system that we are allowed to change, and we already got started. We installed a set of PPE high flow exhaust manifolds that have a much larger internal diameter than stock and they have nice, smooth, sweeping transitions, which will do a couple different things. Number one increase the overall power output. Number two, reduce exhaust gas temperatures, and number three make the turbo spool up a lot quicker. Now speaking of the turbo it's technically part of the exhaust system, and this is a Stealth 67 VGT we picked up from Duramax Tuner dot com. It will support 800 horsepower but to do so it needs to be getting air from the exhaust manifold, and luckily PPE has exactly what we need because don't forget we also need to feed the e-g-r. This is their 50 state legal high flow up pipe, and it has again a much larger diameter and a much thicker wall thickness than stock, and bolts right up keeping all these systems happy. Now the stock down pipe is quite restrictive because it has almost a sharp 90 degree bend as it exits the turbine. Also PPE has what we need there with their three inch stainless steel high flow down pipe. It bolts right into place and has all the factory provisions including a port for the ninth injector so we can fill that d-p-f with diesel during a regen. There are mixed opinions about anti-seize compound and exhaust hardware, but it is very common to break these manifold and turbo bolts when attempting to remove them. So a little extra insurance goes a long way in my book. The PPE up pipes install in the exact same was as our stock parts and with both sides connected I can move on to installing the down pipe, which wraps up our exhaust upgrades.
(Austin)>> I went ahead and dug out the transmission, and that means it's time to drop the motor in and then we can lift it up and bolt this dude up from underneath, and Xcalliber built this for us. This is the black series and it's good to handle like 1,000 horsepower. So no matter what we do to this build now or in the future we know we're not gonna have any problems.
(LT)>> Well the great news is I have every last piece buttoned up on this engine. So all we've got to do is like Austin says, get it in the truck. And from there since we took all the time now to get all the harness and everything connected there's really only like three things we've got to plug up and this thing should be able to run, but first we need that crane. So why don't you unhitch the transmission.
(Austin)>> And hook you up.
(LT)>> Get this thing off the stand for good. [ mechanical humming ]
(LT)>> Now just put a little bump on it. Okay let me get these motor mounts off. [ drill humming ]
(LT)>> So I remember pulling thing out, and the challenge that we're gonna have is basically getting it under the firewall.
(Austin)>> Yeah it does stick out quite a bit.
(LT)>> Basically the oil pan is gonna be jammed right up against the crossmember. [ Music ] We're all crooked here. [ Music ]
(Austin)>> Looks good!
(LT)>> Get a good push. [ drill humming ]
(LT)>> You know if we put this same engine in a car that weighed a third as much it might actually go fast.
(Austin)>> It was a lot lighter about 10 minutes ago. We ain't got no brakes now remember.
(LT)> Oh no we've got brakes. Got no power though. You know the great thing about the Denali is it's nice and comfortable inside while you're being pushed.
(Austin)>> Is it, I wouldn't know.
(LT)>> Well it's always a huge accomplishment to get your engine back in the project vehicle because this was a pretty extensive build and we took this thing apart I think last fall. So it has been a little while.
(Austin)>> Yeah no doubt. Biggest part of the build but it's the last part of the build. We are almost there.
(LT)>> Well all we've got to do from here is fill this big empty space with a transmission and then we have something else we're gonna bolt on to the motor upstairs, like another fuel pump.
(Austin)>> And get a crossmember out.
(LT)>> How's this all gonna work, next!
(Austin)>> We're back under the truck where we're finally gonna bolt up this transmission for good. This Allison is built for well over 1,000 horsepower. [ Music ]
(LT)>> Tail shaft first, up and over the crossmember.
(Austin)>> Now we're gonna reuse this stock transfer case but they're overbuilt, and it's still gonna hold up to all the power we'll throw at the Denali. Since we have the space we'll mount up the front portion of the exhaust system. Then tighten up the crossmember and secure the transmission.
(LT)>> Watch your shoulder. You know most people don't know this but NASA also uses these on the space shuttle.
(Austin)>> I believe it, I believe it. We're utilizing the brand new factory exhaust system that includes the d-p-f and all the after treatment systems. That's a big chunk of metal but the best thing is it goes right in using all the o-e-m bushings and mounting locations.
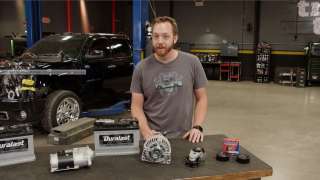
(LT)>> There we go, she's in! The LML Duramax was used between 2011 and 2016, and at its heart was a Bosch CP-4 injection pump. Now this is a pretty high tech piece of equipment and is much different from the earlier CP-3 that was used between '01 and '10, mainly because it's a two piston design. Now this pump will also operate at a much higher pressure than the older ones, which means you can atomize the fuel into a much smaller droplet, which will mean more complete combustion and reduced emissions output. Now that all sounds great but the CP-4 does have a weak link, and it is known to prematurely fail, and when it does it's gonna take out the rest of your fuel system including those very expensive injectors. Now we already have a brand new CP-4 bolted down into the valley, and when we installed our fast lift pump some time ago we gave it an extra layer of protection because the Fast will remove any air and water from the fuel and increase its lubricating properties, which will have this pump live a long and happy life. Now the only other drawback that we have is the maximum horsepower. This has a lower volume even though it does have a higher pressure than the CP-3, and it'll max out somewhere around 550 horses at the rear tires, and we want to make a whole lot more than that, which means we need some more high pressure fuel. We all know that Summit Racing has a huge line of high performance parts for gasoline engines, but they also have a pretty extensive line for diesels as well, and that's where we picked up this ATS twin fueler kit, which is gonna add a second injection pump into the mix, a CP-3. Now whether you have a factory CP-4 or a CP-3 in the valley it's driven by the camshaft gear. However our second pump is gonna be driven by the serpentine belt. So the kit comes with all the necessary brackets and high pressure fuel lines that we need to complete the installation, and this is gonna plumb into the back of the driver's side fuel rail, and of course we get all the other things too like the low pressure fuel line, and the pulleys, and the belt, plus the fittings that you need to round out the installation. We'll get started with the bracket. By combining a stock CP-4 and a CP-3 we've got the best of both worlds. A high pressure and high volume system that together will support over 1,000 horsepower, and the best part is because the fuel demand is split between two pumps they have an increased life span as well. Before we wrap up the installation on our twin fueler with a serpentine belt I figured this was the perfect opportunity to replace some of the parts up front since the originals have 100,000 miles on them. So we grabbed a bunch of parts from Duralast. Now we started with a set of smooth idler pulleys as well as a grooved tensioner pulley assembly to keep everything tight. A new gold alternator will keep everything charged up as well as a starter that's gonna get things turned over. Speaking of which we're also gonna be installing a set of platinum a-g-m batteries. Now these have absorbed glass mat technology, which has great deep cycle capability, which is perfect for starting up a big heavy diesel engine like ours, especially if you live in a colder climate where your grid heater and glow plugs are constantly going to be cycling. Now a battery like this a-g-m has twice the life cycle of a conventional battery. It recharges quicker and the platinum a-g-m comes with a free three year nationwide replacement warranty, but before we get any of this installed there's a few parts I've got to take off. The new batteries are a direct replacement from the old ones. So it takes no time at all to swap them out, and with the rest of our accessories installed we'll have a quiet smooth running engine that'll charge and start for many years to come.
(Austin)>> Well looks like an assembled engine to me. I mean after starting with a giant hole here I didn't think we'd get this far, but not that bad.
(LT)>> Yeah cause we took care of so much of the hard, tedious stuff when it was out on the engine stand. It's pretty much like an assembly line. Just dump it in and go.
(Austin)>> Well thank you guys for watching. If you want to see any parts we used here on today's show just visit Powernation TV dot com and catch you next week. [ Music ]
Show Full Transcript
(Austin)>> Then time for a new school twist on an old school method for making some exhaust sound just a little bit louder. [ Music ] [ engine revving ]
(LT)>> Yeah baby!
(Austin)>> Woo hoo! [ Music ]
(LT)>> Hey guys welcome back to the shop. Today we're gonna be spending some more time on Dragonali, our 2011 GMC Sierra 2500 HD Denali quad cab, four wheel drive, automatic, awesome sorta fast truck. Now normally it's powered by this guy right here. A 6.6 LML Duramax and today is gonna be the day, we hope, that this thing goes back under the hood.
(Austin)>> Now it has been a minute since we had it rolled in the shop and we've actually done a lot of work on the engine that you guys haven't seen. I mean the last time you saw it, it was pretty much just a bare block and now what, we've got about 10 miles of fuel lines, wiring harnesses, hoses, all kinda wrapped in one, and not an easy task.
(LT)>> Well I am sure glad we took a whole bunch of pictures when this thing was disassembled because without exception this is the most complicated engine that I've had to reassemble, and it's mostly just all the stuff that's intertwined on the top. You've got high and low pressure fuel systems. You've got a wiring harness. You've got an injection pump that's buried way down there in the valley, and just everything has a very specific order that it needs to go in, but we've got it all together and the engine's just about ready to go. However there is gonna be a pretty big change that we make in the direction of this build.
(Austin)>> Just as many projects go they always have a change in plans, and this one definitely took a hard left turn, but that's okay. We originally built the bottom end to handle 1,000 horsepower and all the torque that comes with it, and well we decided to take the emissions intact route. So we know it's gonna handle it.
(LT)>> Now here's the thing. To make that 1,000 horsepower we would have had to remove a lot of the emissions components that came on this LML. You know things like e-g-r, d-p-f, and the catalyst in the exhaust. However we do realize that this truck is going to be spending a lot of time on the street. It's just too nice of a vehicle to cut up and to make a dedicated race truck. So we want to do the responsible thing and make this truck emissions legal so we can still enjoy it every day on the streets.
(Austin)>> Now it doesn't mean we still can't have fun with it. We can change a lot of components on the engine and still make a high horsepower number, and still end up pretty cool.
(LT)>> And I'm actually excited. I'm kinda up for the challenge to see how much power we can make, and one of the first parts that we actually can change is the turbocharger and that's where we're gonna get started.
(Austin)>> And that goes right there. And since we now know we're going emissions intact we obviously can't run that cool compound turbo setup we wanted but it doesn't mean we still can't upgrade this guy, and it sits right in the valley.
(LT)>> Yeah you know the primary charger, as long as we keep the v-g-t function, there's no reason we can't upgrade it to almost any size that we want. And the stock turbo is pretty small. It measures in at just under 60 millimeters. We're replacing it with this Stealth 67 G-2 we picked up from Calibrated Power. Now this will support 800 horsepower and it still has all the v-g-t functionality, which means we can still tow with it cause the turbine braking will still work, and it's gonna be nice and responsive.
(Austin)>> Yeah spool up fairly quickly and another cool thing is it sits on the same exact platform as the factory one. So we swap some lines, swap some sensors, and it bolts right in.
(LT)>> Yeah you know a lot of guys will convert to like an S-400 but there's a lot of other stuff that you need to do to make those fit. So that's the best part. It's a drop in turbo, hooks right up. So all you've got to do is swap over a few coolant tubes and we're good to go.
(Austin)>> Sweet we'll get to that and I'm gonna pick up a truck and do some exhaust man.
(LT)>> Sounds tiring cause it's "exhausting"! This style of turbocharger has a vein position sensor as well as a turbine outlet temp sensor and a pair of water lines, which will all need to be transferred from the stock turbo to the Stealth 67. And with the provided gaskets it'll be a leak free installation. [ Music ] So to make life just a little bit easier we're gonna throw the Y-bridge in before the turbo. On a Duramax the turbocharger sits in the rear of the valley, and while this type of turbo can be dropped in with the engine still in the truck it's so much easier to access everything with our engine on the stand. Just about every single diesel engine produced in the United States for on road use over the last 15 or so years has come fitted with one of these, an e-g-r or exhaust gas recirculation system. Now it's quite heavy, it looks complicated, and it takes up so much space it makes it almost impossible to get to anything on the top of our LML, but it does reduce the pollution that comes out of the tailpipe of our LML. So we're happy to reinstall it. Now there's a lot going on here but it's actually quite simple, the path that the exhaust takes. Now this is the up pipe and it connects the exhaust manifold to the turbocharger. That's where we want most of the exhaust gas to go, however a small percentage is diverted into the e-g-r system. The first stop is a valve, which controls exactly how much exhaust gas proceeds on. Now because the temperature of the exhaust gas is so warm it first passes through an e-g-r cooler, which reduces the temperature of the gas. Now the hotter the exhaust gas is entering the engine the more temperature of combustion is gonna be, and therefore the more pollution it's gonna create. So as we lower the temperature of the exhaust gas we lower the temperature of combustion, which again reduces the harmful pollution. We're happy to install it, it just takes a couple of extra steps. [ Music ] There are several smaller pieces that make up the e-g-r system, and I'll start with the main lengths of the e-g-r cooler, and then I'll attach the forward e-g-r valve between the cooler and the intake, and then I'll connect the secondary tube to the top of the valve. On the back side of the engine the primary valve connects everything together, and again this work is so much simpler to do with the engine not in the truck. Next rat rod rumble by pushing a button.
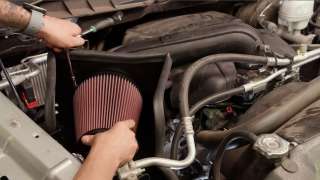
(Austin)>> Well we have a pleasant little surprise for you here today in the shop. I know a lot of you guys are driving late model pickups such as this, and what's the first thing you want to do when you take it off the lot? Put your custom touches to it and make it your own. Well that's the purpose of this. We're gonna enter the first stage of the build. We're not getting in the suspension, we're not getting into the engine, but we'll do some simple things that'll get air in, get air out, even give you some power and fuel efficiency, and this is a 2016 Ram 1500. It's rocking the 5-7 Hemi and from the factory it's putting down about 395 horse, about 410 pounds of torque. We're gonna do exactly that. That's its purpose. Show you how easy it is. We'll get that air. We'll put a proper tune on it, and then we'll let it breathe and we just might have a special twist with that exhaust that might surprise you. So you may remember those old school hot rods with the exhaust cutouts. They pull up at the light. It's got a nice rumble to it, and then the next second bam, nice, loud, and aggressive. Well that's exactly what we have here. This is Flowmaster's Flow FX direct fit dual mode muffler, and that's exactly what it does. It gives you the best of both worlds. One mode the exhaust gas passes straight through the high flow muffler straight out the tailpipes. Then with the touch of new technology and a button bam, the power chamber has an actuator valve that will rotate and redirect the exhaust gas straight out a three inch turn down pipe, which will give you that nice, loud, aggressive sound when you want it. And the best part is this replaces the factory muffler, pops right in in no time at all. Let's get this truck on the lift and get it done. [ mechanical humming ]
(Austin)>> The nice thing about the upgrades we're giving this Ram is you don't have to do all of them at the same time. Performance exhaust boom! You're gonna get instant gratification as soon as you turn that key. When you budget allows you can all the cold air kit and tuner later. Right now all this junk's got to go. Got her! Once the supplied actuator is bolted to the power chamber... [ drill humming ]
(Austin)>> ...it's ready to go under the truck. This upgrade from Flowmaster keeps the factory converters and tailpipes intact. Bolts right in the stock location for a perfect fit. Redirecting that exhaust through that turn down instantly gives the truck multiple personalities. So all that's left to do is to mount the module that's actually gonna send the power to the actuator to turn the system on and off, and it's fairly simple. It comes with all the wiring harnesses needed. All we've got to do is find a 12 volt power source somewhere behind the dash, tap in with a fuse, and we'll be in business. [ Music ] And no worries about any part of this installation. The kit comes with easy to read instructions. I mean even LT could figure this one out. I already ran the harness under the truck and through the firewall, and it connects straight to the module under the dash. To compliment the straight through muffler design Flowmaster's Delta Force performance air intake will move more air through its high flow eight layer filter. Now for the last piece of the puzzle, tuning, and we're using the Diablo Sport Trinity 2 EX, and it's pretty simple. It plugs into the o-b-d-2 port right to the back of the device, mounts on the windshield. Now the best thing about this it'll read d-t-c codes. So if your check engine light comes on you can figure out what the problem is, monitor a bunch of different gauges, and also choose from different power levels whether you're wanting fuel economy, towing, or even high performance, and it's pretty simple, straight forward and we'll just go through the steps and take this truck outside and see what it actually sounds like. [ bell dinging ] [ Music ]
(Austin)>> When we first pulled this truck in the shop I've got to say it didn't sound like much at all. [ engine revving ]
(Austin)>> But in quick time we made some progress and it sounds a whole lot better. We'll see what LT thinks about it.
(LT)>> Well the good thing is I can actually tell it has a V-8 just from listening to it now.
(Austin)>> Right it sounds pretty good now. I like it!
(LT)>> So how hard was the install? Did it take too long?
(Austin)>> Dude super quick, seamless, easy.
(LT)>> Alright now the valve right now is closed right? It's running through the mufflers?
(Austin)>> Yeah we are closed.
(LT)>> Rev it up a couple of times, let's hear it. [ engine revving ]
(LT)>> Well it certainly is a lot more aggressive than it was stock and it gives it nice tough sound, but like we came to hear a cutout right? So let's hear this thing wide open.
(Austin)>> Let's see the difference. Okay open!
(LT)>> Oh yeah you can definitely tell. Rev it up a little bit. [ engine growling ]
(LT)>> Yeah for sure. I like it! I'd probably leave it like that and drive around but here's the thing. You just made this truck louder. I'm gonna go make our Denali a little bit quieter.
(Austin)>> True that buddy.
(LT)>> Next Duramax goes back home.
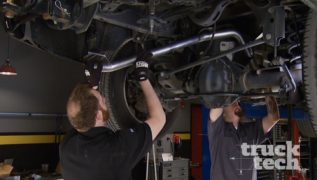
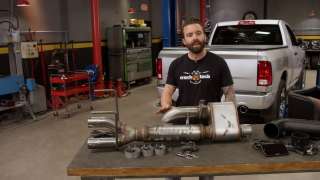
(LT)>> Even though we're building this LML to be emissions intact there are still parts of the exhaust system that we are allowed to change, and we already got started. We installed a set of PPE high flow exhaust manifolds that have a much larger internal diameter than stock and they have nice, smooth, sweeping transitions, which will do a couple different things. Number one increase the overall power output. Number two, reduce exhaust gas temperatures, and number three make the turbo spool up a lot quicker. Now speaking of the turbo it's technically part of the exhaust system, and this is a Stealth 67 VGT we picked up from Duramax Tuner dot com. It will support 800 horsepower but to do so it needs to be getting air from the exhaust manifold, and luckily PPE has exactly what we need because don't forget we also need to feed the e-g-r. This is their 50 state legal high flow up pipe, and it has again a much larger diameter and a much thicker wall thickness than stock, and bolts right up keeping all these systems happy. Now the stock down pipe is quite restrictive because it has almost a sharp 90 degree bend as it exits the turbine. Also PPE has what we need there with their three inch stainless steel high flow down pipe. It bolts right into place and has all the factory provisions including a port for the ninth injector so we can fill that d-p-f with diesel during a regen. There are mixed opinions about anti-seize compound and exhaust hardware, but it is very common to break these manifold and turbo bolts when attempting to remove them. So a little extra insurance goes a long way in my book. The PPE up pipes install in the exact same was as our stock parts and with both sides connected I can move on to installing the down pipe, which wraps up our exhaust upgrades.
(Austin)>> I went ahead and dug out the transmission, and that means it's time to drop the motor in and then we can lift it up and bolt this dude up from underneath, and Xcalliber built this for us. This is the black series and it's good to handle like 1,000 horsepower. So no matter what we do to this build now or in the future we know we're not gonna have any problems.
(LT)>> Well the great news is I have every last piece buttoned up on this engine. So all we've got to do is like Austin says, get it in the truck. And from there since we took all the time now to get all the harness and everything connected there's really only like three things we've got to plug up and this thing should be able to run, but first we need that crane. So why don't you unhitch the transmission.
(Austin)>> And hook you up.
(LT)>> Get this thing off the stand for good. [ mechanical humming ]
(LT)>> Now just put a little bump on it. Okay let me get these motor mounts off. [ drill humming ]
(LT)>> So I remember pulling thing out, and the challenge that we're gonna have is basically getting it under the firewall.
(Austin)>> Yeah it does stick out quite a bit.
(LT)>> Basically the oil pan is gonna be jammed right up against the crossmember. [ Music ] We're all crooked here. [ Music ]
(Austin)>> Looks good!
(LT)>> Get a good push. [ drill humming ]
(LT)>> You know if we put this same engine in a car that weighed a third as much it might actually go fast.
(Austin)>> It was a lot lighter about 10 minutes ago. We ain't got no brakes now remember.
(LT)> Oh no we've got brakes. Got no power though. You know the great thing about the Denali is it's nice and comfortable inside while you're being pushed.
(Austin)>> Is it, I wouldn't know.
(LT)>> Well it's always a huge accomplishment to get your engine back in the project vehicle because this was a pretty extensive build and we took this thing apart I think last fall. So it has been a little while.
(Austin)>> Yeah no doubt. Biggest part of the build but it's the last part of the build. We are almost there.
(LT)>> Well all we've got to do from here is fill this big empty space with a transmission and then we have something else we're gonna bolt on to the motor upstairs, like another fuel pump.
(Austin)>> And get a crossmember out.
(LT)>> How's this all gonna work, next!
(Austin)>> We're back under the truck where we're finally gonna bolt up this transmission for good. This Allison is built for well over 1,000 horsepower. [ Music ]
(LT)>> Tail shaft first, up and over the crossmember.
(Austin)>> Now we're gonna reuse this stock transfer case but they're overbuilt, and it's still gonna hold up to all the power we'll throw at the Denali. Since we have the space we'll mount up the front portion of the exhaust system. Then tighten up the crossmember and secure the transmission.
(LT)>> Watch your shoulder. You know most people don't know this but NASA also uses these on the space shuttle.
(Austin)>> I believe it, I believe it. We're utilizing the brand new factory exhaust system that includes the d-p-f and all the after treatment systems. That's a big chunk of metal but the best thing is it goes right in using all the o-e-m bushings and mounting locations.
(LT)>> There we go, she's in! The LML Duramax was used between 2011 and 2016, and at its heart was a Bosch CP-4 injection pump. Now this is a pretty high tech piece of equipment and is much different from the earlier CP-3 that was used between '01 and '10, mainly because it's a two piston design. Now this pump will also operate at a much higher pressure than the older ones, which means you can atomize the fuel into a much smaller droplet, which will mean more complete combustion and reduced emissions output. Now that all sounds great but the CP-4 does have a weak link, and it is known to prematurely fail, and when it does it's gonna take out the rest of your fuel system including those very expensive injectors. Now we already have a brand new CP-4 bolted down into the valley, and when we installed our fast lift pump some time ago we gave it an extra layer of protection because the Fast will remove any air and water from the fuel and increase its lubricating properties, which will have this pump live a long and happy life. Now the only other drawback that we have is the maximum horsepower. This has a lower volume even though it does have a higher pressure than the CP-3, and it'll max out somewhere around 550 horses at the rear tires, and we want to make a whole lot more than that, which means we need some more high pressure fuel. We all know that Summit Racing has a huge line of high performance parts for gasoline engines, but they also have a pretty extensive line for diesels as well, and that's where we picked up this ATS twin fueler kit, which is gonna add a second injection pump into the mix, a CP-3. Now whether you have a factory CP-4 or a CP-3 in the valley it's driven by the camshaft gear. However our second pump is gonna be driven by the serpentine belt. So the kit comes with all the necessary brackets and high pressure fuel lines that we need to complete the installation, and this is gonna plumb into the back of the driver's side fuel rail, and of course we get all the other things too like the low pressure fuel line, and the pulleys, and the belt, plus the fittings that you need to round out the installation. We'll get started with the bracket. By combining a stock CP-4 and a CP-3 we've got the best of both worlds. A high pressure and high volume system that together will support over 1,000 horsepower, and the best part is because the fuel demand is split between two pumps they have an increased life span as well. Before we wrap up the installation on our twin fueler with a serpentine belt I figured this was the perfect opportunity to replace some of the parts up front since the originals have 100,000 miles on them. So we grabbed a bunch of parts from Duralast. Now we started with a set of smooth idler pulleys as well as a grooved tensioner pulley assembly to keep everything tight. A new gold alternator will keep everything charged up as well as a starter that's gonna get things turned over. Speaking of which we're also gonna be installing a set of platinum a-g-m batteries. Now these have absorbed glass mat technology, which has great deep cycle capability, which is perfect for starting up a big heavy diesel engine like ours, especially if you live in a colder climate where your grid heater and glow plugs are constantly going to be cycling. Now a battery like this a-g-m has twice the life cycle of a conventional battery. It recharges quicker and the platinum a-g-m comes with a free three year nationwide replacement warranty, but before we get any of this installed there's a few parts I've got to take off. The new batteries are a direct replacement from the old ones. So it takes no time at all to swap them out, and with the rest of our accessories installed we'll have a quiet smooth running engine that'll charge and start for many years to come.
(Austin)>> Well looks like an assembled engine to me. I mean after starting with a giant hole here I didn't think we'd get this far, but not that bad.
(LT)>> Yeah cause we took care of so much of the hard, tedious stuff when it was out on the engine stand. It's pretty much like an assembly line. Just dump it in and go.
(Austin)>> Well thank you guys for watching. If you want to see any parts we used here on today's show just visit Powernation TV dot com and catch you next week. [ Music ]


