


Carcass Featured Projects


Carcass Builds


Want more content like this?
Join the PowerNation Email Newsletter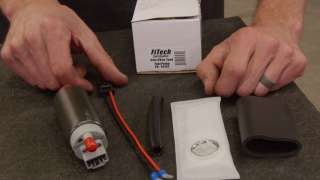


Episode Transcript
(Jeremy)>> You're watching Powernation!
(Jeremy)>> Today on Carcass we head out to a salvage yard to rescue an engine for our abandoned daily driver project.
(Jimmy)>> We'll get it back to the shop, tear it down, and give a quick refresh before dropping it back into our Chevy. [ Music ] [ engine revving ] [ Music ]
(Jeremy)>> Hey guys, welcome to Carcass. Well, we're out and about today. We're gonna go to some place a little special to pick up some pretty important parts for our next project.
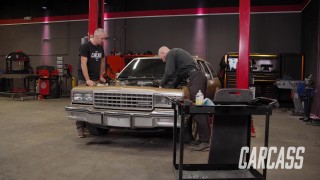
(Jimmy)>> Yeah, so we're actually bringing back a previous project that you guys have seen before. It's a 1996 Chevy pickup, single cab short bed, which is one of our personal favorites. So, on that truck we did a little bit of body and paint work just to show you guys how to do that stuff, but now we're actually gonna bring it back and do kind of an original restoration if you will. So, on the outside we want to keep it pretty much stock looking, but drivetrain wise we're gonna upgrade it and we're going to get something from a newer Chevy pickup.
(Jeremy)>> So we're in our RockAuto Driveway Rescue van. It's packed full of tools. So, we're gonna go out to the salvage yard, pluck this engine and trans combo out of it. We're gonna load it in the van and get it all back to the shop. Once we're there we'll access what we've got. We'll jump on RockAuto dot com, figure out what we need, and get a bunch of stuff ordered and get this whole thing started and put together.
(Jimmy)>> And I've already looked a little bit, and RockAuto does offer some mild upgrade parts. So, depending on what we want to get into we could throw a little bit of a cam at it. Just depends on what we want to do, but otherwise RockAuto has everything we need to do a little bit of a freshen up for this thing and should get it on the road and it should drive pretty nice.
(Jeremy)>> And I think it's not too far up here. So, we'll get up here, unload everything, go out, find what we need, and get it back to the shop and get started.
(Jimmy)>> Let's find something! [ Music ]
(Jeremy)>> Alright man, I think all of the LS's, GM stuff, that's all in the back corner.
(Jimmy)>> Let's go grab it! [ Music ] We're at Express Pull-n-Save where they feature 2,000 cars and their inventory changes daily. [ Music ] We've been up and down a few rows already just checking things out, and we have quite a few options but we're looking for an engine that's a little more complete. Even already in this row there's a Yukon right here. There's a couple of Tahoes. We're just checking things out to see what we have.
(Jeremy)>> Let's see how much is there or not there.
(Jimmy)>> This one's got most of the front drive. Computer is here.
(Jeremy)> It's nice that the fender's off of it.
(Jimmy)>> It makes it easier to work on. Just two-wheel drive too. So that's a plus.
(Jeremy)>> It looks clean. The engine itself is very clean.
(Jimmy)>> Not a whole lot of grime and junk on it. Is this it?
(Jeremy)>> Yeah, I think this is our best bet.
(Jimmy)>> Let's do it man!
(Jeremy)>> Let's grab some tools. We'll get the core support off first, and then just dive into it. [ drill humming ] [ Music ]
(Jeremy)>> It's kinda heavy. [ drill humming ] [ Music ]
(Jeremy)>> The LS platform came around in the late '90's and has become an extremely popular swap. You can find these engines in multiple GM cars, trucks, and s-u-v's, and the aftermarket support for the LS is huge, and you can even make them build some pretty impressive horsepower. [ drill humming ] [ Music ]
(Jeremy)>> Okay, there's that one. [ Music ] [ drill humming ] [ Music ]
(Jeremy)>> Now we get the picker in here. Pick this thing up. [ Music ] Now imagine trying to do this when they didn't have this type of equipment in here.
(Jimmy)>> Or if you're by yourself.
(Jeremy)>> Yeah, you're screwed! [ Music ] [ hoist chain clicking ]
(Jeremy)>> That's how you pull a junkyard motor. Now we've just got to get it on a cart. [ hoist chain clicking ] [ Music ]
(Jeremy)>> How does it roll? It seems to roll okay. Not majorly flat tires but... [ Music ] That looks like he'll make it. [ Music ] Coming up, we get our junkyard LS into the shop and start tearing it down, getting it ready for its new life in our C-1500.
(Jeremy)>> Alright guys, well we have our LS into the shop here. We've got the transmission off of it and it's sitting on the engine stand, and we're gonna get ready to put it into our o-b-s Chevy truck, but there is one thing we know about this motor is we have no clue how many miles are on this thing. So, we're gonna have to tear into a little bit. It's got some oil leaks and some parts that are pretty much wore out, but that's where RockAuto comes into play. What we're gonna do is get a list together, and we'll jump online and get those parts ordered to take care of all the issues on this engine. The first thing we've got to do is just kinda dive into this. We'll start that list, and we'll go from there. We'll start by taking off the front accessory drive. Didn't make a big mess. That's a first. [ drill humming ]
(Jeremy)>> That's a little heavy. [ drill humming ]
(Jeremy)>> Then we'll move on to the intake. [ Music ] [ drill humming ] [ Music ]
(Jeremy)>> These down here for now. [ Music ] [ drill humming ]
(Jeremy)>> Up next, we'll loosen all the bolts for the heads and pick them off too. [ Music ] [ drill humming ]
(Jeremy)>> So my first initial thoughts on this is the engine doesn't look half bad. There's no broken pieces, but then again I'm no engine expert, but luckily for us we do have somebody right next door that is. [ Music ] Alright guys, well we have the heads off of it and like I said, I went down to Engine Power and got some reinforcements. So, we've got Frankie here that's gonna hopefully tell us about how many miles we think might be on this thing.
(Frankie)>> Well the good thing about these engines, LS's, is that they're known for going high miles and still being perfectly fine. Just looking at this one off the bat the top of the pistons look good. They're a little bit wet with oil. I don't see any scoring in the cylinder walls. So that means a ring is probably not broken. That all looks good. There's a little bit of oil consumption, but you're gonna have that on a high mileage engine. I would guess that this thing is probably over 100,000, maybe 100,000 to 150,000. It's hard to know. Did you guys look at it when you pulled it out of the car or no?
(Jeremy)>> There's no way of knowing right. There's no dash or nothing in them.
(Frankie)>> It still has cross hatch. I would say it sat a little bit, but that's not a big deal. Having cross hatch is a huge plus, and that's what these engines are really good about is that they usually maintain a cross hatch into the high miles. And that's why people are able to pull them out of junkyards and make them run, and they run great. I mean it turns over good right?
(Jeremy)>> Yeah, I had to turn it all over when I had to get the torque converter bolts out. So, I didn't hear anything. It didn't make any funny noises. I'm doing it by hand right now with no combustion in the engine.
(Frankie)>> Still that's a good sign that the bottom end turns over, and if you're gonna do like gaskets on this it might be worth pulling the pan just to make sure there's no chunks, cutting open the filter. That will tell you a lot about an engine. Actually cutting open the filter, seeing if there's any material, or what material is inside. That'll tell you what's wearing or not, but I think for what you guys are doing. Basically, a stock daily driver type deal, I think this is gonna be just fine. I mean once you clean it up and everything, I think it's gonna run good and it's gonna run, not a brand new engine but it'll run like a good engine.
(Jeremy)>> So we've got some cleaning up to do really, and that's really about it. We're gonna throw a bunch of new gaskets at it, and we've got a bunch of other parts to put at it, but from here I'll probably just flip this thing over, get the pan and stuff off. I know you guys have a big hot tank cleaner thing. So, we may run some parts down by you then.
(Frankie)>> It's a lot easier than doing it by hand.
(Jeremy)>> So I'm gonna get this apart a little bit more, and if I run into any issues we'll come down and grab you.
(Frankie)>> Yeah, we have a good selection of stock LS parts in case anything's broken, but I don't think you're gonna run into any problems. I think you're gonna be good.
(Jeremy)>> I think it'll be alright. That's the best thing about these engine stands.
(Frankie)>> Alright, that's my cue to leave.
(Jeremy)>> Now it's time to just make a mess. [ drill humming ]
(Jeremy)>> Alright, let's get this pan off of here. Take a good look at what's underneath it, if we can see anything. Any sludge or anything in here, or any big chunks. I don't see any chunks. It's a little sludgy but that's probably just more from not changing the oil, but I think we're good. So, from here I'll probably get this thing just cleaned up really good. Then we can start throwing some parts and pieces at it. Get it ready to set in our daily driver pickup.
(Jimmy)>> Now that we've cleaned up 20 years of dirt and grime on our engine we'll give it new life with some fresh components.
(Jimmy)>> Jeremy has a lot of the engine parts cleaned up, and we talked about what parts we needed to complete the engine, and also maybe some things that we forgot when we were out at the junkyard. So, we went to RockAuto dot com and put together a huge list and ordered everything that we needed. The nice thing about RockAuto is that you can order anything from an o-e style replacement, or if you want to do some upgrades you can do that too. Just depends on what you want to do and how much you want to spend. So, in our case we tore the engine down a little bit. So, we've got a full gasket set, which is a no brainer cause we want to make sure this thing is sealed up when we put it back together. We also got an oil pump, timing set, and we also got some external engine parts like power steering pump, water pump, starter, and an alternator. For right now we're just gonna focus on getting the long block back together. The first thing we're doing here is just replacing this oil restrictor that goes in the back of the block. These are super important because if this O-ring fails or if you just forget to put one in then you won't have any oil pressure at all, and it's always a good idea with these junkyard engines to go ahead and replace this. We'll get the old one out and then put this new one in. [ Music ] Important thing just to make sure you put some oil on the O-ring before you put the new one back in. Up next here is this cam retainer plate. In the block there's these two oil passages right here, and this O-ring helps contain all that oil. So, it's another one of these parts where it's cheap to replace and easy enough if you're down this far. So, it's cheap insurance. [ Music ] Alright timing chain on. Just make sure the timing marks are lined up. This might take a few tries depending on how many times you've done it. Also be sure to add some thread locker to make sure these bolts don't come out. We'll torque these to 26-pound feet. When installing the oil pump it's a good idea to go ahead and lubricate the internal parts for initial startup. [ Music ] Alright so now I'll move on to the bottom. Get the oil pan and pickup tube in here, and that'll be it. Flip back over and throw the rest on the top. We do have a new O-ring. That's a must. Just got to be real careful here when you're putting this in. If the O-ring gets pinched then it won't seal. So, you just want to take your time. Kinda watch it and make sure it's not pinched or anything, and that's it. Good to go! [ Music ] So, I'm actually gonna leave these bolts loose for now because the rear cover and the timing cover have bolts that go through the oil pan into the cover. So, it's just a little it easier to get those aligned the way they need to. Tighten those down and then tighten this down last. So, we've got our rear main cover and our timing cover here. It's a great idea to replace the seals. They're really cheap. Again, one of those parts you might as well do it while you're here. To get these out I find the best way is to just work your way gently with a screwdriver, tap it with a hammer. It's easy to crack this stuff. So just take it slow, and then to get the new one in just press it in. There we go. One thing to note with these seals. These ones in particular are Teflon. So, when you go to install this cover on the engine you do not need to oil it. [ Music ] With the timing cover it's a little bit different because as you can see this seal doesn't ride on the crank itself. It actually rides on the crankshaft pulley. So, we're gonna put these bolts in a little bit loose. We'll actually install the pulley so it kinda lines up the timing cover, and then we'll tighten everything down at the end. [ Music ] Finally, we are on to the top end. [ Music ] Put some bolts on it. [ Music ] We've got our cylinder heads on, and I've got the bolts down by hand. So now we need to torque them, and these are an o-e style head bolt. So, they require a torque for the pass, and the subsequent two passes are by angle. That's where our Matco Tools three-eighths drive electronic torque wrench comes into play because this can do angle and torque. The nice thing too is that it has nine presets. So, if you do a job over and over again, you can just go to your presets, do the job, and move on to the next one. Another great feature of this torque wrench is that there are three ways it tells you you've reached your torque spec by vibrating the handle, an audible beep, or the three stages of an l-e-d. [ Music ] After looking at our old rocker arms and seeing how worn out they were we opted to get a new set from RockAuto. [ beep ] [ beep ] [ beep ] [ beep ]
(Jimmy)>> We got this engine pretty much buttoned up and it looks so much better than it did when we got it out of the junkyard. Obviously we cleaned everything. All the new RockAuto parts, all that went on pretty smooth. So, I can't wait to get this thing in the truck and see what it sounds like when it's fired up. There's still a lot of parts that we need to put on here before we get going, but it's almost easier to do those things once we get it in there. So, looking pretty good.
(Jeremy)>> Up next, we'll show you a quick and easy way to upgrade your fuel system.
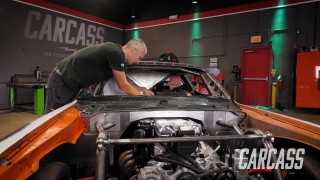
(Jimmy)>> We've got our junkyard engine and transmission in our Silverado now, which is a pretty familiar site for us because we've done this swap before. So, we've got our ICT billet swap mounts from Summit Racing, and we're actually able to use the stock transmission crossmember for our 4-L-60-E, which makes it super easy. I've got some other parts to throw on the front. So, I'm gonna start collecting a bunch of stuff.
(Jeremy)>> And to get this thing fired up we do have a lot of work to do. One of those is to take care of this big bunch of wiring, get all that hooked up, and the other side of that is the fuel side of things. Now with this being a 1996 Chevy pickup it originally came with a Vortec engine. It had a pretty good fuel pump in it that could handle some decent horsepower, but since we went to the LS side of things and that there is an off chance we may be adding even more horsepower we need to upgrade our fuel pump. So that means I've got to get this stock sending unit out of the tank. [ Music ] Now it's pretty obvious that the previous owner installed a new sending unit. So, this one comes out pretty easy. [ Music ] Get this out of here and get over to the table. We'll switch the pump out. Alright to do the fuel pump upgrade on our Chevy pickup we're gonna be using a kit that we got from FiTech. Now you guys can pick this kit up and it'll have everything you need to do the swap on your next project. It comes with the boot that goes around the pump. It comes with a sock, or the screen here. It comes with the pigtail so you can wire this thing in, and a 340 liter per hour fuel pump. Now this thing is more than capable of handling the horsepower of our stock LS, but it will also handle more horsepower like if we decide to add a turbocharger to this thing and get into a little bit of boost. This goes right over here into the stock sending unit. So, all I have to do is just swap these things out. [ Music ] Get rid of that and we'll get this off of here too. Alright put the new pump in, put the boot on the pump here, and slide this into place. Keep moving forward. [ Music ] Then wire it up. [ Music ] Alright that takes care of the wiring side of things. Last thing we'll go ahead and throw this screen on the bottom of the pump here and go put this back in the truck. [ Music ] Alright well that wraps up the fuel pump install, and that's also gonna wrap it up for us today. So, if you guys like anything you've seen check us out on our website, and we'll see you guys next time.
Show Full Transcript
(Jeremy)>> Today on Carcass we head out to a salvage yard to rescue an engine for our abandoned daily driver project.
(Jimmy)>> We'll get it back to the shop, tear it down, and give a quick refresh before dropping it back into our Chevy. [ Music ] [ engine revving ] [ Music ]
(Jeremy)>> Hey guys, welcome to Carcass. Well, we're out and about today. We're gonna go to some place a little special to pick up some pretty important parts for our next project.
(Jimmy)>> Yeah, so we're actually bringing back a previous project that you guys have seen before. It's a 1996 Chevy pickup, single cab short bed, which is one of our personal favorites. So, on that truck we did a little bit of body and paint work just to show you guys how to do that stuff, but now we're actually gonna bring it back and do kind of an original restoration if you will. So, on the outside we want to keep it pretty much stock looking, but drivetrain wise we're gonna upgrade it and we're going to get something from a newer Chevy pickup.
(Jeremy)>> So we're in our RockAuto Driveway Rescue van. It's packed full of tools. So, we're gonna go out to the salvage yard, pluck this engine and trans combo out of it. We're gonna load it in the van and get it all back to the shop. Once we're there we'll access what we've got. We'll jump on RockAuto dot com, figure out what we need, and get a bunch of stuff ordered and get this whole thing started and put together.
(Jimmy)>> And I've already looked a little bit, and RockAuto does offer some mild upgrade parts. So, depending on what we want to get into we could throw a little bit of a cam at it. Just depends on what we want to do, but otherwise RockAuto has everything we need to do a little bit of a freshen up for this thing and should get it on the road and it should drive pretty nice.
(Jeremy)>> And I think it's not too far up here. So, we'll get up here, unload everything, go out, find what we need, and get it back to the shop and get started.
(Jimmy)>> Let's find something! [ Music ]
(Jeremy)>> Alright man, I think all of the LS's, GM stuff, that's all in the back corner.
(Jimmy)>> Let's go grab it! [ Music ] We're at Express Pull-n-Save where they feature 2,000 cars and their inventory changes daily. [ Music ] We've been up and down a few rows already just checking things out, and we have quite a few options but we're looking for an engine that's a little more complete. Even already in this row there's a Yukon right here. There's a couple of Tahoes. We're just checking things out to see what we have.
(Jeremy)>> Let's see how much is there or not there.
(Jimmy)>> This one's got most of the front drive. Computer is here.
(Jeremy)> It's nice that the fender's off of it.
(Jimmy)>> It makes it easier to work on. Just two-wheel drive too. So that's a plus.
(Jeremy)>> It looks clean. The engine itself is very clean.
(Jimmy)>> Not a whole lot of grime and junk on it. Is this it?
(Jeremy)>> Yeah, I think this is our best bet.
(Jimmy)>> Let's do it man!
(Jeremy)>> Let's grab some tools. We'll get the core support off first, and then just dive into it. [ drill humming ] [ Music ]
(Jeremy)>> It's kinda heavy. [ drill humming ] [ Music ]
(Jeremy)>> The LS platform came around in the late '90's and has become an extremely popular swap. You can find these engines in multiple GM cars, trucks, and s-u-v's, and the aftermarket support for the LS is huge, and you can even make them build some pretty impressive horsepower. [ drill humming ] [ Music ]
(Jeremy)>> Okay, there's that one. [ Music ] [ drill humming ] [ Music ]
(Jeremy)>> Now we get the picker in here. Pick this thing up. [ Music ] Now imagine trying to do this when they didn't have this type of equipment in here.
(Jimmy)>> Or if you're by yourself.
(Jeremy)>> Yeah, you're screwed! [ Music ] [ hoist chain clicking ]
(Jeremy)>> That's how you pull a junkyard motor. Now we've just got to get it on a cart. [ hoist chain clicking ] [ Music ]
(Jeremy)>> How does it roll? It seems to roll okay. Not majorly flat tires but... [ Music ] That looks like he'll make it. [ Music ] Coming up, we get our junkyard LS into the shop and start tearing it down, getting it ready for its new life in our C-1500.
(Jeremy)>> Alright guys, well we have our LS into the shop here. We've got the transmission off of it and it's sitting on the engine stand, and we're gonna get ready to put it into our o-b-s Chevy truck, but there is one thing we know about this motor is we have no clue how many miles are on this thing. So, we're gonna have to tear into a little bit. It's got some oil leaks and some parts that are pretty much wore out, but that's where RockAuto comes into play. What we're gonna do is get a list together, and we'll jump online and get those parts ordered to take care of all the issues on this engine. The first thing we've got to do is just kinda dive into this. We'll start that list, and we'll go from there. We'll start by taking off the front accessory drive. Didn't make a big mess. That's a first. [ drill humming ]
(Jeremy)>> That's a little heavy. [ drill humming ]
(Jeremy)>> Then we'll move on to the intake. [ Music ] [ drill humming ] [ Music ]
(Jeremy)>> These down here for now. [ Music ] [ drill humming ]
(Jeremy)>> Up next, we'll loosen all the bolts for the heads and pick them off too. [ Music ] [ drill humming ]
(Jeremy)>> So my first initial thoughts on this is the engine doesn't look half bad. There's no broken pieces, but then again I'm no engine expert, but luckily for us we do have somebody right next door that is. [ Music ] Alright guys, well we have the heads off of it and like I said, I went down to Engine Power and got some reinforcements. So, we've got Frankie here that's gonna hopefully tell us about how many miles we think might be on this thing.
(Frankie)>> Well the good thing about these engines, LS's, is that they're known for going high miles and still being perfectly fine. Just looking at this one off the bat the top of the pistons look good. They're a little bit wet with oil. I don't see any scoring in the cylinder walls. So that means a ring is probably not broken. That all looks good. There's a little bit of oil consumption, but you're gonna have that on a high mileage engine. I would guess that this thing is probably over 100,000, maybe 100,000 to 150,000. It's hard to know. Did you guys look at it when you pulled it out of the car or no?
(Jeremy)>> There's no way of knowing right. There's no dash or nothing in them.
(Frankie)>> It still has cross hatch. I would say it sat a little bit, but that's not a big deal. Having cross hatch is a huge plus, and that's what these engines are really good about is that they usually maintain a cross hatch into the high miles. And that's why people are able to pull them out of junkyards and make them run, and they run great. I mean it turns over good right?
(Jeremy)>> Yeah, I had to turn it all over when I had to get the torque converter bolts out. So, I didn't hear anything. It didn't make any funny noises. I'm doing it by hand right now with no combustion in the engine.
(Frankie)>> Still that's a good sign that the bottom end turns over, and if you're gonna do like gaskets on this it might be worth pulling the pan just to make sure there's no chunks, cutting open the filter. That will tell you a lot about an engine. Actually cutting open the filter, seeing if there's any material, or what material is inside. That'll tell you what's wearing or not, but I think for what you guys are doing. Basically, a stock daily driver type deal, I think this is gonna be just fine. I mean once you clean it up and everything, I think it's gonna run good and it's gonna run, not a brand new engine but it'll run like a good engine.
(Jeremy)>> So we've got some cleaning up to do really, and that's really about it. We're gonna throw a bunch of new gaskets at it, and we've got a bunch of other parts to put at it, but from here I'll probably just flip this thing over, get the pan and stuff off. I know you guys have a big hot tank cleaner thing. So, we may run some parts down by you then.
(Frankie)>> It's a lot easier than doing it by hand.
(Jeremy)>> So I'm gonna get this apart a little bit more, and if I run into any issues we'll come down and grab you.
(Frankie)>> Yeah, we have a good selection of stock LS parts in case anything's broken, but I don't think you're gonna run into any problems. I think you're gonna be good.
(Jeremy)>> I think it'll be alright. That's the best thing about these engine stands.
(Frankie)>> Alright, that's my cue to leave.
(Jeremy)>> Now it's time to just make a mess. [ drill humming ]
(Jeremy)>> Alright, let's get this pan off of here. Take a good look at what's underneath it, if we can see anything. Any sludge or anything in here, or any big chunks. I don't see any chunks. It's a little sludgy but that's probably just more from not changing the oil, but I think we're good. So, from here I'll probably get this thing just cleaned up really good. Then we can start throwing some parts and pieces at it. Get it ready to set in our daily driver pickup.
(Jimmy)>> Now that we've cleaned up 20 years of dirt and grime on our engine we'll give it new life with some fresh components.
(Jimmy)>> Jeremy has a lot of the engine parts cleaned up, and we talked about what parts we needed to complete the engine, and also maybe some things that we forgot when we were out at the junkyard. So, we went to RockAuto dot com and put together a huge list and ordered everything that we needed. The nice thing about RockAuto is that you can order anything from an o-e style replacement, or if you want to do some upgrades you can do that too. Just depends on what you want to do and how much you want to spend. So, in our case we tore the engine down a little bit. So, we've got a full gasket set, which is a no brainer cause we want to make sure this thing is sealed up when we put it back together. We also got an oil pump, timing set, and we also got some external engine parts like power steering pump, water pump, starter, and an alternator. For right now we're just gonna focus on getting the long block back together. The first thing we're doing here is just replacing this oil restrictor that goes in the back of the block. These are super important because if this O-ring fails or if you just forget to put one in then you won't have any oil pressure at all, and it's always a good idea with these junkyard engines to go ahead and replace this. We'll get the old one out and then put this new one in. [ Music ] Important thing just to make sure you put some oil on the O-ring before you put the new one back in. Up next here is this cam retainer plate. In the block there's these two oil passages right here, and this O-ring helps contain all that oil. So, it's another one of these parts where it's cheap to replace and easy enough if you're down this far. So, it's cheap insurance. [ Music ] Alright timing chain on. Just make sure the timing marks are lined up. This might take a few tries depending on how many times you've done it. Also be sure to add some thread locker to make sure these bolts don't come out. We'll torque these to 26-pound feet. When installing the oil pump it's a good idea to go ahead and lubricate the internal parts for initial startup. [ Music ] Alright so now I'll move on to the bottom. Get the oil pan and pickup tube in here, and that'll be it. Flip back over and throw the rest on the top. We do have a new O-ring. That's a must. Just got to be real careful here when you're putting this in. If the O-ring gets pinched then it won't seal. So, you just want to take your time. Kinda watch it and make sure it's not pinched or anything, and that's it. Good to go! [ Music ] So, I'm actually gonna leave these bolts loose for now because the rear cover and the timing cover have bolts that go through the oil pan into the cover. So, it's just a little it easier to get those aligned the way they need to. Tighten those down and then tighten this down last. So, we've got our rear main cover and our timing cover here. It's a great idea to replace the seals. They're really cheap. Again, one of those parts you might as well do it while you're here. To get these out I find the best way is to just work your way gently with a screwdriver, tap it with a hammer. It's easy to crack this stuff. So just take it slow, and then to get the new one in just press it in. There we go. One thing to note with these seals. These ones in particular are Teflon. So, when you go to install this cover on the engine you do not need to oil it. [ Music ] With the timing cover it's a little bit different because as you can see this seal doesn't ride on the crank itself. It actually rides on the crankshaft pulley. So, we're gonna put these bolts in a little bit loose. We'll actually install the pulley so it kinda lines up the timing cover, and then we'll tighten everything down at the end. [ Music ] Finally, we are on to the top end. [ Music ] Put some bolts on it. [ Music ] We've got our cylinder heads on, and I've got the bolts down by hand. So now we need to torque them, and these are an o-e style head bolt. So, they require a torque for the pass, and the subsequent two passes are by angle. That's where our Matco Tools three-eighths drive electronic torque wrench comes into play because this can do angle and torque. The nice thing too is that it has nine presets. So, if you do a job over and over again, you can just go to your presets, do the job, and move on to the next one. Another great feature of this torque wrench is that there are three ways it tells you you've reached your torque spec by vibrating the handle, an audible beep, or the three stages of an l-e-d. [ Music ] After looking at our old rocker arms and seeing how worn out they were we opted to get a new set from RockAuto. [ beep ] [ beep ] [ beep ] [ beep ]
(Jimmy)>> We got this engine pretty much buttoned up and it looks so much better than it did when we got it out of the junkyard. Obviously we cleaned everything. All the new RockAuto parts, all that went on pretty smooth. So, I can't wait to get this thing in the truck and see what it sounds like when it's fired up. There's still a lot of parts that we need to put on here before we get going, but it's almost easier to do those things once we get it in there. So, looking pretty good.
(Jeremy)>> Up next, we'll show you a quick and easy way to upgrade your fuel system.
(Jimmy)>> We've got our junkyard engine and transmission in our Silverado now, which is a pretty familiar site for us because we've done this swap before. So, we've got our ICT billet swap mounts from Summit Racing, and we're actually able to use the stock transmission crossmember for our 4-L-60-E, which makes it super easy. I've got some other parts to throw on the front. So, I'm gonna start collecting a bunch of stuff.
(Jeremy)>> And to get this thing fired up we do have a lot of work to do. One of those is to take care of this big bunch of wiring, get all that hooked up, and the other side of that is the fuel side of things. Now with this being a 1996 Chevy pickup it originally came with a Vortec engine. It had a pretty good fuel pump in it that could handle some decent horsepower, but since we went to the LS side of things and that there is an off chance we may be adding even more horsepower we need to upgrade our fuel pump. So that means I've got to get this stock sending unit out of the tank. [ Music ] Now it's pretty obvious that the previous owner installed a new sending unit. So, this one comes out pretty easy. [ Music ] Get this out of here and get over to the table. We'll switch the pump out. Alright to do the fuel pump upgrade on our Chevy pickup we're gonna be using a kit that we got from FiTech. Now you guys can pick this kit up and it'll have everything you need to do the swap on your next project. It comes with the boot that goes around the pump. It comes with a sock, or the screen here. It comes with the pigtail so you can wire this thing in, and a 340 liter per hour fuel pump. Now this thing is more than capable of handling the horsepower of our stock LS, but it will also handle more horsepower like if we decide to add a turbocharger to this thing and get into a little bit of boost. This goes right over here into the stock sending unit. So, all I have to do is just swap these things out. [ Music ] Get rid of that and we'll get this off of here too. Alright put the new pump in, put the boot on the pump here, and slide this into place. Keep moving forward. [ Music ] Then wire it up. [ Music ] Alright that takes care of the wiring side of things. Last thing we'll go ahead and throw this screen on the bottom of the pump here and go put this back in the truck. [ Music ] Alright well that wraps up the fuel pump install, and that's also gonna wrap it up for us today. So, if you guys like anything you've seen check us out on our website, and we'll see you guys next time.


