
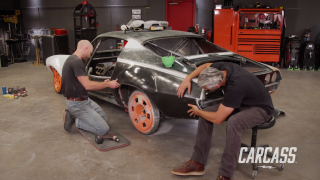
Carcass Featured Projects


Carcass Builds


Want more content like this?
Join the PowerNation Email NewsletterParts Used In This Episode

Matco Tools
MATCO Tools are the Official Tool Supplier to Carcass
The Industrial Depot
Tools, Hardware, Shop Supplies
Episode Transcript
(Jeremy)>> You're watching Powernation.
(Jeremy)>> Today on Carcass when upgrading to bigger wheels and tires you may need to make some room. We show you some easy and inexpensive ways to fix this problem in your own garage.
(Jimmy)>> Giving you tips and pointers that we use in our own shops. Plus we shine the light on how to restore old and faded out headlights. ♪ ♪ [ tires squealing ] ♪ ♪
(Jimmy)>> Hey guys, welcome to Carcass. Today we're gonna be doing stuff a little bit different than what we usually do. We're not gonna be doing any fab work and we're gonna be using a lot of tools that you probably already have in your garage.
(Jeremy)>> And we're gonna be taking care of some common issues that you guys run into when you start putting aftermarket parts on your trucks. One of those things being a bigger set of wheels and tires. Now this is our 2006 Dodge Ram TRX. This is a four wheel drive truck but it's also a front independent front suspension truck. So we're gonna be working solely in the front of this truck. We're gonna be installing a leveling kit, but the other truck, well that's just a little bit different.
(Jimmy)>> And this is our 2000 Ford F-250. This thing's gonna get a full lift kit and it's quite a bit different than the Ram. It has a solid axle and leaf spring setup in the front. So the parts and pieces are different but we will be working in the front and back.
(Jeremy)>> And like you said we're gonna be doing this with basic hand tools, maybe a couple of air tools. Stuff that you guys probably have already at home in your garages or you can rent from a local auto parts store, and we're gonna be working on this stuff on the ground like we do at home in our own garages. So no hoist for us today. We're gonna get started with a jack and a couple of jack stands. ♪ ♪
(Jimmy)>> Alright! ♪ ♪ Keep going up a little more if you can. How about that? Try that?
(Jeremy)>> Coming down.
(Jimmy)>> That's good. ♪ ♪ We do use this truck sometimes as a chase truck when we're out on the trail. So it does see some action, and at ride height the tires don't really have a problem getting into the bumper and the inner fender, but once we're out on the trails and we get up on some rocks the suspension can compress and then we do get that issue. So that's why we're putting a leveling kit on it. ♪ ♪ With the wheel and tire out of the way I can start taking off the nuts that hold on our strut. ♪ ♪ Followed by the nut holding on the upper ball joint. ♪ ♪ The tie rod and sway bar nuts are next. [ ratchet clicking ]
(Jimmy)>> I'll lower the jack so I can knock the upper ball joint loose, which is easily done with a couple of hits of a hammer. I'll do the same thing with our tie rod. ♪ ♪ With the suspension out of the way we can loosen the lower strut bolt and remove it. Get this dude out, get ready for the new stuff. ♪ ♪ I'll leave you with the fun job while I take off the other side.
(Jeremy)>> Alrighty, to level out the front of our Dodge we're gonna be using some spacers, and depending on what you guys are working on there's different types of spacers. One set goes on the top side of your strut. There's another different style that goes between the bottom side of your strut and your lower control arm but what we did is we went to Summit Racing and picked up a Skyjacker leveling kit. Now the kit uses just a couple of spacers that slide over the top of the strut that way and that gives us the height we're looking for. Now I have to use the original spring and strut bearing off of our stock strut to pull this off. Now to get this apart there's a couple of different ways you guys can do that as well. You can go to your local auto parts store and pick up a set of manual spring compressors. Now you can either rent or buy these but this is one option, or you can do what I do. Take the whole assembly into your repair shop and they will use a strut spring compressor. Now this is a great option and the cost isn't that expensive if you guys choose to go this route. What I have to do is get this installed into this assembly here. We've got to pull this all down. We'll get our new kit put onto these springs and then we'll level out our Dodge. Using a strut compressor like this one is a lot safer than the basic spring compressors. You want to keep that in mind when making your decision. We just want to compress it just enough to take the load off the strut plate. Then take the nut off and remove the strut. Now the Skyjacker struts will automatically give us a one inch lift but they also send these spacers, which are half inch a piece. So by installing one of them that's an inch and a half of lift. Installing two of them that's two inches, and that's exactly what we're going for. We'll also install the spring seat, and then I've got to rotate the shaft to extend the shock, and then we'll put on our bump stop. Before installing your strut it's a good idea to check your strut mounting location in conjunction with the lower control arm on the truck. That way you won't have to fight it when you reinstall it. ♪ ♪ [ drill humming ] ♪ ♪
(Jeremy)>> With everything tightened up we'll go put this back on the truck.
(Jimmy)>> We finish installing our leveling kit on our Dodge.
(Jeremy)>> Then spring into action lifting our F-250.
(Jimmy)>> Jeremy's got our struts all back together now, and while this thing is apart it's a good idea to check all the wearable items that might need to be replaced. I was looking around our truck and noticed the outer tie rod end is a complete piece of junk. So I went ahead and replaced it. Now I've just got to put the strut back in and everything should go back together in the reverse order we took it out. ♪ ♪ [ drill humming ]
(Jimmy)>> This is one of the most common upgrades to do to your truck, and if you're looking to save a few bucks you can spend a couple of hours doing it in your garage on a Saturday rather than taking it to a shop. ♪ ♪ Last step! ♪ ♪ Okay! ♪ ♪ It may not look like much but it will definitely give us some extra clearance on the trails and also adds a little more aggressive look to our Dodge.
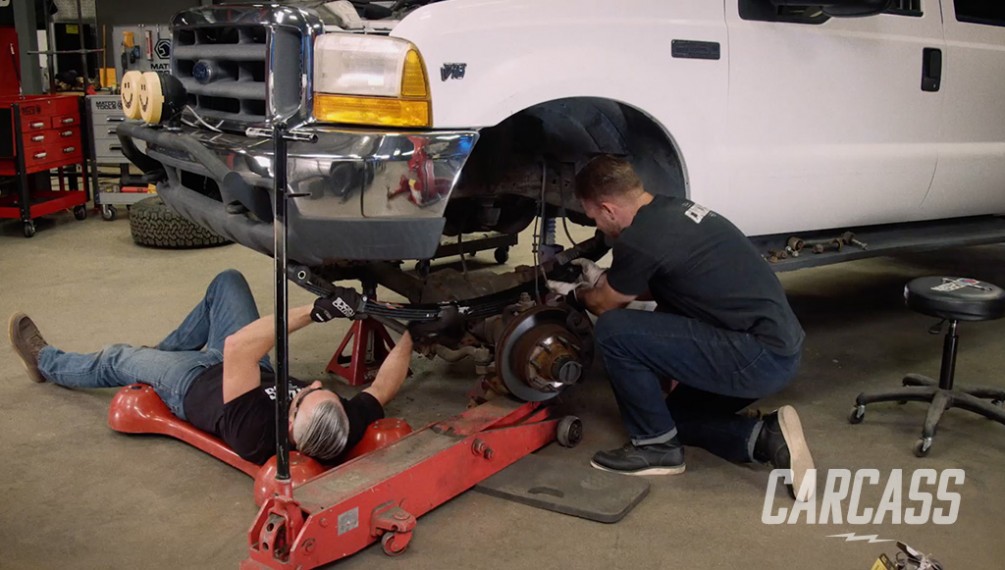
(Jeremy)>> Over at the Ford it's a little bit different than the Dodge in that this is a solid front axle truck with four leaf springs all the way around it. Now we're gonna be lifting this truck, and the way we're gonna pull that off is we're just gonna be replacing the leaf springs.
(Jimmy)>> And we're gonna do a set of upgraded brakes and a new set of wheels and tires while we're at it. ♪ ♪
(Jeremy)>> With the truck sitting on a set of jack stands we'll take off the wheels and tires. ♪ ♪ Now we can start removing our old suspension, beginning with the shock. Then move on to the sway bar link. The U-bolts are next. Dang, short work of that! [ drill humming ]
(Jeremy)>> Slowly drop the axle away from the spring. Let's see if I can get the bolts out of the leaf spring here. She's a little stuck. We'll give her a little love. Let's see how much brute force this takes to get this free. Oh come on Betsy. You get your workout in for the day here. Sometimes it helps too if you can jam your knee up against something underneath the truck here. Gives you a little more leverage to pull with. Workout your arms for the day that's for sure. Woo, see if I can go both now. So the bolt's spinning freely. So that means that it's not seized into the bushing inside the leaf spring. Super common on doing older trucks, but we're good on the front side. Now I've just got to worry about the back side. Alright, oh this one's way easier. I can use the gun for this one. ♪ Jimmy can you help me pull this leaf spring out? Get the bolts out of here once. ♪ ♪ Heavy! ♪ ♪ Now that we have everything torn down the last thing we have to do is get rid of the factory track bar bracket because the lift we're installing comes with a new one. ♪ ♪ [ drill humming ] ♪ ♪
(Jeremy)>> Coming up, lifting our Ford turns into a day at the gym.
♪
(Jeremy)>> With all the parts and pieces out from underneath the Ford it's time to install the lift. Now we went with a Skyjacker setup and it came with a set of leaf springs for the front and the rear, but we also picked up a track bar relocation bracket, a dropped pitman arm. We got ourselves a bunch of shocks and all the necessary hardware we need to install this thing. Now we got our setup from Summit Racing and this is a four inch lift. Now they also have lifts ranging from six to eight inches. This all installs pretty simple. Where we're gonna start is with the pitman arm. ♪ ♪ [ drill humming ]
(Jeremy)>> I'll put that track bar relocation bracket in the stock location. The other bracket I'm gonna use the stock hardware too. A little tricky to get in there but we'll get it. Those two, I've got one more on the crossmember. ♪ With our new brackets in place we'll tighten them down. ♪ ♪ [ drill humming ]
(Jeremy)>> Now try to get the track bar up here. It's a little tight in the bushing but we'll get it in there. [ drill humming ]
(Jeremy)>> Next we'll do the drag link and get that in there. ♪ ♪ We'll snug this down and make sure you don't forget the cotter key. ♪ ♪
(Jimmy)>> Alright you ready for the spring?
(Jeremy)>> Yeah, I'll try to muscle it in here once. ♪ ♪ Now we'll just snug these up for now. Once we get the suspension set back on the ground under load is when we'll come down and tighten everything up for the final time. ♪ ♪ So a little tip here in the back. If you loosen up the bolt or the upper bolt on the shackle you can slide that shackle forward a little bit to accept the new leaf spring. It makes it a lot easier to slide everything together. ♪ ♪ Try to hold this up there then. Oh perfect, look at that!
(Jimmy)>> Nice fit!
(Jeremy)>> Yeah it fits good. Now we can install the stock leaf spring bracket with the new u-bolts that came in our kit. I'll come back and torque those later. Next is our new sway bar links. ♪ ♪ Now the shocks! ♪ ♪ [ drill humming ]
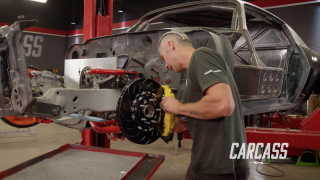
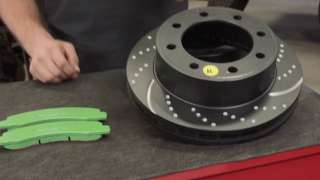
(Jimmy)>> We've got our lift installed now and to finish out the front we're gonna be doing a brake upgrade. I've already got this corner torn apart. So to put it back together we're gonna be going with EBC's 3-GD series sport rotors that are dimpled and slotted and precision machined from premium quality castings. These are able to expel dust, dirt, and gases, which help the rotor maintain a flat and parallel pad wear for better pad contact and better braking. For pads we're going with EBC's Green Stuff 6,000 series organic brake pads, which are great for four by four use and applications with heavy braking such as towing. We might do a little bit of that with this guy, and so the first thing we've got to do is put the rotors on. ♪ ♪ When installing new brake pads you want to make sure that the caliper piston is compressed completely. This can be done with a c-clamp or a big set of channel locks. This'll make it easier to slide it back on the rotor. ♪ [ drill humming ]
(Jimmy)>> We add the final touches to our lift and show you a quick way to restore weathered headlights.
(Jeremy)>> For our lift kit in the back it's basically the same as the front. It's just a little bit simpler because we don't have the steering to deal with. Now we already went ahead and took care of the other side. So what we've gotta do is get rid of this spring. We'll replace it with our lift spring. Then we'll do a little quick brake upgrade, set this thing on the ground, see what it looks like. [ drill humming ] ♪ ♪
(Jeremy)>> Alright Jimmy you want to come and grab this. ♪ ♪
(Jimmy)>> I'll get the other shackle on it.
(Jeremy)>> Definitely heavy. [ drill humming ]
(Jeremy)>> Put the overload back on it. The u-bolt plate and u-bolts. ♪ ♪ [ drill humming ]
(Jeremy)>> We'll torque all of our u-bolts down to factory spec, which is 185 foot pounds. Oh that's a lot of torque. Alright lets get the shock in here and wrap it up by doing some brakes. [ drill humming ] ♪ ♪
(Jimmy)>> Now we'll get the old stuff out so we can put on some new pads and a new rotor. Just like the front we went with EBC GDSport rotors and 6,000 series pads. ♪ ♪ Alright that wraps it up.
(Jeremy)>> The leveling kit that we got for the Dodge and the lift kit that we got for the Ford we got those parts from Summit Racing along with all the brakes for the truck and this set of wheels and tires. These are 17x9 Method Racing MR-315 machined aluminum wheels. We wrapped those in a set of nitto ridge grappler tires. We're gonna get these set underneath the truck and see what this thing looks like. [ drill humming ]
(Jeremy)>> It's amazing how a simple lift can really change the attitude and the look of a truck..
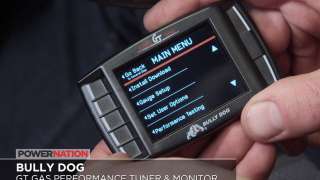
(Jimmy)>> Our trucks are almost done and there's just one or two more things we've got to do before we get them out of the shop, and that one thing is to adjust for our new tire size so that our speedo reads correctly. One way to do that is to use a programmer or a tuner, and the one that we're using is a GT gas tuner that we got from Bully Dog. Not only will it let us adjust our speedo for our bigger tire size. It will also unlock horsepower and torque, let us disable our traction control. And you can check clear those pesky trouble codes along with many other things. It has pre-loaded tunes and a wide variety of hauling and off road features. If you're looking for a tuner or programmer go check out Bully Dog's full line of products.
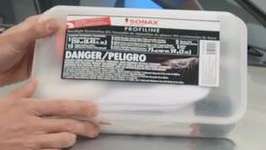
(Jeremy)> Another thing you guys should do before you hit the road is adjust your headlights after you put a lift and level kit in. Now since we were up front we noticed that the headlights were extremely faded out from sitting in the sun. Now you could just go ahead and replace these but that could get pretty expensive. Another option is to buff them out, and we're gonna be doing that using a Sonax headlight restoration kit, and this thing is pretty simple to use. So the first thing we're gonna do after we tape the headlights off is we're just gonna spray them down with a little bit of water and then we'll use the provided p-ball with 1,000 grit sand paper and we'll just start sanding across the headlights. Try to get rid of some of that corrosion and the faded out parts so we can bring these things back so they look like brand new. Then we'll finish it up with 2,000 grit, and then wipe it off with a clean microfiber cloth. Now we'll apply the Sonax headlight polish onto a slightly wet lamb skin pad, and polish it out with the polisher until the plastic is clear. The more time you spend on each step the better the results are gonna be. ♪ Alright, let's take a look and see what it looks like. So the last step is to apply the Sonax Profiline headlight protector. Now this will create a shell and keep our headlights looking brand new. We'll apply two coats letting it dry in between. Then we'll polish it out with a clean microfiber cloth. This should protect our headlights for some time.
(Jimmy)>> It's amazing once you clean you realize how dirty they were.
(Jeremy)>> Yeah this turned out and the lift and level kit look amazing as well. This is just kind of a cherry on top.
(Jimmy)>> Well if you guys want to learn more about these builds you can go to Powernation TV dot com and we also have new build pages for the tow truck and project Junk Mail. So you can go there to check them out as well.
(Jeremy)>> But we'll see you guys next time. Tape that off I'll finish this side.
Show Full Transcript
(Jeremy)>> Today on Carcass when upgrading to bigger wheels and tires you may need to make some room. We show you some easy and inexpensive ways to fix this problem in your own garage.
(Jimmy)>> Giving you tips and pointers that we use in our own shops. Plus we shine the light on how to restore old and faded out headlights. ♪ ♪ [ tires squealing ] ♪ ♪
(Jimmy)>> Hey guys, welcome to Carcass. Today we're gonna be doing stuff a little bit different than what we usually do. We're not gonna be doing any fab work and we're gonna be using a lot of tools that you probably already have in your garage.
(Jeremy)>> And we're gonna be taking care of some common issues that you guys run into when you start putting aftermarket parts on your trucks. One of those things being a bigger set of wheels and tires. Now this is our 2006 Dodge Ram TRX. This is a four wheel drive truck but it's also a front independent front suspension truck. So we're gonna be working solely in the front of this truck. We're gonna be installing a leveling kit, but the other truck, well that's just a little bit different.
(Jimmy)>> And this is our 2000 Ford F-250. This thing's gonna get a full lift kit and it's quite a bit different than the Ram. It has a solid axle and leaf spring setup in the front. So the parts and pieces are different but we will be working in the front and back.
(Jeremy)>> And like you said we're gonna be doing this with basic hand tools, maybe a couple of air tools. Stuff that you guys probably have already at home in your garages or you can rent from a local auto parts store, and we're gonna be working on this stuff on the ground like we do at home in our own garages. So no hoist for us today. We're gonna get started with a jack and a couple of jack stands. ♪ ♪
(Jimmy)>> Alright! ♪ ♪ Keep going up a little more if you can. How about that? Try that?
(Jeremy)>> Coming down.
(Jimmy)>> That's good. ♪ ♪ We do use this truck sometimes as a chase truck when we're out on the trail. So it does see some action, and at ride height the tires don't really have a problem getting into the bumper and the inner fender, but once we're out on the trails and we get up on some rocks the suspension can compress and then we do get that issue. So that's why we're putting a leveling kit on it. ♪ ♪ With the wheel and tire out of the way I can start taking off the nuts that hold on our strut. ♪ ♪ Followed by the nut holding on the upper ball joint. ♪ ♪ The tie rod and sway bar nuts are next. [ ratchet clicking ]
(Jimmy)>> I'll lower the jack so I can knock the upper ball joint loose, which is easily done with a couple of hits of a hammer. I'll do the same thing with our tie rod. ♪ ♪ With the suspension out of the way we can loosen the lower strut bolt and remove it. Get this dude out, get ready for the new stuff. ♪ ♪ I'll leave you with the fun job while I take off the other side.
(Jeremy)>> Alrighty, to level out the front of our Dodge we're gonna be using some spacers, and depending on what you guys are working on there's different types of spacers. One set goes on the top side of your strut. There's another different style that goes between the bottom side of your strut and your lower control arm but what we did is we went to Summit Racing and picked up a Skyjacker leveling kit. Now the kit uses just a couple of spacers that slide over the top of the strut that way and that gives us the height we're looking for. Now I have to use the original spring and strut bearing off of our stock strut to pull this off. Now to get this apart there's a couple of different ways you guys can do that as well. You can go to your local auto parts store and pick up a set of manual spring compressors. Now you can either rent or buy these but this is one option, or you can do what I do. Take the whole assembly into your repair shop and they will use a strut spring compressor. Now this is a great option and the cost isn't that expensive if you guys choose to go this route. What I have to do is get this installed into this assembly here. We've got to pull this all down. We'll get our new kit put onto these springs and then we'll level out our Dodge. Using a strut compressor like this one is a lot safer than the basic spring compressors. You want to keep that in mind when making your decision. We just want to compress it just enough to take the load off the strut plate. Then take the nut off and remove the strut. Now the Skyjacker struts will automatically give us a one inch lift but they also send these spacers, which are half inch a piece. So by installing one of them that's an inch and a half of lift. Installing two of them that's two inches, and that's exactly what we're going for. We'll also install the spring seat, and then I've got to rotate the shaft to extend the shock, and then we'll put on our bump stop. Before installing your strut it's a good idea to check your strut mounting location in conjunction with the lower control arm on the truck. That way you won't have to fight it when you reinstall it. ♪ ♪ [ drill humming ] ♪ ♪
(Jeremy)>> With everything tightened up we'll go put this back on the truck.
(Jimmy)>> We finish installing our leveling kit on our Dodge.
(Jeremy)>> Then spring into action lifting our F-250.
(Jimmy)>> Jeremy's got our struts all back together now, and while this thing is apart it's a good idea to check all the wearable items that might need to be replaced. I was looking around our truck and noticed the outer tie rod end is a complete piece of junk. So I went ahead and replaced it. Now I've just got to put the strut back in and everything should go back together in the reverse order we took it out. ♪ ♪ [ drill humming ]
(Jimmy)>> This is one of the most common upgrades to do to your truck, and if you're looking to save a few bucks you can spend a couple of hours doing it in your garage on a Saturday rather than taking it to a shop. ♪ ♪ Last step! ♪ ♪ Okay! ♪ ♪ It may not look like much but it will definitely give us some extra clearance on the trails and also adds a little more aggressive look to our Dodge.
(Jeremy)>> Over at the Ford it's a little bit different than the Dodge in that this is a solid front axle truck with four leaf springs all the way around it. Now we're gonna be lifting this truck, and the way we're gonna pull that off is we're just gonna be replacing the leaf springs.
(Jimmy)>> And we're gonna do a set of upgraded brakes and a new set of wheels and tires while we're at it. ♪ ♪
(Jeremy)>> With the truck sitting on a set of jack stands we'll take off the wheels and tires. ♪ ♪ Now we can start removing our old suspension, beginning with the shock. Then move on to the sway bar link. The U-bolts are next. Dang, short work of that! [ drill humming ]
(Jeremy)>> Slowly drop the axle away from the spring. Let's see if I can get the bolts out of the leaf spring here. She's a little stuck. We'll give her a little love. Let's see how much brute force this takes to get this free. Oh come on Betsy. You get your workout in for the day here. Sometimes it helps too if you can jam your knee up against something underneath the truck here. Gives you a little more leverage to pull with. Workout your arms for the day that's for sure. Woo, see if I can go both now. So the bolt's spinning freely. So that means that it's not seized into the bushing inside the leaf spring. Super common on doing older trucks, but we're good on the front side. Now I've just got to worry about the back side. Alright, oh this one's way easier. I can use the gun for this one. ♪ Jimmy can you help me pull this leaf spring out? Get the bolts out of here once. ♪ ♪ Heavy! ♪ ♪ Now that we have everything torn down the last thing we have to do is get rid of the factory track bar bracket because the lift we're installing comes with a new one. ♪ ♪ [ drill humming ] ♪ ♪
(Jeremy)>> Coming up, lifting our Ford turns into a day at the gym.
♪
(Jeremy)>> With all the parts and pieces out from underneath the Ford it's time to install the lift. Now we went with a Skyjacker setup and it came with a set of leaf springs for the front and the rear, but we also picked up a track bar relocation bracket, a dropped pitman arm. We got ourselves a bunch of shocks and all the necessary hardware we need to install this thing. Now we got our setup from Summit Racing and this is a four inch lift. Now they also have lifts ranging from six to eight inches. This all installs pretty simple. Where we're gonna start is with the pitman arm. ♪ ♪ [ drill humming ]
(Jeremy)>> I'll put that track bar relocation bracket in the stock location. The other bracket I'm gonna use the stock hardware too. A little tricky to get in there but we'll get it. Those two, I've got one more on the crossmember. ♪ With our new brackets in place we'll tighten them down. ♪ ♪ [ drill humming ]
(Jeremy)>> Now try to get the track bar up here. It's a little tight in the bushing but we'll get it in there. [ drill humming ]
(Jeremy)>> Next we'll do the drag link and get that in there. ♪ ♪ We'll snug this down and make sure you don't forget the cotter key. ♪ ♪
(Jimmy)>> Alright you ready for the spring?
(Jeremy)>> Yeah, I'll try to muscle it in here once. ♪ ♪ Now we'll just snug these up for now. Once we get the suspension set back on the ground under load is when we'll come down and tighten everything up for the final time. ♪ ♪ So a little tip here in the back. If you loosen up the bolt or the upper bolt on the shackle you can slide that shackle forward a little bit to accept the new leaf spring. It makes it a lot easier to slide everything together. ♪ ♪ Try to hold this up there then. Oh perfect, look at that!
(Jimmy)>> Nice fit!
(Jeremy)>> Yeah it fits good. Now we can install the stock leaf spring bracket with the new u-bolts that came in our kit. I'll come back and torque those later. Next is our new sway bar links. ♪ ♪ Now the shocks! ♪ ♪ [ drill humming ]
(Jimmy)>> We've got our lift installed now and to finish out the front we're gonna be doing a brake upgrade. I've already got this corner torn apart. So to put it back together we're gonna be going with EBC's 3-GD series sport rotors that are dimpled and slotted and precision machined from premium quality castings. These are able to expel dust, dirt, and gases, which help the rotor maintain a flat and parallel pad wear for better pad contact and better braking. For pads we're going with EBC's Green Stuff 6,000 series organic brake pads, which are great for four by four use and applications with heavy braking such as towing. We might do a little bit of that with this guy, and so the first thing we've got to do is put the rotors on. ♪ ♪ When installing new brake pads you want to make sure that the caliper piston is compressed completely. This can be done with a c-clamp or a big set of channel locks. This'll make it easier to slide it back on the rotor. ♪ [ drill humming ]
(Jimmy)>> We add the final touches to our lift and show you a quick way to restore weathered headlights.
(Jeremy)>> For our lift kit in the back it's basically the same as the front. It's just a little bit simpler because we don't have the steering to deal with. Now we already went ahead and took care of the other side. So what we've gotta do is get rid of this spring. We'll replace it with our lift spring. Then we'll do a little quick brake upgrade, set this thing on the ground, see what it looks like. [ drill humming ] ♪ ♪
(Jeremy)>> Alright Jimmy you want to come and grab this. ♪ ♪
(Jimmy)>> I'll get the other shackle on it.
(Jeremy)>> Definitely heavy. [ drill humming ]
(Jeremy)>> Put the overload back on it. The u-bolt plate and u-bolts. ♪ ♪ [ drill humming ]
(Jeremy)>> We'll torque all of our u-bolts down to factory spec, which is 185 foot pounds. Oh that's a lot of torque. Alright lets get the shock in here and wrap it up by doing some brakes. [ drill humming ] ♪ ♪
(Jimmy)>> Now we'll get the old stuff out so we can put on some new pads and a new rotor. Just like the front we went with EBC GDSport rotors and 6,000 series pads. ♪ ♪ Alright that wraps it up.
(Jeremy)>> The leveling kit that we got for the Dodge and the lift kit that we got for the Ford we got those parts from Summit Racing along with all the brakes for the truck and this set of wheels and tires. These are 17x9 Method Racing MR-315 machined aluminum wheels. We wrapped those in a set of nitto ridge grappler tires. We're gonna get these set underneath the truck and see what this thing looks like. [ drill humming ]
(Jeremy)>> It's amazing how a simple lift can really change the attitude and the look of a truck..
(Jimmy)>> Our trucks are almost done and there's just one or two more things we've got to do before we get them out of the shop, and that one thing is to adjust for our new tire size so that our speedo reads correctly. One way to do that is to use a programmer or a tuner, and the one that we're using is a GT gas tuner that we got from Bully Dog. Not only will it let us adjust our speedo for our bigger tire size. It will also unlock horsepower and torque, let us disable our traction control. And you can check clear those pesky trouble codes along with many other things. It has pre-loaded tunes and a wide variety of hauling and off road features. If you're looking for a tuner or programmer go check out Bully Dog's full line of products.
(Jeremy)> Another thing you guys should do before you hit the road is adjust your headlights after you put a lift and level kit in. Now since we were up front we noticed that the headlights were extremely faded out from sitting in the sun. Now you could just go ahead and replace these but that could get pretty expensive. Another option is to buff them out, and we're gonna be doing that using a Sonax headlight restoration kit, and this thing is pretty simple to use. So the first thing we're gonna do after we tape the headlights off is we're just gonna spray them down with a little bit of water and then we'll use the provided p-ball with 1,000 grit sand paper and we'll just start sanding across the headlights. Try to get rid of some of that corrosion and the faded out parts so we can bring these things back so they look like brand new. Then we'll finish it up with 2,000 grit, and then wipe it off with a clean microfiber cloth. Now we'll apply the Sonax headlight polish onto a slightly wet lamb skin pad, and polish it out with the polisher until the plastic is clear. The more time you spend on each step the better the results are gonna be. ♪ Alright, let's take a look and see what it looks like. So the last step is to apply the Sonax Profiline headlight protector. Now this will create a shell and keep our headlights looking brand new. We'll apply two coats letting it dry in between. Then we'll polish it out with a clean microfiber cloth. This should protect our headlights for some time.
(Jimmy)>> It's amazing once you clean you realize how dirty they were.
(Jeremy)>> Yeah this turned out and the lift and level kit look amazing as well. This is just kind of a cherry on top.
(Jimmy)>> Well if you guys want to learn more about these builds you can go to Powernation TV dot com and we also have new build pages for the tow truck and project Junk Mail. So you can go there to check them out as well.
(Jeremy)>> But we'll see you guys next time. Tape that off I'll finish this side.


