
Carcass Featured Projects


Carcass Builds


Want more content like this?
Join the PowerNation Email NewsletterParts Used In This Episode
Gearstar Performance Transmissions
Transmission
Holley
Holley Sniper EFI Carburetor
Matco Tools
MATCO Tools are the Official Tool Supplier to PowerNation
The Industrial Depot
Tools, Hardware, Shop Supplies
Episode Transcript
(Jimmy)>> You're watching Powernation!
(Jimmy)>> Today on Carcass we hear our 630 horse powerhouse roar between the frame rails.
(Jeremy)>> And we bury our Willys wagon in the mud.
(Jimmy)>> That's right, with a few cuts here and a few welds there this bad boy is ready to get dirty. [ MUSIC ]
(Narrator)>> When you want to build something different you turn to Carcass. They transform cars and trucks into one of a kind builds. From street to mud, if you dream it they can build it. This is Carcass, a non-traditional speed shop. [ MUSIC ]
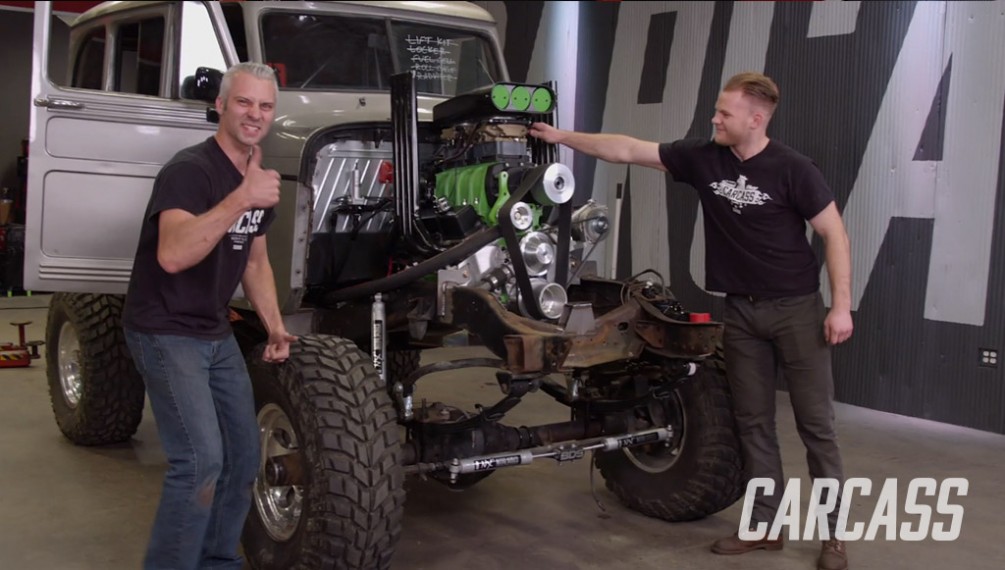
(Jimmy)>> This is our Chevy M-1010 military ambulance chassis. It started with a big ambo box out back and a Chevy truck cab out front, but we've made a lot of changes to transform this tough chassis into a mud monster.
(Jeremy)>> That's right we sliced over two feet out of the frame, added some fish plates, and boxed it in for strength. We added some custom body mounts and got the first look of our Willys body sitting on top.
(Jimmy)>> With the dream coming alive we gutted the interior pulling up the carpet, trashing the rat's nest of wiring, and removed the chicken wire firewall.
(Jeremy)>> Then we got to work upgrading our suspension and our front axle. We added an eight inch lift to give us more ground clearance and an Eaton E-locker to give us true four wheel drive.
(Jimmy)>> Inside the cab we added a fuel cell in the back and fabbed up a pretty basic roll cage, which allowed us to mount a radiator in the window.
(Jeremy)>> With our fuel and cooling system in place we're now ready to drop the drivetrain in our M-1010 chassis.
(Jimmy)>> Our engine is a 383 stroker small block Chevy with a roots style blower. It pushes out a whopping 630 horsepower and 532 pound feet of torque.
(Jeremy)>> Our goal was to back this new powerhouse up with the original turbo 400 transmission and our 208 transfer case but reverse went out on us in the parking lot. So we sent the whole setup off to Gear Star for a complete rebuild so it can withstand all of the horses our power plant can throw at it.
(Jimmy)>> If we use the stock engine mounts our engine and transmission will sit way too far forward in relation to our Willys body. So we're gonna use an engine plate and a mid-plate, which essentially lets us put our drivetrain wherever we want.
(Jeremy)>> The mounting solution we're using is from Summit Racing, and since it includes a mid-plate we're gonna add a spacer between the crankshaft and the flex plate. And then we'll just install the flex plate like normal, making sure we add blue Permatex thread locker to the bolts and torqueing them down. [ torque wrench clicking ]
(Jimmy)>> With the engine supported by the hoist we can remove the cart it was sitting on, which allows us to line up the mid-plate with the back of the engine.
(Jeremy)>> Keep coming! Slowing down!
(Jimmy)>> We'll line up the bell housing and the transmission with the holes on the back of the engine. Then we'll add bolts marrying the two together. [ drill humming ]
(Jeremy)>> Alright you ready? I'll spin the engine over. Turning the engine over with a ratchet allows us to align the flex plate with the torque converter. Then we'll just start the bolts by hand, snug them up with an impact, and torque them down to 40 pound feet.
(Jimmy)>> To install the motor plate we'll remove the water pump. With it out of the way we'll add the plate using the bottom holes to hold it in place. Then the water pump is re-installed sharing the same bolt holes as the motor plate.
(Jeremy)>> Alright a little bit on the throttle.
(Jimmy)>> Now we're ready to test fit our engine. We'll lower it into place until it touches the frame rails.
(Jeremy)>> Almost, there we go. Okay to get this thing centered so we know how much we should be cutting off. That's 14 and three quarter-ish. That's actually about 14 and five-eighths. So that's super close so we'll called that centered.
(Jimmy)>> How's the front look?
(Jeremy)>> We'll go see. That should be hopefully centered. Got two feet across, and if I eyeball it that actually looks super, super close. And the plates, look right from side to side. So put a mark here and I'll do the same thing on the other side, and we'll just trim right there.
(Jimmy)>> These are universal mid and engine plates, which need to be trimmed down to fit our frame rails. The measurement doesn't have to be exact but we need just enough clearance to fit between the frame rails centering the crank pulley and the tail shaft.
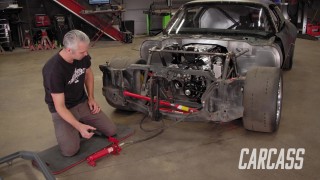
(Jeremy)>> With a quick measurement up front we now know we have enough room to clear the grille shell, and Jimmy, well he came up with an easy mounting solution out back.
(Jimmy)>> How far apart are those crossmember bolts?
(Jeremy)>> They're three inches. That's gonna work. With the location that we've picked for the drivetrain we're still gonna be able to use the stock transmission crossmember, which is great because that's gonna save us quite a bit of time. All we have to do is slide it back one bolt hole, and then just drill another hole in the frame, and then we'll just use all the stock hardware to put it back on.
(Jimmy)>> Securing the transmission to the crossmember will help us make the motor mounts because it'll locate everything front to back. With the transmission locked in we're gonna get started on the engine mount. Making a template will make sure that everything's gonna fit.
(Jeremy)>> We're making these brackets out of three-sixteenths steel, and the Edwards Iron Worker will get the job done quickly. We'll first cut out a chunk on the shear. Then we'll move over to the notcher doing some very specific cuts to give this bracket its shape.
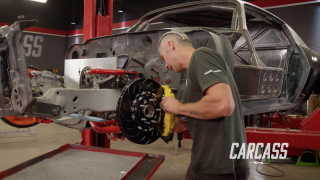
(Jimmy)>> We'll clean that up with a belt sander before bringing it back to the engine. With it clamped in place we'll be able to tack it in, followed by drilling a hole through the engine plate and the fabricated mount.
(Jeremy)>> We'll add some grade eight hardware and then just tighten them down, and then we'll make these engine mounts a permanent part of our chassis.
(Jimmy)>> The mid-plate gets the same treatment, rinsing and repeating the process to wrangle those 630 horses between our two frame rails.
(Jeremy)>> Up next our Willys body finds its final resting place.
(Jimmy)>> Plus we fill this giant space with a custom firewall. You're watching Carcass.
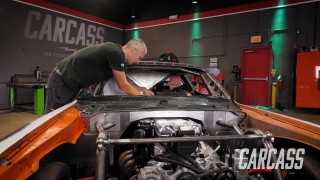
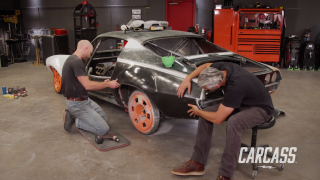
(Jeremy)>> We've done just about all we can do with the Willys body since it's been separated from the M-1010 chassis. Well now we need to see how it all fits together with the upgraded engine and the beefier transmission. So we're gonna marry these two together for the very last time. [ drill humming ]
(Jimmy)>> Before we can make our new firewall we need to pull some measurements from the giant hole where the old firewall used to be. We'll measure the overall width and length taking note of where a bend can transition the firewall to the kick pan. We measured an overall width of 50 inches and a length of 26 inches keeping in mind that the floor tapers near the bottom.
(Jeremy)>> Following our measurements we'll lay down a couple of lines on our steel. The first line is the center line, and the outside marks are the cut lines that follow the taper of the floor. With the lines laid out we'll cut the piece down on the shear, and then we'll come back, trim the edges down to its final size with our Matco Tools Power Shear. After we hand form the transition from the firewall to the kick pan on our break... [ MUSIC ] ...we'll come back and do one more cut making way for the transmission. Let's see if we can sneak it behind the supercharger. That just kind of slid right in there. Before we can do any cutting we need to mark the areas where we can't cut. Then we'll take our firewall over to the table for some modifications.
(Jimmy)>> We'll cut a curve in the corners to mask the curvature of the cowl. Then we'll need to cut a hole to make room for the distributor on the back side of the engine.
(Jeremy)>> We'll add a distributor relief panel that we made in the slip roller... [ welder crackling ]
(Jeremy)>> ...and then just tack it into place. [ welder crackling ] We'll cap it off with the matching plate and weld it in. [ welder crackling ]
(Jimmy)>> Finally we'll add a bend for the kick pan bending it just enough so it'll line up with the original floor. Now at this point the metal is pretty flimsy. So to stiffen it up we're gonna add some ribs at the bead roller. These not only add some rigidity to the firewall but they also add some style points in the cab and the engine bay.
(Jeremy)>> That's right and to wrap up this firewall install all we need to do is add a couple dozen rosette welds. And our Willys body, well it's starting to look whole again. We'll start our engine prep with a cooling solution. Now we mounted our radiator out back so we have a unique plumbing situation to maneuver around our new engine mounts.
(Jimmy)>> With that out of the way we can start running our hose. We'll need to drill a hole in the cab to pass it through to the radiator.
(Jeremy)>> Good thing we're not restoring this truck.
(Jimmy)>> Then we'll fish our hosing through the hole up to the radiator where we'll make our final connections to cool the engine. The same will be done with the return lines carrying the hot water from the engine.
(Jeremy)>> Now that we've got our coolant hoses run we'll work on keeping our transmission happy too. We're using dash six hose and a-n fittings. They screw directly into the ports on the transmission and the hoses are braided, allowing them to survive the rigorous conditions they'll be exposed to. This all gets looped together in the rear of the vehicle where we mounted the trans cooler.
(Jimmy)>> With all the cooling out of the way we can get to work doing a little upgrade to the top end of our engine. We're adding Holley Performance Sniper EFI's to replace the dual carbureted solution that we were using before. We'll need to tie these throttle bodies together because they're gonna be working in tandem with each other.
(Jeremy)>> That's right, there's a lot more wiring involved in this setup over the dual carbs we had before, but let's face it. Modernizing our 67 year old Willys is just plain cool.
(Jimmy)>> And it should be mentioned that these kind of systems require high fuel pressure to operate. So we're gonna be using line rated for e-f-i throughout our entire fuel system. And since we mounted the fuel tank in the rear we'll fish the line under the chassis making connections at the fuel pump and filters before finishing up at the tank.
(Jeremy)>> There are a few more things we need to button up before we can get this engine started. We need to slap on an alternator from Summit Racing and install the belt that will drive it. Then we'll add a set of zoomy headers that will give this small block Chevy that signature sound. And finally we'll button up the top of the engine with the matching scoop. Okay man fluid's in it and it's all wired up.
(Jimmy)>> Let's get some spark going on this guy.
(Jeremy)>> Let's see if it rocks. Ready? [ engine starting ]
(Jimmy)>> Ohh yeaaah, woo! That's awesome!
(Jeremy)>> Just like that! [ engine revving ]
(Jimmy)>> Yes! Coming up we're making hood room and shifting towards the Willys mud launch.
(Jimmy)>> We're about on the home stretch. We just have the rest of the body panels put on, get the pedals in, steering, and some other interior stuff.
(Jeremy)>> Yeah we've got the steering to work with, the brakes to work with. That includes the hydra-boost. We've also got the driveshafts to put in and those monster 43 inch tires.
(Jimmy)>> That's really gonna finish off the look, and also cutting a hole in the hood is gonna finish off the look to get the top end of that guy sticking out of it.
(Jimmy)>> The fenders are a simple install but require two people. One to hold it in position while the other adds the hard to get to bolts.
(Jeremy)>> With the two fenders installed we can add that recognizable front grille that will bolt to the fenders and the custom body mount we made up front.
(Jimmy)>> The last item to be installed will be the hood, but we already know it won't fit just because of how tall our engine is. So we're gonna have to make some modifications. We'll measure the width to the outside of the headers and how much room the scoop takes up front to back.
(Jeremy)>> Back at the hood we'll start laying out those measurements. We'll use the body lines as a natural line to follow for the width of our cut. We'll use two inch tape on the sides and one and half inch tape for the front and rear cuts on the hood.
(Jimmy)>> Now we're not gonna get to cutting right away. We're gonna start with the corners first. Our engine is solid mounted, and it's gonna shake and rattle around, and corners are very prone to cracking. So we're gonna round the corners off to prevent that and it's gonna give us some style points.
(Jeremy)>> To accomplish this we'll use an inch and three quarter hole saw. We'll line the edge of that up with the outside edge of our tape without the pilot bit installed. This will allow us to mark the center. [ MUSIC ] Then we'll come back with the drill, apply even pressure to punch our way through the hood.
(Jimmy)>> We'll follow that up with a cutoff wheel carefully following the outside of our tape lines. As we cut we'll work our way around meeting each of the rounded corners until we reach the last corner setting the sheet metal free.
(Jeremy)>> There ain't no turning back now. Time for a test fit. We need to remove the scoop up top and the air filters because we know the hood isn't going to completely fit in this state. The air cleaner and the scoop overlap the hood just a little bit. So we'll mark that and then take it back to the bench to cut it out. We'll use the same hole saw to take care of the corners and trim the rest like earlier. [ saw buzzing ]
(Jimmy)>> Now we're ready to see how this bad boy looks. With a few finishing touches our nearly 70 year old hood gets a tough new look.
(Jeremy)>> The shifter assembly we got from Summit Racing is fairly easy to install. The only tough part is working in tight quarters. The main plate goes on first, screwing into the casting mounts on the transmission.
(Jimmy)>> Next we need to position the shifter body on top of the plate and mark the area where we need to cut the trans tunnel. We'll do this from the top side.
(Jeremy)>> Now you may be asking yourself how in the heck are we gonna mark the top side of the tunnel? Well that's easy. We'll just count the ribs on the bottom side of the tunnel. Then we'll do the same on the top side to locate our starting point.
(Jimmy)>> Using a spare piece of metal, we'll protect our wiring from any sparks and we'll begin our cut using a cutoff wheel. We'll carefully cut along our line creating a rectangle long enough to allow the shifter to fully travel.
(Jeremy)>> We can now pass the shifter through the hole. Then with the help of a buddy we can position it over the main bracket and install the hard to get to screws. A quick tip. If your fingers can't get into those hard to reach areas but a wrench can just add a little bit of masking tape to the ends. That way it has just enough material to grab onto the nut to get into those hard to reach places.
(Jimmy)>> With the shifter now secured to the main plate we need to install the trans gear lever. It's a quick bolt on. Following that we need to measure the length of the threaded rod that will connect the shifter to the trans gear lever. You'll want to make sure both of these are in the park position.
(Jeremy)>> We'll transfer that measurement to our threaded rod subtracting an inch and three quarter for the rod ends. Then we'll just trim it off with a cutoff wheel. With our rod ends installed we can now marry our transmission to our shifter. One end goes to the trans gear lever and the other connects to the quad lever on the shifter. Then we'll just snug up the set nuts on the rod ends. A quick test in the cab makes sure that everything functions properly. Up next we're getting in deep, maybe too deep!
[ MUSIC ]
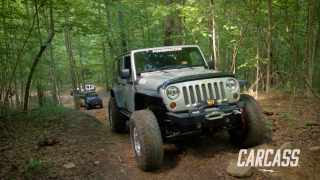
(Jeremy)>> This is the first time we're getting behind the wheel of our Willys mud wagon, and I can't be any more excited cause this is exactly what we did back home in Minnesota.
(Jimmy)>> And what a better place to take our mud monster than American Rebel Mud Park in Waynesboro, Tennessee. Approximately 500 acres and situated on the banks of the Buffalo River, this park is designed as an escape for mudders and enthusiasts. With a park like this it's needless to say that this is the perfect place to take our Willys mud wagon on its first test drive.
(Jeremy)>> Now we made some modifications up front to make sure our engine didn't pull in any debris. We turned the scoop backwards and we added three intake tubes to pull clean air from inside the cab.
(Jimmy)>> And we added a torque arm to prevent axle wrap under hard acceleration. [ engine revving ] [ MUSIC ]
(Jeremy)>> Alright man what do you say we take it easy here for the first little bit?
(Jimmy)>> Yeah I think we go up a little bit at a time and then see if we can't put this thing through the ringer.
(Jeremy)>> Yeah there's a little pit here. So let's start right here.
(Jimmy)>> Sounds good. [ engine revving ]
(Jeremy)>> Alright man that truck's a little too clean. It's time to get it dirty. You go for it. [ MUSIC ] [ engine revving ]
(Jimmy)>> The first and second puddles were about the same. A lot of water, a lot of mudslinging off the tires, but the third puddle wasn't so easy. I was looking at it from over the hood and it didn't look that deep, and then my front tire sank in and I thought this might be a problem.
(Jeremy)>> Oh that's deep, oh that's deep! Stop, out of the throttle.
(Jimmy)>> So I gunned it hoping to get the wheel speed up to get out of the mud but the tires just kept getting deeper and deeper in the mud, and well I got stuck. [ MUSIC ]
(Jeremy)>> That's just good ole fashioned fun right there. [ MUSIC ] Dude I thought we were gonna take it easy?
(Jimmy)>> Minor miscalculation. Yeah I went into this one and I'm like. [ bleep ]
(Jimmy)>> Right when I got in I started sinking, I'm like oh #*%^.
(Jeremy)>> The Willys is finally feeling at home in the mud but maybe this hole was a little too deep.
(Jimmy)>> Alright so first run of the day off to not so hot of a start. We got the truck stuck. Kinda reiterates my I don't love lifted trucks but this is one problem you get. When stuck in the mud you have to pull it out. So Jeremy's getting the F-350 I am sitting on my personal island. [ MUSIC ] [ engine revving ]
(Jeremy)>> So if I could rewind to the beginning of the day and draw this picture of exactly how I wanted the Willys to look that right there is 100 percent how I thought it would look. That's awesome! [ engine revving ]
(Jimmy)>> I'm filthy, the truck's filthy. We got it out of the mud. So now it's Jeremy's turn to thrash this thing.
(Jeremy)>> On my run I'm gonna take a slightly different approach. I'm gonna play around in the shallows, figure out how the truck acts, and figure out how the mud is gonna act, and then once I'm confident that the truck can do this we're gonna hit the deep end and then the ultimate goal is not to get stuck. [ engine revving ]
(Jeremy)>> The shallows went great and I have all the faith in the world that we can push our Willys mud wagon into some deeper water. So we're gonna whip this thing around this pit and hope we don't get stuck on the other side. [ engine revving ]
(Jimmy)>> This mud hole wasn't as deep as the one I ran into to, but when Jeremy ventured into the deep end the blower belt starting shoot water out of the cutout in the hood. [ engine revving ]
(Jimmy)>> Nice driving slick.
(Jeremy)>> Dude that is an absolute animal but it kinda felt like something was rubbing towards the end there. I don't know what's going on. The center section legit broke off the tubes.
(Jimmy)>> That's gnarly dude! That's not supposed to look like that. You think it's gonna make it back to the trailer?
(Jeremy)>> Yeah I think it will but you know what? I think we've got to call it a day, but man look at this thing. It did everything we wanted it to do.
(Jimmy)>> This is what it's supposed to look like at the end of the day anyway.
(Jeremy)>> Yeah it wasn't supposed to be clean. For more information on anything you've seen today check us out on Powernation TV dot com.
Show Full Transcript
(Jimmy)>> Today on Carcass we hear our 630 horse powerhouse roar between the frame rails.
(Jeremy)>> And we bury our Willys wagon in the mud.
(Jimmy)>> That's right, with a few cuts here and a few welds there this bad boy is ready to get dirty. [ MUSIC ]
(Narrator)>> When you want to build something different you turn to Carcass. They transform cars and trucks into one of a kind builds. From street to mud, if you dream it they can build it. This is Carcass, a non-traditional speed shop. [ MUSIC ]
(Jimmy)>> This is our Chevy M-1010 military ambulance chassis. It started with a big ambo box out back and a Chevy truck cab out front, but we've made a lot of changes to transform this tough chassis into a mud monster.
(Jeremy)>> That's right we sliced over two feet out of the frame, added some fish plates, and boxed it in for strength. We added some custom body mounts and got the first look of our Willys body sitting on top.
(Jimmy)>> With the dream coming alive we gutted the interior pulling up the carpet, trashing the rat's nest of wiring, and removed the chicken wire firewall.
(Jeremy)>> Then we got to work upgrading our suspension and our front axle. We added an eight inch lift to give us more ground clearance and an Eaton E-locker to give us true four wheel drive.
(Jimmy)>> Inside the cab we added a fuel cell in the back and fabbed up a pretty basic roll cage, which allowed us to mount a radiator in the window.
(Jeremy)>> With our fuel and cooling system in place we're now ready to drop the drivetrain in our M-1010 chassis.
(Jimmy)>> Our engine is a 383 stroker small block Chevy with a roots style blower. It pushes out a whopping 630 horsepower and 532 pound feet of torque.
(Jeremy)>> Our goal was to back this new powerhouse up with the original turbo 400 transmission and our 208 transfer case but reverse went out on us in the parking lot. So we sent the whole setup off to Gear Star for a complete rebuild so it can withstand all of the horses our power plant can throw at it.
(Jimmy)>> If we use the stock engine mounts our engine and transmission will sit way too far forward in relation to our Willys body. So we're gonna use an engine plate and a mid-plate, which essentially lets us put our drivetrain wherever we want.
(Jeremy)>> The mounting solution we're using is from Summit Racing, and since it includes a mid-plate we're gonna add a spacer between the crankshaft and the flex plate. And then we'll just install the flex plate like normal, making sure we add blue Permatex thread locker to the bolts and torqueing them down. [ torque wrench clicking ]
(Jimmy)>> With the engine supported by the hoist we can remove the cart it was sitting on, which allows us to line up the mid-plate with the back of the engine.
(Jeremy)>> Keep coming! Slowing down!
(Jimmy)>> We'll line up the bell housing and the transmission with the holes on the back of the engine. Then we'll add bolts marrying the two together. [ drill humming ]
(Jeremy)>> Alright you ready? I'll spin the engine over. Turning the engine over with a ratchet allows us to align the flex plate with the torque converter. Then we'll just start the bolts by hand, snug them up with an impact, and torque them down to 40 pound feet.
(Jimmy)>> To install the motor plate we'll remove the water pump. With it out of the way we'll add the plate using the bottom holes to hold it in place. Then the water pump is re-installed sharing the same bolt holes as the motor plate.
(Jeremy)>> Alright a little bit on the throttle.
(Jimmy)>> Now we're ready to test fit our engine. We'll lower it into place until it touches the frame rails.
(Jeremy)>> Almost, there we go. Okay to get this thing centered so we know how much we should be cutting off. That's 14 and three quarter-ish. That's actually about 14 and five-eighths. So that's super close so we'll called that centered.
(Jimmy)>> How's the front look?
(Jeremy)>> We'll go see. That should be hopefully centered. Got two feet across, and if I eyeball it that actually looks super, super close. And the plates, look right from side to side. So put a mark here and I'll do the same thing on the other side, and we'll just trim right there.
(Jimmy)>> These are universal mid and engine plates, which need to be trimmed down to fit our frame rails. The measurement doesn't have to be exact but we need just enough clearance to fit between the frame rails centering the crank pulley and the tail shaft.
(Jeremy)>> With a quick measurement up front we now know we have enough room to clear the grille shell, and Jimmy, well he came up with an easy mounting solution out back.
(Jimmy)>> How far apart are those crossmember bolts?
(Jeremy)>> They're three inches. That's gonna work. With the location that we've picked for the drivetrain we're still gonna be able to use the stock transmission crossmember, which is great because that's gonna save us quite a bit of time. All we have to do is slide it back one bolt hole, and then just drill another hole in the frame, and then we'll just use all the stock hardware to put it back on.
(Jimmy)>> Securing the transmission to the crossmember will help us make the motor mounts because it'll locate everything front to back. With the transmission locked in we're gonna get started on the engine mount. Making a template will make sure that everything's gonna fit.
(Jeremy)>> We're making these brackets out of three-sixteenths steel, and the Edwards Iron Worker will get the job done quickly. We'll first cut out a chunk on the shear. Then we'll move over to the notcher doing some very specific cuts to give this bracket its shape.
(Jimmy)>> We'll clean that up with a belt sander before bringing it back to the engine. With it clamped in place we'll be able to tack it in, followed by drilling a hole through the engine plate and the fabricated mount.
(Jeremy)>> We'll add some grade eight hardware and then just tighten them down, and then we'll make these engine mounts a permanent part of our chassis.
(Jimmy)>> The mid-plate gets the same treatment, rinsing and repeating the process to wrangle those 630 horses between our two frame rails.
(Jeremy)>> Up next our Willys body finds its final resting place.
(Jimmy)>> Plus we fill this giant space with a custom firewall. You're watching Carcass.
(Jeremy)>> We've done just about all we can do with the Willys body since it's been separated from the M-1010 chassis. Well now we need to see how it all fits together with the upgraded engine and the beefier transmission. So we're gonna marry these two together for the very last time. [ drill humming ]
(Jimmy)>> Before we can make our new firewall we need to pull some measurements from the giant hole where the old firewall used to be. We'll measure the overall width and length taking note of where a bend can transition the firewall to the kick pan. We measured an overall width of 50 inches and a length of 26 inches keeping in mind that the floor tapers near the bottom.
(Jeremy)>> Following our measurements we'll lay down a couple of lines on our steel. The first line is the center line, and the outside marks are the cut lines that follow the taper of the floor. With the lines laid out we'll cut the piece down on the shear, and then we'll come back, trim the edges down to its final size with our Matco Tools Power Shear. After we hand form the transition from the firewall to the kick pan on our break... [ MUSIC ] ...we'll come back and do one more cut making way for the transmission. Let's see if we can sneak it behind the supercharger. That just kind of slid right in there. Before we can do any cutting we need to mark the areas where we can't cut. Then we'll take our firewall over to the table for some modifications.
(Jimmy)>> We'll cut a curve in the corners to mask the curvature of the cowl. Then we'll need to cut a hole to make room for the distributor on the back side of the engine.
(Jeremy)>> We'll add a distributor relief panel that we made in the slip roller... [ welder crackling ]
(Jeremy)>> ...and then just tack it into place. [ welder crackling ] We'll cap it off with the matching plate and weld it in. [ welder crackling ]
(Jimmy)>> Finally we'll add a bend for the kick pan bending it just enough so it'll line up with the original floor. Now at this point the metal is pretty flimsy. So to stiffen it up we're gonna add some ribs at the bead roller. These not only add some rigidity to the firewall but they also add some style points in the cab and the engine bay.
(Jeremy)>> That's right and to wrap up this firewall install all we need to do is add a couple dozen rosette welds. And our Willys body, well it's starting to look whole again. We'll start our engine prep with a cooling solution. Now we mounted our radiator out back so we have a unique plumbing situation to maneuver around our new engine mounts.
(Jimmy)>> With that out of the way we can start running our hose. We'll need to drill a hole in the cab to pass it through to the radiator.
(Jeremy)>> Good thing we're not restoring this truck.
(Jimmy)>> Then we'll fish our hosing through the hole up to the radiator where we'll make our final connections to cool the engine. The same will be done with the return lines carrying the hot water from the engine.
(Jeremy)>> Now that we've got our coolant hoses run we'll work on keeping our transmission happy too. We're using dash six hose and a-n fittings. They screw directly into the ports on the transmission and the hoses are braided, allowing them to survive the rigorous conditions they'll be exposed to. This all gets looped together in the rear of the vehicle where we mounted the trans cooler.
(Jimmy)>> With all the cooling out of the way we can get to work doing a little upgrade to the top end of our engine. We're adding Holley Performance Sniper EFI's to replace the dual carbureted solution that we were using before. We'll need to tie these throttle bodies together because they're gonna be working in tandem with each other.
(Jeremy)>> That's right, there's a lot more wiring involved in this setup over the dual carbs we had before, but let's face it. Modernizing our 67 year old Willys is just plain cool.
(Jimmy)>> And it should be mentioned that these kind of systems require high fuel pressure to operate. So we're gonna be using line rated for e-f-i throughout our entire fuel system. And since we mounted the fuel tank in the rear we'll fish the line under the chassis making connections at the fuel pump and filters before finishing up at the tank.
(Jeremy)>> There are a few more things we need to button up before we can get this engine started. We need to slap on an alternator from Summit Racing and install the belt that will drive it. Then we'll add a set of zoomy headers that will give this small block Chevy that signature sound. And finally we'll button up the top of the engine with the matching scoop. Okay man fluid's in it and it's all wired up.
(Jimmy)>> Let's get some spark going on this guy.
(Jeremy)>> Let's see if it rocks. Ready? [ engine starting ]
(Jimmy)>> Ohh yeaaah, woo! That's awesome!
(Jeremy)>> Just like that! [ engine revving ]
(Jimmy)>> Yes! Coming up we're making hood room and shifting towards the Willys mud launch.
(Jimmy)>> We're about on the home stretch. We just have the rest of the body panels put on, get the pedals in, steering, and some other interior stuff.
(Jeremy)>> Yeah we've got the steering to work with, the brakes to work with. That includes the hydra-boost. We've also got the driveshafts to put in and those monster 43 inch tires.
(Jimmy)>> That's really gonna finish off the look, and also cutting a hole in the hood is gonna finish off the look to get the top end of that guy sticking out of it.
(Jimmy)>> The fenders are a simple install but require two people. One to hold it in position while the other adds the hard to get to bolts.
(Jeremy)>> With the two fenders installed we can add that recognizable front grille that will bolt to the fenders and the custom body mount we made up front.
(Jimmy)>> The last item to be installed will be the hood, but we already know it won't fit just because of how tall our engine is. So we're gonna have to make some modifications. We'll measure the width to the outside of the headers and how much room the scoop takes up front to back.
(Jeremy)>> Back at the hood we'll start laying out those measurements. We'll use the body lines as a natural line to follow for the width of our cut. We'll use two inch tape on the sides and one and half inch tape for the front and rear cuts on the hood.
(Jimmy)>> Now we're not gonna get to cutting right away. We're gonna start with the corners first. Our engine is solid mounted, and it's gonna shake and rattle around, and corners are very prone to cracking. So we're gonna round the corners off to prevent that and it's gonna give us some style points.
(Jeremy)>> To accomplish this we'll use an inch and three quarter hole saw. We'll line the edge of that up with the outside edge of our tape without the pilot bit installed. This will allow us to mark the center. [ MUSIC ] Then we'll come back with the drill, apply even pressure to punch our way through the hood.
(Jimmy)>> We'll follow that up with a cutoff wheel carefully following the outside of our tape lines. As we cut we'll work our way around meeting each of the rounded corners until we reach the last corner setting the sheet metal free.
(Jeremy)>> There ain't no turning back now. Time for a test fit. We need to remove the scoop up top and the air filters because we know the hood isn't going to completely fit in this state. The air cleaner and the scoop overlap the hood just a little bit. So we'll mark that and then take it back to the bench to cut it out. We'll use the same hole saw to take care of the corners and trim the rest like earlier. [ saw buzzing ]
(Jimmy)>> Now we're ready to see how this bad boy looks. With a few finishing touches our nearly 70 year old hood gets a tough new look.
(Jeremy)>> The shifter assembly we got from Summit Racing is fairly easy to install. The only tough part is working in tight quarters. The main plate goes on first, screwing into the casting mounts on the transmission.
(Jimmy)>> Next we need to position the shifter body on top of the plate and mark the area where we need to cut the trans tunnel. We'll do this from the top side.
(Jeremy)>> Now you may be asking yourself how in the heck are we gonna mark the top side of the tunnel? Well that's easy. We'll just count the ribs on the bottom side of the tunnel. Then we'll do the same on the top side to locate our starting point.
(Jimmy)>> Using a spare piece of metal, we'll protect our wiring from any sparks and we'll begin our cut using a cutoff wheel. We'll carefully cut along our line creating a rectangle long enough to allow the shifter to fully travel.
(Jeremy)>> We can now pass the shifter through the hole. Then with the help of a buddy we can position it over the main bracket and install the hard to get to screws. A quick tip. If your fingers can't get into those hard to reach areas but a wrench can just add a little bit of masking tape to the ends. That way it has just enough material to grab onto the nut to get into those hard to reach places.
(Jimmy)>> With the shifter now secured to the main plate we need to install the trans gear lever. It's a quick bolt on. Following that we need to measure the length of the threaded rod that will connect the shifter to the trans gear lever. You'll want to make sure both of these are in the park position.
(Jeremy)>> We'll transfer that measurement to our threaded rod subtracting an inch and three quarter for the rod ends. Then we'll just trim it off with a cutoff wheel. With our rod ends installed we can now marry our transmission to our shifter. One end goes to the trans gear lever and the other connects to the quad lever on the shifter. Then we'll just snug up the set nuts on the rod ends. A quick test in the cab makes sure that everything functions properly. Up next we're getting in deep, maybe too deep!
[ MUSIC ]
(Jeremy)>> This is the first time we're getting behind the wheel of our Willys mud wagon, and I can't be any more excited cause this is exactly what we did back home in Minnesota.
(Jimmy)>> And what a better place to take our mud monster than American Rebel Mud Park in Waynesboro, Tennessee. Approximately 500 acres and situated on the banks of the Buffalo River, this park is designed as an escape for mudders and enthusiasts. With a park like this it's needless to say that this is the perfect place to take our Willys mud wagon on its first test drive.
(Jeremy)>> Now we made some modifications up front to make sure our engine didn't pull in any debris. We turned the scoop backwards and we added three intake tubes to pull clean air from inside the cab.
(Jimmy)>> And we added a torque arm to prevent axle wrap under hard acceleration. [ engine revving ] [ MUSIC ]
(Jeremy)>> Alright man what do you say we take it easy here for the first little bit?
(Jimmy)>> Yeah I think we go up a little bit at a time and then see if we can't put this thing through the ringer.
(Jeremy)>> Yeah there's a little pit here. So let's start right here.
(Jimmy)>> Sounds good. [ engine revving ]
(Jeremy)>> Alright man that truck's a little too clean. It's time to get it dirty. You go for it. [ MUSIC ] [ engine revving ]
(Jimmy)>> The first and second puddles were about the same. A lot of water, a lot of mudslinging off the tires, but the third puddle wasn't so easy. I was looking at it from over the hood and it didn't look that deep, and then my front tire sank in and I thought this might be a problem.
(Jeremy)>> Oh that's deep, oh that's deep! Stop, out of the throttle.
(Jimmy)>> So I gunned it hoping to get the wheel speed up to get out of the mud but the tires just kept getting deeper and deeper in the mud, and well I got stuck. [ MUSIC ]
(Jeremy)>> That's just good ole fashioned fun right there. [ MUSIC ] Dude I thought we were gonna take it easy?
(Jimmy)>> Minor miscalculation. Yeah I went into this one and I'm like. [ bleep ]
(Jimmy)>> Right when I got in I started sinking, I'm like oh #*%^.
(Jeremy)>> The Willys is finally feeling at home in the mud but maybe this hole was a little too deep.
(Jimmy)>> Alright so first run of the day off to not so hot of a start. We got the truck stuck. Kinda reiterates my I don't love lifted trucks but this is one problem you get. When stuck in the mud you have to pull it out. So Jeremy's getting the F-350 I am sitting on my personal island. [ MUSIC ] [ engine revving ]
(Jeremy)>> So if I could rewind to the beginning of the day and draw this picture of exactly how I wanted the Willys to look that right there is 100 percent how I thought it would look. That's awesome! [ engine revving ]
(Jimmy)>> I'm filthy, the truck's filthy. We got it out of the mud. So now it's Jeremy's turn to thrash this thing.
(Jeremy)>> On my run I'm gonna take a slightly different approach. I'm gonna play around in the shallows, figure out how the truck acts, and figure out how the mud is gonna act, and then once I'm confident that the truck can do this we're gonna hit the deep end and then the ultimate goal is not to get stuck. [ engine revving ]
(Jeremy)>> The shallows went great and I have all the faith in the world that we can push our Willys mud wagon into some deeper water. So we're gonna whip this thing around this pit and hope we don't get stuck on the other side. [ engine revving ]
(Jimmy)>> This mud hole wasn't as deep as the one I ran into to, but when Jeremy ventured into the deep end the blower belt starting shoot water out of the cutout in the hood. [ engine revving ]
(Jimmy)>> Nice driving slick.
(Jeremy)>> Dude that is an absolute animal but it kinda felt like something was rubbing towards the end there. I don't know what's going on. The center section legit broke off the tubes.
(Jimmy)>> That's gnarly dude! That's not supposed to look like that. You think it's gonna make it back to the trailer?
(Jeremy)>> Yeah I think it will but you know what? I think we've got to call it a day, but man look at this thing. It did everything we wanted it to do.
(Jimmy)>> This is what it's supposed to look like at the end of the day anyway.
(Jeremy)>> Yeah it wasn't supposed to be clean. For more information on anything you've seen today check us out on Powernation TV dot com.


