
Carcass Featured Projects


Carcass Builds


Want more content like this?
Join the PowerNation Email NewsletterParts Used In This Episode
Edwards Ironworkers
Edwards Ironworker & Horizontal Press
Matco Tools
MATCO Tools are the Official Tool Supplier to PowerNation
The Industrial Depot
Tools, Hardware, Shop Supplies
Episode Transcript
(Jeremy)>> Hey guys if you like what you've seen in this video go ahead and smash that thumbs up button, and if you want to see more subscribe. And as always comment below and tell us what you think.
(Jimmy)>> Today on Carcass drifting is in our future with a four door s-u-v.
(Narrator)>> When you want to build something different you turn to Carcass. They transform cars and trucks into one of a kind builds. From street to mud, if you dream it they can build it. This is Carcass, a non-traditional speed shop. [ MUSIC ]
(Jimmy)>> This is our 2006 Trailblazer SS. It's the super sport s-u-v from the bowtie brigade sporting some serious boosts in performance.
(Jeremy)>> That's right, this mid-size s-u-v was an exciting new variation of a proven platform that GM had from 2001 to about 2009 but was later replace by the Traverse. [ MUSIC ]
(Jimmy)>> I think this is gonna be my favorite build this year and this thing is already pretty capable as is.
(Jeremy)>> Totally, and we are gonna have a blast making this thing literally drive sideways.
(Jimmy)>> And you know what's better than drifting with just one friend? Drifting with the whole family.
(Jeremy)>> Yep you heard right. We're gonna take this already capable two wheel drive Trailblazer SS and make it even more sporty, turning it into a four door drift truck. We're gonna tear out the interior, cage the inside, and put in some proper racing seats and harnesses. Then we're gonna throw in a whole new powertrain converting this thing from an automatic to a manual transmission, and finally we'll address our steering and our suspension, making this thing a capable drift machine.
(Jimmy)>> This thing weighs over two tons, and we would like to save somewhere in the ballpark of about 500 pounds. So to do that we're gonna have to rip out everything we can get our hands on inside the cab. One of the heaviest things in the cab are the seats, and since we're bringing some friends along these seats just aren't suitable anymore for this application.
(Jeremy)>> I'll go through! Get skinny!
(Jimmy)>> We aren't going to leave much behind in the cab. We're gonna remove the center console, all the door seal plates, and any of the plastic trim. Panel after panel we're removing anything and everything we can get our hands on to lighten up the load. Even the headliner has to go.
(Jeremy)>> That's right, the only thing we really want to keep is the dash. So we'll take a little bit of extra time removing it.
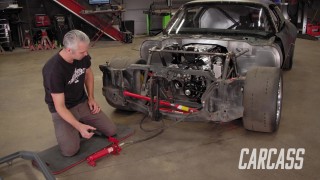
(Jimmy)>> With the truck in this state we now have a clean canvas to start our work. Before I even get started on the roll cage I need to figure out where the main hoop is gonna land, and to do that I'm gonna use these blocks, set one of our racing seats on top at the farthest point back from the pedals in case we have a tall driver, and what this is gonna do is push the main hoop as far back as it needs to go so I can get started building.
(Jeremy)>> There's a couple different ways we could build the base of our roll cage. The way we chose was to use a plinth in the form of a box. That way we could build our cage like normal and when we're ready we'll just slide it back off the box, lower it down, and that way we can weld completely around all of our tubes.
(Jimmy)>> We'll kick this build off with a couple of measurements at the base of the B-pillar. With the measurements in hand we'll cut out the pieces at the Edwards Iron Worker making a slight bend in one of the pieces to match the profile of our cab.
(Jeremy)>> All we need to do from here is weld up a simple but strong box to support our main hoops.
(Jimmy)>> This method for building out the plinth box works the same as just welding a base plate to the floor to help spread the load over a large area to prevent failure of our roll cage, and it has the advantage of giving us access to all the weld seams.
(Jeremy)>> With that in mind we can now construct our cage starting with our main hoops. We'll position one behind the front seat utilizing a 75 and 15 degree bend, and then we'll place a secondary hoop behind the passenger seats cause we want our friends in back to be just as safe as we are up front.
(Jimmy)>> Next we need to install the side hoops. Each of these is set on the plinth box and the other end is notched to be married to the main hoop. We'll work our way back and tack these into place.
(Jeremy)>> The last pieces to be installed on this jungle gym are the diagonal brace and the door bars. That will help provide some triangulated strength and protect the passengers from any lateral impacts.
(Jimmy)>> We're now ready to finish weld all of our joints, and we have very little room between the top of the cage and the roof. So it'll be impossible to get a tig torch up in that tiny space. This is where our plinth box design comes into play. All we have to do is slide the cage back a few inches, allowing it to drop almost four inches, and that'll give us the ability to weld around each joint.
(Jeremy)>> With the front portion of our cage welded solid all we have to do is set it back on the plinth boxes, add a bar connecting the rear hoop to the front hoop, and make this a permanent part of our Trailblazer. [ MUSIC ]
(Jimmy)>> The cage went in like a piece of cake and we know throughout this build there's going to be some fabrication and need for some specialty parts, but we're also gonna be replacing stock parts to get this truck drifting.
(Jeremy)>> Coming up we put humpty dumpty back together again. This is Carcass.
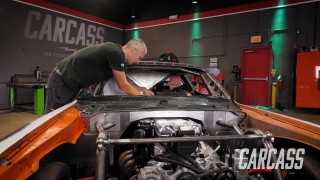
(Jeremy)>> Our 2006 Trailblazer SS hasn't made any changes in the looks department on the exterior but the interior, well that's a whole other story.
(Jimmy)>> Now that the inside is safer it's time to put this thing all back together, and that starts with the dash.
(Jeremy)>> We need to modify the dash so it can fit around the roll cage we just installed. With an idea of how much room we need those measurements will be transferred to the top of our dash and then we'll just start cutting. With our cuts made we'll check to see if it fits. We'll keep an eye out for clearances around the down bars and to see if the dash lines up with the original bolt holes.
(Jimmy)>> Fortunately we only had to make one cut here with everything fitting like a glove, and with a half a dozen bolts holding it in place we can add some creature comforts like a/c controls, and even the radio just for looks.
(Jeremy)>> One thing that we are re-installing that's for more than just looks is the dash cluster. We'll be needing that to sneak up on that red line. Now that we have the front of our truck put back together it's time to make this a four passenger capable drift truck. We picked up some bucket seats from Summit Racing dot com and some brackets to match. The floor of our Trailblazer is an uneven mess. So we need to build some standoffs so we can safely attach our seats.
(Jimmy)>> We'll start by cutting inch and three quarter tubing at the chop saw. Then we'll add a tube flange and weld the two together. Before we can install the standoff in the cab we need to add a base plate.
(Jeremy)>> With that in place we can slip in our standoffs and then just tack those to the base plates. When we feel like everything is hunky dory we'll mark the holes in the back of the seats and then just drill them out.
(Jimmy)>> We'll finish weld our base plates and our standoffs, and finally throw in the seat one last time to bolt it down. [ MUSIC ]
(Jeremy)>> With our front seats we're fighting a similar problem with our trans tunnel being uneven. So we have to be a little more creative with our approach. With a diagonal measurement of seven inches in the front and four inches in the rear we'll cut down an inch and a half strap on our Edwards Iron Worker making sure we leave about an inch and a half to the four inch end of our measurement. Then we'll make a 45 degree bend 7 inches from one end and about 5.5 inches from the other. With the strapping flipped over we'll add a second 45 degree bend about an inch and a half from the end.
(Jimmy)>> A quick sanity check to make sure we made all the right bends at all the right lengths. Then we'll trace out our shape on some eighth inch plate and cut it out at the Iron Worker before moving to the welding table to put our tig to work.
(Jeremy)>> With the riser constructed all there is left to do is bolt it to the seat bracket. Add a simple tube and tab bracket to the other side, and then just set the seat in place.
(Jimmy)>> And we'll need to carefully weld it into place making sure not to put too much heat in one area.
(Jeremy)>> Let's get in here and see if it works. Oh man that's like butter.
(Jimmy)>> The interior is nearly complete but there's something missing that just doesn't feel quite right. We've got wiring strewn across the floor and we need a place to mount the hand brake for this drift truck. So we're gonna quickly fab up a center console and finish off the cab.
(Jeremy)>> We need to grab a measurement from the bottom of our dash to the rear cross bar of our roll cage. Then at the chop saw we'll cut a section of inch and five-eighths tubing and give it a 45 degree bend on our Edwards 10 ton bender.
(Jimmy)>> A notch needs to be cut at one end so that it can be attached to the cross bar of our roll cage, but before we can do that we need to install two mounting plates to the factory studs under the dash.
(Jeremy)>> Then we'll raise the tubing into place and tack that in front and at the rear of the cross bar. We'll bring in a second piece of bent tubing and tack that in place as well.
(Jimmy)>> Now we're ready to make a template for the sheet metal we'll use to cover the console. We'll crudely punch the shifter through the cardboard and roughly trace out where the e-brake will be.
(Jeremy)>> With those lines marked out we'll make quick work of them with the cutoff wheel. Then with some careful bending and maneuvering around the shifter we'll slide one piece of sheet metal on top making sure to tack it into place, and adding the remaining sections towards the rear.
(Jimmy)>> The last sections to go on are the side panels. We cut those out using a similar template. They get tacked on with a healthy number of tacks.
(Jeremy)>> We can now mount our hand brake since we have a center console to support it, and that all starts with finding a good location for the driver to have easy access to it.
(Jimmy)>> We want our hand brake to have a rigid base. So we're gonna trace out our mounting bracket on some eighth inch steel. We'll cut it out on the Iron Worker before taking it over to the belt sander to give it its final shape.
(Jeremy)>> In the cab we can tack it in the location where we want our hand brake to live. Then just drill out a couple of holes. [ drill humming ]
(Jeremy)>> And bolt it into place.
(Jimmy)>> Next on Carcass we send out our stock ponies to pasture and saddle up some fresh muscle for our four seat drifting machine. This is Carcass.
[ MUSIC ]
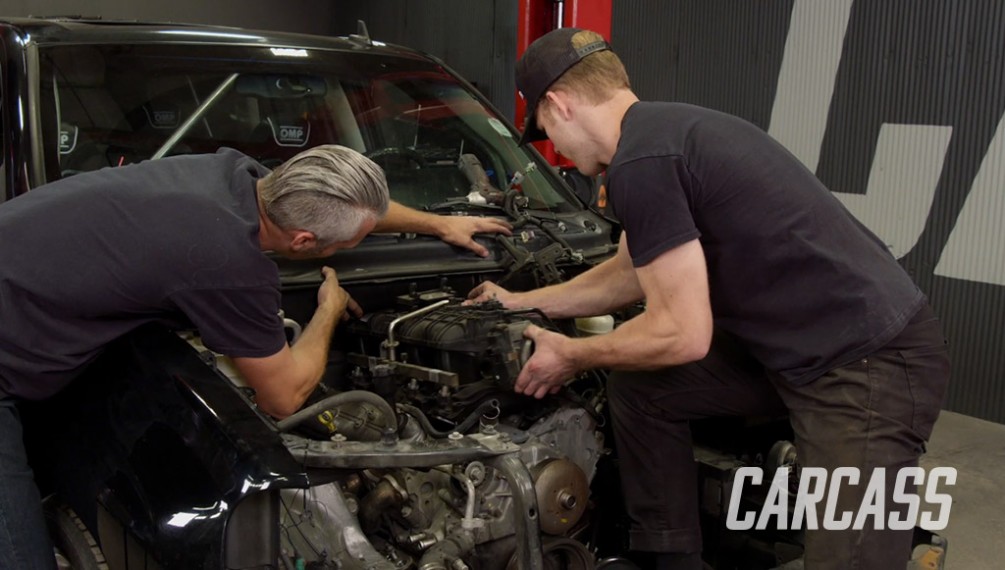
(Jeremy)>> The interior of our four door drifting machine is nearly complete. Now we're planning on converting this two wheel drive automatic into a six speed manual. So we're gonna have to do some work inside the cab, but before we can get to that we need to yank out this tired old 400 horsepower pony that nearly has 230,000 miles on it and replace it with a brand new 450 horsepower Clydesdale. Holy cow, I don't want to break it but it's half broke already. I got mine. [ MUSIC ]
(Jeremy)>> With a few bolts here and a few hoses there we'll have the intake free from the top of the engine, making plenty of room for us to pull this poor pony free. With our motor mounts loose we can now yank out this washed up race horse. All that leg work we put into prepping the front end, well it's about to pay off, making easy work lifting this 400 pound engine free from its home.
(Jimmy)>> Giddy up ponies! Alright dude!
(Jeremy)>> Alright we can back up like three inches maybe? A little more. I'm on on this side. We'll snug up our engine for starters, and then we'll slip in our headers from below and bolt them in up top. With most of the wiring out of the way we can tackle the front accessory drive. An alternator gets thrown into the mix and a final connection can be made.
(Jimmy)>> With a brand new 450 horsepower engine sitting under the hood our Trailblazer SS is taking on a new persona.
(Jeremy)>> That's right, we'll soon be able to call this thing a drifting Trailblazer with the thoroughbred we have up front, but before we get to that point we need to saddle up this pony. To make this install easier we'll work on this vehicle when it's on the hoist. Jimmy and I will both tackle the clutch together because four hands are way better than two.
(Jimmy)>> In order to setup our clutch throw out bearing spacing we need to install the bell housing and take a measurement. Using a square we'll use the face of the bell housing for reference and measure to the fingers of the pressure plate with a caliper.
(Jeremy)>> On the transmission we'll use a square and set it on the throw out bearing, measuring the distance from the throw out bearing to where the transmission case would meet the bell housing. With those numbers in hand we'll do a little math and our goal is to have about 150 thousandths air gap.
(Jimmy)>> To achieve this we'll pop the throw out bearing off the shaft, and we'll need to add five 90 thousandths shims. Then we can slip the throw out bearing back on the shaft.
(Jeremy)>> Our transmission is now ready to be installed but before we can do that we need to make some changes in the cab to make room for our shifter, and that all starts with the measurement of the transmission.
(Jimmy)>> 23 inches. Using the bell housing for reference again we can mark the location on the underside of the vehicle and drill a pilot hole to reference the location on the other side.
(Jeremy)>> In the cab we'll unbolt and remove the old automatic shifter, and using the pilot hole we drilled from the bottom we'll line up a four inch hole saw and plunge cut a giant hole through the transmission tunnel.
(Jimmy)>> Think we can get it first try?
(Jeremy)>> I don't know. And stop. Now we've got a shifter it's gonna hit.
(Jimmy)>> Installing the transmission is pretty straight forward. We need to marry the input shaft of the transmission with the clutch, carefully guiding this 135 pound beast into position.
(Jimmy)>> To finish up our installation we'll use the stock cross member and bushings, snugging everything up.
(Jeremy)>> Now it's time to get started on our clutch pedal. To get it installed we'll drill out 2 connecting inch and a half holes in the firewall, checking to make sure that the fittings clear the hole.
(Jimmy)>> Next we'll drill a hole through the bracket we fabbed up and punch it through the floor. Then add the pedal securing it to the bracket. We'll follow that up with a remote reservoir, which will mount in the cab, and connect the hose to the master cylinder.
(Jeremy)>> We'll make the final connection under the vehicle, attaching the clutch line.
(Jeremy)>> Back in the cab we'll attach the new handle bracket to the shifter before we can figure out a solution for the handle. Jimmy's got a great idea for the handle. We're gonna cut up this huge inch and five-sixteenths wrench and weld it to the handle bracket. Then we'll just put it in the cab and see how it acts. This worked out really, really good but can you imagine it as a right hand drive car?
(Jimmy)>> I don't really have any coordination with my left hand.
(Jeremy)>> I got plenty on this side. Dump the clutch ready, one, two, three. [ making engine noises ]
(Jimmy)>> Coming up look out EPA.
(Jeremy)>> Because we're transforming the exterior of our Trailblazer SS.
(Jimmy)>> That's right, we're making a carbon hood print.
[ MUSIC ]
(Jimmy)>> This 14 year old paint job is in decent shape and we could polish this truck up to a mirror like shine but we have alternative plans for this guy.
(Jeremy)>> Our vehicle is gonna get some special treatment from the guys down the street, making our Trailblazer look like a true drifting vehicle. This process starts with some design ideas. Finding out the colors we like and the ones we don't. When we've chosen a design we'll send it off to The Wrap Lab in Franklin, Tennessee, and let the pros get to work.
(Jimmy)>> We're gonna reconstruct the hood of our Trailblazer SS but we're gonna do it with carbon fiber.
(Jeremy)>> Carbon fiber can be up to five times stronger than steel and twice as stiff, but for our application we aren't concerned about strength. We're concerned about weight savings and the looks department.
(Jimmy)>> To get our hood looking sporty there's a little prep involved. Carbon fiber is laid down in layers molding to the shape of the hood. So with a thorough cleaning we can start the process.
(Jeremy)>> We'll then apply several coats of wax making sure to gently buff it after each coat. With a good layer of this stuff on we won't have to worry about the carbon fiber sticking to the hood.
(Jimmy)>> With that out of the way we can start working with the material. We're pre-cutting four sections of carbon fiber cloth to size. We're doing this because this will be a fairly quick process and having these on standby will prevent headaches down the road.
(Jeremy)>> We're now ready to lay down our first layer. Spreading it out on the hood we'll use a can of adhesive spray to help hold it in place.
(Jimmy)>> Then we can start mixing the laminating epoxy resin. This is mixed three to one with a hardener. Two part epoxies like this have something called a pot life. This means there's only an effective working time before it becomes less workable or useless and you risk wasting material. The pot life on this epoxy is one hour. So we're gonna have to work quickly to get each layer on.
(Jeremy)>> We're using a squeegee to carefully spread the epoxy covering every square inch of carbon fiber. We'll lay it on thick getting good coverage, and then we'll go over it one more time to remove the excess.
(Jimmy)>> This is repeated again with the second layer, and again with the third, and once more for our final layer of carbon fiber letting the epoxy cure overnight. I think we got it, Johnny on the spot. Good job man.
(Jimmy)>> The epoxy has been given ample time to cure and it's time to crack it loose from the mold.
(Jeremy)>> This is why several coats of wax are essential to this process.
(Jimmy)>> Whoa, that's awesome! Seeing the underside of the hood I'm happy to say that our prep work has paid off, but we're not done yet. We need to make the top side of this thing look just as glassy smooth as the bottom side.
(Jeremy)>> This starts with a little scuff sanding. We're using 120 grit to prep for our flow coat.
(Jimmy)>> We're laying on this coat super thick using modified squeegees to spread but allowing it to pool. We'll let gravity do the work of leveling it all out.
(Jeremy)>> With our flow coat having ample time to cure we'll hit it one more time with a d-a and a series of sand paper grits.
(Jimmy)>> Then we'll trim the edges with a cutoff wheel taking care not to over cut. We were lucky that the underside of the mold left a line to follow which corresponds with the edge of the hood.
(Jeremy)>> The last step to this process is to give our carbon fiber hood some u/v protection with a clear coat and we'll let that dry overnight. To mount our hood we need to add a few reinforcements to help hold the hood in place. At the break we'll take two pieces of 20 gauge steel and bend them length wise at 90 degrees.
(Jimmy)>> With those in hand we'll shrink one side and test fit them to make sure they fit the contour of the hood. Then at the band saw we'll cut one of them down the middle removing a chunk so that they'll be able to form an "X" on the hood.
(Jeremy)>> We'll need to trace the metal stiffeners and use those marks to scuff the surface. Then we'll apply some panel bond adhesive and stick our metal reinforcements to the bottom side of the hood.
(Jimmy)>> To finish up this install we'll drill some holes for a hood pin kit we picked up from Summit Racing, installing the plates that prevent the pins from scratching the hood. [ MUSIC ] Dude this thing looks way more like a race car now.
(Jeremy)>> It looks just like the original hood but it's way cooler.
(Jimmy)>> Our design team and the guys at The Wrap Lab really knocked this thing out of the park, and to be honest I'm kinda speechless.
(Jeremy)>> We've got black body lines meeting orange wrap lines. We've got killer looking side stripes, our signature lightning bolt, and Carcass logo written on the back, and that's paired up with our custom carbon fiber hood, and that gives our drifting Trailblazer a whole new persona.
(Jeremy)>> Yes, that's exactly what it was supposed to do.
(Jimmy)>> It sounds good too. Got a little rumble to it.
(Jeremy)>> I like that! That was simple, very simple. [ MUSIC ]
(Jimmy)>> Follow along with this build at Powernation TV dot com.
(Jeremy)>> Next time on Carcass we pump up the horsepower with a Vortec supercharger.
(Jimmy)>> Plus we put it to the test on the dyno and on the pavement.
(Jeremy)>> You're watching Carcass!
Show Full Transcript
(Jimmy)>> Today on Carcass drifting is in our future with a four door s-u-v.
(Narrator)>> When you want to build something different you turn to Carcass. They transform cars and trucks into one of a kind builds. From street to mud, if you dream it they can build it. This is Carcass, a non-traditional speed shop. [ MUSIC ]
(Jimmy)>> This is our 2006 Trailblazer SS. It's the super sport s-u-v from the bowtie brigade sporting some serious boosts in performance.
(Jeremy)>> That's right, this mid-size s-u-v was an exciting new variation of a proven platform that GM had from 2001 to about 2009 but was later replace by the Traverse. [ MUSIC ]
(Jimmy)>> I think this is gonna be my favorite build this year and this thing is already pretty capable as is.
(Jeremy)>> Totally, and we are gonna have a blast making this thing literally drive sideways.
(Jimmy)>> And you know what's better than drifting with just one friend? Drifting with the whole family.
(Jeremy)>> Yep you heard right. We're gonna take this already capable two wheel drive Trailblazer SS and make it even more sporty, turning it into a four door drift truck. We're gonna tear out the interior, cage the inside, and put in some proper racing seats and harnesses. Then we're gonna throw in a whole new powertrain converting this thing from an automatic to a manual transmission, and finally we'll address our steering and our suspension, making this thing a capable drift machine.
(Jimmy)>> This thing weighs over two tons, and we would like to save somewhere in the ballpark of about 500 pounds. So to do that we're gonna have to rip out everything we can get our hands on inside the cab. One of the heaviest things in the cab are the seats, and since we're bringing some friends along these seats just aren't suitable anymore for this application.
(Jeremy)>> I'll go through! Get skinny!
(Jimmy)>> We aren't going to leave much behind in the cab. We're gonna remove the center console, all the door seal plates, and any of the plastic trim. Panel after panel we're removing anything and everything we can get our hands on to lighten up the load. Even the headliner has to go.
(Jeremy)>> That's right, the only thing we really want to keep is the dash. So we'll take a little bit of extra time removing it.
(Jimmy)>> With the truck in this state we now have a clean canvas to start our work. Before I even get started on the roll cage I need to figure out where the main hoop is gonna land, and to do that I'm gonna use these blocks, set one of our racing seats on top at the farthest point back from the pedals in case we have a tall driver, and what this is gonna do is push the main hoop as far back as it needs to go so I can get started building.
(Jeremy)>> There's a couple different ways we could build the base of our roll cage. The way we chose was to use a plinth in the form of a box. That way we could build our cage like normal and when we're ready we'll just slide it back off the box, lower it down, and that way we can weld completely around all of our tubes.
(Jimmy)>> We'll kick this build off with a couple of measurements at the base of the B-pillar. With the measurements in hand we'll cut out the pieces at the Edwards Iron Worker making a slight bend in one of the pieces to match the profile of our cab.
(Jeremy)>> All we need to do from here is weld up a simple but strong box to support our main hoops.
(Jimmy)>> This method for building out the plinth box works the same as just welding a base plate to the floor to help spread the load over a large area to prevent failure of our roll cage, and it has the advantage of giving us access to all the weld seams.
(Jeremy)>> With that in mind we can now construct our cage starting with our main hoops. We'll position one behind the front seat utilizing a 75 and 15 degree bend, and then we'll place a secondary hoop behind the passenger seats cause we want our friends in back to be just as safe as we are up front.
(Jimmy)>> Next we need to install the side hoops. Each of these is set on the plinth box and the other end is notched to be married to the main hoop. We'll work our way back and tack these into place.
(Jeremy)>> The last pieces to be installed on this jungle gym are the diagonal brace and the door bars. That will help provide some triangulated strength and protect the passengers from any lateral impacts.
(Jimmy)>> We're now ready to finish weld all of our joints, and we have very little room between the top of the cage and the roof. So it'll be impossible to get a tig torch up in that tiny space. This is where our plinth box design comes into play. All we have to do is slide the cage back a few inches, allowing it to drop almost four inches, and that'll give us the ability to weld around each joint.
(Jeremy)>> With the front portion of our cage welded solid all we have to do is set it back on the plinth boxes, add a bar connecting the rear hoop to the front hoop, and make this a permanent part of our Trailblazer. [ MUSIC ]
(Jimmy)>> The cage went in like a piece of cake and we know throughout this build there's going to be some fabrication and need for some specialty parts, but we're also gonna be replacing stock parts to get this truck drifting.
(Jeremy)>> Coming up we put humpty dumpty back together again. This is Carcass.
(Jeremy)>> Our 2006 Trailblazer SS hasn't made any changes in the looks department on the exterior but the interior, well that's a whole other story.
(Jimmy)>> Now that the inside is safer it's time to put this thing all back together, and that starts with the dash.
(Jeremy)>> We need to modify the dash so it can fit around the roll cage we just installed. With an idea of how much room we need those measurements will be transferred to the top of our dash and then we'll just start cutting. With our cuts made we'll check to see if it fits. We'll keep an eye out for clearances around the down bars and to see if the dash lines up with the original bolt holes.
(Jimmy)>> Fortunately we only had to make one cut here with everything fitting like a glove, and with a half a dozen bolts holding it in place we can add some creature comforts like a/c controls, and even the radio just for looks.
(Jeremy)>> One thing that we are re-installing that's for more than just looks is the dash cluster. We'll be needing that to sneak up on that red line. Now that we have the front of our truck put back together it's time to make this a four passenger capable drift truck. We picked up some bucket seats from Summit Racing dot com and some brackets to match. The floor of our Trailblazer is an uneven mess. So we need to build some standoffs so we can safely attach our seats.
(Jimmy)>> We'll start by cutting inch and three quarter tubing at the chop saw. Then we'll add a tube flange and weld the two together. Before we can install the standoff in the cab we need to add a base plate.
(Jeremy)>> With that in place we can slip in our standoffs and then just tack those to the base plates. When we feel like everything is hunky dory we'll mark the holes in the back of the seats and then just drill them out.
(Jimmy)>> We'll finish weld our base plates and our standoffs, and finally throw in the seat one last time to bolt it down. [ MUSIC ]
(Jeremy)>> With our front seats we're fighting a similar problem with our trans tunnel being uneven. So we have to be a little more creative with our approach. With a diagonal measurement of seven inches in the front and four inches in the rear we'll cut down an inch and a half strap on our Edwards Iron Worker making sure we leave about an inch and a half to the four inch end of our measurement. Then we'll make a 45 degree bend 7 inches from one end and about 5.5 inches from the other. With the strapping flipped over we'll add a second 45 degree bend about an inch and a half from the end.
(Jimmy)>> A quick sanity check to make sure we made all the right bends at all the right lengths. Then we'll trace out our shape on some eighth inch plate and cut it out at the Iron Worker before moving to the welding table to put our tig to work.
(Jeremy)>> With the riser constructed all there is left to do is bolt it to the seat bracket. Add a simple tube and tab bracket to the other side, and then just set the seat in place.
(Jimmy)>> And we'll need to carefully weld it into place making sure not to put too much heat in one area.
(Jeremy)>> Let's get in here and see if it works. Oh man that's like butter.
(Jimmy)>> The interior is nearly complete but there's something missing that just doesn't feel quite right. We've got wiring strewn across the floor and we need a place to mount the hand brake for this drift truck. So we're gonna quickly fab up a center console and finish off the cab.
(Jeremy)>> We need to grab a measurement from the bottom of our dash to the rear cross bar of our roll cage. Then at the chop saw we'll cut a section of inch and five-eighths tubing and give it a 45 degree bend on our Edwards 10 ton bender.
(Jimmy)>> A notch needs to be cut at one end so that it can be attached to the cross bar of our roll cage, but before we can do that we need to install two mounting plates to the factory studs under the dash.
(Jeremy)>> Then we'll raise the tubing into place and tack that in front and at the rear of the cross bar. We'll bring in a second piece of bent tubing and tack that in place as well.
(Jimmy)>> Now we're ready to make a template for the sheet metal we'll use to cover the console. We'll crudely punch the shifter through the cardboard and roughly trace out where the e-brake will be.
(Jeremy)>> With those lines marked out we'll make quick work of them with the cutoff wheel. Then with some careful bending and maneuvering around the shifter we'll slide one piece of sheet metal on top making sure to tack it into place, and adding the remaining sections towards the rear.
(Jimmy)>> The last sections to go on are the side panels. We cut those out using a similar template. They get tacked on with a healthy number of tacks.
(Jeremy)>> We can now mount our hand brake since we have a center console to support it, and that all starts with finding a good location for the driver to have easy access to it.
(Jimmy)>> We want our hand brake to have a rigid base. So we're gonna trace out our mounting bracket on some eighth inch steel. We'll cut it out on the Iron Worker before taking it over to the belt sander to give it its final shape.
(Jeremy)>> In the cab we can tack it in the location where we want our hand brake to live. Then just drill out a couple of holes. [ drill humming ]
(Jeremy)>> And bolt it into place.
(Jimmy)>> Next on Carcass we send out our stock ponies to pasture and saddle up some fresh muscle for our four seat drifting machine. This is Carcass.
[ MUSIC ]
(Jeremy)>> The interior of our four door drifting machine is nearly complete. Now we're planning on converting this two wheel drive automatic into a six speed manual. So we're gonna have to do some work inside the cab, but before we can get to that we need to yank out this tired old 400 horsepower pony that nearly has 230,000 miles on it and replace it with a brand new 450 horsepower Clydesdale. Holy cow, I don't want to break it but it's half broke already. I got mine. [ MUSIC ]
(Jeremy)>> With a few bolts here and a few hoses there we'll have the intake free from the top of the engine, making plenty of room for us to pull this poor pony free. With our motor mounts loose we can now yank out this washed up race horse. All that leg work we put into prepping the front end, well it's about to pay off, making easy work lifting this 400 pound engine free from its home.
(Jimmy)>> Giddy up ponies! Alright dude!
(Jeremy)>> Alright we can back up like three inches maybe? A little more. I'm on on this side. We'll snug up our engine for starters, and then we'll slip in our headers from below and bolt them in up top. With most of the wiring out of the way we can tackle the front accessory drive. An alternator gets thrown into the mix and a final connection can be made.
(Jimmy)>> With a brand new 450 horsepower engine sitting under the hood our Trailblazer SS is taking on a new persona.
(Jeremy)>> That's right, we'll soon be able to call this thing a drifting Trailblazer with the thoroughbred we have up front, but before we get to that point we need to saddle up this pony. To make this install easier we'll work on this vehicle when it's on the hoist. Jimmy and I will both tackle the clutch together because four hands are way better than two.
(Jimmy)>> In order to setup our clutch throw out bearing spacing we need to install the bell housing and take a measurement. Using a square we'll use the face of the bell housing for reference and measure to the fingers of the pressure plate with a caliper.
(Jeremy)>> On the transmission we'll use a square and set it on the throw out bearing, measuring the distance from the throw out bearing to where the transmission case would meet the bell housing. With those numbers in hand we'll do a little math and our goal is to have about 150 thousandths air gap.
(Jimmy)>> To achieve this we'll pop the throw out bearing off the shaft, and we'll need to add five 90 thousandths shims. Then we can slip the throw out bearing back on the shaft.
(Jeremy)>> Our transmission is now ready to be installed but before we can do that we need to make some changes in the cab to make room for our shifter, and that all starts with the measurement of the transmission.
(Jimmy)>> 23 inches. Using the bell housing for reference again we can mark the location on the underside of the vehicle and drill a pilot hole to reference the location on the other side.
(Jeremy)>> In the cab we'll unbolt and remove the old automatic shifter, and using the pilot hole we drilled from the bottom we'll line up a four inch hole saw and plunge cut a giant hole through the transmission tunnel.
(Jimmy)>> Think we can get it first try?
(Jeremy)>> I don't know. And stop. Now we've got a shifter it's gonna hit.
(Jimmy)>> Installing the transmission is pretty straight forward. We need to marry the input shaft of the transmission with the clutch, carefully guiding this 135 pound beast into position.
(Jimmy)>> To finish up our installation we'll use the stock cross member and bushings, snugging everything up.
(Jeremy)>> Now it's time to get started on our clutch pedal. To get it installed we'll drill out 2 connecting inch and a half holes in the firewall, checking to make sure that the fittings clear the hole.
(Jimmy)>> Next we'll drill a hole through the bracket we fabbed up and punch it through the floor. Then add the pedal securing it to the bracket. We'll follow that up with a remote reservoir, which will mount in the cab, and connect the hose to the master cylinder.
(Jeremy)>> We'll make the final connection under the vehicle, attaching the clutch line.
(Jeremy)>> Back in the cab we'll attach the new handle bracket to the shifter before we can figure out a solution for the handle. Jimmy's got a great idea for the handle. We're gonna cut up this huge inch and five-sixteenths wrench and weld it to the handle bracket. Then we'll just put it in the cab and see how it acts. This worked out really, really good but can you imagine it as a right hand drive car?
(Jimmy)>> I don't really have any coordination with my left hand.
(Jeremy)>> I got plenty on this side. Dump the clutch ready, one, two, three. [ making engine noises ]
(Jimmy)>> Coming up look out EPA.
(Jeremy)>> Because we're transforming the exterior of our Trailblazer SS.
(Jimmy)>> That's right, we're making a carbon hood print.
[ MUSIC ]
(Jimmy)>> This 14 year old paint job is in decent shape and we could polish this truck up to a mirror like shine but we have alternative plans for this guy.
(Jeremy)>> Our vehicle is gonna get some special treatment from the guys down the street, making our Trailblazer look like a true drifting vehicle. This process starts with some design ideas. Finding out the colors we like and the ones we don't. When we've chosen a design we'll send it off to The Wrap Lab in Franklin, Tennessee, and let the pros get to work.
(Jimmy)>> We're gonna reconstruct the hood of our Trailblazer SS but we're gonna do it with carbon fiber.
(Jeremy)>> Carbon fiber can be up to five times stronger than steel and twice as stiff, but for our application we aren't concerned about strength. We're concerned about weight savings and the looks department.
(Jimmy)>> To get our hood looking sporty there's a little prep involved. Carbon fiber is laid down in layers molding to the shape of the hood. So with a thorough cleaning we can start the process.
(Jeremy)>> We'll then apply several coats of wax making sure to gently buff it after each coat. With a good layer of this stuff on we won't have to worry about the carbon fiber sticking to the hood.
(Jimmy)>> With that out of the way we can start working with the material. We're pre-cutting four sections of carbon fiber cloth to size. We're doing this because this will be a fairly quick process and having these on standby will prevent headaches down the road.
(Jeremy)>> We're now ready to lay down our first layer. Spreading it out on the hood we'll use a can of adhesive spray to help hold it in place.
(Jimmy)>> Then we can start mixing the laminating epoxy resin. This is mixed three to one with a hardener. Two part epoxies like this have something called a pot life. This means there's only an effective working time before it becomes less workable or useless and you risk wasting material. The pot life on this epoxy is one hour. So we're gonna have to work quickly to get each layer on.
(Jeremy)>> We're using a squeegee to carefully spread the epoxy covering every square inch of carbon fiber. We'll lay it on thick getting good coverage, and then we'll go over it one more time to remove the excess.
(Jimmy)>> This is repeated again with the second layer, and again with the third, and once more for our final layer of carbon fiber letting the epoxy cure overnight. I think we got it, Johnny on the spot. Good job man.
(Jimmy)>> The epoxy has been given ample time to cure and it's time to crack it loose from the mold.
(Jeremy)>> This is why several coats of wax are essential to this process.
(Jimmy)>> Whoa, that's awesome! Seeing the underside of the hood I'm happy to say that our prep work has paid off, but we're not done yet. We need to make the top side of this thing look just as glassy smooth as the bottom side.
(Jeremy)>> This starts with a little scuff sanding. We're using 120 grit to prep for our flow coat.
(Jimmy)>> We're laying on this coat super thick using modified squeegees to spread but allowing it to pool. We'll let gravity do the work of leveling it all out.
(Jeremy)>> With our flow coat having ample time to cure we'll hit it one more time with a d-a and a series of sand paper grits.
(Jimmy)>> Then we'll trim the edges with a cutoff wheel taking care not to over cut. We were lucky that the underside of the mold left a line to follow which corresponds with the edge of the hood.
(Jeremy)>> The last step to this process is to give our carbon fiber hood some u/v protection with a clear coat and we'll let that dry overnight. To mount our hood we need to add a few reinforcements to help hold the hood in place. At the break we'll take two pieces of 20 gauge steel and bend them length wise at 90 degrees.
(Jimmy)>> With those in hand we'll shrink one side and test fit them to make sure they fit the contour of the hood. Then at the band saw we'll cut one of them down the middle removing a chunk so that they'll be able to form an "X" on the hood.
(Jeremy)>> We'll need to trace the metal stiffeners and use those marks to scuff the surface. Then we'll apply some panel bond adhesive and stick our metal reinforcements to the bottom side of the hood.
(Jimmy)>> To finish up this install we'll drill some holes for a hood pin kit we picked up from Summit Racing, installing the plates that prevent the pins from scratching the hood. [ MUSIC ] Dude this thing looks way more like a race car now.
(Jeremy)>> It looks just like the original hood but it's way cooler.
(Jimmy)>> Our design team and the guys at The Wrap Lab really knocked this thing out of the park, and to be honest I'm kinda speechless.
(Jeremy)>> We've got black body lines meeting orange wrap lines. We've got killer looking side stripes, our signature lightning bolt, and Carcass logo written on the back, and that's paired up with our custom carbon fiber hood, and that gives our drifting Trailblazer a whole new persona.
(Jeremy)>> Yes, that's exactly what it was supposed to do.
(Jimmy)>> It sounds good too. Got a little rumble to it.
(Jeremy)>> I like that! That was simple, very simple. [ MUSIC ]
(Jimmy)>> Follow along with this build at Powernation TV dot com.
(Jeremy)>> Next time on Carcass we pump up the horsepower with a Vortec supercharger.
(Jimmy)>> Plus we put it to the test on the dyno and on the pavement.
(Jeremy)>> You're watching Carcass!


