
Carcass Featured Projects


Carcass Builds


Want more content like this?
Join the PowerNation Email NewsletterParts Used In This Episode
Matco Tools
MATCO Tools are the Official Tool Supplier to PowerNation
The Industrial Depot
Tools, Hardware, Shop Supplies
Episode Transcript
(Jimmy)>> Today on Carcass.
(Jeremy)>> We strip and remove the non-essentials.
(Jimmy)>> And our Willys body finally gets a home.
(Jeremy)>> You're watching Carcass. ♪ ♪
(Narrator)>> When you want to build something different you turn to these guys, Jeremy Weckman and Jimmy King. Jeremy was raised in Minnesota building street rods. He's a builder, fabricator, and welder. Jimmy grew up in Nevada working in his dad's garage building cars. He's a mechanical engineer, builder, and fabricator. They take left for dead rides and transform them into one of a kind builds. If you can dream it they can build it. This is Carcass, a non-traditional speed shop.
(Jimmy)>> We made a lot of headway on our 1953 Willys wagon.
(Jeremy)>> We started with a CUCV, which stands for Civilian Utility Cargo Vehicle. In this case a Chevy M1010, which was used as an ambulance in the US Coast Guard.
(Jimmy)>> Needless to say this behemoth of a vehicle has made quite the transformation in preparation for the Willys body.
(Jeremy)>> That's right. We removed the big ambo box on the back and then lifted the body clean off the chassis.
(Jimmy)>> Then we removed the exhaust, yanked out the engine and transmission, and got rid of the diesel fuel lines.
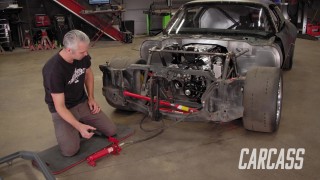
(Jeremy)>> With our frame practically bare we armed ourselves with some cutoff wheels and took our wheel base from 132 inches down to a more suitable 107.
(Jimmy)>> To reinforce that section of the frame we welded a fish plate over the cut seam and boxed it in for strength.
(Jeremy)>> Now we're moments away from giving this thing the infamous suit of armor, converting it into a 1953 Willys wagon. ♪ ♪
(Jimmy)>> I can't wait to get to the shop to see if we can't get the body on the chassis.
(Jeremy)>> The wheel base of the Willys is 104. We ended up at 107 inches. I mean that's close enough we really couldn't take any more out of that section anyways. So I think we'll be just fine.
(Jimmy)>> And honestly I don't think it matters too much because the front fenders on the Willys, it's not closed off. So you can have the wheel base whatever you want, and it might look cool if the tires stick out a little bit.
(Jeremy)>> Yeah that'd be kinda awesome to have the front tires stick out just a little bit. It'll give it a different look. [ engine revving ]
(Jimmy)>> I do have one concern though putting the body on, and it has to do with the rear wheel opening cause it's really short and it's got like this flat top on it. It's not round. Right now we have the 37 inch tires on it and I'm afraid when we come down with the body it'll hit the tires before it lands on the chassis.
(Jeremy)>> Yeah you're right. Well we do have the stock tires that came on it. So we can switch them out, or we had talked about putting a lift in it and if we lift it up that'll pull the chassis further away from the axle. So then there might be enough room to set the body on.
(Jimmy)>> That's a good point. ♪ ♪ I don't know if you noticed but the firewall on the Willys, it's like this weird fiberglass mesh and I just think we should cut the whole thing out because we're not sure where everything's gonna land once we get the engine in, which is a little bit down the line but I feel like it'll make our lives easier now if we can get it out of the way. And then once we put the engine in just build the firewall around it.
(Jeremy)>> Right there's no way of knowing where the firewall's gonna land in relationship to where the engine's gonna be sitting and relationship to where the wheel well's gonna fall on the back wheels. I mean I think you're right. It makes a whole lot of sense. One, it's in terrible shape and two, it's just gonna make our lives a lot easier. We'll I don't know about you but I'm super excited to get to the shop and set that body on top of that chassis.
(Jimmy)>> Yeah we'll see how it goes. I mean we don't know until we try it out.
(Jeremy)>> That's right. [ engine revving ]
(Jeremy)>> So lowered slammed to the ground that thing will be awesome.
(Jimmy)>> And drifted, yes! ♪ ♪ To kick this day off we're gonna remove all the extra body mounts and brackets that are on the CUCV chassis cause we're gonna end up making our own mounts to stick the Willys body on top.
(Jeremy)>> All the body mounts are riveted to the frame, and there's a number of ways we can remove them. We're going with a grinding method.
(Jimmy)>> We're gonna grind down the head of each rivet flush with the bracket. Then with a punch and hammer will knock each one out. [ hammer banging metal ]
(Jimmy)>> Hmm, I didn't even get all the rivets out yet. [ grinder buzzing ]
(Jeremy)>> Each body mount has about five rivets. So this may take a while, but getting rid of these will make it a whole lot easier to set the Willys body on top of the chassis.
(Jimmy)>> With the body mounts out of the way we'll move to the back and cut the spare tire carrier free. Then we'll move on to the exhaust mounts.
(Jeremy)>> The first one is bolted to the chassis, but with all that corrosion it may take a little bit of force to break the bolts free. ♪ ♪
(Jimmy)>> The last two exhaust brackets were riveted to the chassis. So we took a little bit different approach to these. A little caveman strength will do the trick.
(Jeremy)>> While Jimmy finishes that I'm gonna go ahead and take the fuel tank out of the Willys. We'll use a transmission jack to safely support the gas tank. Then we'll remove the four nuts securing the straps. [ drill humming ]
(Jeremy)>> Then we'll just remove this ancient tank out of the way so we can put our Willys body on the chassis.
(Jimmy)>> After some thinking Jeremy and I decided the best way to get the Willys body on the chassis is to use the forklift. To do that we'll put the forks through the windows. Just tell me when to stop.
(Jeremy)>> Alright. Okay go up.
(Jimmy)>> Going up.
(Jeremy)>> Looks good. Alright you're touching. ♪ ♪ Oh yeah, I think we need to roll the chassis forward. ♪ ♪ Alright let's try that.
(Jimmy)>> Alright going down. ♪ ♪
(Jeremy)>> Alright stop. Yeah that ain't gonna work.
(Jimmy)>> What's going on?
(Jeremy)>> The back of the body is hitting the chassis. Yeah what we're gonna have to do is either cut the back of the chassis off or we're gonna have to come up in here and cut the body.
(Jimmy)>> Yeah it just depends if we want to try and keep these stairs or not.
(Jeremy)>> Jimmy and I are gonna have to put some thought into what we want for this build.
(Jimmy)>> That's right, the question we need answered is do we cut into the iconic Willys body or not.
(Jeremy)>> Yeah do we sacrifice preservation for convenience or convenience for preservation?
(Jimmy)>> We'll find out.
(Jeremy)>> Up next we go nuts!
(Jimmy)>> And make this marriage final.
(Jeremy)>> You're watching Carcass.
(Jimmy)>> We were ready to plant our Willys wagon body on our CUCV chassis but we hit a little snag.
(Jeremy)>> Yeah our chassis is a little too long to fit underneath the Willys body. So we're faced with a decision. Either we've got to cut the body or cut the back off where the steps are, and those are what we wanted to keep.
(Jimmy)>> As much as we would love to keep the steps out back it does look a little goofy sticking out from the rear. So we're torching the idea.
(Jeremy)>> We're gonna make quick work of removing the rear section from our chassis, but we're gonna have to be extra careful when cutting it. Since this section weighs 50 pounds and is so large we're gonna partially cut each side of the frame and gradually let it sag on its own. Once it's in a safer position we'll make our final cuts and let it fall to the ground.
(Jimmy)>> With the stairs out of the way we can see if the body will fit.
(Jeremy)>> Keep going. Okay stop right there. It's still touching.
(Jimmy)>> It actually looks really level the way it's sitting there now.
(Jeremy)>> You're right. That's sitting like perfectly level on the chassis.
(Jimmy)>> So I think we just make mounts as it's sitting there and call it good.
(Jeremy)>> Yeah we'll just leave it right there. We thought the body would have to wrap around the rear section of the chassis, but since it's sitting perfectly level we're just gonna get straight to work fabbing up the body mounts that hold everything in place.
(Jimmy)>> This all starts with cutting a three inch section of four by two rectangular tubing.
(Jeremy)>> And a little prep work of a few strong points on the Willys body.
(Jimmy)>> The tubing will get a half inch hole drilled through one side. Then it can be paired with a bushing to help locate where it needs to be tacked on the body. [ welder crackling ]
(Jimmy)>> With the bushing out of the way we can make this body mount permanent. [ welder crackling ]
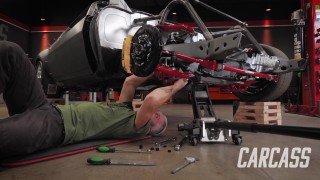
(Jeremy)>> We need to create a number of body mounts for this body swap. Seven of them to be exact, and all of them have their own set of challenges. With this specific one we're using the stock body mount on the Willys. So we'll have to build a matching chassis mount to marry the two together. With the template traced out on an eighth inch plate of steel we can move over to the Edwards Iron Worker and cut them out.
(Jimmy)>> The geometry of the body mounts we're building is super important, and to get the most strength we're gonna go for a triangular configuration. If we used a parallel configuration we wouldn't get as much strength in the lateral direction. However if we use a triangular configuration we'd get a lot of strength laterally, and that's gonna be suitable for our Willys body. Nothing like a good triangle.
(Jeremy)>> With two of the three pieces we need already cut out all there's left to do is to assemble our triangular mount. The first plate is eyeballed into position and then just tacked in place. The second is eyeballed in a similar fashion and tacked in as well. The reason we can eyeball these is because we're gonna cut the top plate to fit. We'll use our trusty Edwards Iron Worker to cut out the shape and just punch a hole for the bolt. Then we can just slide in our top plate and our bushing for a quick test fit. Perfect! Knowing we have a good fit, the top plate gets tacked into place. [ welder crackling ]
(Jimmy)>> Now all there's left to do is to remove the Willys body and finish weld all the mounts. ♪ ♪ [ welder crackling ]
(Jeremy)>> I'm excited, are you excited? I know you're excited.
(Jimmy)>> Yeah! It's now time as some would say to lock in this marriage, and we're gonna make this match final with a few bolts, a few washers, and some torqued down nuts.
(Jeremy)>> Our huge CUCV chassis and our iconic Willys body are now one in Carcass matrimony.
(Jimmy)>> Coming up, we check on the status of our small block Chevy.
(Jeremy)>> What's taking those Engine Power guys so long?
(Jimmy)>> You're watching Carcass.
(Jeremy)>> Hey Jimmy, what are you doing?
(Jimmy)>> Nice scooter man.
(Jeremy)>> Thanks dude.
(Jimmy)>> I've been looking at the engine mounts and I think if we put the engine in the original position the blower drive is gonna be right where the grill is.
(Jeremy)>> Yeah, you know the wheels and tires, they fit in the wheel well perfectly. So I think the next logical step is to just shift the motor back.
(Jimmy)>> Yeah so we're gonna have to make custom engine mounts, take the firewall out, which we wanted to do anyway so that's fine, but we need the engine to do all that.
(Jeremy)>> Yeah the guys down in Engine Power have the engine and something went wrong with it. So they tore it all apart. Let's go see how they're doing. You got your skateboard? Let's go! You want to race?
(Jimmy)>> I'll beat you.
(Jeremy)>> Yeah buddy! See I've got a brake. Yeah you don't have a brake.
(Jimmy)>> Road surfing. What are these guys up to?
(Jeremy)>> Hey guys, how far did you guys get?
(Pat)>> What's up fellas?
(Mike)>> We got it apart.
(Jeremy)>> Yeah I see there's a bunch of parts sitting on two different benches.
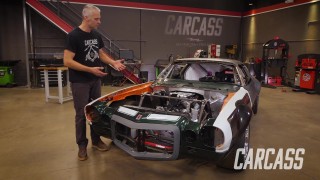
(Mike)>> We got some parts in. Pat's measuring up the new pistons, checking them out.
(Pat)>> Well these, we're using a dish piston. We'll knock some compression out of it. Not that it didn't need it but we're gonna build in a little bit of a safety margin on this thing because this particular engine has been whipped like a rented mule since we've taken it out of the car.
(Jimmy)>> So what was the last build you guys did with this motor?
(Mike)>> We flogged it with some nitrous. It made 720?
(Pat)>> It made 720, and what we're guessing is we were a little hard on the thing last time. What happens on a piston. Back here in the corner, this is the thinnest part. This is where the valve relief goes in, and sometimes when they get a little soft and they get a lot of cycle time on it.
(Mike)>> At least 300 pulls on the dyno.
(Pat)>> We have a bunch of pulls. We have 300 plus pulls on it testing cylinder heads, cam shafts, intake manifolds to see how high it'll rev. Just stuff like that, and what happens is this looks like it developed a crack in the valve relief, and what happens is once it starts it'll start to eat itself. So it went ahead and took a chunk out of the top ring land.
(Mike)>> And what's awesome is none of the other holes were like that. They all checked out great. Tune up looked good, the whole nine yards.
(Pat)>> You can tell how good the tune up and everything was by not only looking at the top of the piston, but here's something pretty interesting. That's the bearings that came out of it. Now those bearings right there look like they haven't even been run, and those have made 720 horse on nitrous, 570, 565, 570 naturally aspirated turning the engine 8,000 plus. So everything else was cool.
(Mike)>> And then we've got blower pulls on it too before we hurt the piston.
(Pat)>> Yeah we're doing our warm up stuff, and actually our first initial one the engine with no timing. It had 22 degrees of timing in it, it made 650 for power and 650 on torque, and then we had a bit of a minor malfunction.
(Jeremy)>> So what are you guys gonna put back into it to get it back on the dyno?
(Mike)>> So what we did. The crank, because of the new pistons, is at the machine shop getting re-balanced. Pat's gonna re-hone the block. We're waiting for the torque plate to get here. We want to make sure everything's done the right way. And as far as the rods go we're gonna reuse the rods. Cylinder head, the one with the bad cylinder was over, had some aluminum and that caked onto the bottom of the cylinder head and it needed a valve job cause it got some trash in the seat. So we're just getting all that stuff cleaned up. We'll have it back tomorrow.
(Jeremy)>> Cool, so you guys will starting to work on this more tomorrow?
(Pat)>> Yes absolutely, and again for what happened it pretty much a minimal amount of parts that it needs. Since we can put parts in it we're doing things a little bit different. Putting an upgraded piston in it. It has a better ring pack, it has a better skirt design. The bearings, we're gonna put the same bearings. The coated bearing looks good. All the clearances are right because we can tell that by the way it came apart. Oil pump was good. This thing had oil pressure. So we're not worried about that, and then basically we're gonna get back to square one and then get back on it and start banging on the thing again.
(Mike)>> You know what's not going to change?
(Jeremy)>> What's that?
(Mike)>> The green blower. Money green!
(Jeremy)>> That's one of my favorite things you decided to do is definitely paint it green.
(Mike)>> The color just makes everything stand out. You either like it or you hate it. There's no in between with the green.
(Jeremy)>> With this thing sticking out of the hood of the Willys it's just gonna have a huge calling. People are just gonna ogle over it.
(Mike)>> Now did you guys sit down and do any kind of draw up, rendering, ideas of what it's gonna look like? Really, it's all up here. Well put it on paper, we want to see something.
(Jeremy)>> Well we'll have you guys down actually. We'll probably come and get you. When you're done with it and you give it back to us we'll bring you guys back down to the shop and you can help us probably dial it in a little better.
(Pat)>> By saying that we're gonna have this thing on the dyno very, very soon. So you hear noise come on down and you can check it out.
(Mike)>> The last time he came down and checked this out he looked at a watch. And now he wants us to come down and help him.
(Jeremy)>> When you guys have time, how about that? Does that work?
(Pat)>> That'll work better.
(Jimmy)>> In the meantime we'll keep getting the Willys prepped but when you guys get this back on the dyno let us know.
(Mike)>> Yeah you guys have to come down and make some pulls again.
(Jeremy)>> Alright we'll come running.
(Mike)>> See y'all.
(Pat)>> Get back to work. You guys got stuff to do.
(Jeremy)>> Coming up we tear out the Willys' interior.
(Jimmy)>> And wreak havoc on the chicken wire firewall.
(Jeremy)>> Next on Carcass.
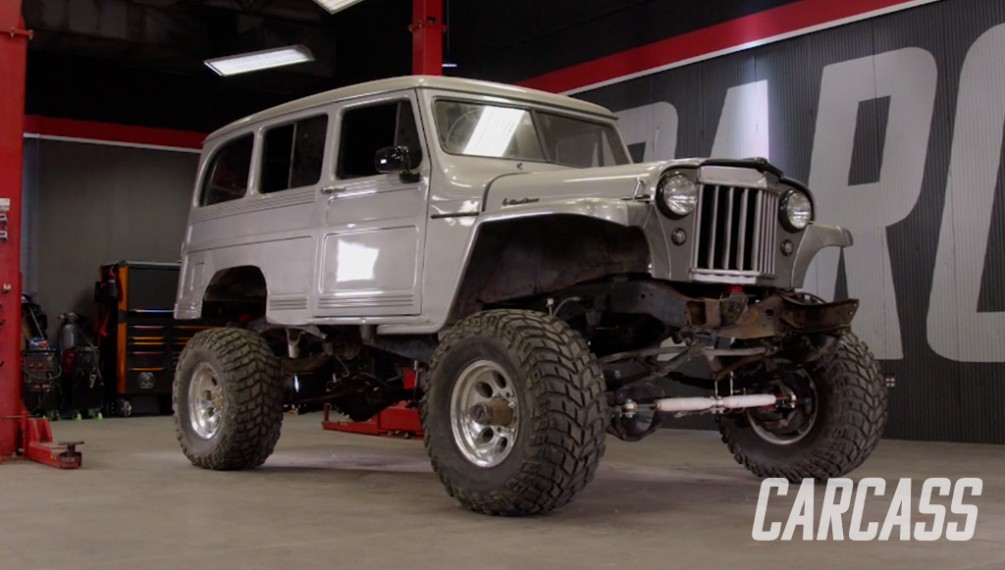
(Jeremy)>> We hit a major milestone. We were able to set the Willys body on the CUCV chassis.
(Jimmy)>> To get there we cleaned old bracketry off the chassis and removed that fuel tank from the Willys.
(Jeremy)>> Then we were able to set that iconic body down on the frame and we started building seven new body mounts.
(Jimmy)>> With these two joined together it looks radical.
(Jeremy)>> That's right but we still have a lot of work to do. So we're gonna get that body off so we can prep it for the new engine and trans combo.
(Jimmy)>> Probably cut these wires that are gonna be coming out of here. We're gonna take out all the interior for two reasons. One, we need to get rid of that check wire firewall and two, this truck is gonna spend a lot of time in the mud and carpet is just a bad idea.
(Jeremy)>> Wow!
(Jimmy)>> I'd just get cutting away. Just redo this whole thing ourselves. This is one of those things were they have a problem and they're like I can't find where the wiring problem is. I wonder why?
(Jeremy)>> The wiring in this thing is a mess. You've got a whole bunch of wire nuts, crimps, after crimps, after crimps, and I'd be surprised if anybody could track down an electrical issue when this thing was running.
(Jimmy)>> Now this cowl vent linkage is kinda sketchy.
(Jeremy)>> Does that still work?
(Jimmy)>> Yeah it does. Free a/c!
(Jeremy)>> Alright wiring's pretty much done. Next is kinda the seats huh?
(Jimmy)>> Yeah looks like it.
(Jeremy)>> I have no idea how they come out of here though. Look at that. Dude there's like a little trap door down here.
(Jimmy)>> Oh yeah, you're right.
(Jeremy)>> And then the seats are just bolted right down to this riser. Well that's easy enough. ♪ ♪ There's one!
(Jimmy)>> With the second seat out of the way we can get to tearing out that carpet and remove the steering.
(Jeremy)>> The carpet came out without a hitch and the steering, well a few bolts took care of that mess.
(Jimmy)>> With the steering out of the way we can tear out the rest of the carpet below the dash.
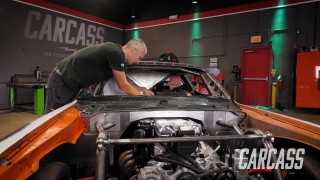
(Jeremy)>> With the interior out and in the dumpster it's time to start on the firewall, but first Jimmy and I have got to get rid of the hood, the fenders, and the grille shell.
(Jimmy)>> The hood was already loose and just sitting on top for looks. However we did have to unbolt the grille, which was attached to the fenders. ♪ ♪
(Jeremy)>> We followed that up with a quick removal of the battery tray. Then we got to work removing the bolts that hold the fender onto the Willys body. ♪ ♪ You know Jimmy, this firewall, this is just a work of art.
(Jimmy)>> It's an ugly work of art.
(Jeremy)>> Somebody had a small block Chevy in here and it looks like that was beat in for the valve cover and the h-e-i kinda sat right in here.
(Jimmy)>> Well if we're gonna cut it out anyways where do you think we should cut it at?
(Jeremy)>> I think we're gonna end up cutting down here where the toe board is and we'll come across the top and cut it. I just have no idea what's behind there.
(Jimmy)>> If it's gonna come out anyways I'm curious if this thing's actually that strong and if it can hold up to a few hits with a hammer.
(Jeremy)>> Go for it. Let's see what happens. [ banging ]
(Jimmy)>> Oh yeah! [ banging ]
(Jimmy)>> Oh, yeah, that broke through.
(Jeremy)>> Yeah that's definitely not as strong as metal. What do you say we just get to cutting?
(Jimmy)>> Let's get it.
(Jeremy)>> We're using reciprocating saws for this job because let's face it. They cut fast and we are not at all concerned about accuracy.
(Jimmy)>> We have a lot of metal to cut through, not to mention the layers upon layers of weld, bondo, and chicken wire, but with our Jedi strength we'll use the force to open this tin can.
(Jeremy)>> With this thing tore apart follow along as we build this monster at Powernation TV dot com. Coming up on our next show we're gonna install some major upgrades to make way for our drivetrain.
(Jimmy)>> And we jack this bad boy up another four inches, stay tuned.
(Jeremy)>> You're watching Carcass.
Show Full Transcript
(Jeremy)>> We strip and remove the non-essentials.
(Jimmy)>> And our Willys body finally gets a home.
(Jeremy)>> You're watching Carcass. ♪ ♪
(Narrator)>> When you want to build something different you turn to these guys, Jeremy Weckman and Jimmy King. Jeremy was raised in Minnesota building street rods. He's a builder, fabricator, and welder. Jimmy grew up in Nevada working in his dad's garage building cars. He's a mechanical engineer, builder, and fabricator. They take left for dead rides and transform them into one of a kind builds. If you can dream it they can build it. This is Carcass, a non-traditional speed shop.
(Jimmy)>> We made a lot of headway on our 1953 Willys wagon.
(Jeremy)>> We started with a CUCV, which stands for Civilian Utility Cargo Vehicle. In this case a Chevy M1010, which was used as an ambulance in the US Coast Guard.
(Jimmy)>> Needless to say this behemoth of a vehicle has made quite the transformation in preparation for the Willys body.
(Jeremy)>> That's right. We removed the big ambo box on the back and then lifted the body clean off the chassis.
(Jimmy)>> Then we removed the exhaust, yanked out the engine and transmission, and got rid of the diesel fuel lines.
(Jeremy)>> With our frame practically bare we armed ourselves with some cutoff wheels and took our wheel base from 132 inches down to a more suitable 107.
(Jimmy)>> To reinforce that section of the frame we welded a fish plate over the cut seam and boxed it in for strength.
(Jeremy)>> Now we're moments away from giving this thing the infamous suit of armor, converting it into a 1953 Willys wagon. ♪ ♪
(Jimmy)>> I can't wait to get to the shop to see if we can't get the body on the chassis.
(Jeremy)>> The wheel base of the Willys is 104. We ended up at 107 inches. I mean that's close enough we really couldn't take any more out of that section anyways. So I think we'll be just fine.
(Jimmy)>> And honestly I don't think it matters too much because the front fenders on the Willys, it's not closed off. So you can have the wheel base whatever you want, and it might look cool if the tires stick out a little bit.
(Jeremy)>> Yeah that'd be kinda awesome to have the front tires stick out just a little bit. It'll give it a different look. [ engine revving ]
(Jimmy)>> I do have one concern though putting the body on, and it has to do with the rear wheel opening cause it's really short and it's got like this flat top on it. It's not round. Right now we have the 37 inch tires on it and I'm afraid when we come down with the body it'll hit the tires before it lands on the chassis.
(Jeremy)>> Yeah you're right. Well we do have the stock tires that came on it. So we can switch them out, or we had talked about putting a lift in it and if we lift it up that'll pull the chassis further away from the axle. So then there might be enough room to set the body on.
(Jimmy)>> That's a good point. ♪ ♪ I don't know if you noticed but the firewall on the Willys, it's like this weird fiberglass mesh and I just think we should cut the whole thing out because we're not sure where everything's gonna land once we get the engine in, which is a little bit down the line but I feel like it'll make our lives easier now if we can get it out of the way. And then once we put the engine in just build the firewall around it.
(Jeremy)>> Right there's no way of knowing where the firewall's gonna land in relationship to where the engine's gonna be sitting and relationship to where the wheel well's gonna fall on the back wheels. I mean I think you're right. It makes a whole lot of sense. One, it's in terrible shape and two, it's just gonna make our lives a lot easier. We'll I don't know about you but I'm super excited to get to the shop and set that body on top of that chassis.
(Jimmy)>> Yeah we'll see how it goes. I mean we don't know until we try it out.
(Jeremy)>> That's right. [ engine revving ]
(Jeremy)>> So lowered slammed to the ground that thing will be awesome.
(Jimmy)>> And drifted, yes! ♪ ♪ To kick this day off we're gonna remove all the extra body mounts and brackets that are on the CUCV chassis cause we're gonna end up making our own mounts to stick the Willys body on top.
(Jeremy)>> All the body mounts are riveted to the frame, and there's a number of ways we can remove them. We're going with a grinding method.
(Jimmy)>> We're gonna grind down the head of each rivet flush with the bracket. Then with a punch and hammer will knock each one out. [ hammer banging metal ]
(Jimmy)>> Hmm, I didn't even get all the rivets out yet. [ grinder buzzing ]
(Jeremy)>> Each body mount has about five rivets. So this may take a while, but getting rid of these will make it a whole lot easier to set the Willys body on top of the chassis.
(Jimmy)>> With the body mounts out of the way we'll move to the back and cut the spare tire carrier free. Then we'll move on to the exhaust mounts.
(Jeremy)>> The first one is bolted to the chassis, but with all that corrosion it may take a little bit of force to break the bolts free. ♪ ♪
(Jimmy)>> The last two exhaust brackets were riveted to the chassis. So we took a little bit different approach to these. A little caveman strength will do the trick.
(Jeremy)>> While Jimmy finishes that I'm gonna go ahead and take the fuel tank out of the Willys. We'll use a transmission jack to safely support the gas tank. Then we'll remove the four nuts securing the straps. [ drill humming ]
(Jeremy)>> Then we'll just remove this ancient tank out of the way so we can put our Willys body on the chassis.
(Jimmy)>> After some thinking Jeremy and I decided the best way to get the Willys body on the chassis is to use the forklift. To do that we'll put the forks through the windows. Just tell me when to stop.
(Jeremy)>> Alright. Okay go up.
(Jimmy)>> Going up.
(Jeremy)>> Looks good. Alright you're touching. ♪ ♪ Oh yeah, I think we need to roll the chassis forward. ♪ ♪ Alright let's try that.
(Jimmy)>> Alright going down. ♪ ♪
(Jeremy)>> Alright stop. Yeah that ain't gonna work.
(Jimmy)>> What's going on?
(Jeremy)>> The back of the body is hitting the chassis. Yeah what we're gonna have to do is either cut the back of the chassis off or we're gonna have to come up in here and cut the body.
(Jimmy)>> Yeah it just depends if we want to try and keep these stairs or not.
(Jeremy)>> Jimmy and I are gonna have to put some thought into what we want for this build.
(Jimmy)>> That's right, the question we need answered is do we cut into the iconic Willys body or not.
(Jeremy)>> Yeah do we sacrifice preservation for convenience or convenience for preservation?
(Jimmy)>> We'll find out.
(Jeremy)>> Up next we go nuts!
(Jimmy)>> And make this marriage final.
(Jeremy)>> You're watching Carcass.
(Jimmy)>> We were ready to plant our Willys wagon body on our CUCV chassis but we hit a little snag.
(Jeremy)>> Yeah our chassis is a little too long to fit underneath the Willys body. So we're faced with a decision. Either we've got to cut the body or cut the back off where the steps are, and those are what we wanted to keep.
(Jimmy)>> As much as we would love to keep the steps out back it does look a little goofy sticking out from the rear. So we're torching the idea.
(Jeremy)>> We're gonna make quick work of removing the rear section from our chassis, but we're gonna have to be extra careful when cutting it. Since this section weighs 50 pounds and is so large we're gonna partially cut each side of the frame and gradually let it sag on its own. Once it's in a safer position we'll make our final cuts and let it fall to the ground.
(Jimmy)>> With the stairs out of the way we can see if the body will fit.
(Jeremy)>> Keep going. Okay stop right there. It's still touching.
(Jimmy)>> It actually looks really level the way it's sitting there now.
(Jeremy)>> You're right. That's sitting like perfectly level on the chassis.
(Jimmy)>> So I think we just make mounts as it's sitting there and call it good.
(Jeremy)>> Yeah we'll just leave it right there. We thought the body would have to wrap around the rear section of the chassis, but since it's sitting perfectly level we're just gonna get straight to work fabbing up the body mounts that hold everything in place.
(Jimmy)>> This all starts with cutting a three inch section of four by two rectangular tubing.
(Jeremy)>> And a little prep work of a few strong points on the Willys body.
(Jimmy)>> The tubing will get a half inch hole drilled through one side. Then it can be paired with a bushing to help locate where it needs to be tacked on the body. [ welder crackling ]
(Jimmy)>> With the bushing out of the way we can make this body mount permanent. [ welder crackling ]
(Jeremy)>> We need to create a number of body mounts for this body swap. Seven of them to be exact, and all of them have their own set of challenges. With this specific one we're using the stock body mount on the Willys. So we'll have to build a matching chassis mount to marry the two together. With the template traced out on an eighth inch plate of steel we can move over to the Edwards Iron Worker and cut them out.
(Jimmy)>> The geometry of the body mounts we're building is super important, and to get the most strength we're gonna go for a triangular configuration. If we used a parallel configuration we wouldn't get as much strength in the lateral direction. However if we use a triangular configuration we'd get a lot of strength laterally, and that's gonna be suitable for our Willys body. Nothing like a good triangle.
(Jeremy)>> With two of the three pieces we need already cut out all there's left to do is to assemble our triangular mount. The first plate is eyeballed into position and then just tacked in place. The second is eyeballed in a similar fashion and tacked in as well. The reason we can eyeball these is because we're gonna cut the top plate to fit. We'll use our trusty Edwards Iron Worker to cut out the shape and just punch a hole for the bolt. Then we can just slide in our top plate and our bushing for a quick test fit. Perfect! Knowing we have a good fit, the top plate gets tacked into place. [ welder crackling ]
(Jimmy)>> Now all there's left to do is to remove the Willys body and finish weld all the mounts. ♪ ♪ [ welder crackling ]
(Jeremy)>> I'm excited, are you excited? I know you're excited.
(Jimmy)>> Yeah! It's now time as some would say to lock in this marriage, and we're gonna make this match final with a few bolts, a few washers, and some torqued down nuts.
(Jeremy)>> Our huge CUCV chassis and our iconic Willys body are now one in Carcass matrimony.
(Jimmy)>> Coming up, we check on the status of our small block Chevy.
(Jeremy)>> What's taking those Engine Power guys so long?
(Jimmy)>> You're watching Carcass.
(Jeremy)>> Hey Jimmy, what are you doing?
(Jimmy)>> Nice scooter man.
(Jeremy)>> Thanks dude.
(Jimmy)>> I've been looking at the engine mounts and I think if we put the engine in the original position the blower drive is gonna be right where the grill is.
(Jeremy)>> Yeah, you know the wheels and tires, they fit in the wheel well perfectly. So I think the next logical step is to just shift the motor back.
(Jimmy)>> Yeah so we're gonna have to make custom engine mounts, take the firewall out, which we wanted to do anyway so that's fine, but we need the engine to do all that.
(Jeremy)>> Yeah the guys down in Engine Power have the engine and something went wrong with it. So they tore it all apart. Let's go see how they're doing. You got your skateboard? Let's go! You want to race?
(Jimmy)>> I'll beat you.
(Jeremy)>> Yeah buddy! See I've got a brake. Yeah you don't have a brake.
(Jimmy)>> Road surfing. What are these guys up to?
(Jeremy)>> Hey guys, how far did you guys get?
(Pat)>> What's up fellas?
(Mike)>> We got it apart.
(Jeremy)>> Yeah I see there's a bunch of parts sitting on two different benches.
(Mike)>> We got some parts in. Pat's measuring up the new pistons, checking them out.
(Pat)>> Well these, we're using a dish piston. We'll knock some compression out of it. Not that it didn't need it but we're gonna build in a little bit of a safety margin on this thing because this particular engine has been whipped like a rented mule since we've taken it out of the car.
(Jimmy)>> So what was the last build you guys did with this motor?
(Mike)>> We flogged it with some nitrous. It made 720?
(Pat)>> It made 720, and what we're guessing is we were a little hard on the thing last time. What happens on a piston. Back here in the corner, this is the thinnest part. This is where the valve relief goes in, and sometimes when they get a little soft and they get a lot of cycle time on it.
(Mike)>> At least 300 pulls on the dyno.
(Pat)>> We have a bunch of pulls. We have 300 plus pulls on it testing cylinder heads, cam shafts, intake manifolds to see how high it'll rev. Just stuff like that, and what happens is this looks like it developed a crack in the valve relief, and what happens is once it starts it'll start to eat itself. So it went ahead and took a chunk out of the top ring land.
(Mike)>> And what's awesome is none of the other holes were like that. They all checked out great. Tune up looked good, the whole nine yards.
(Pat)>> You can tell how good the tune up and everything was by not only looking at the top of the piston, but here's something pretty interesting. That's the bearings that came out of it. Now those bearings right there look like they haven't even been run, and those have made 720 horse on nitrous, 570, 565, 570 naturally aspirated turning the engine 8,000 plus. So everything else was cool.
(Mike)>> And then we've got blower pulls on it too before we hurt the piston.
(Pat)>> Yeah we're doing our warm up stuff, and actually our first initial one the engine with no timing. It had 22 degrees of timing in it, it made 650 for power and 650 on torque, and then we had a bit of a minor malfunction.
(Jeremy)>> So what are you guys gonna put back into it to get it back on the dyno?
(Mike)>> So what we did. The crank, because of the new pistons, is at the machine shop getting re-balanced. Pat's gonna re-hone the block. We're waiting for the torque plate to get here. We want to make sure everything's done the right way. And as far as the rods go we're gonna reuse the rods. Cylinder head, the one with the bad cylinder was over, had some aluminum and that caked onto the bottom of the cylinder head and it needed a valve job cause it got some trash in the seat. So we're just getting all that stuff cleaned up. We'll have it back tomorrow.
(Jeremy)>> Cool, so you guys will starting to work on this more tomorrow?
(Pat)>> Yes absolutely, and again for what happened it pretty much a minimal amount of parts that it needs. Since we can put parts in it we're doing things a little bit different. Putting an upgraded piston in it. It has a better ring pack, it has a better skirt design. The bearings, we're gonna put the same bearings. The coated bearing looks good. All the clearances are right because we can tell that by the way it came apart. Oil pump was good. This thing had oil pressure. So we're not worried about that, and then basically we're gonna get back to square one and then get back on it and start banging on the thing again.
(Mike)>> You know what's not going to change?
(Jeremy)>> What's that?
(Mike)>> The green blower. Money green!
(Jeremy)>> That's one of my favorite things you decided to do is definitely paint it green.
(Mike)>> The color just makes everything stand out. You either like it or you hate it. There's no in between with the green.
(Jeremy)>> With this thing sticking out of the hood of the Willys it's just gonna have a huge calling. People are just gonna ogle over it.
(Mike)>> Now did you guys sit down and do any kind of draw up, rendering, ideas of what it's gonna look like? Really, it's all up here. Well put it on paper, we want to see something.
(Jeremy)>> Well we'll have you guys down actually. We'll probably come and get you. When you're done with it and you give it back to us we'll bring you guys back down to the shop and you can help us probably dial it in a little better.
(Pat)>> By saying that we're gonna have this thing on the dyno very, very soon. So you hear noise come on down and you can check it out.
(Mike)>> The last time he came down and checked this out he looked at a watch. And now he wants us to come down and help him.
(Jeremy)>> When you guys have time, how about that? Does that work?
(Pat)>> That'll work better.
(Jimmy)>> In the meantime we'll keep getting the Willys prepped but when you guys get this back on the dyno let us know.
(Mike)>> Yeah you guys have to come down and make some pulls again.
(Jeremy)>> Alright we'll come running.
(Mike)>> See y'all.
(Pat)>> Get back to work. You guys got stuff to do.
(Jeremy)>> Coming up we tear out the Willys' interior.
(Jimmy)>> And wreak havoc on the chicken wire firewall.
(Jeremy)>> Next on Carcass.
(Jeremy)>> We hit a major milestone. We were able to set the Willys body on the CUCV chassis.
(Jimmy)>> To get there we cleaned old bracketry off the chassis and removed that fuel tank from the Willys.
(Jeremy)>> Then we were able to set that iconic body down on the frame and we started building seven new body mounts.
(Jimmy)>> With these two joined together it looks radical.
(Jeremy)>> That's right but we still have a lot of work to do. So we're gonna get that body off so we can prep it for the new engine and trans combo.
(Jimmy)>> Probably cut these wires that are gonna be coming out of here. We're gonna take out all the interior for two reasons. One, we need to get rid of that check wire firewall and two, this truck is gonna spend a lot of time in the mud and carpet is just a bad idea.
(Jeremy)>> Wow!
(Jimmy)>> I'd just get cutting away. Just redo this whole thing ourselves. This is one of those things were they have a problem and they're like I can't find where the wiring problem is. I wonder why?
(Jeremy)>> The wiring in this thing is a mess. You've got a whole bunch of wire nuts, crimps, after crimps, after crimps, and I'd be surprised if anybody could track down an electrical issue when this thing was running.
(Jimmy)>> Now this cowl vent linkage is kinda sketchy.
(Jeremy)>> Does that still work?
(Jimmy)>> Yeah it does. Free a/c!
(Jeremy)>> Alright wiring's pretty much done. Next is kinda the seats huh?
(Jimmy)>> Yeah looks like it.
(Jeremy)>> I have no idea how they come out of here though. Look at that. Dude there's like a little trap door down here.
(Jimmy)>> Oh yeah, you're right.
(Jeremy)>> And then the seats are just bolted right down to this riser. Well that's easy enough. ♪ ♪ There's one!
(Jimmy)>> With the second seat out of the way we can get to tearing out that carpet and remove the steering.
(Jeremy)>> The carpet came out without a hitch and the steering, well a few bolts took care of that mess.
(Jimmy)>> With the steering out of the way we can tear out the rest of the carpet below the dash.
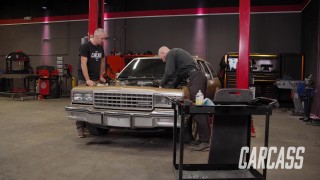
(Jeremy)>> With the interior out and in the dumpster it's time to start on the firewall, but first Jimmy and I have got to get rid of the hood, the fenders, and the grille shell.
(Jimmy)>> The hood was already loose and just sitting on top for looks. However we did have to unbolt the grille, which was attached to the fenders. ♪ ♪
(Jeremy)>> We followed that up with a quick removal of the battery tray. Then we got to work removing the bolts that hold the fender onto the Willys body. ♪ ♪ You know Jimmy, this firewall, this is just a work of art.
(Jimmy)>> It's an ugly work of art.
(Jeremy)>> Somebody had a small block Chevy in here and it looks like that was beat in for the valve cover and the h-e-i kinda sat right in here.
(Jimmy)>> Well if we're gonna cut it out anyways where do you think we should cut it at?
(Jeremy)>> I think we're gonna end up cutting down here where the toe board is and we'll come across the top and cut it. I just have no idea what's behind there.
(Jimmy)>> If it's gonna come out anyways I'm curious if this thing's actually that strong and if it can hold up to a few hits with a hammer.
(Jeremy)>> Go for it. Let's see what happens. [ banging ]
(Jimmy)>> Oh yeah! [ banging ]
(Jimmy)>> Oh, yeah, that broke through.
(Jeremy)>> Yeah that's definitely not as strong as metal. What do you say we just get to cutting?
(Jimmy)>> Let's get it.
(Jeremy)>> We're using reciprocating saws for this job because let's face it. They cut fast and we are not at all concerned about accuracy.
(Jimmy)>> We have a lot of metal to cut through, not to mention the layers upon layers of weld, bondo, and chicken wire, but with our Jedi strength we'll use the force to open this tin can.
(Jeremy)>> With this thing tore apart follow along as we build this monster at Powernation TV dot com. Coming up on our next show we're gonna install some major upgrades to make way for our drivetrain.
(Jimmy)>> And we jack this bad boy up another four inches, stay tuned.
(Jeremy)>> You're watching Carcass.


