
More BajAwesome Beetle Episodes


Carcass Featured Projects


Carcass Builds


Want more content like this?
Join the PowerNation Email NewsletterParts Used In This Episode
Matco Tools
MATCO Tools are the Official Tool Supplier to PowerNation
The Industrial Depot
Tools, Hardware, Shop Supplies
Episode Transcript
(Jeremy)>> Today on Carcass we break some glass, add some safety to our Baja bug, and give it a new sound.
(Jimmy)>> This bug is getting some style out back, up top, and in front. This thing is gonna look awesome by the time we're done with it.
(Narrator)>> When you want to build something different you turn to these guys, Jeremy Weckman and Jimmy King. Jeremy was raised in Minnesota building street rods. He's a builder, fabricator, and welder. Jimmy grew up in Nevada working in his dad's garage building cars. He's a mechanical engineer, builder, and fabricator. They take left for dead rides and transform them into one of a kind builds. If you can dream it they can build it. This is Carcass, a non-traditional speed shop. [ Music ]
(Jeremy)>> This is our office. A 50,000 square foot warehouse that is also home to three other shops.
(Jimmy)>> And it's where we spend most of our time working on projects, like this u-t-v Baja bug.
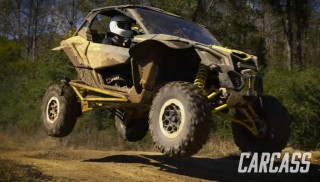
(Jeremy)>> We picked up this CanAm X-3 in Kentucky, and it had some minor cosmetic damage but that didn't stop us from taking it out on the short course where we slid around some corners, got some air, and wouldn't you know it we even rolled this thing over. [ Music ]
(Jimmy)>> And we picked up our Volkswagen bug locally here in Tennessee, from a guy who likes to collect cars. We brought both of these projects back to the shop and got right to work.
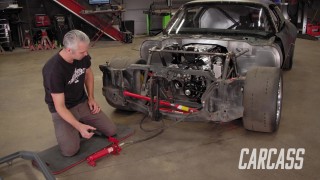
(Jeremy)>> We tore out the interior of the bug and made quick work of separating the body from the chassis.
(Jimmy)>> And we got a good look at the nuts and bolts on the CanAm after we ripped off all the plastic. Jeremy and I thought it looked really cool. So we took it out for a spin one last time. [ engine revving ]
(Jeremy)>> When we were all done having our fun we sliced the top off the CanAm, lifted the body free of the bug chassis, and slid the u-t-v into place.
(Jimmy)>> With a little bit of shuffling we were able to squeeze the bug body over the u-t-v giving us the first look at this unusual combo, but to be honest it looks right at home.
(Jeremy)>> You know Jimmy there is so much more head room in here now that we cut the top off the side by side.
(Jimmy)>> Yeah and you know with the new cage if we use the tube roller and contour the body really well there's gonna be more room everywhere, and I think it's only gonna take us a day to build.
(Jeremy)>> Yeah we've got two really pads to start with when we built. Now that we cut the old cage off we've got a really good pad in the front and we got a really good pad in the back. [ Music ]
(Jimmy)>> That's not the center.
(Jeremy)>> Before we started the cage work we found the center of the Beetle body, and then we grabbed the cheater and we found the bend angle of the rear hoop.
(Jimmy)>> Alright I think 70 degrees is gonna work. Jeremy can you mark that for me? [ Music ]
(Jeremy)>> And you know Jimmy not everybody knows what a cheater is.
(Jimmy)>> Funny you say that cause I happen to have one in my pocket.
(Jeremy)>> Convenient.
(Jimmy)>> The cheater is helped to find the location and bend angle of a tube in your roll cage. To make a cheater we took an 18 inch long piece of tubing and marked it every inch for 10 inches. We then put the tube in the bender and bent it to the angle we needed. As we were bending it we marked it every 10 degrees. Those inch and degree marks will help us determine how much tube is used per 10 degrees of bending. This represents the rear hoop of our roll cage. This center mark is the center of the bug body. This is the reference mark of our cheater. This is about where the end of the bend is, and this is the base plate of our CanAm. Using our cheater I know that 70 degrees equals about five and three quarter inches of tube, and we estimated that from the end of our bend to the base plate is about 12 and a half, and we leave long on purpose just so we can trim it and cut it to fit. All these measurements are only half of our rear hoop, and that equals 37 and three quarters of an inch. Now we double it to get the whole rear hoop and we get 65 and a half inches. [ Music ] The first bend is pretty easy. You just throw the proper length of tubing in the bender and hit the desired angle. It's the second bend that takes a little more experience to get right. Both ends of the rear hoop need to be parallel. So using an angle finder can make that happen. [ Music ] Hey Jeremy can you help me measure something real quick? [ Music ] You can take that angle finder and measure the angle this sits at cause I've got to figure out the cuts I need to make to let it sit from the base plate.
(Jeremy)>> What does that read?
(Jimmy)>> Looks about 40 degrees.
(Jeremy)>> Perfect, while you get that cut then we'll go ahead and start working on the side hoops. [ saw buzzing ]
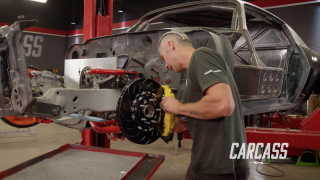
(Jeremy)>> With the ends of the tubes cut we're gonna we're gonna use the belt sander and just kinda sneak up on this angle. Now we want to make sure this fits absolutely perfect because this is gonna make the rest of the cage build go smoothly.
(Jimmy)>> Our side hoops will match the curves of the bug body, giving us more room on the inside. We'll use the tube roller to make that happen. That's money! That's gonna be real easy to weld.
(Jeremy)>> With those mounted to the rear hoops and the front mounted to the CanAm's front plates we can add some cross braces and then we're off to the races. I said braces and races. [ Music ] [ grinder buzzing ] [ Music ]
(Jimmy)>> So yours fit?
(Jeremy)>> Mine fits. Yours fit?
(Jimmy)>> Mine fits.
(Jeremy)>> Well we can't put these in. We've got a couple of things we've got to weld up right?
(Jimmy)>> Yeah we've got to weld the front cross bar in and then we can weld these in. So I say we take the body off and get welding.
(Jeremy)>> Sounds good to me. Let's get the body off. With everything out of the way it was time to strike an arc. Tig welding is two handed by nature. So it makes it a heck of a lot easier to do it without the body in the way.
(Jimmy)>> With the rear and side hoops burned in we have a couple of small pieces we have to add in for strength. [ Music ]
(Jeremy)>> My mind is not working right now. Do your thing.
(Jimmy)>> What are you trying to do?
(Jeremy)>> Trying to get my mind back in the game here.
(Jimmy)>> Nice!
(Jeremy)>> How do I notch this without using that? My mind's not here. It's gone! [ Music ] I think that's right. The worst I could be is wrong. [ Music ] Perfect! [ Music ] Man did we accomplish exactly what we set out to do. Not only did we build a cage that's specific to this body swap. Well it also looks good and it's gonna keep the both of us protected.
(Jimmy)>> We tied it into the strongest points on the frame. We added extra bracing, extra gussets. This inch and a half tubing is gonna do exactly what it's supposed to.
(Jeremy)>> You know the way that we bent these side hoops you know it fits perfectly underneath the Volkswagen body and we don't even need to put that thing on here. It looks so good!
(Jimmy)>> Well while the body's still off let's do the exhaust swap.
(Jeremy)>> Oh yeah, that's out in the warehouse somewhere right?
(Jimmy)>> If we can find it. It's a big warehouse.
(Jeremy)>> Next on Carcass we carefully remove our glass from the bug.
(Jimmy)>> Plus how we make our CanAm sound more intimidating.
(Jeremy)>> You're watching Carcass.
(Jimmy)>> We work in a 50,000 square foot warehouse, and finding the right parts can sometimes be like finding a needle in a haystack. Luckily this go around I beat Jeremy to the punch.
(Jeremy)>> Ah shoot dude! You already found the exhaust system.
(Jimmy)>> Yeah I did, straight from Summit Racing.
(Jeremy)>> Well I guess you don't need this big box then.
(Jimmy)>> Nah, and to be honest this is more of a one man job. So what are you gonna do?
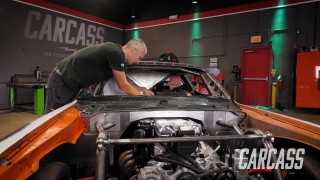
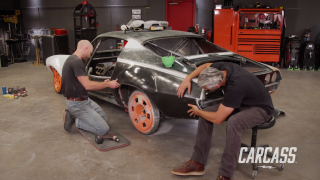
(Jeremy)>> Well I was kinda thinking about putting the bug body on a diet.
(Jimmy)>> You gonna pull the glass out?
(Jeremy)>> Yeah I guess I can pull the glass out.
(Jimmy)>> Have fun.
(Jeremy)>> Yeah! [ Music ] I'm not tall enough to do that. [ Music ] One of many. Don't drop it, nice! Oh man! It's tough work. Holy Martha! [ Music ] I borrowed these tools from the guys next door in Detroit Muscle. Now I don't know if it's the guy using them or the tools themselves but this task has proven to be pretty challenging. Essentially what I'm trying to do is separate the glass from the body, and that's held in with some really, really strong goopy stuff. I think the pry bar can help me pop out the rear quarter glass, and if I get like two of them in there I can kind of move them around and kinda help push it out so it comes out, but I've got to be really, really careful. [ Music ] Whoops! Now since the first way to get rid of the glass took forever we're gonna do the second one quite a bit quicker, and if I can find the right tool, the hammer, definitely make it happen. [ Music ] That was anti-climactic. Ah trick, I'm gonna put a garbage can underneath. That way I don't have to clean up so much. [ Music ] I wonder if Jimmy's got the exhaust done yet.
(Jimmy)>> We're swapping out the exhaust on our CanAm for two reasons. "A", the stock exhaust system doesn't look that cool and "B", we want some power gains. So this new exhaust system from Summit Racing will check both of those boxes. [ drill vibrating ]
(Jimmy)>> Out with the old. I didn't even know this thing had O-2 sensors. [ metal tapping ] [ Music ]
(Jimmy)>> We have to take off the stock exhaust in sections all the way back to that tiny little turbo, and we're gonna have to make some modifications to the o-e heat shield so it'll work with our aftermarket exhaust, but that's nothing that a cutoff wheel can't fix. [ saw buzzing ]
(Jimmy)>> Of all the places I could have chosen to sit down. I chose this comfy cardboard box that Jeremy left for me earlier. Why I did I don't know but it made the most sense at the time. [ metal clanging ] [ Music ]
(Jimmy)>> Swapping out the exhaust is pretty straight forward. The V-band clamps and the worm gear clamps get reused along with the stock heat shield. Next we add the aluminum mufflers. They add a little bit of flare and will make our side by side sound wicked. We have to button up a few things like the exhaust spring and the O-2 sensor. After that the stock outer heat shield can be re-installed. [ Music ] Let's see how this thing sounds. [ engine starting and revving ]
(Jeremy)>> Man that sounds good. I didn't even hear the turbo.
(Jimmy)>> You like it?
(Jeremy)>> Yeah!
(Jimmy)>> Coming up on Carcass our Baja Bug gets a go fast look with some custom louvres.
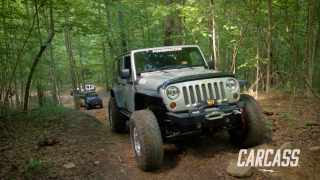
(Jeremy)>> Plus we take our monster army truck out for a mid-day cruise.
(Jimmy)>> You're watching Carcass.
(Jimmy)>> We combined the body of a Volkswagen bug with the frame and drivetrain of a CanAm X-3.
(Jeremy)>> Needless to say our Baja Bug has gone through quite a transformation. We fabricated a killer roll cage that fits right underneath the bug body.
(Jimmy)>> While we had the bug and u-t-v separated we put the donor bug on a diet by removing all the glass, and we also added a better sounding exhaust to the CanAm. [ engine revving ]
(Jeremy)>> So ever since I carefully took the glass out of the back of the car I've been trying to figure out what to do with the opening. Well I think I've got a pretty dynamite idea and I cannot wait to show Jimmy. Yes there it is. [ Music ] Perfect! [ Music ] Hey Jimmy come and check this out.
(Jimmy)>> Okay.
(Jeremy)>> Check this out. So I've been trying to figure out what to do with the opening back here.
(Jimmy)>> Yes.
(Jeremy)>> And these were sitting down by Detroit Muscle. I think we can pull this off.
(Jimmy)>> Yeah we could just make our own.
(Jeremy)>> I think so. This is a little wide anyway. So instead of cutting it down let's just go make our own.
(Jimmy)>> I love this!
(Jeremy)>> Let's go figure this out.
(Jimmy)>> So we're looking at about 40.5 and 3.5 tall.
(Jeremy)>> Alright so what about the bends? What's the measurement here and here?
(Jimmy)>> As for the top bends, 38 inches.
(Jeremy)>> And then what's the bottom?
(Jimmy)>> 32.75 of an inch.
(Jeremy)>> The way we give the louvre its shape is with the measurements. The top edge is longer than the bottom edge. That way it gives us the two points to line it up in the break. [ Music ] Yeah, the first louvre fit perfectly. Now the opening of our Volkswagen is a little bit narrower on the top and then it widens out at the bottom. So we're just gonna add a half of an inch to each louvre as we travel down. That's gonna give it a little bit of curvature and it should match the Volkswagen perfectly.
(Jimmy)>> All the bends in our louvres are about 45 degrees but there's a little trick to it. After we complete the first bend we have to take it out of the break, flip it over, and bend it the opposite direction.
(Jeremy)>> Oh yeah!
(Jimmy)>> That's a good start.
(Jeremy)>> That is a good start. [ drill buzzing ] [ Music ]
(Jeremy)>> You know these things really did turn out amazing. For the little bit of work in the break and the bender they fit great and they follow the contour of the body.
(Jimmy)>> I 100 percent agree and to me this thing just looks fast now and I love it, but according to my watch it's lunch time and we've got to find something to drive.
(Jeremy)>> Alright. [ engine starting ] [ Music ]
(Jeremy)>> If we could change anything about this it would be really cool to do an LS swap. Make it really drivable like distances. Then since it's got the good box in the back put a couple of wheel chalks in there. You could throw three dirt bikes in the back, all your stuff, put some cots in it. You could take this thing out in the desert and go have a blast with it.
(Jimmy)>> Like a little toy hauler. I definitely agree it needs an engine swap. LS is maybe a little too common. I think we could do something a little more unique. Maybe a blower motor sticking out of the hood, but then that wouldn't make it great for going on trips. It'd be more like a mudslinging, having a good time, huge tires.
(Jeremy)>> I could get on board with that. That sounds pretty good too. Can I get a number one with a Coke please? Thank you!
(Jimmy)>> Alright so here's an idea. We've got that '53 Willys body laying around in the shop.
(Jeremy)>> You want to put that on here?
(Jimmy)>> Uh huh!
(Jeremy)>> Man I think that could work. We would have to cut it up quite a bit. Well we'd have to cut this up quite a bit. That's a heck of a proposition.
(Jimmy)>> It's an idea at least.
(Jeremy)>> Up next on Carcass we toss a whole of accessories at our bug body.
(Jimmy)>> But they won't all fit unless we find a way to make it work.
(Jeremy)>> This thing is gonna look amazing when it's all done.
[ Music ]
(Jeremy)>> Man I've got to get back on those side panels. Oh and Summit Racing dropped off a box.
(Jimmy)>> That's the roof rack. I've got to get that on before the end of the day. We have a lot to do by the end of the day, and taking a long lunch break did not help with that cause.
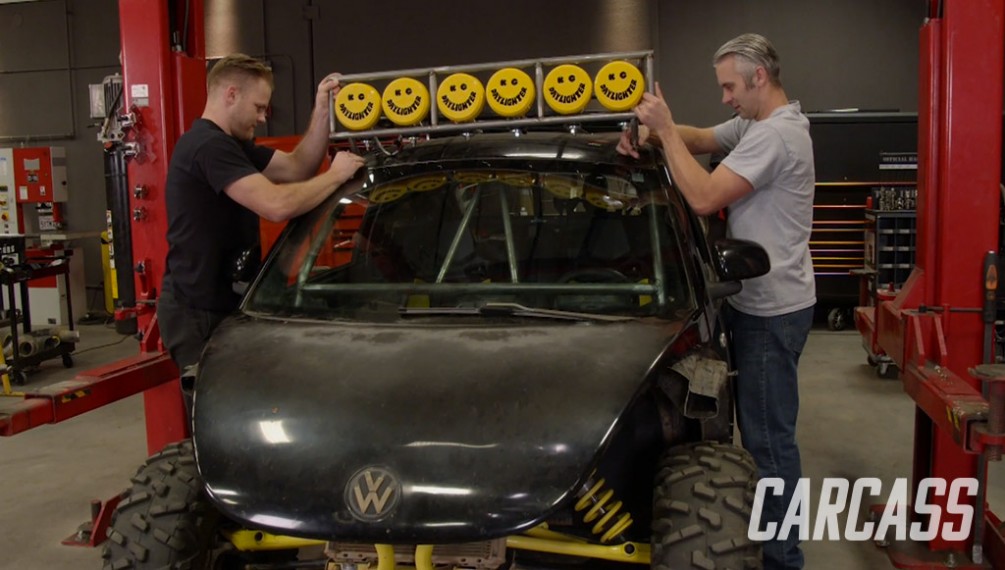
(Jeremy)>> We have window deletes that we have to fabricate. We have a roof rack that we need to put on with custom mounts that need to be made. Plus we're gonna put a whole bunch of lights on top of this thing.
(Jimmy)>> By the end of the day this thing will be back on four wheels and drivable. [ Music ]
(Jeremy)>> Making a template is a necessity. It makes trimming down your piece on the shear a whole lot easier. Plus it ensures that you're gonna have enough material if you have to move over to the band saw. And with a little left you can always come back and sneak up to that perfect shape on the belt sander. [ drill buzzing ]
(Jimmy)>> I unpacked our roof rack and it is perfect for this build. So I'm gonna get right to making the brackets to mount this thing to the roof. I cut one inch flat strap and rounded the corners at the belt sander. With two bolt holes punched in them I can lay them out on the roof using the roof rack as a guide. That way I know exactly where they're gonna go. With a few holes drilled through the top the brackets are ready to support the roof rack. Half inch square tubing will be plenty strong for this application, and with them cut to length our roof rack can be a permanent addition to our Baja Bug.
(Jeremy)>> While Jimmy finishes up the roof rack I'm gonna go ahead and get started on the scoops that we're gonna add to the window deletes. [ Music ] Our scoops are gonna fit in right along with our bug body, which means they're gonna have some curves. Once I get the two dimensional shape I'll add the third dimension using the slip roller. Using the newly made scoop as a template we can cut a hole in the window delete to make room for our new scoop. We're close here. Yeah that's a little tight huh?
(Jimmy)>> Yeah, I think if you open up the slot just a hair. We can kind of manipulate this to go in where we want it.
(Jeremy)>> Help us clean the edges up. Trim that and we'll tack it in. [ saw buzzing ] [ welder crackling ]
(Jeremy)>> Alright, one more. [ welder crackling ]
(Jeremy)>> Alright this is the moment we have all been waiting for.
(Jimmy)>> Lights!
(Jeremy)>> This is like putting the star on top of the Christmas tree.
(Jimmy)>> I think this is gonna be like the end all be all of a real retro Baja Bug.
(Jeremy)>> It's gonna be like a race bug.
(Jimmy)>> We used the height of our lights to help us get the proper length for our cuts. One inch tubing is then notched so it can all be welded together. [ Music ] You see that? That's our camera man Wilson making his national debut. With a few simple brackets we mounted the lights we got from Summit Racing dot com with the hardware that came in the box. You the man.
(Jeremy)>> This is gonna be like putting the cherry right on top.
(Jimmy)>> Ooh baby, we got a light bar.
(Jeremy)>> And this apparatus. [ Music ] Man that's exactly what I was thinking.
(Jimmy)>> Is that enough Baja for you?
(Jeremy)>> Yeah!
(Jimmy)>> Alright well let's try the lights out.
(Jeremy)>> Alright let's light them up. [ engine idling ]
(Jeremy)>> For more information on anything you've seen today check us out on Powernation TV dot com.
Show Full Transcript
(Jimmy)>> This bug is getting some style out back, up top, and in front. This thing is gonna look awesome by the time we're done with it.
(Narrator)>> When you want to build something different you turn to these guys, Jeremy Weckman and Jimmy King. Jeremy was raised in Minnesota building street rods. He's a builder, fabricator, and welder. Jimmy grew up in Nevada working in his dad's garage building cars. He's a mechanical engineer, builder, and fabricator. They take left for dead rides and transform them into one of a kind builds. If you can dream it they can build it. This is Carcass, a non-traditional speed shop. [ Music ]
(Jeremy)>> This is our office. A 50,000 square foot warehouse that is also home to three other shops.
(Jimmy)>> And it's where we spend most of our time working on projects, like this u-t-v Baja bug.
(Jeremy)>> We picked up this CanAm X-3 in Kentucky, and it had some minor cosmetic damage but that didn't stop us from taking it out on the short course where we slid around some corners, got some air, and wouldn't you know it we even rolled this thing over. [ Music ]
(Jimmy)>> And we picked up our Volkswagen bug locally here in Tennessee, from a guy who likes to collect cars. We brought both of these projects back to the shop and got right to work.
(Jeremy)>> We tore out the interior of the bug and made quick work of separating the body from the chassis.
(Jimmy)>> And we got a good look at the nuts and bolts on the CanAm after we ripped off all the plastic. Jeremy and I thought it looked really cool. So we took it out for a spin one last time. [ engine revving ]
(Jeremy)>> When we were all done having our fun we sliced the top off the CanAm, lifted the body free of the bug chassis, and slid the u-t-v into place.
(Jimmy)>> With a little bit of shuffling we were able to squeeze the bug body over the u-t-v giving us the first look at this unusual combo, but to be honest it looks right at home.
(Jeremy)>> You know Jimmy there is so much more head room in here now that we cut the top off the side by side.
(Jimmy)>> Yeah and you know with the new cage if we use the tube roller and contour the body really well there's gonna be more room everywhere, and I think it's only gonna take us a day to build.
(Jeremy)>> Yeah we've got two really pads to start with when we built. Now that we cut the old cage off we've got a really good pad in the front and we got a really good pad in the back. [ Music ]
(Jimmy)>> That's not the center.
(Jeremy)>> Before we started the cage work we found the center of the Beetle body, and then we grabbed the cheater and we found the bend angle of the rear hoop.
(Jimmy)>> Alright I think 70 degrees is gonna work. Jeremy can you mark that for me? [ Music ]
(Jeremy)>> And you know Jimmy not everybody knows what a cheater is.
(Jimmy)>> Funny you say that cause I happen to have one in my pocket.
(Jeremy)>> Convenient.
(Jimmy)>> The cheater is helped to find the location and bend angle of a tube in your roll cage. To make a cheater we took an 18 inch long piece of tubing and marked it every inch for 10 inches. We then put the tube in the bender and bent it to the angle we needed. As we were bending it we marked it every 10 degrees. Those inch and degree marks will help us determine how much tube is used per 10 degrees of bending. This represents the rear hoop of our roll cage. This center mark is the center of the bug body. This is the reference mark of our cheater. This is about where the end of the bend is, and this is the base plate of our CanAm. Using our cheater I know that 70 degrees equals about five and three quarter inches of tube, and we estimated that from the end of our bend to the base plate is about 12 and a half, and we leave long on purpose just so we can trim it and cut it to fit. All these measurements are only half of our rear hoop, and that equals 37 and three quarters of an inch. Now we double it to get the whole rear hoop and we get 65 and a half inches. [ Music ] The first bend is pretty easy. You just throw the proper length of tubing in the bender and hit the desired angle. It's the second bend that takes a little more experience to get right. Both ends of the rear hoop need to be parallel. So using an angle finder can make that happen. [ Music ] Hey Jeremy can you help me measure something real quick? [ Music ] You can take that angle finder and measure the angle this sits at cause I've got to figure out the cuts I need to make to let it sit from the base plate.
(Jeremy)>> What does that read?
(Jimmy)>> Looks about 40 degrees.
(Jeremy)>> Perfect, while you get that cut then we'll go ahead and start working on the side hoops. [ saw buzzing ]
(Jeremy)>> With the ends of the tubes cut we're gonna we're gonna use the belt sander and just kinda sneak up on this angle. Now we want to make sure this fits absolutely perfect because this is gonna make the rest of the cage build go smoothly.
(Jimmy)>> Our side hoops will match the curves of the bug body, giving us more room on the inside. We'll use the tube roller to make that happen. That's money! That's gonna be real easy to weld.
(Jeremy)>> With those mounted to the rear hoops and the front mounted to the CanAm's front plates we can add some cross braces and then we're off to the races. I said braces and races. [ Music ] [ grinder buzzing ] [ Music ]
(Jimmy)>> So yours fit?
(Jeremy)>> Mine fits. Yours fit?
(Jimmy)>> Mine fits.
(Jeremy)>> Well we can't put these in. We've got a couple of things we've got to weld up right?
(Jimmy)>> Yeah we've got to weld the front cross bar in and then we can weld these in. So I say we take the body off and get welding.
(Jeremy)>> Sounds good to me. Let's get the body off. With everything out of the way it was time to strike an arc. Tig welding is two handed by nature. So it makes it a heck of a lot easier to do it without the body in the way.
(Jimmy)>> With the rear and side hoops burned in we have a couple of small pieces we have to add in for strength. [ Music ]
(Jeremy)>> My mind is not working right now. Do your thing.
(Jimmy)>> What are you trying to do?
(Jeremy)>> Trying to get my mind back in the game here.
(Jimmy)>> Nice!
(Jeremy)>> How do I notch this without using that? My mind's not here. It's gone! [ Music ] I think that's right. The worst I could be is wrong. [ Music ] Perfect! [ Music ] Man did we accomplish exactly what we set out to do. Not only did we build a cage that's specific to this body swap. Well it also looks good and it's gonna keep the both of us protected.
(Jimmy)>> We tied it into the strongest points on the frame. We added extra bracing, extra gussets. This inch and a half tubing is gonna do exactly what it's supposed to.
(Jeremy)>> You know the way that we bent these side hoops you know it fits perfectly underneath the Volkswagen body and we don't even need to put that thing on here. It looks so good!
(Jimmy)>> Well while the body's still off let's do the exhaust swap.
(Jeremy)>> Oh yeah, that's out in the warehouse somewhere right?
(Jimmy)>> If we can find it. It's a big warehouse.
(Jeremy)>> Next on Carcass we carefully remove our glass from the bug.
(Jimmy)>> Plus how we make our CanAm sound more intimidating.
(Jeremy)>> You're watching Carcass.
(Jimmy)>> We work in a 50,000 square foot warehouse, and finding the right parts can sometimes be like finding a needle in a haystack. Luckily this go around I beat Jeremy to the punch.
(Jeremy)>> Ah shoot dude! You already found the exhaust system.
(Jimmy)>> Yeah I did, straight from Summit Racing.
(Jeremy)>> Well I guess you don't need this big box then.
(Jimmy)>> Nah, and to be honest this is more of a one man job. So what are you gonna do?
(Jeremy)>> Well I was kinda thinking about putting the bug body on a diet.
(Jimmy)>> You gonna pull the glass out?
(Jeremy)>> Yeah I guess I can pull the glass out.
(Jimmy)>> Have fun.
(Jeremy)>> Yeah! [ Music ] I'm not tall enough to do that. [ Music ] One of many. Don't drop it, nice! Oh man! It's tough work. Holy Martha! [ Music ] I borrowed these tools from the guys next door in Detroit Muscle. Now I don't know if it's the guy using them or the tools themselves but this task has proven to be pretty challenging. Essentially what I'm trying to do is separate the glass from the body, and that's held in with some really, really strong goopy stuff. I think the pry bar can help me pop out the rear quarter glass, and if I get like two of them in there I can kind of move them around and kinda help push it out so it comes out, but I've got to be really, really careful. [ Music ] Whoops! Now since the first way to get rid of the glass took forever we're gonna do the second one quite a bit quicker, and if I can find the right tool, the hammer, definitely make it happen. [ Music ] That was anti-climactic. Ah trick, I'm gonna put a garbage can underneath. That way I don't have to clean up so much. [ Music ] I wonder if Jimmy's got the exhaust done yet.
(Jimmy)>> We're swapping out the exhaust on our CanAm for two reasons. "A", the stock exhaust system doesn't look that cool and "B", we want some power gains. So this new exhaust system from Summit Racing will check both of those boxes. [ drill vibrating ]
(Jimmy)>> Out with the old. I didn't even know this thing had O-2 sensors. [ metal tapping ] [ Music ]
(Jimmy)>> We have to take off the stock exhaust in sections all the way back to that tiny little turbo, and we're gonna have to make some modifications to the o-e heat shield so it'll work with our aftermarket exhaust, but that's nothing that a cutoff wheel can't fix. [ saw buzzing ]
(Jimmy)>> Of all the places I could have chosen to sit down. I chose this comfy cardboard box that Jeremy left for me earlier. Why I did I don't know but it made the most sense at the time. [ metal clanging ] [ Music ]
(Jimmy)>> Swapping out the exhaust is pretty straight forward. The V-band clamps and the worm gear clamps get reused along with the stock heat shield. Next we add the aluminum mufflers. They add a little bit of flare and will make our side by side sound wicked. We have to button up a few things like the exhaust spring and the O-2 sensor. After that the stock outer heat shield can be re-installed. [ Music ] Let's see how this thing sounds. [ engine starting and revving ]
(Jeremy)>> Man that sounds good. I didn't even hear the turbo.
(Jimmy)>> You like it?
(Jeremy)>> Yeah!
(Jimmy)>> Coming up on Carcass our Baja Bug gets a go fast look with some custom louvres.
(Jeremy)>> Plus we take our monster army truck out for a mid-day cruise.
(Jimmy)>> You're watching Carcass.
(Jimmy)>> We combined the body of a Volkswagen bug with the frame and drivetrain of a CanAm X-3.
(Jeremy)>> Needless to say our Baja Bug has gone through quite a transformation. We fabricated a killer roll cage that fits right underneath the bug body.
(Jimmy)>> While we had the bug and u-t-v separated we put the donor bug on a diet by removing all the glass, and we also added a better sounding exhaust to the CanAm. [ engine revving ]
(Jeremy)>> So ever since I carefully took the glass out of the back of the car I've been trying to figure out what to do with the opening. Well I think I've got a pretty dynamite idea and I cannot wait to show Jimmy. Yes there it is. [ Music ] Perfect! [ Music ] Hey Jimmy come and check this out.
(Jimmy)>> Okay.
(Jeremy)>> Check this out. So I've been trying to figure out what to do with the opening back here.
(Jimmy)>> Yes.
(Jeremy)>> And these were sitting down by Detroit Muscle. I think we can pull this off.
(Jimmy)>> Yeah we could just make our own.
(Jeremy)>> I think so. This is a little wide anyway. So instead of cutting it down let's just go make our own.
(Jimmy)>> I love this!
(Jeremy)>> Let's go figure this out.
(Jimmy)>> So we're looking at about 40.5 and 3.5 tall.
(Jeremy)>> Alright so what about the bends? What's the measurement here and here?
(Jimmy)>> As for the top bends, 38 inches.
(Jeremy)>> And then what's the bottom?
(Jimmy)>> 32.75 of an inch.
(Jeremy)>> The way we give the louvre its shape is with the measurements. The top edge is longer than the bottom edge. That way it gives us the two points to line it up in the break. [ Music ] Yeah, the first louvre fit perfectly. Now the opening of our Volkswagen is a little bit narrower on the top and then it widens out at the bottom. So we're just gonna add a half of an inch to each louvre as we travel down. That's gonna give it a little bit of curvature and it should match the Volkswagen perfectly.
(Jimmy)>> All the bends in our louvres are about 45 degrees but there's a little trick to it. After we complete the first bend we have to take it out of the break, flip it over, and bend it the opposite direction.
(Jeremy)>> Oh yeah!
(Jimmy)>> That's a good start.
(Jeremy)>> That is a good start. [ drill buzzing ] [ Music ]
(Jeremy)>> You know these things really did turn out amazing. For the little bit of work in the break and the bender they fit great and they follow the contour of the body.
(Jimmy)>> I 100 percent agree and to me this thing just looks fast now and I love it, but according to my watch it's lunch time and we've got to find something to drive.
(Jeremy)>> Alright. [ engine starting ] [ Music ]
(Jeremy)>> If we could change anything about this it would be really cool to do an LS swap. Make it really drivable like distances. Then since it's got the good box in the back put a couple of wheel chalks in there. You could throw three dirt bikes in the back, all your stuff, put some cots in it. You could take this thing out in the desert and go have a blast with it.
(Jimmy)>> Like a little toy hauler. I definitely agree it needs an engine swap. LS is maybe a little too common. I think we could do something a little more unique. Maybe a blower motor sticking out of the hood, but then that wouldn't make it great for going on trips. It'd be more like a mudslinging, having a good time, huge tires.
(Jeremy)>> I could get on board with that. That sounds pretty good too. Can I get a number one with a Coke please? Thank you!
(Jimmy)>> Alright so here's an idea. We've got that '53 Willys body laying around in the shop.
(Jeremy)>> You want to put that on here?
(Jimmy)>> Uh huh!
(Jeremy)>> Man I think that could work. We would have to cut it up quite a bit. Well we'd have to cut this up quite a bit. That's a heck of a proposition.
(Jimmy)>> It's an idea at least.
(Jeremy)>> Up next on Carcass we toss a whole of accessories at our bug body.
(Jimmy)>> But they won't all fit unless we find a way to make it work.
(Jeremy)>> This thing is gonna look amazing when it's all done.
[ Music ]
(Jeremy)>> Man I've got to get back on those side panels. Oh and Summit Racing dropped off a box.
(Jimmy)>> That's the roof rack. I've got to get that on before the end of the day. We have a lot to do by the end of the day, and taking a long lunch break did not help with that cause.
(Jeremy)>> We have window deletes that we have to fabricate. We have a roof rack that we need to put on with custom mounts that need to be made. Plus we're gonna put a whole bunch of lights on top of this thing.
(Jimmy)>> By the end of the day this thing will be back on four wheels and drivable. [ Music ]
(Jeremy)>> Making a template is a necessity. It makes trimming down your piece on the shear a whole lot easier. Plus it ensures that you're gonna have enough material if you have to move over to the band saw. And with a little left you can always come back and sneak up to that perfect shape on the belt sander. [ drill buzzing ]
(Jimmy)>> I unpacked our roof rack and it is perfect for this build. So I'm gonna get right to making the brackets to mount this thing to the roof. I cut one inch flat strap and rounded the corners at the belt sander. With two bolt holes punched in them I can lay them out on the roof using the roof rack as a guide. That way I know exactly where they're gonna go. With a few holes drilled through the top the brackets are ready to support the roof rack. Half inch square tubing will be plenty strong for this application, and with them cut to length our roof rack can be a permanent addition to our Baja Bug.
(Jeremy)>> While Jimmy finishes up the roof rack I'm gonna go ahead and get started on the scoops that we're gonna add to the window deletes. [ Music ] Our scoops are gonna fit in right along with our bug body, which means they're gonna have some curves. Once I get the two dimensional shape I'll add the third dimension using the slip roller. Using the newly made scoop as a template we can cut a hole in the window delete to make room for our new scoop. We're close here. Yeah that's a little tight huh?
(Jimmy)>> Yeah, I think if you open up the slot just a hair. We can kind of manipulate this to go in where we want it.
(Jeremy)>> Help us clean the edges up. Trim that and we'll tack it in. [ saw buzzing ] [ welder crackling ]
(Jeremy)>> Alright, one more. [ welder crackling ]
(Jeremy)>> Alright this is the moment we have all been waiting for.
(Jimmy)>> Lights!
(Jeremy)>> This is like putting the star on top of the Christmas tree.
(Jimmy)>> I think this is gonna be like the end all be all of a real retro Baja Bug.
(Jeremy)>> It's gonna be like a race bug.
(Jimmy)>> We used the height of our lights to help us get the proper length for our cuts. One inch tubing is then notched so it can all be welded together. [ Music ] You see that? That's our camera man Wilson making his national debut. With a few simple brackets we mounted the lights we got from Summit Racing dot com with the hardware that came in the box. You the man.
(Jeremy)>> This is gonna be like putting the cherry right on top.
(Jimmy)>> Ooh baby, we got a light bar.
(Jeremy)>> And this apparatus. [ Music ] Man that's exactly what I was thinking.
(Jimmy)>> Is that enough Baja for you?
(Jeremy)>> Yeah!
(Jimmy)>> Alright well let's try the lights out.
(Jeremy)>> Alright let's light them up. [ engine idling ]
(Jeremy)>> For more information on anything you've seen today check us out on Powernation TV dot com.


